
Import Tickets from Zendesk, Freshdesk or Intercom
Leaving a hosted help desk usually means leaving your history behind. Years of conversations stay in an account you’re about to cancel. The next time a customer says “as I told you last year”, nobody can find what they were told.
Core Support → Import brings tickets, their full conversations and the customers behind them over from Zendesk, Freshdesk or Intercom, through each one’s own API. Core Support only reads from the other help desk, nothing is emailed to anyone and an import can be run again or undone.
Before You Start
The Import screen is for managers: Support Managers and administrators. Each help desk has its own tab, beside a CSV file tab for spreadsheets.
Two things are worth doing first:
- Add your team. A team member from the other help desk is matched by email address to a person here who can work tickets. Matched replies appear under their name.
- Map customer fields. If the other help desk keeps customer fields you want, add them on Core Support → Customers → Fields first. The import fills them as it runs.
Connect the Help Desk
Each help desk needs its own credentials. Core Support only reads with them.
Zendesk
Zendesk no longer issues API tokens, so Core Support connects through an OAuth client that an administrator adds in Zendesk:
- In Zendesk, go to Admin Center → Apps and integrations → APIs → OAuth clients and click Add OAuth client.
- Fill in a name such as “Core Support”, a short description and your company. Note the Identifier.
- Change Client kind from Public to Confidential. Leave Redirect URLs empty, and leave Allowed scopes empty or include
read. - Click Save and copy the Secret straight away. Zendesk shows it only once.
Then fill in the Zendesk tab:
- Zendesk address: your subdomain, such as
acmefor acme.zendesk.com. - OAuth client identifier: the client’s Identifier.
- OAuth client secret: the secret you copied.
Core Support asks Zendesk for read-only access with the client. Each access token lasts two hours and stays encrypted; a new one is asked for when it ends.
The client acts as the administrator who added it, because Zendesk only lets administrators export tickets. If it acts as an agent, the check warns that an administrator should add the client.
If the check stops, it says what to change:
- “Zendesk did not accept this OAuth client”: the Identifier or the secret is wrong. Regenerate the secret on the client’s page in Zendesk if you no longer have it.
- “This OAuth client cannot connect on its own”: the client kind is still Public. Change it to Confidential.
- “This OAuth client may not read”: the client’s allowed scopes leave out
read. - “Zendesk no longer accepts API tokens”: this connection was saved with an API token before. Add an OAuth client as above.
Freshdesk
- Freshdesk address: your subdomain, such as
acmefor acme.freshdesk.com. - API key: from Profile settings → View API key. Use an administrator’s key so every ticket is visible.
If Freshdesk says “Your API Key is disabled”, an administrator turns on Grant API key access to the agent for that person under Admin → Agents → Security and permission. The key works from then on. Until then, the check stops with “Freshdesk refused this API key”.
Intercom
- Data hosted in: United States, Europe or Australia, wherever your workspace keeps its data.
- Access token: from an app for your own workspace in Intercom’s Developer Hub.
To make the app:
- In Intercom, open the Developer Hub. The first time, Intercom asks you to accept its developer guidelines.
- Choose New app and name it something like “Core Support”.
- Open Configure → Authentication. Turn on Read conversations, Read and list users and companies and Read admins, then save.
- Copy the Access token from the same page.
If one of those permissions is off, the check stops with “This access token may not read everything an import needs” and names the three to turn on. Copy the token again after changing them.
Save the Connection
- Go to Core Support → Import and choose the help desk’s tab.
- Fill in the Connect card.
- Choose Connect and check.
The credentials are encrypted and never shown again. A saved secret field reads “Saved. Leave blank to keep it.” Remove connection forgets the credentials and keeps every imported ticket.
Check What Will Come Over
Connecting runs a check straight away, which reads the account without importing anything. The What the import will bring over card then shows:
- Account: such as acme.zendesk.com, or your Intercom workspace’s name
- Tickets: how many the help desk reports, or a dash when it doesn’t say
- Team members, with a table of each one’s name, email and Replies here appear as: a person here, or Kept as a name
- the customer field keys it found, as “Found: …”
Unmatched team members keep their name with the help desk after it, such as “Sam (Zendesk)”. No WordPress accounts are created. For Freshdesk, the check also lists every custom status with the Core Support status it becomes. Check again reads everything once more.
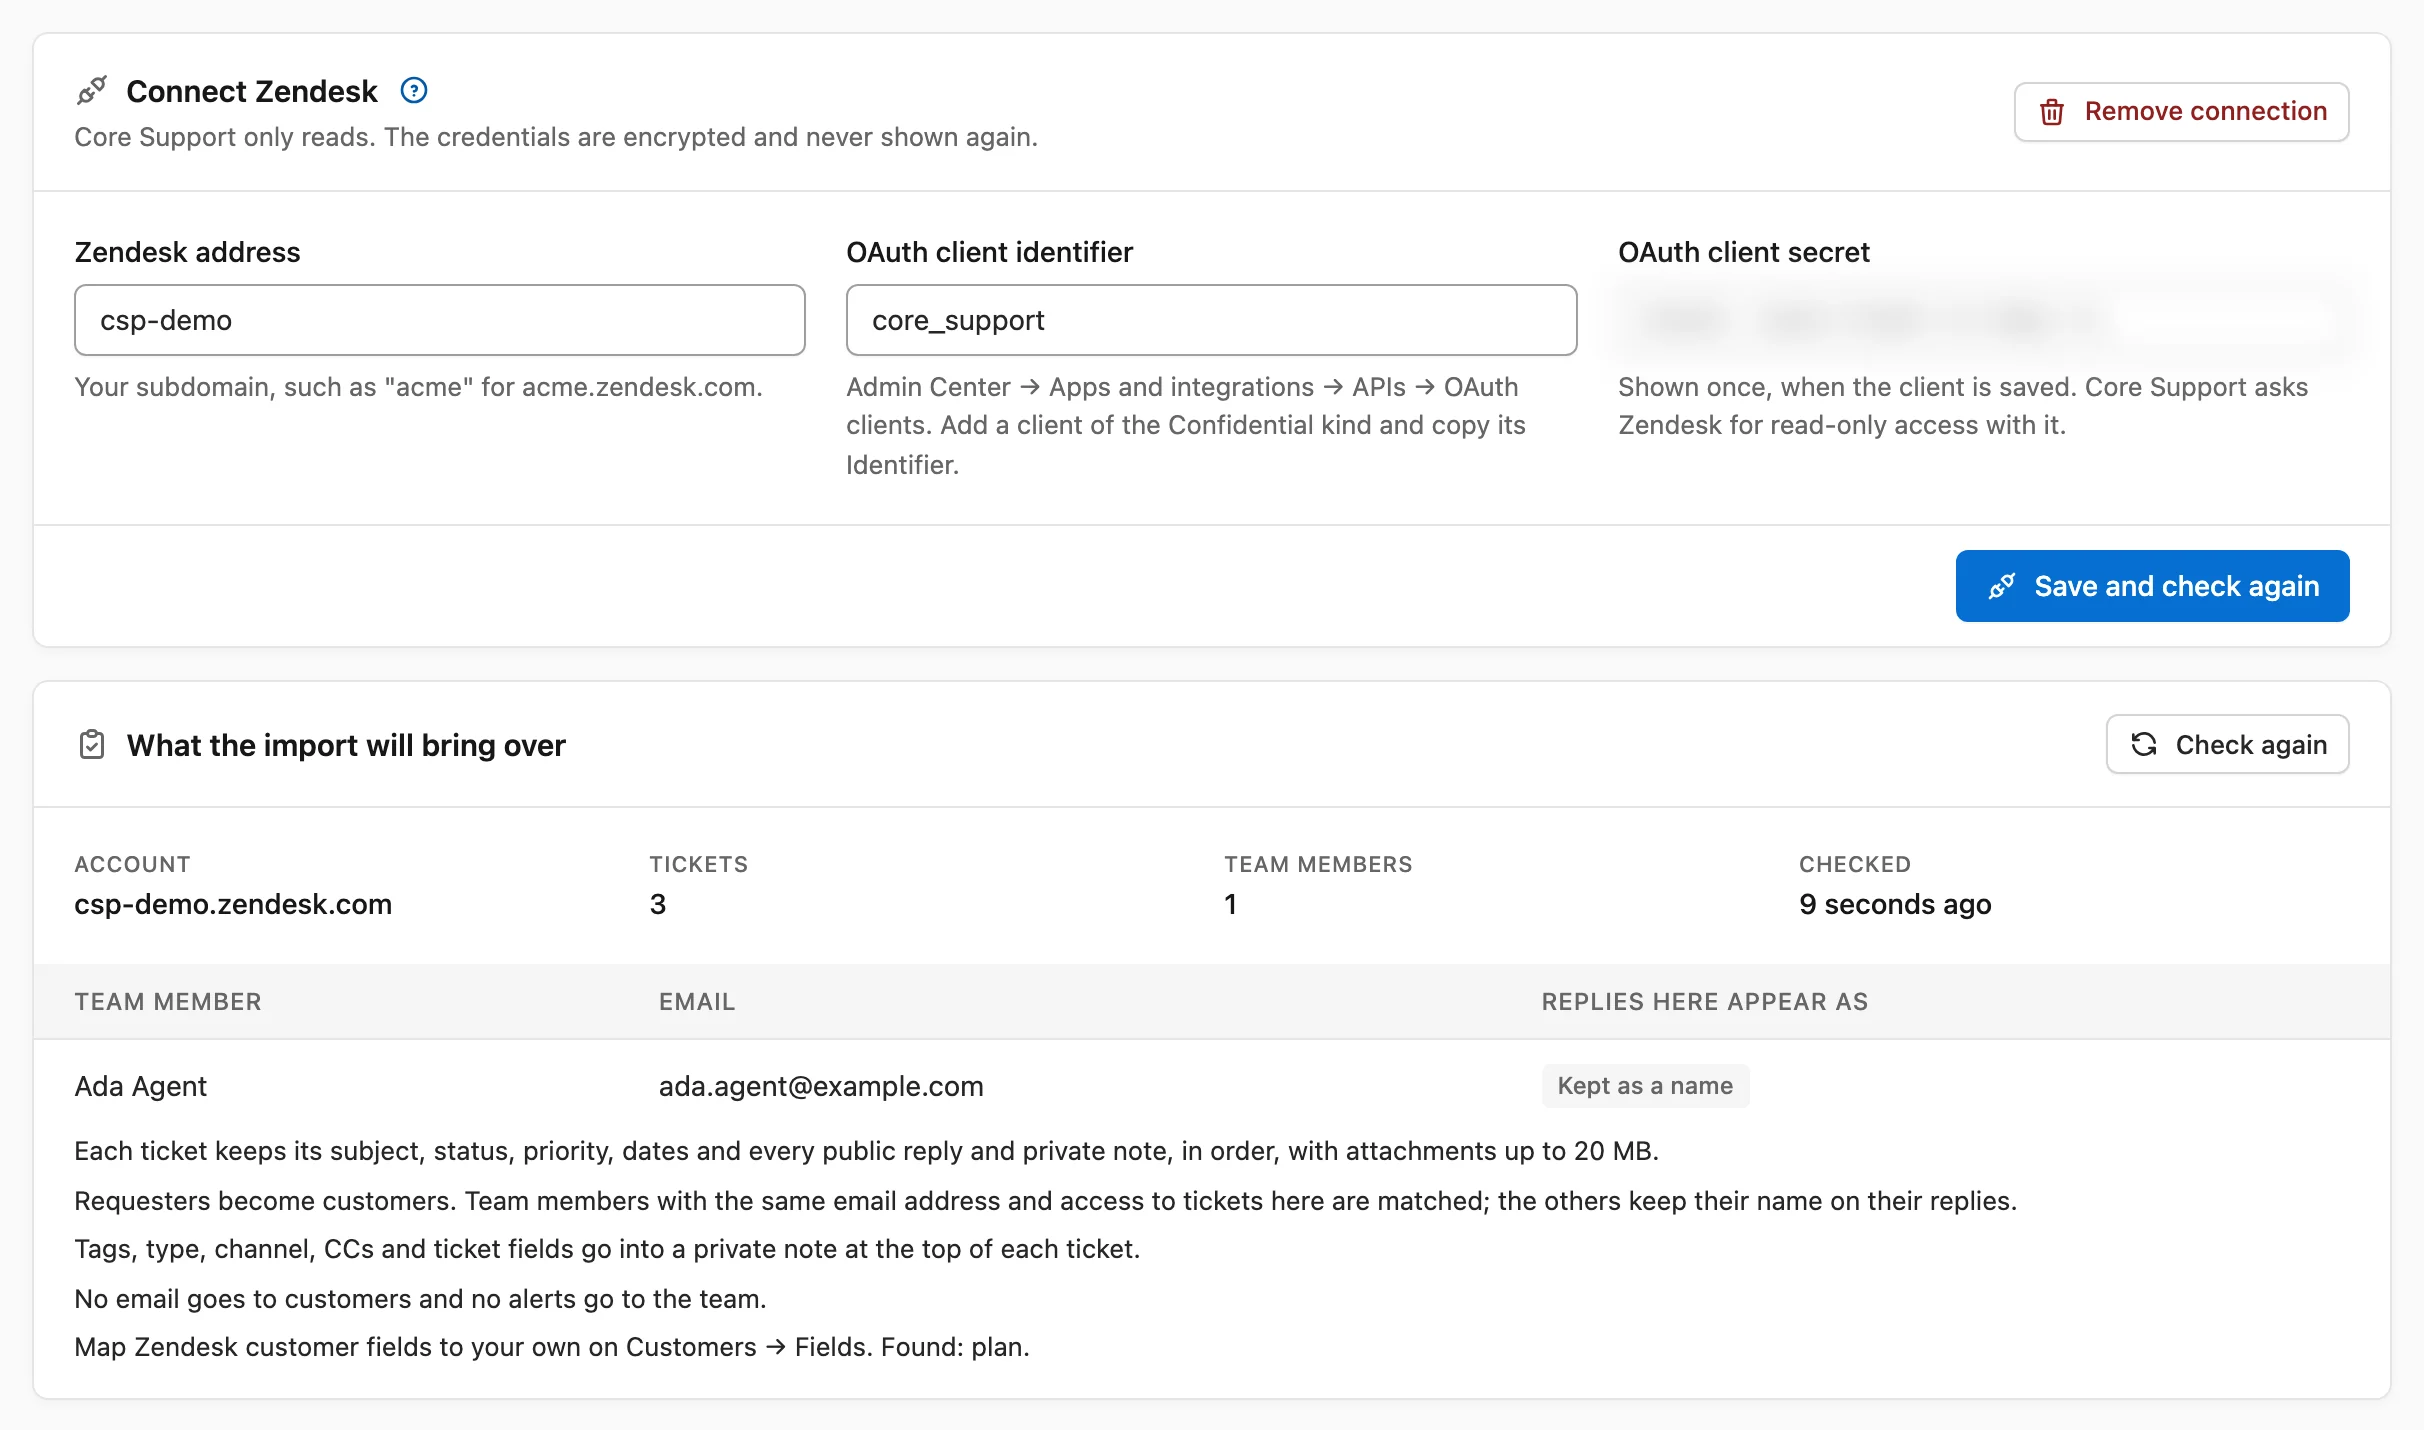
A refused check names the problem, such as “There is no Zendesk account at acme.zendesk.com. Check the address.” or “Zendesk refused the credentials. Check them on Core Support → Import.”
Start the Import
The Import from Zendesk card (or Freshdesk or Intercom) has 3 settings:
- Only tickets updated since: a date. Leave it empty to import everything.
- Replies go out from: the mailbox your team’s later replies on these tickets use. It shows once you have a mailbox set up.
- Copy attachments: on by default. “Files up to 20 MB are copied into your attachment storage.”
Choose Start import. The import runs in the background, and the Imports card at the bottom of the screen follows it.
Follow the Progress
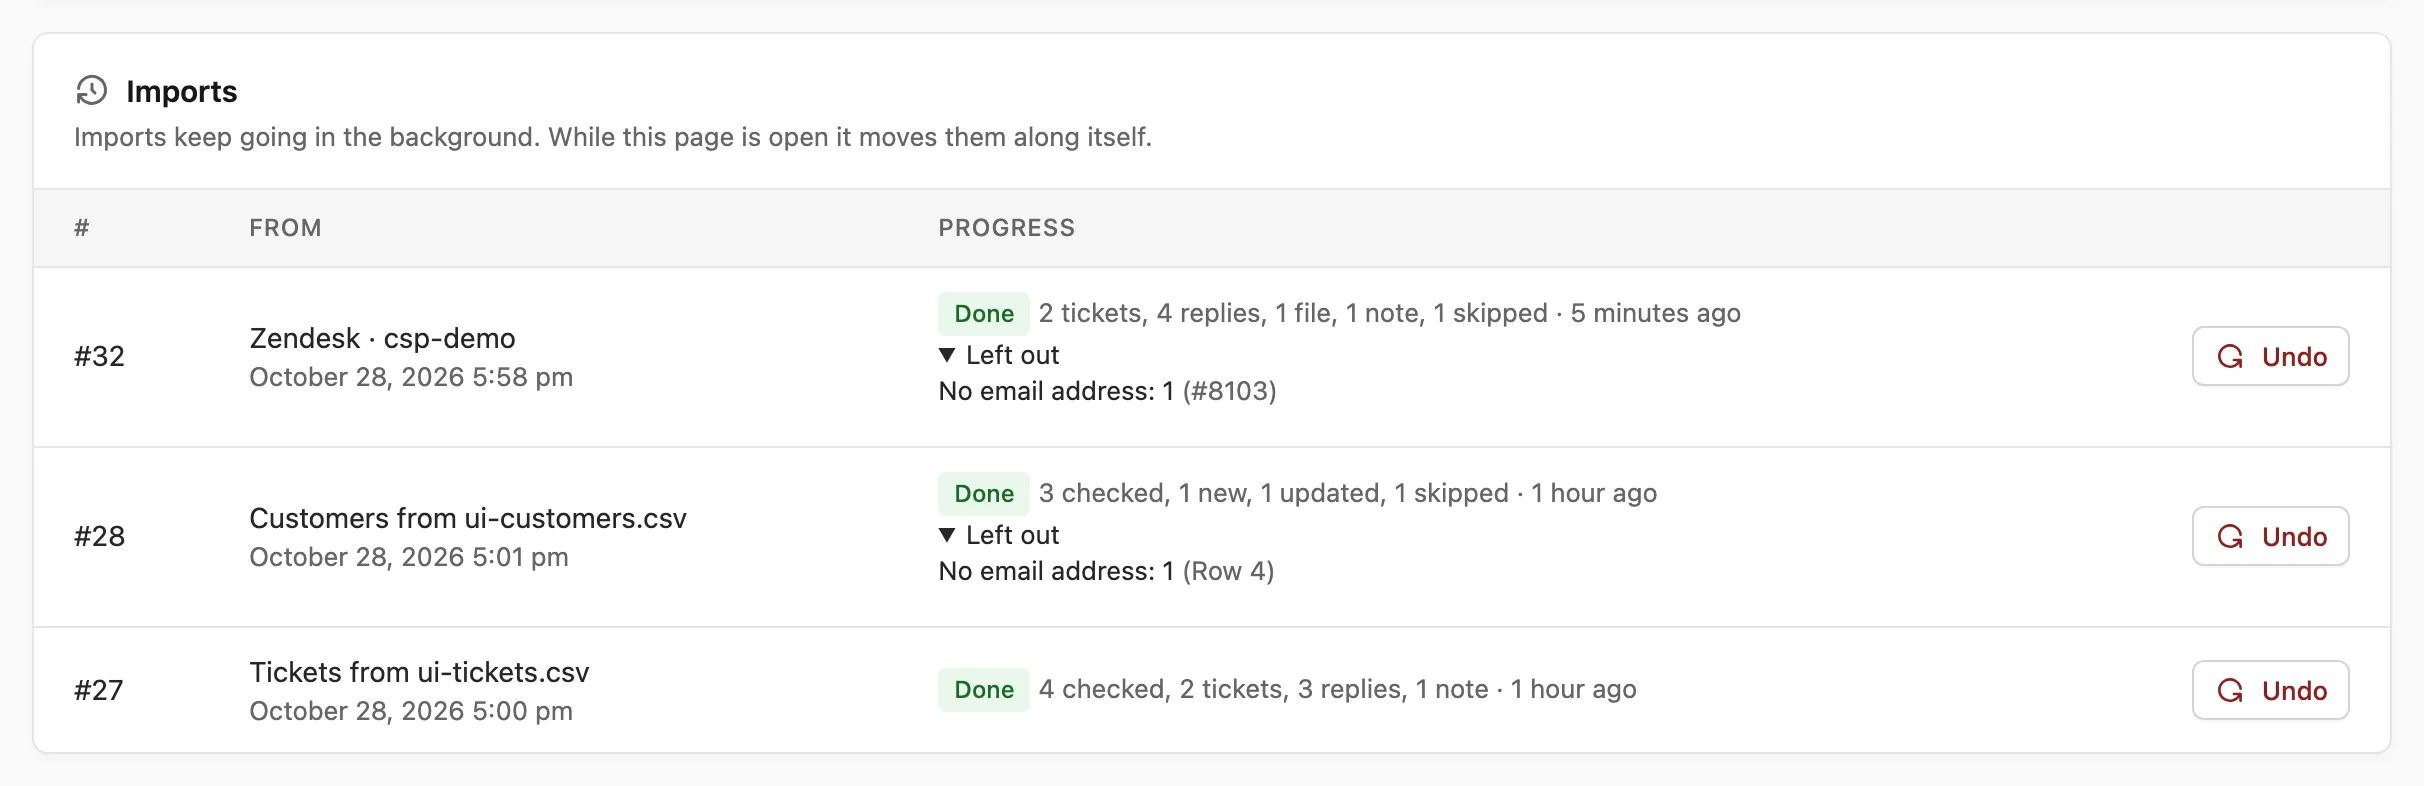
Each import in the Imports card shows its number, the help desk and account, when it started and its state: Queued, Running, Waiting, Done, Stopped or Undone. The counts read like “120 tickets, 1,480 replies, 96 notes, 210 files”.
- Waiting usually means the help desk asked Core Support to slow down. The import pauses for as long as the help desk asks, up to an hour, then carries on. The note reads like “Zendesk asked to slow down; continuing shortly.”
- Other errors are retried after 30 seconds, 2 minutes, 10 minutes and 30 minutes. After that, the import shows Stopped with the reason.
- Refused credentials stop the import at once.
While the Import screen is open, it moves the import along itself, so imports finish even where WP-Cron doesn’t run. A stopped import can be started again: anything already imported is skipped.
What Comes Over
Each ticket keeps its subject, status, priority, dates and every public reply and private note, in order. The assignee comes along when they’re a matched team member.
| Help desk | Becomes Open | Becomes Waiting on customer | Becomes Resolved |
|---|---|---|---|
| Zendesk | New, Open, Hold | Pending | Solved, Closed |
| Freshdesk | Open | Pending | Resolved, Closed |
| Intercom | Open | Snoozed | Closed |
A Freshdesk custom status goes by its name. One that mentions waiting, pending or hold becomes Waiting on customer. One that mentions resolved, closed, done, complete or solved becomes Resolved, and any other becomes Open.
Urgent and High keep their priority, and Intercom’s priority conversations become High. Everything else becomes Normal.
- Conversations: each message appears as the customer or the team member who wrote it. Freshdesk’s ticket description becomes the first message. Intercom notes become private notes, and parts without words, such as assignments and state changes, are left out.
- Files: inline images keep their place in the message, and attachments up to 20 MB are copied into your attachment storage.
- A private note at the top of each ticket links back to the original. It also keeps what Core Support has no place for yet: tags, type, channel, CCs, ticket fields and an assignee without an account here.
- Customers: each requester becomes a customer, merged by email address with anyone already here. They bring their name, phone and mapped fields, and Intercom adds their city, region and country.
Nothing goes out. Imported replies never email anyone and never alert your team, and imported tickets don’t add contacts to FluentCRM. A customer sees an imported ticket in their portal once their account has confirmed that email address, the same way an emailed ticket joins it.
What Doesn’t Come Over
- Zendesk side conversations, satisfaction ratings, macros, triggers and views
- Freshdesk archived tickets, satisfaction ratings and time entries
- Intercom Tickets, the separate ticket type
Some records are left out on purpose and listed in the report below. Requesters without an email address are the common case: phone, social or anonymous visitors can’t become customers.
The Report of What Was Left Out
When an import skips anything, Left out appears under its progress. It opens a list of what was skipped, with up to 10 examples for each reason:
- No email address
- Deleted in the other help desk
- Attachment over 20 MB
- Attachment could not be downloaded
- The ticket already has 500 messages
Run It Again or Import Changes
Running an import again is safe. Anything already imported is skipped, newer replies are added and each ticket’s status catches up.
After the first import finishes, the card also offers Import changes since a date. It brings over only what changed since shortly before the last finished import started.
I’d run the full import a few days before you switch, so you can check the result. Then run Import changes right after you point your support address at Core Support, to catch the last conversations.
Undo an Import
A finished import has an Undo button in the Imports card. After a confirmation, it removes exactly what that import added:
- the tickets it created, with their replies, notes and files
- replies it added to tickets an earlier import created
- the customers it created
A customer who has since opened a ticket here, placed an order or come from another source keeps their record. They lose only what the import said about them. The import then shows Undone, and its records can be imported again.
From the Command Line
The connection is always saved on the screen, so credentials never reach your shell history.
wp core-support import start zendesk
wp core-support import start freshdesk --since=2026-01-01
wp core-support import start intercom --changes
wp core-support import undo 12--since=<date>: only tickets updated on or after this date, asYYYY-MM-DD.--changes: only what changed since the last finished import.--no-files: leave attachments out.
Each command waits until the job finishes. An import started on the screen runs to the end from a terminal with wp core-support jobs run <id>, and wp core-support jobs list shows the job numbers.
Limits
- A ticket keeps up to 500 messages. For longer ones, the first and the newest are kept, with a note saying how many were left out.
- Intercom shares only the newest 500 parts of a conversation, and the note says so too.
- Attachments over 20 MB are left out and listed.
- A message longer than 50,000 characters of text is shortened, with a note in the message, and the whole message is attached to it.
For a spreadsheet or a help desk without an importer here, Import Customers and Tickets from a CSV File covers the file format. Imported requesters land in Customers like everyone else, as Keep One Record for Each Customer explains.