
 by
I get why a flat average order value bugs you. The fix everyone recommends is a WooCommerce order bump: 1 small offer at checkout that the customer adds with a tick. The trouble is that the best-known plugins for it are funnel builders, and they charge funnel-builder money for one checkbox.
FunnelKit’s cheapest plan with bumps renews at $299 a year for 2 sites, and CartFlows Pro renews at $299 a year for 3 sites. Both also swap your checkout page for their own template. If you run 3 or 4 stores, that bill multiplies fast.
My advice is to skip the funnel builder unless you need a funnel. Stackless for WooCommerce is a plugin I built that adds features to core WooCommerce as modules you switch on one at a time. Its Order Bumps module puts the offer on the Checkout block or the classic checkout. Its Post-purchase Offers module adds a one-click offer on the thank-you page, after the customer has paid.
Stackless costs $39 a year or $99 lifetime at the early adopter price, and both licenses cover unlimited sites. Every module comes with the license, so the bump and the upsell cost nothing extra.
I sell it, so I’ve put its limits right beside the claims they qualify. If all you want is 1 bump on 1 store, the marketplace’s Order Bump for WooCommerce at $79 a year is the fair alternative.
Do You Need a Funnel Builder for an Order Bump?
No, not for a bump, and not for a single offer after checkout either. The 4 routes below all put a WooCommerce order bump on the checkout. The difference is what else you install, whether your checkout page survives and whether you get an offer after payment.
I took the prices from each vendor’s pricing page, for the cheapest plan that includes bumps. Where a plan has an introductory price, the renewal price is the one I’d plan around.
| Route | Order bump | One-click offer after payment | Your checkout page | Cheapest plan with bumps | Sites |
|---|---|---|---|---|---|
| Stackless for WooCommerce | Yes, the Order Bumps module | Yes, the Post-purchase Offers module | Stays as it is, Checkout block or classic | $39 a year or $99 lifetime | Unlimited |
| Order Bump for WooCommerce (Flintop, on WooCommerce.com) | Yes | Not listed | Stays as it is, classic or block checkout | $79 a year | 1 |
| FunnelKit Funnel Builder | Yes, on Plus | Yes, on Plus | Replaced by a FunnelKit checkout | Plus, $299 a year ($149.50 for the first year as I write this) | 2 |
| CartFlows | Yes, on Pro | Yes, on Pro | Replaced by a CartFlows checkout layout | Pro, $299 a year ($199 for the first year) | 3 |
The funnel builders aren’t overpriced for what they do. FunnelKit Plus brings unlimited funnels, A/B testing and funnel analytics along with the bump and the upsell. CartFlows Pro brings its own checkout layouts, thank-you pages and downsells.
You pay for all of that whether you use it or not, and the checkout page you tuned for the Checkout block becomes their template. So my advice splits 3 ways:
- You want multi-step funnels, downsells or A/B tests: I’d buy the funnel builder and set the bump up inside it.
- You want a bump, a thank-you page offer or both: Stackless covers both and leaves your checkout alone. For 1 bump on 1 store and nothing else, the $79 extension does the job too.
- You already pay for FunnelKit or CartFlows and the bump is earning: stay where you are. Why spend extra? Ripping out a working checkout mid-term to save a license fee isn’t a good idea at all. I’d look at it again at renewal, when the question is whether you still open the funnel parts.
For a single store, the $79 marketplace extension is the fair comparison. Across several stores the arithmetic changes, and I worked that through in how much WooCommerce extensions cost per year.
Order Bump vs Upsell
The two get sold in the same box, so I want to separate these before you buy anything. Both raise the average order, but these sit at different points of the sale and need different plumbing.
- Order bump: shows before payment, on the checkout page, as a checkbox. The customer pays for it in the same transaction, so it works with any gateway your checkout already uses.
- One-click upsell: shows after payment, on the thank-you page or a page of its own. It charges the saved payment method again, so it needs a gateway that allows a second charge.
- Cross-sell: core WooCommerce’s product suggestion on the cart page. It’s at the regular price, with no checkout-only discount and no count of who took it.
Stackless does the first two as separate modules: Order Bumps before payment and Post-purchase Offers after it. It leaves core WooCommerce’s cross-sells alone. There’s no multi-step funnel and no downsell page, so if that’s what you’re after, a funnel builder is the right purchase.
A bump works because the decision has already been made. The customer has typed an address and picked a payment method. A small, related, discounted item asks for a tick, not a second decision.
The moment it asks them to pick a size or read a page, it has stopped being a bump. It’s also 1 of the cheaper fixes in my list of ways to increase ecommerce sales. I’d do the product page work first, because a bump can only add to an order the product page already won.
How a Stackless Order Bump Works
Before the settings, I want you to see the whole path. Every field in the editor makes more sense once you know where the price comes from and when the count moves. The demo store has 3 live bumps you can trigger yourself.
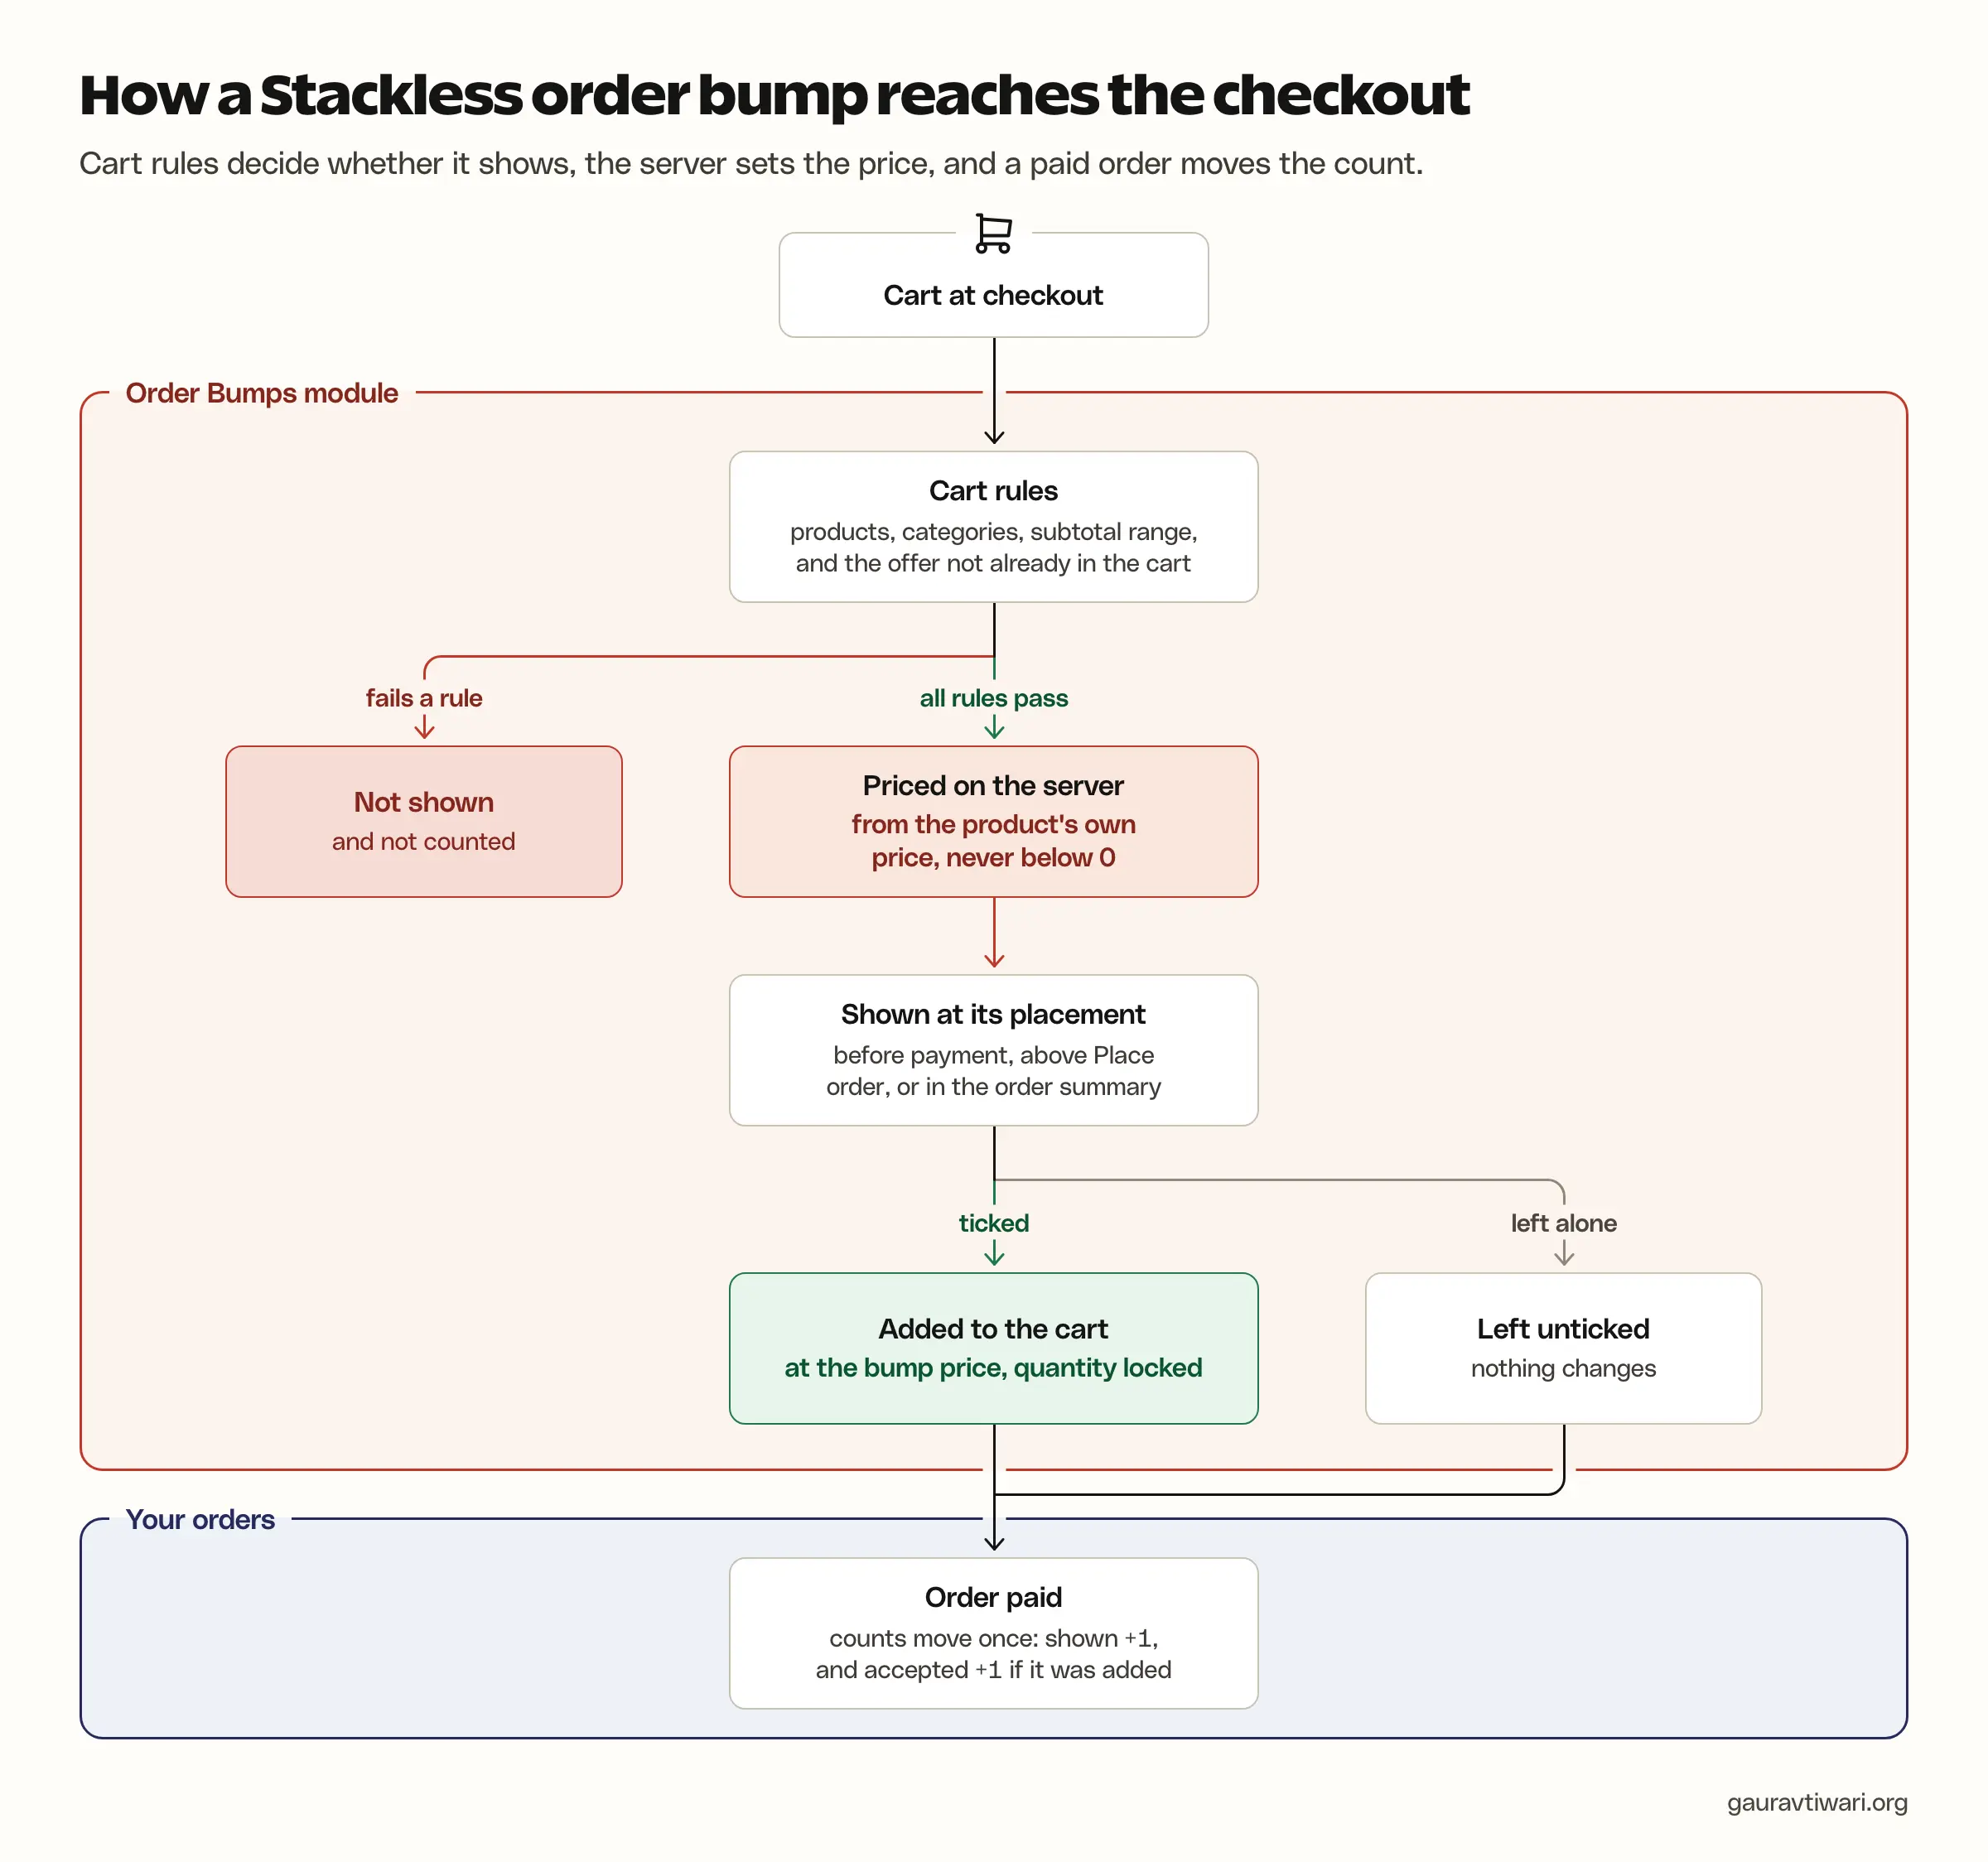
What you can offer. A bump offers 1 product at a quantity you set:
- Product types: a simple product, a subscription product or 1 specific variation of a variable product.
- Quantity: 1 to 99, fixed. The customer can remove the offer but can’t change the quantity.
- Refused products: a variable, grouped or external product can’t be offered directly. A variation with an attribute left as “Any” is refused too, because the bump has to add the item with no questions asked.
- Out of stock: the bump stays active and is hidden at checkout until stock returns.
How it’s priced. Stackless works the bump price out on the server, from the product’s own stored price. It does that on every totals calculation, and never from anything the browser sends.
- Options: percentage off, amount off, a fixed price, or the regular price with no discount.
- Units: amounts are per unit in your store currency, and the result never goes below zero.
- Other currencies: with Multi-Currency Checkout, a percentage or amount off starts from the offer’s price-book price in the shopper’s currency. So 40% off is 40% off the price they see.
- Copy tokens: {price}, {regular_price} and {discount} in the headline or description fill in the shopper’s currency. The card and the cart line always show the same amounts.
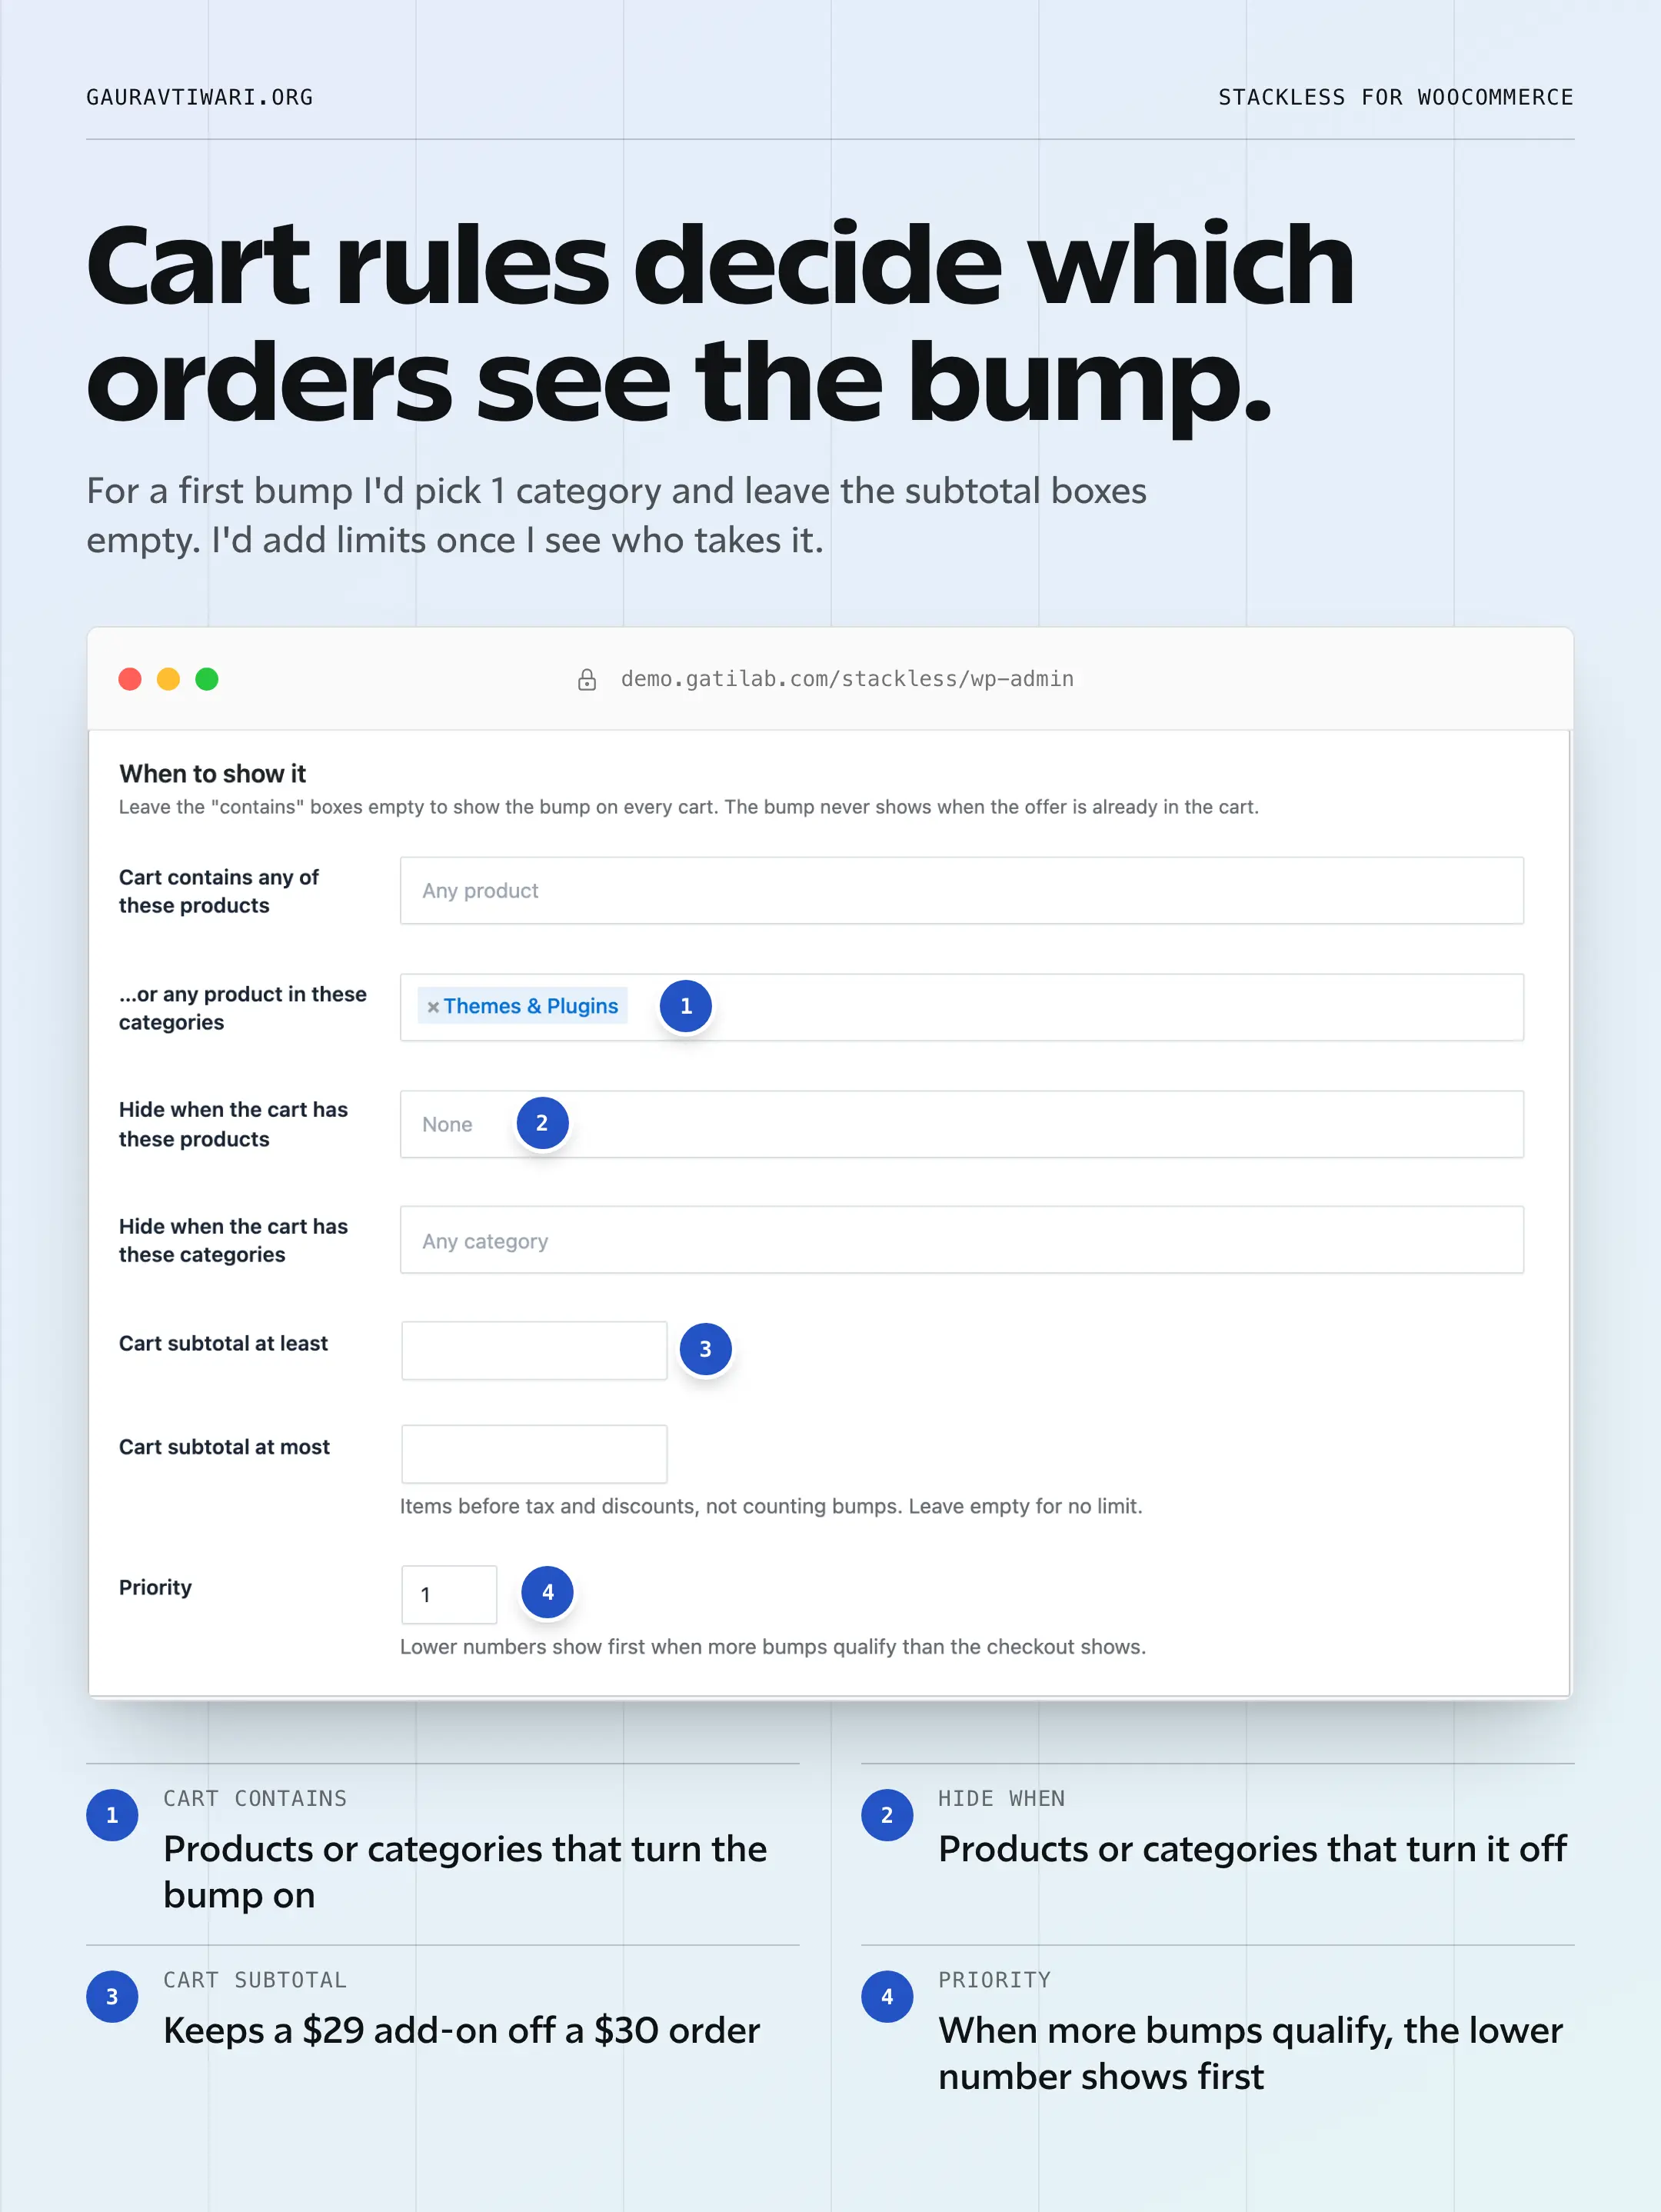
When it shows. A bump shows only when every rule it has passes. The rules are about the cart’s contents and its subtotal:
- Contains: any of these products, or any product in these categories. Leave both empty to show it on every cart.
- Hide: when the cart has these products or these categories.
- Subtotal: at least and at most. It’s counted on items before tax and discounts, with bump items left out, and compared in the shopper’s currency.
- Already in the cart: the bump never shows when the offer is already there, and a bump line never qualifies another bump.
- How many: 1 to 5 bumps per checkout, default 2. When more qualify, the lower priority number shows first.
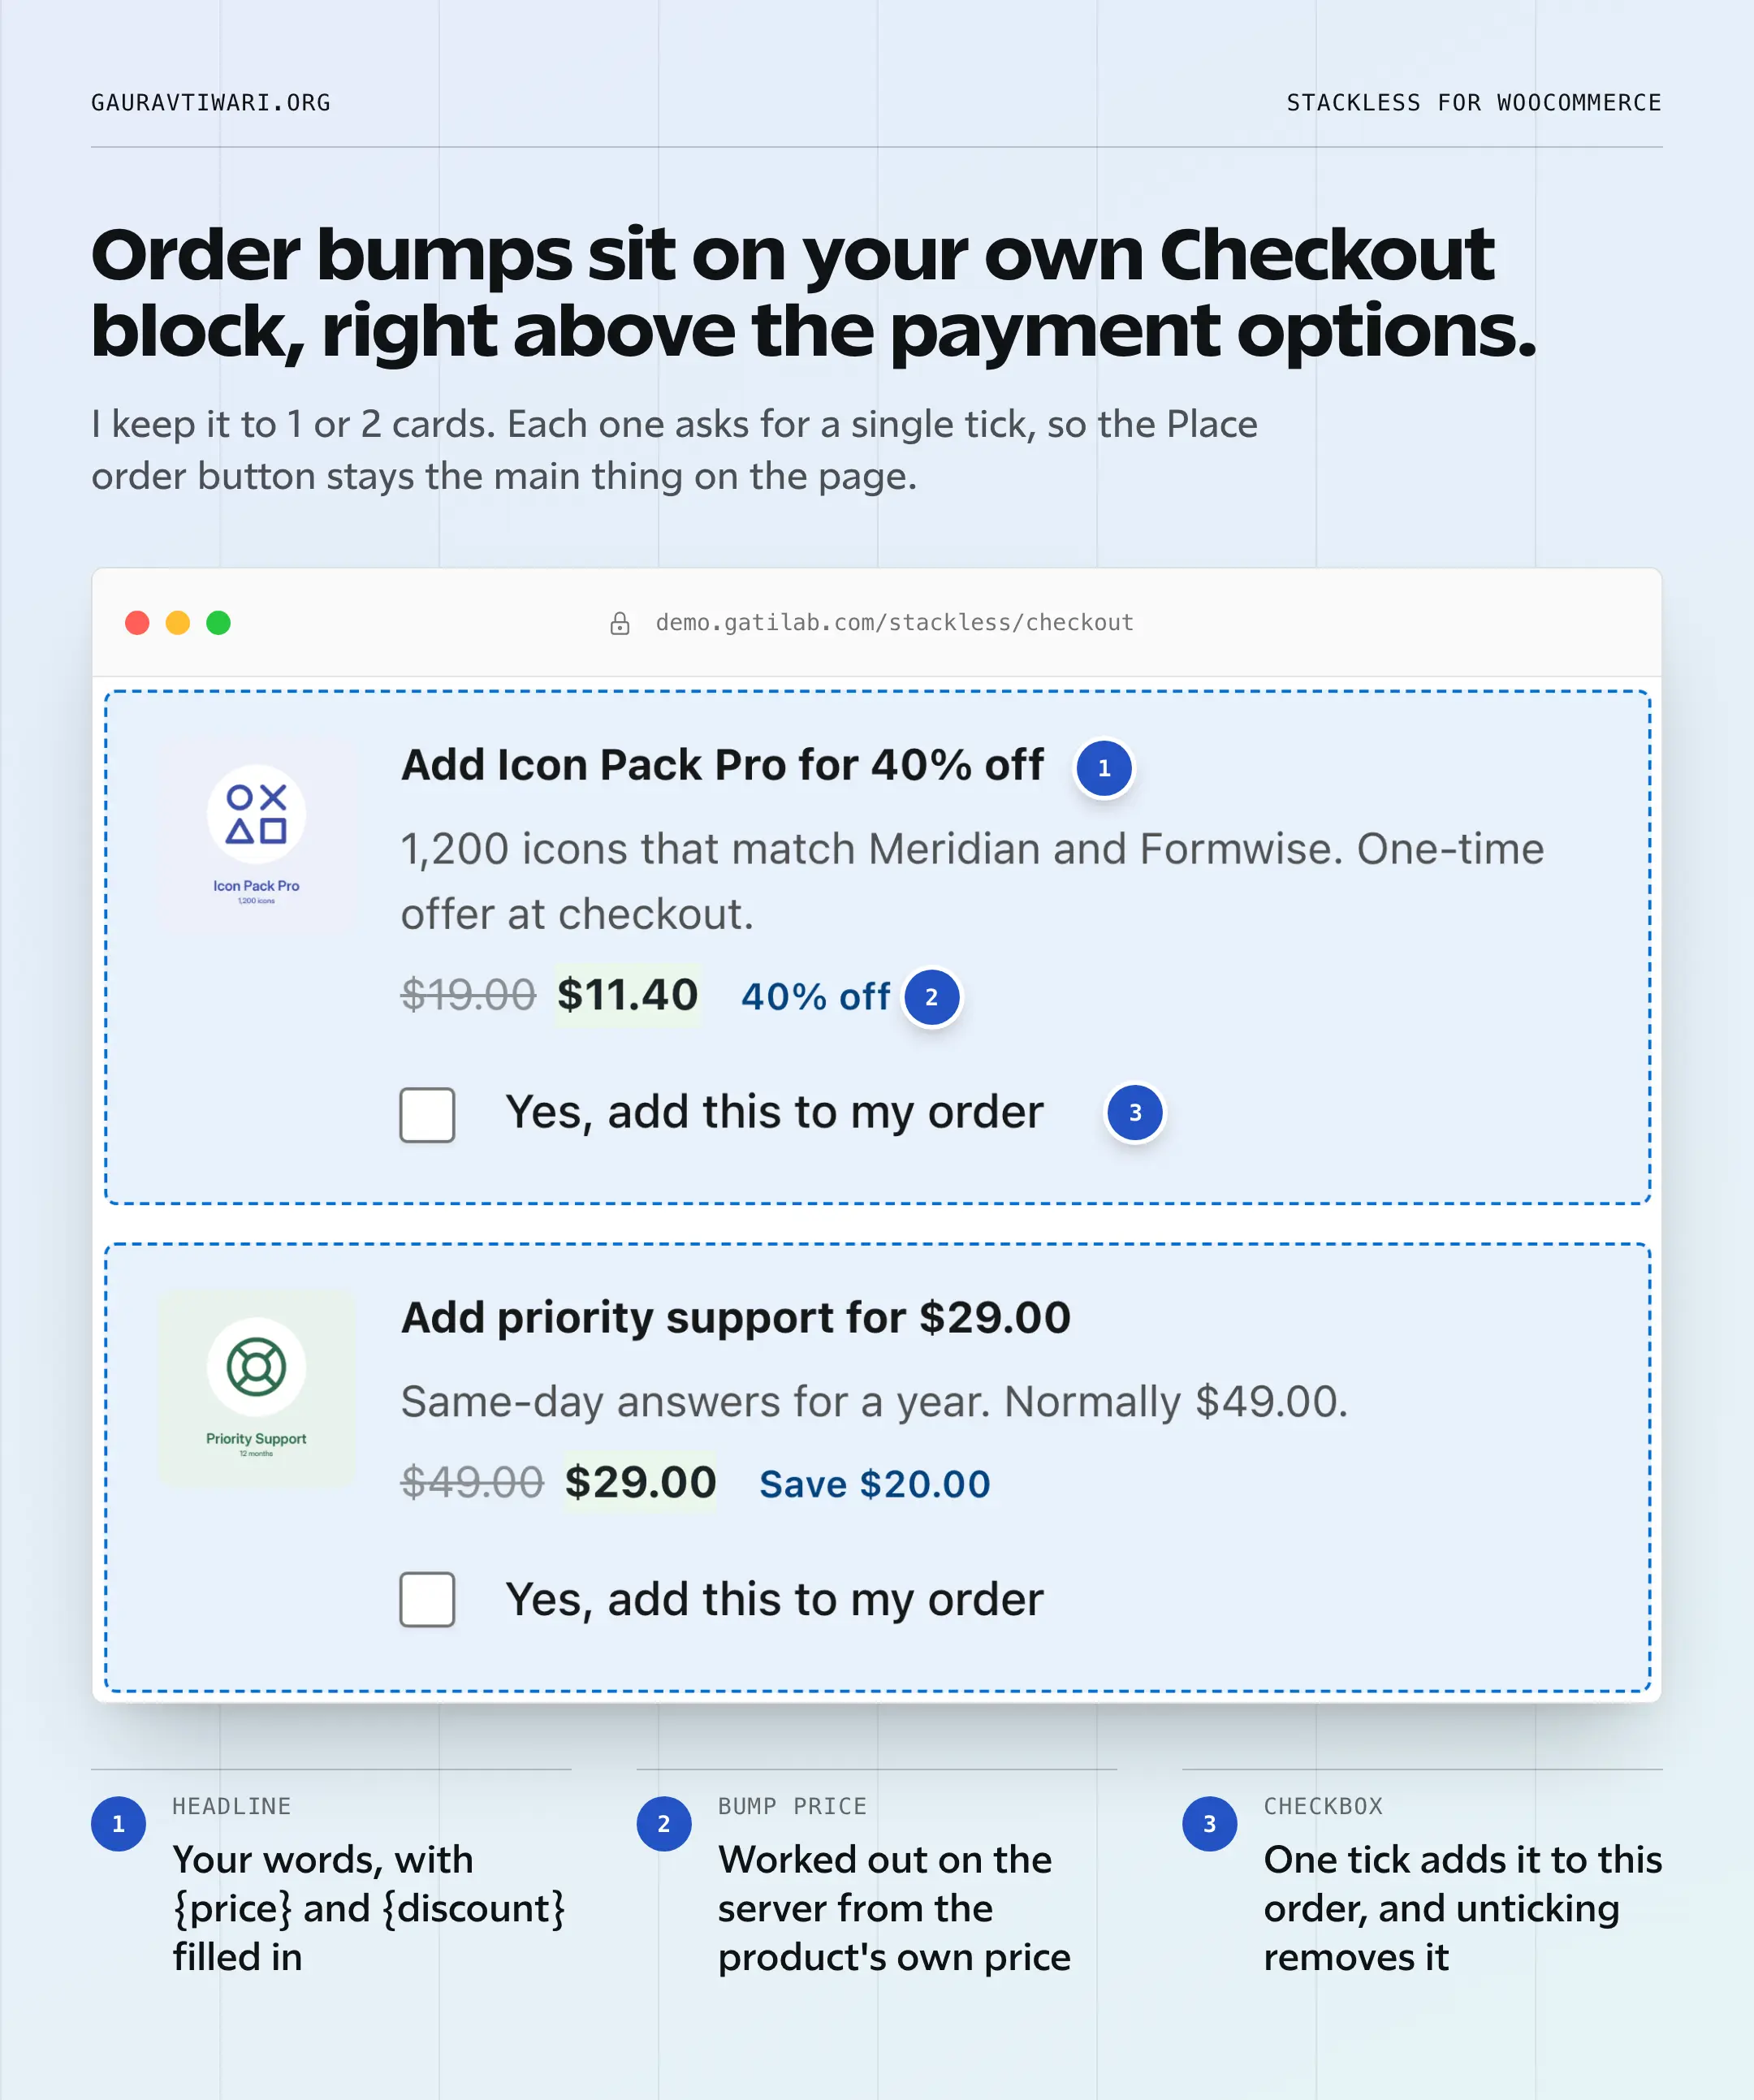
Where it shows. You pick 1 of 3 placements per bump: before the payment methods, just above the Place order button, or inside the order summary. All 3 work on the Checkout block and on the classic checkout, which matters if your store already runs the Checkout block and you’ve no wish to go back.
This is the default placement on the demo store, with a plugin in the cart.
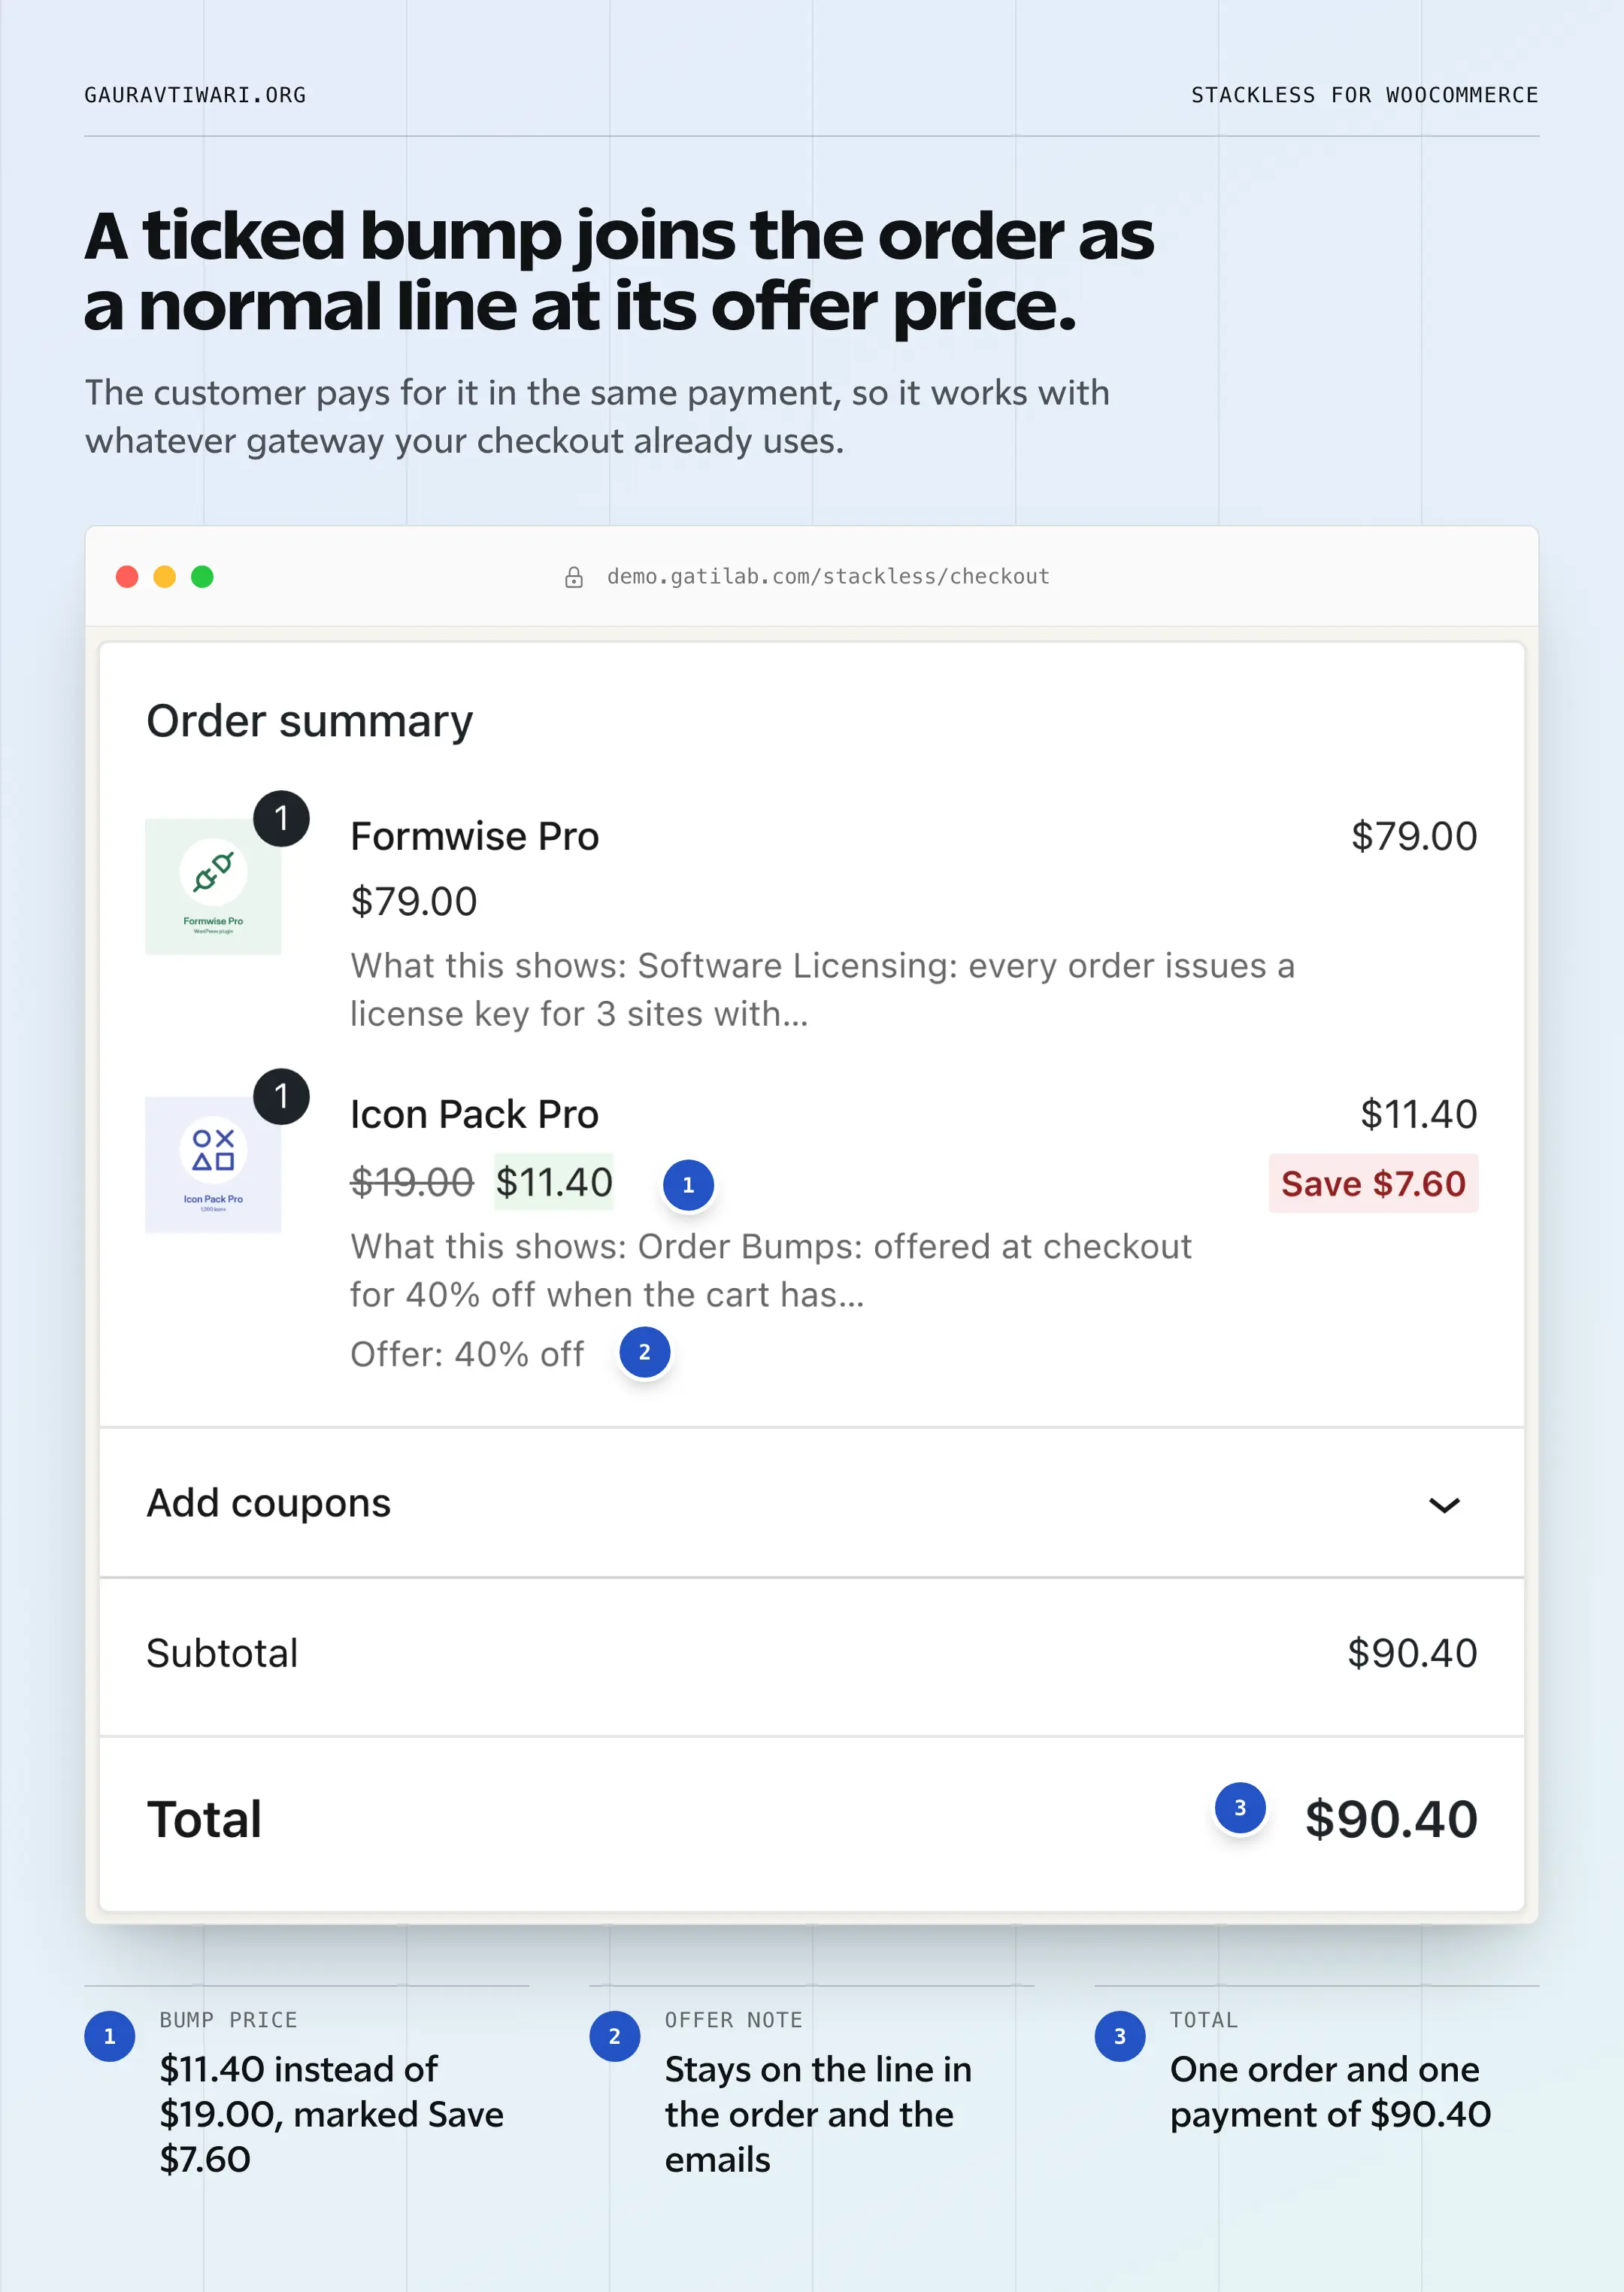
After the tick. The product joins the cart as a normal line at the bump price. It carries an Offer note in the cart and the checkout summary, and it reaches the order and the order emails as an ordinary line at that price.
The quantity is locked, and the customer unticks the box to remove it. If the cart stops qualifying, say the customer removes the product that triggered it, Stackless removes the bump line as well. Nobody walks away with a checkout-only price on an order that never earned it.
On the order screen the line is marked “Added from the order bump” with the bump’s name. The order keeps that line even if you delete the bump later.
Setting Up an Order Bump in Stackless
The editor is 3 panels on 1 screen, and the Order Bumps lesson in the docs walks every field. This is what each field does, with its default.
| Field | What to enter | Default |
|---|---|---|
| Internal name | A label only you see | Empty |
| Product to offer | A simple product, a subscription product or 1 variation | None; the bump stays inactive until it has one |
| Quantity | 1 to 99 | 1 |
| Bump price | Percentage off, Amount off, Fixed price or Regular price, plus the amount | 20% off |
| Headline | The card’s title; {price}, {regular_price} and {discount} work here | “Add [product] to your order” |
| Description | 1 or 2 sentences; links, bold and italic allowed | Empty |
| Checkbox text | The line beside the tick | “Yes, add this to my order” |
| Image | Product image, custom image or none | Product image |
| Placement | Before the payment methods, above the Place order button, or in the order summary | Before the payment methods |
| Cart contains | Products or categories; empty means every cart | Empty |
| Hide when | Products or categories that switch the bump off | Empty |
| Cart subtotal | At least and at most, in your store currency | No limit |
| Priority | 0 to 999; lower shows first | 10 |
This is the order I’d follow for a first bump:
- Switch on Order Bumps from Stackless → Dashboard. A switched-off module loads no code, so there’s nothing to clean up if you turn it off later.
- Under Stackless → Settings → Sales & invoices, set bumps per checkout and the default checkbox text.
- Open Stackless → Order bumps → Add order bump. Fill in the Offer panel: internal name, product, quantity and bump price.
- Fill in What the customer sees: headline, description, checkbox text, image and placement.
- Fill in When to show it: the cart rules and the priority. For a first bump, 1 category and no subtotal limits is enough.
- Tick Show this bump at checkout and save. Stackless keeps a bump inactive while it has no product or an offer it can’t add, and tells you which on save.
- Test it with a cart that qualifies. On the demo store, any product in the Themes & Plugins category brings up the icon pack bump.
Reading the Take Rate
I’d treat the take rate as the one number on that list that matters. I’d also read it carefully, because it’s counted on a narrower base than most people assume.
- Take rate: accepted ÷ shown, to 1 decimal.
- When it moves: once, when the order reaches a paid status. An abandoned checkout counts nothing.
- What “shown” means: paying customers who were offered the bump, not visitors who loaded the page.
- Revenue: the bump line’s total including tax, in your store currency. An accept in another currency counts as an accept and adds nothing to revenue.
- Reset and delete: Reset stats restarts the counts for 1 bump. Delete removes the bump and its counts, and orders keep their items.
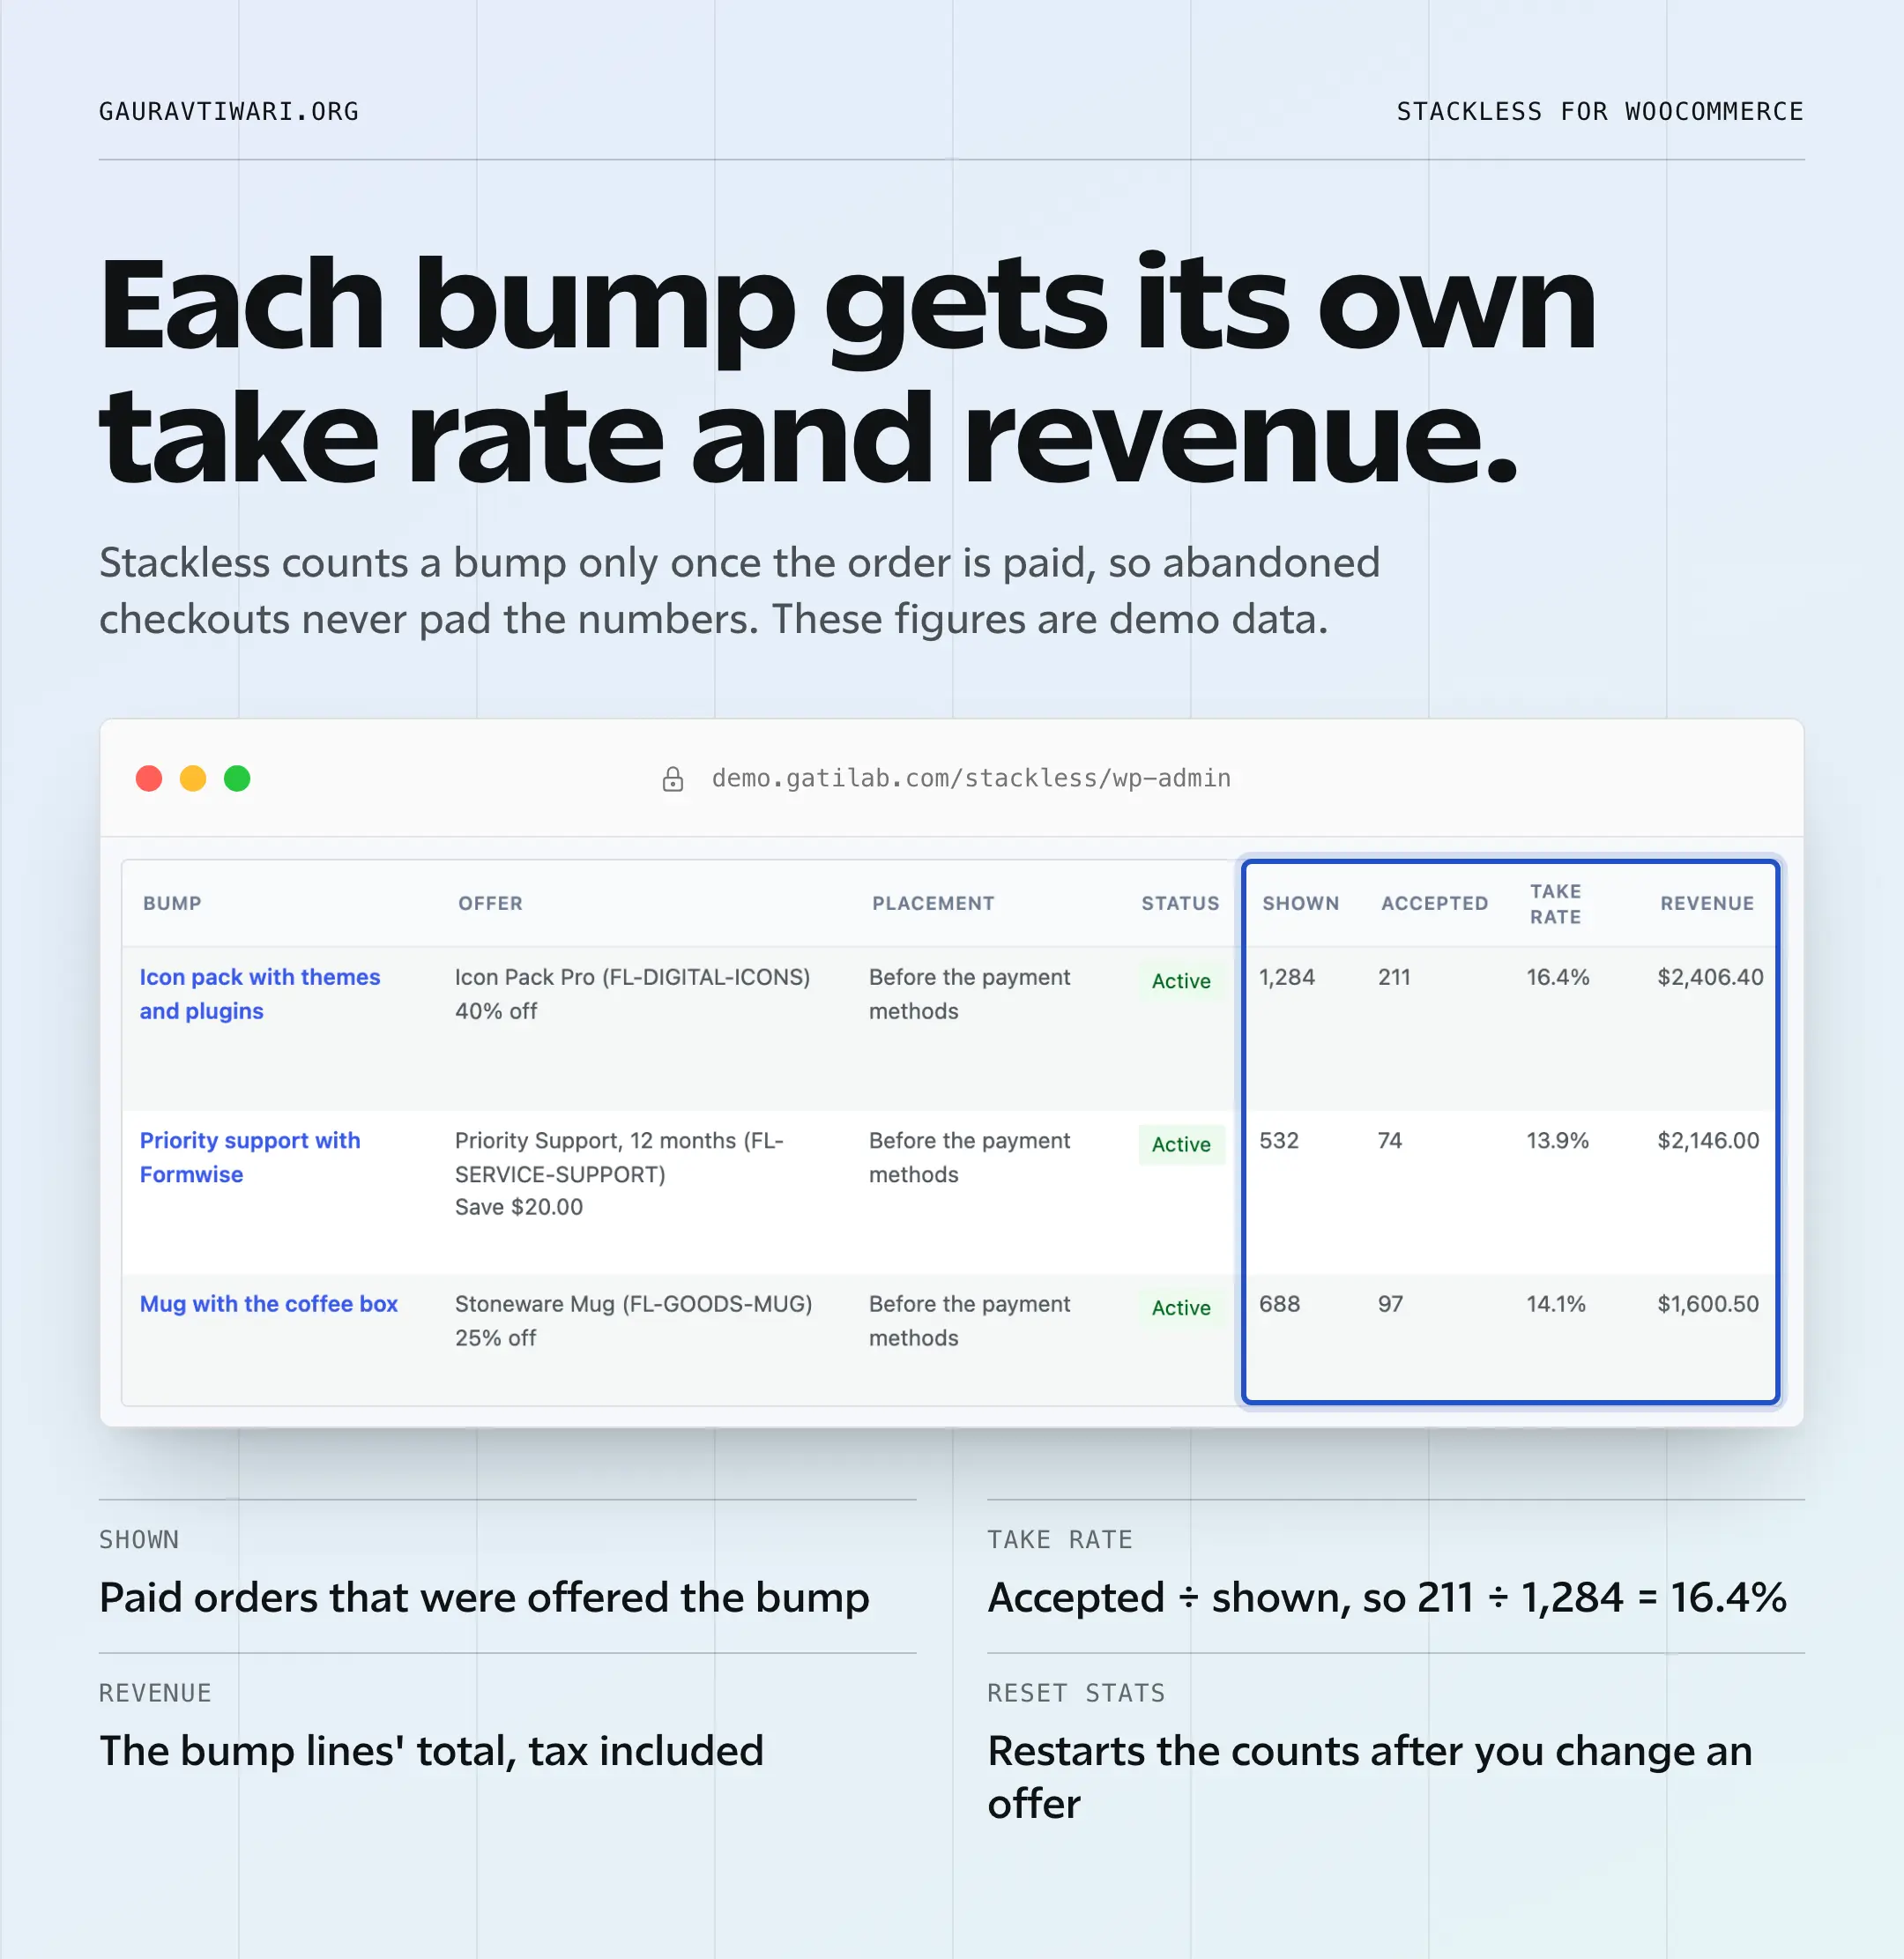
Worked example, from the demo store’s list: 1,284 paid orders showed the icon pack bump and 211 of them added it. The take rate is 211 ÷ 1,284 = 16.4%. Those are demo numbers, so the only thing to copy from these is the shape of the list.
That’s a more useful number than a page-view rate, because it’s already filtered to people who paid. It’s also why I’d compare your bumps with each other rather than with a figure from a funnel builder’s sales page. Those are counted on a different base.
A bump nobody takes is a tax on checkout attention. Every card on that page competes with the Place order button. A bump sitting at 2% is costing you focus while earning you very little.
My suggestion is to change the offer, the price or the rule, then reset the stats. If it stays low after a fair run of paid orders, I’d switch it off and not feel bad about it.
A bump that converts well with a small discount is worth more than one that converts a little better at 40% off. The Revenue column is there to settle that argument.
The bumps that take share a shape, and the rules in the editor exist to hold that shape:
- Related: obviously connected to what’s in the cart. That’s what the category rule is for.
- Cheap next to the cart: the subtotal rule should stop a $29 support plan showing on a $30 order.
- No decisions: no size, no option, no page to read. That’s why Stackless won’t offer a product whose add-on fields need an answer.
- Easy to forget: something the customer wouldn’t go looking for but is glad to be reminded of. A year of support with a plugin, a mug with the coffee box.
One-Click Upsells After Checkout
An order bump has to win the customer before they’ve paid. Post-purchase Offers asks after the first payment is safe, which suits a bigger or second purchase. It shows 1 offer on the thank-you page, and 1 click adds it as a separate order.
On the demo store, anyone who buys a theme or plugin sees a 1:1 setup session at $129 instead of $199. The demo has no saved cards, so its note under the button promises a payment page.
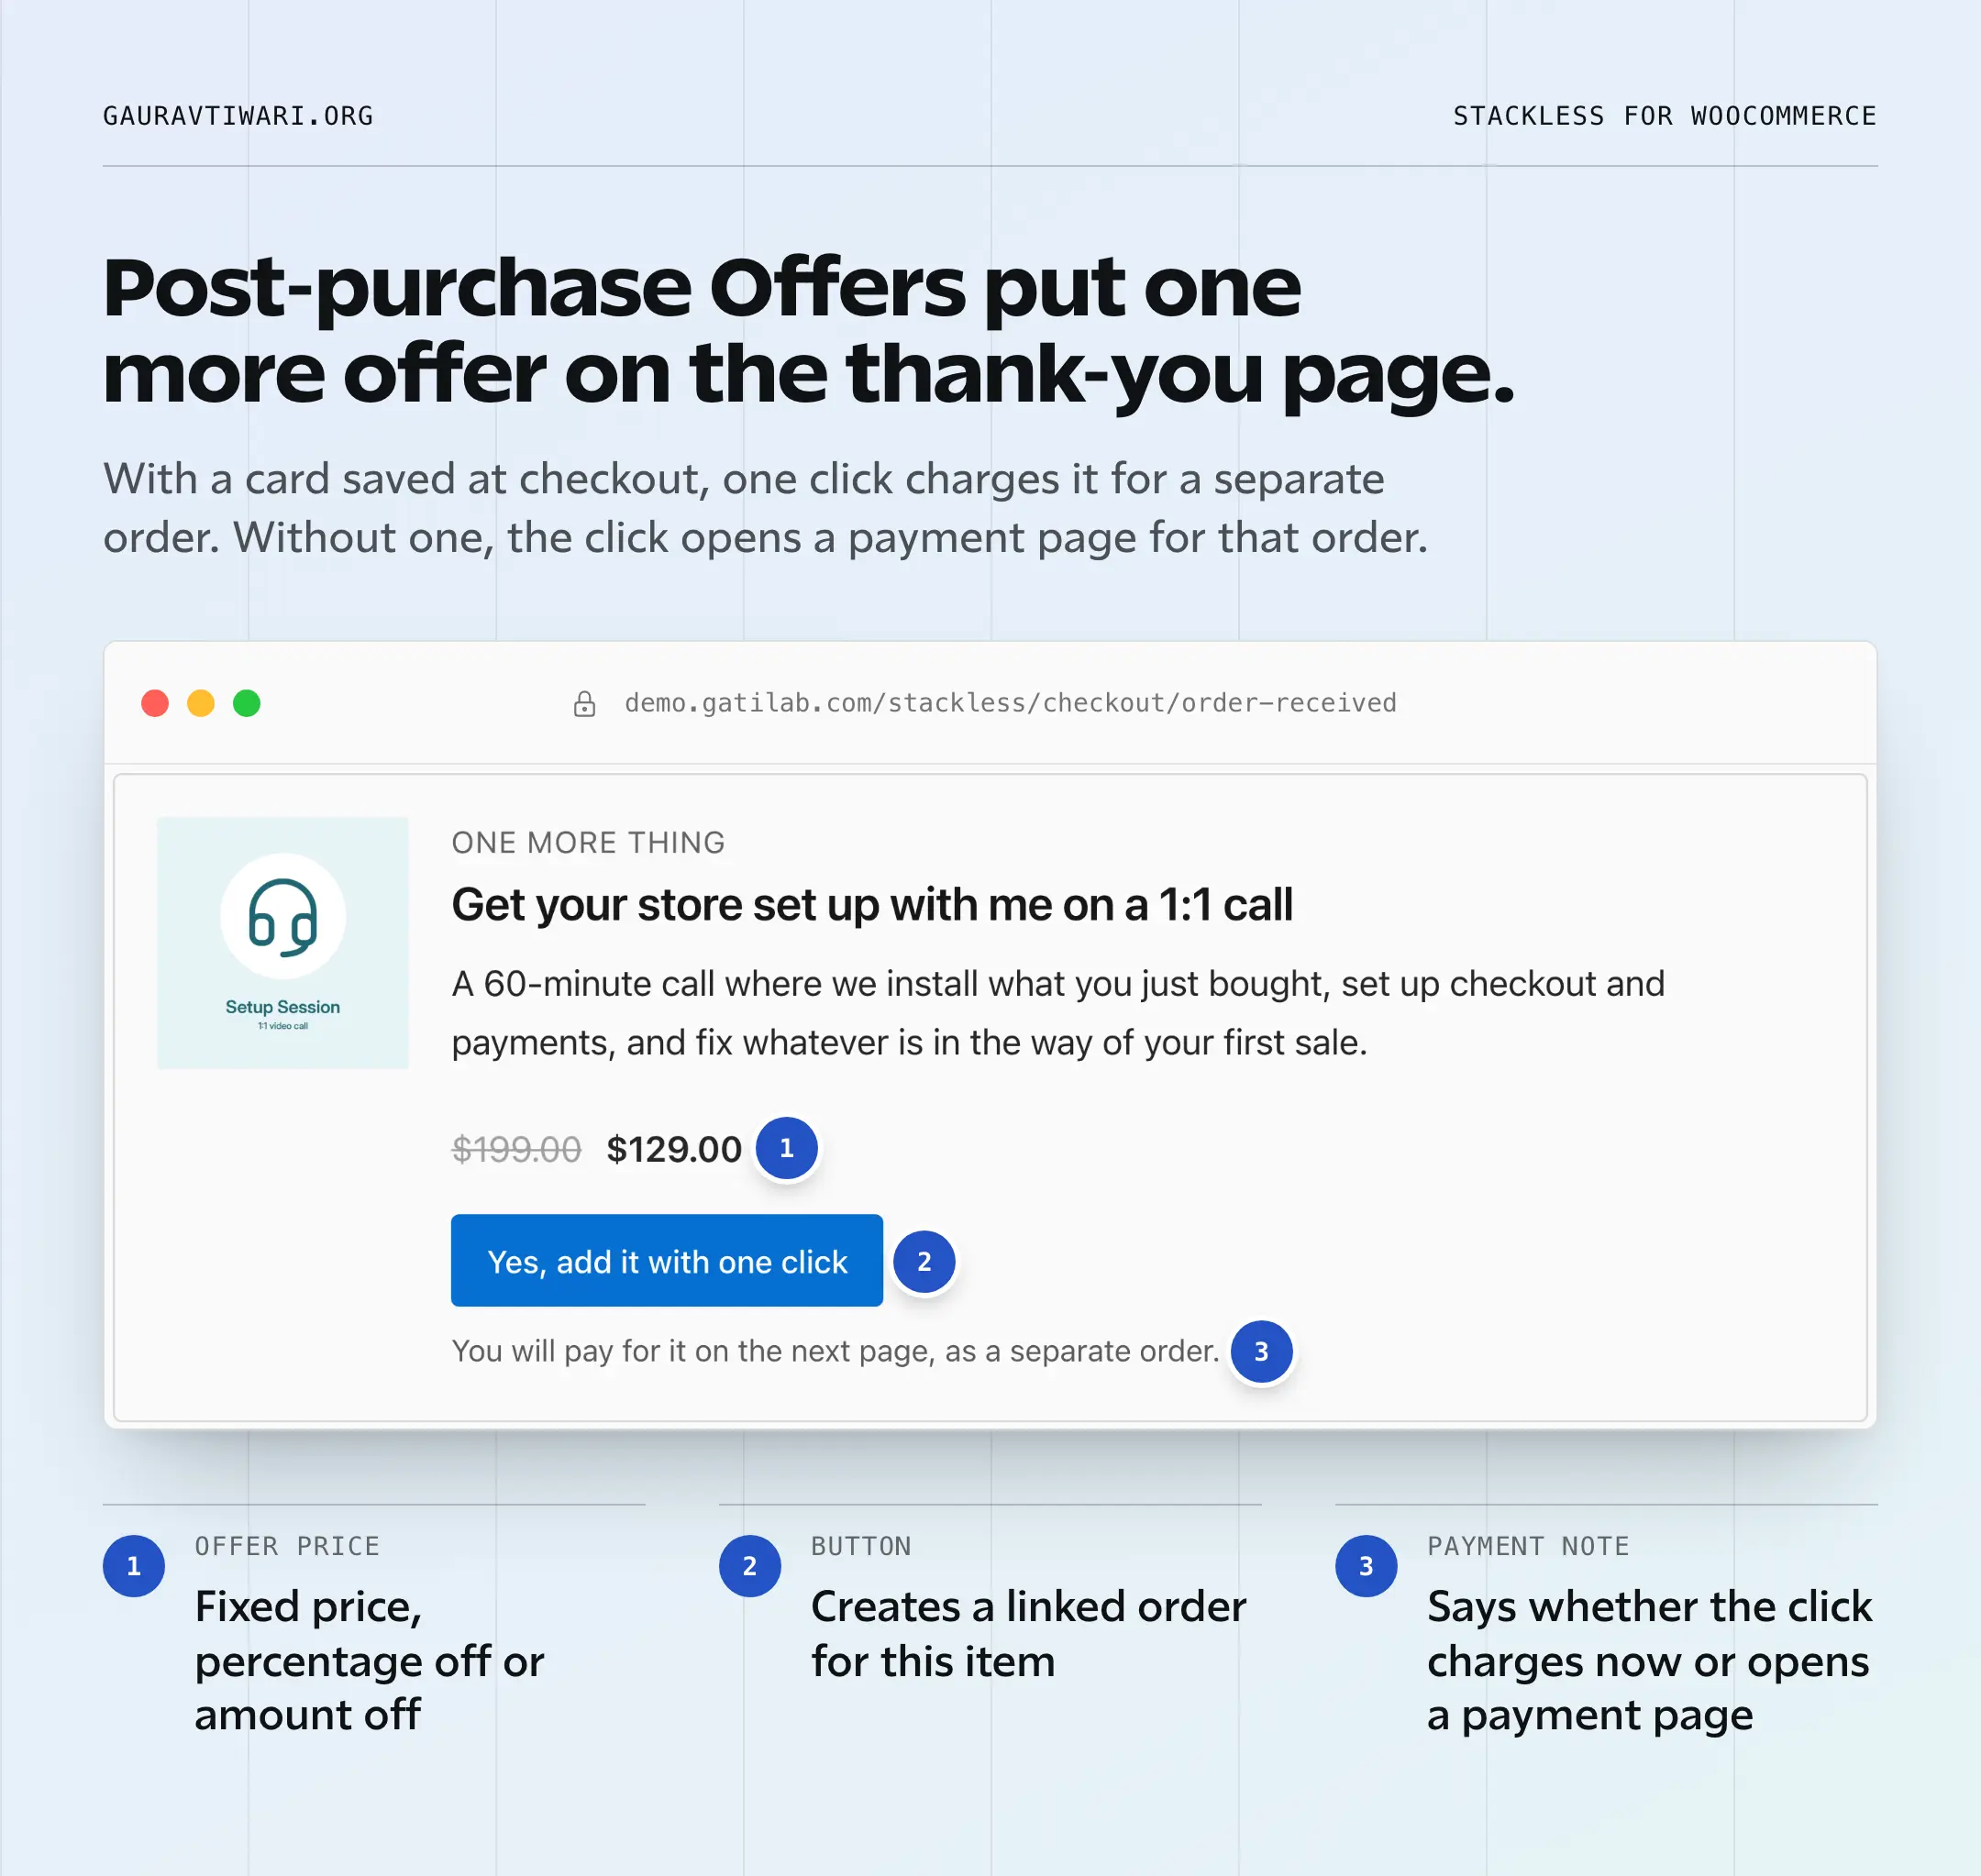
The click always creates a new order for the offer item, with the same addresses, currency and payment method as the first one. What happens next depends on how the first order was paid:
| How the first order was paid | What the click does |
|---|---|
| Stripe, PayPal, Square, Mollie or Razorpay, with a saved payment method | Charges it straight away. The customer stays on the thank-you page and sees that the item was added. |
| The bank asks for 3-D Secure, or PayPal asks for approval | Opens the new order’s payment page to confirm. The order stays pending until they do. |
| A guest checkout, no saved method, another gateway or a merchant-of-record gateway | Opens the new order’s payment page, where they pay as with any order. |
The editor looks like the bump editor, with a few differences that matter:
- Offer: a simple product or 1 fully defined variation, at a fixed price, a percentage off, an amount off or the regular price.
- Rules: products and categories in the order, the order subtotal and, unlike bumps, the payment method used.
- One per order: when several offers match, the lowest priority number wins.
- Time limit: the offer stays up for 30 minutes after payment by default, and you can set anything from 5 to 1,440 minutes.
- Safe to click twice: each order gets 1 linked order at most, so a double click or a reload never charges twice.
- The linked order: a normal WooCommerce order with its own number and emails, notes on both orders and no extra shipping charge.
- Take rate: shown counts once per order, accepted counts when the linked order is paid, and revenue is that order’s total.
Setup takes the same 3 panels as a bump. You switch on Post-purchase Offers under Stackless → Dashboard, then open Stackless → Post-purchase offers → Add offer. The Post-purchase Offers lesson in the docs walks every field.
If you’re moving from a funnel builder, there’s one thing to know. The module pauses itself while FunnelKit Funnel Builder Pro, CartFlows Pro or One Click Upsell Funnel for WooCommerce is active, because they do the same job. Order Bumps keeps working either way.
The Limits
These are the ceilings today. The changelog is where to look when you want to know whether one has moved.
- No funnel: bumps before payment and 1 offer after it, with no multi-step funnel and no downsell when an offer is declined.
- No A/B test: you can’t run 2 versions of a bump or an offer against each other. You change it and reset the stats.
- Rules: products, categories and subtotal only. There’s no rule by customer role, country, date or past purchases.
- Counts: 1 to 5 bumps per checkout, 1 product per bump, at a quantity the customer can’t change.
- Variable products: need 1 chosen variation. The customer can’t pick the size inside the bump.
- Add-on fields: a product whose add-on fields need an answer isn’t offered as a bump.
- Other currencies: an amount-off discount can’t push the converted price below zero. So the saving shown in another currency can be smaller than the amount you set.
- Revenue: counts only accepts in the store currency. The take rate counts all of them.
- “Shown”: counted on paid orders, so it can’t be read as checkout traffic.
- One-click charges: need a customer account and a saved method from the same gateway. Guests always get the payment page.
- Currencies for one click: Razorpay charges saved methods in Indian rupees only, and Mollie charges saved bank methods in euros only. Other orders go to the payment page.
- Linked orders: are one-time sales, so a post-purchase offer can’t start a subscription. Physical items ship at your cost, because no extra shipping is charged.
FAQs on WooCommerce Order Bumps
Yes. The same 3 placements work on the Checkout block and on the classic checkout. Your checkout page stays the one you already have. On the block checkout the bump travels with the cart data, so it updates without a page reload.
Yes. The product picker accepts a simple product, a subscription product or 1 specific variation. I’d run 1 test order before relying on it, so you can see the renewal priced the way you expect.
The bump stays active and is hidden at checkout until stock returns. There’s nothing to switch back on, and the counts carry on from where they were.
Yes. The Post-purchase Offers module shows 1 offer on the thank-you page. It charges the saved payment method for orders paid with Stripe, PayPal, Square, Mollie or Razorpay, and opens a payment page for everything else.
No. Bumps show on the checkout page only, in 1 of 3 placements. If you want a link that fills the cart and opens checkout with a coupon applied, the Buy Links module in Stackless does that.
Order Bumps does. Post-purchase Offers pauses itself while FunnelKit Funnel Builder Pro, CartFlows Pro or One Click Upsell Funnel for WooCommerce is active, so 2 plugins never put an offer on the same thank-you page.
No. The quantity is the one you set on the bump, from 1 to 99. The customer can only remove the offer. If you want a choice of quantities, I’d offer the product at its regular price and leave the quantity to the product page.
Final Remarks
If the job is 1 offer at checkout on a store you already run, I’d switch on Order Bumps and write 1 bump against the category your best sellers live in. Then I’d read the take rate after a month of paid orders. Once that bump earns, Post-purchase Offers is the next thing I’d try, with a bigger item on the thank-you page.
If you need multi-step funnels, downsells or A/B tests, FunnelKit or CartFlows is the better buy, along with their checkout. And if one is already installed and earning, I’d leave it alone until renewal. Until then, you can watch both Stackless offers work on the demo store before you spend anything.
Tell Google you want more of this.
Add Gaurav Tiwari as a preferred sourceOne tap, and this site shows up more often in your own Top Stories, AI Overviews and AI Mode. Remove it any time.
Disclaimer: This site is reader-supported. If you buy through some links, I may earn a small commission at no extra cost to you. I only recommend tools I trust and would use myself. Your support helps keep gauravtiwari.org free and focused on real-world advice. Thanks. - Gaurav Tiwari