How to Start a Blog in 2026: Step-by-Step Guide
You don’t need many reasons to start a blog. One is enough. Starting a blog is easy. You’ll see how easy in the next few sections. Growing it is hard. That’s where mindset matters.
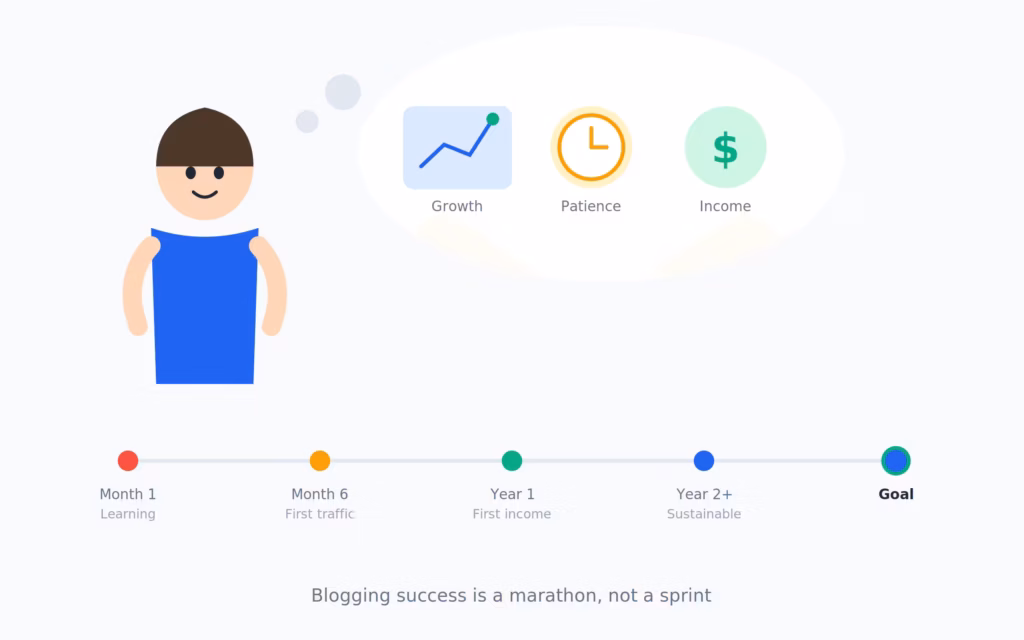
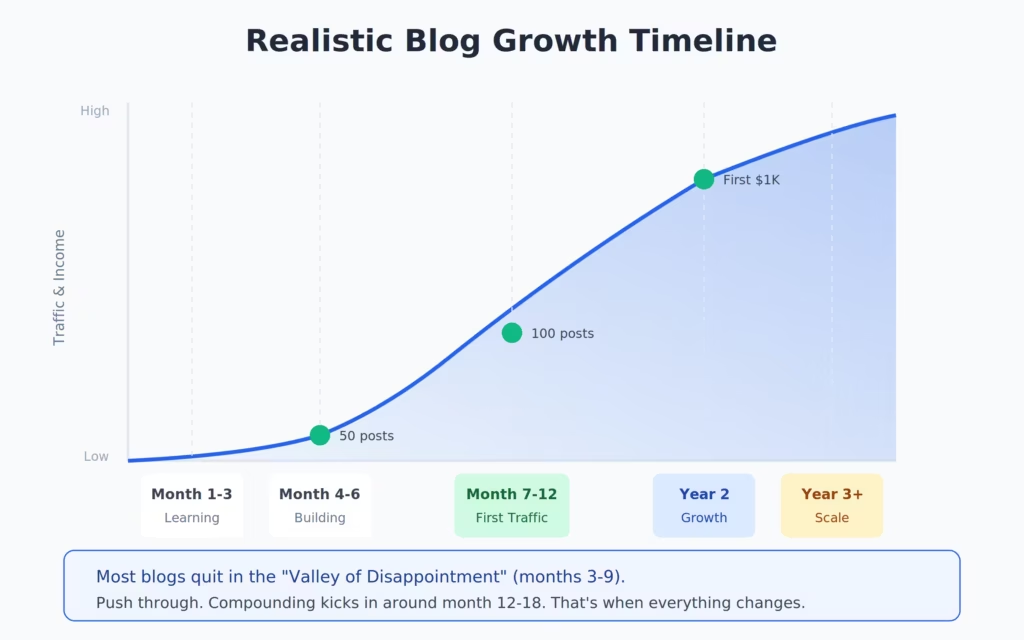
You’ll invest time, money, and mental energy into your blog. Some months, nothing will work. Traffic will flatline. Revenue will disappoint. That’s normal. Success in blogging takes time. But once momentum builds, the results compound.
My first real income took 3 years. But once I started earning, income jumped 2X, 3X every year. Now I make close to 7 figures in USD from blogging and related activities.
Note: “Related activities” includes affiliate marketing and email marketing built on the blog’s audience.
The actual trick? Proper keyword research and content that genuinely helps people. Everything else follows from those two things.
I’ve been blogging since 2008 and building websites since 2009. I’ve worked with 800+ clients, shipped WordPress plugins with thousands of users, and published 1,800+ articles. This guide is everything I know about starting a blog, distilled into one page. No fluff. Just what works.
Pick a niche you can write 100 posts about. Get ScalaHosting or WPX for hosting. Install WordPress with GeneratePress theme and Rank Math for SEO. Write 30 keyword-targeted posts. Promote through search and email. Total first-year cost: $100-250. Time to first income: 6-18 months for most people.
Why Blogs Still Work
“Blogging is dead” is something people have said every year since 2010. And every year, bloggers keep earning. The data says otherwise:
- There are over 600 million blogs on the internet
- 77% of internet users read blogs regularly
- Businesses with blogs get 67% more leads than those without
- The average blogger income among full-time professionals is $45,000-75,000/year
I’ve earned over $650,000 in affiliate commissions alone. That’s not counting ad revenue, sponsored content, or client work that came through the blog. Blogs work because they compound. A post you write today can generate traffic and income for 5-10 years.
The key difference between bloggers who earn and bloggers who quit: the earners treat it like a business from day one. They pick topics people search for. They write content that answers real questions. And they stick with it past the 6-month mark when most people give up.
Related: Best Ways to Make Money Online (if you want more ideas beyond blogging)
What is a Blog?
A blog is a website where you publish articles (called “posts”) on a regular basis. Posts are displayed in reverse chronological order, newest first. That’s the technical definition.
In practice, a blog is your platform. It’s where you build authority on a topic, attract readers through search engines and social media, and eventually turn that audience into income. You own the content. You own the audience data. You control the monetization. Unlike YouTube or Instagram, nobody can change an algorithm and wipe out your business overnight. Your blog lives on your domain, on your hosting, under your control. Also see my best web hosting services.
Most successful blogs today run on WordPress, which powers 43% of all websites. That’s what I’ll walk you through in this guide.
Why Start a Blog?
People start blogs for different reasons. There are real reasons why blogging is a career worth having. The common ones I see among the bloggers who actually stick with it:
- Income: Affiliate commissions, ad revenue, sponsored posts, digital products. I’ve seen bloggers go from $0 to $5,000/month within 18 months.
- Authority: A blog makes you the expert in your niche. Clients, speaking gigs, partnerships all come from published expertise.
- Audience: You build a direct relationship with readers. Email lists built from blog traffic are worth $1-3 per subscriber per month.
- Freedom: You write when you want, from wherever you want. My blog earns while I sleep.
- Creative outlet: Some people just need a place to share what they know. That’s enough.
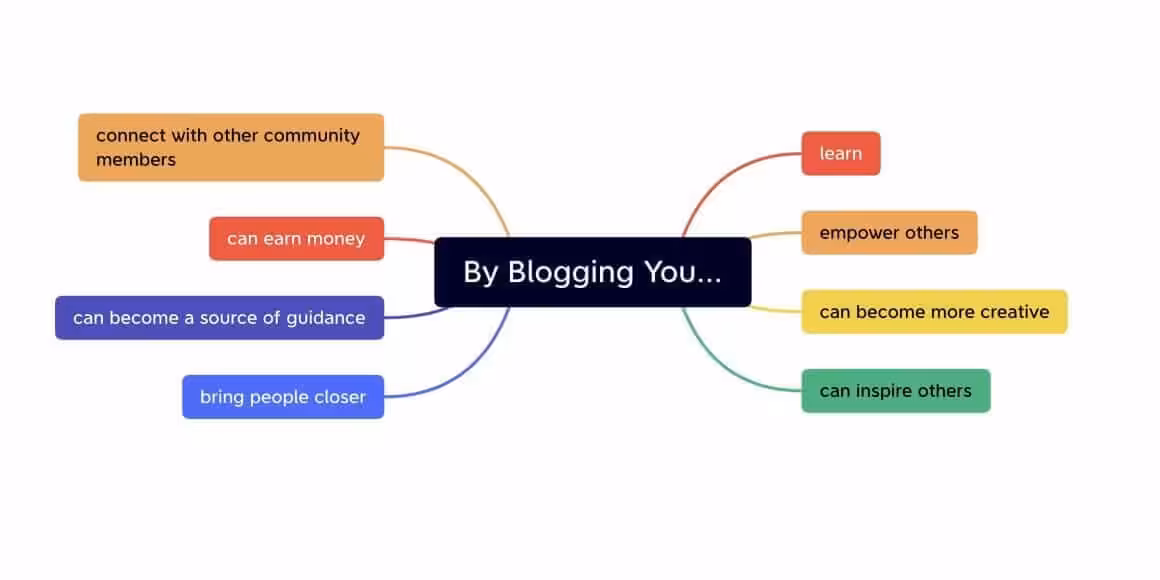
You don’t need all five. One strong reason will carry you through the hard months. For me, it was income. I wanted to stop trading hours for money. The blog made that possible.
How to Start a Blog
Here’s the step-by-step process. I’m going to walk through exactly what I’d do if I were starting from scratch today.
Pick a Niche
Your niche is the topic your blog covers. This single decision affects everything: your content strategy, monetization potential, competition level, and how quickly you’ll grow.
Don’t pick something because it’s “profitable.” Pick something you can write 100 posts about without getting bored. Then check if people are searching for it.
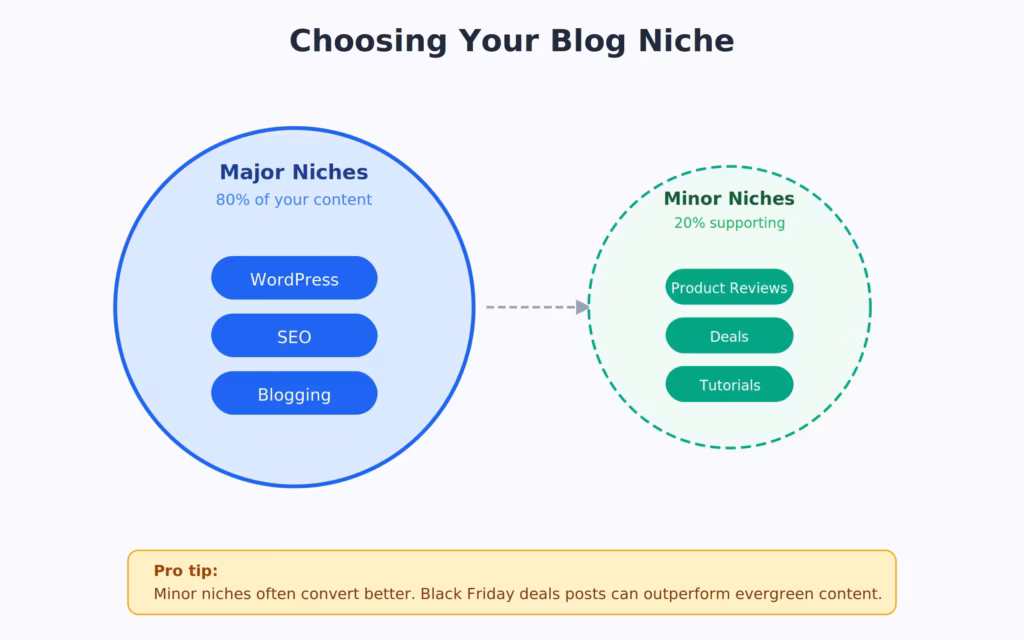
Major vs Minor Niches
Major niches are broad categories: personal finance, health, technology, travel, food. They have massive traffic potential but brutal competition. You’ll need 200+ posts and 2+ years to see results.
Minor niches are focused subsets: budget travel for families, keto meal prep for busy parents, WordPress performance for developers. Less traffic, but you can rank faster and the audience is more engaged. I always recommend starting with a minor niche and expanding later.
How to Validate a Niche
Before committing, check three things:
- Search volume: Use Semrush or Google Keyword Planner. Your niche should have at least 20-30 keywords with 500+ monthly searches.
- Monetization: Can you sell affiliate products, run ads, or create digital products? If there’s no money in the niche, it’s a hobby, not a business.
- Competition: Google your target keywords. If every result is from a massive brand (Forbes, Healthline, NerdWallet), pick a narrower angle.
My blogging niche started narrow (WordPress tutorials) and expanded into broader digital marketing over time. Start focused. Grow later.
Deep dive: How to Choose a Profitable Niche for Your Blog
Choose Your Domain Name
Your domain name is your blog’s address. Keep it short, memorable, and easy to spell. Avoid hyphens, numbers, and anything that’s hard to say out loud.
Tips that actually matter:
- .com is still king. Don’t settle for .net or .info. If the .com isn’t available, pick a different name.
- Brandable > keyword-stuffed. “gauravtiwari.org” beats “best-wordpress-tips-blog.com” every time.
- Say it out loud. If you have to spell it for someone, it’s too complicated.
- Check social media availability. Your domain name should be available as a handle on Twitter/X and Instagram.
I buy all my domains through Namecheap, one of the best domain registrars around. Domains cost about $10-15/year. Don’t fall for the hosting companies that offer “free” domains bundled with hosting. The renewal price is always 2-3x higher.
See: Top 10 Free Business Name Generator Tools
Pick Your Hosting
Hosting is where your blog lives on the internet. Bad hosting means slow pages, downtime, and frustrated visitors who leave before reading a word. Good hosting means fast load times, reliable uptime, and room to grow.
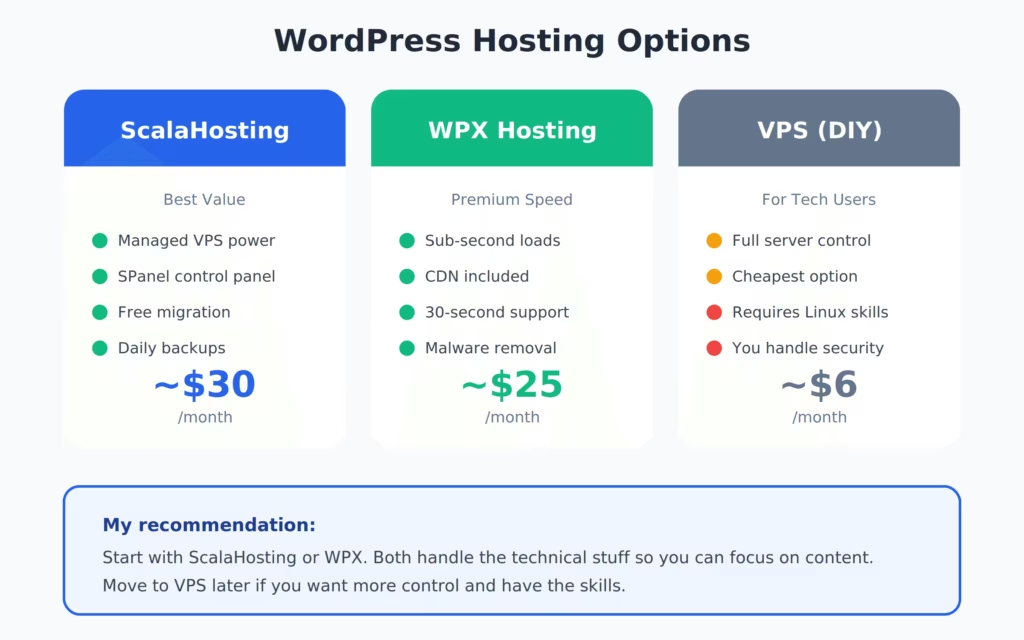
I’ve tested dozens of hosting companies over 16 years. Two stand out for new bloggers:
- SPanel control panel (no cPanel fees)
- SShield security blocks 99.998% of attacks
- Dedicated VPS resources from $14.95/mo
- Free website migration and daily backups
ScalaHosting gives you VPS-level performance at shared hosting prices. Their SPanel replaces cPanel entirely, which saves you money and gives you more control. I moved two of my sites to Scala last year and saw a 40% improvement in server response times. For new bloggers who want room to grow without paying premium prices, this is my top pick.
- Average response time under 200ms
- Custom CDN included (37 global edge locations)
- 30-second average support response time
- Free unlimited site migrations
WPX is what I use for gauravtiwari.org. It’s fast, the support team responds in 30 seconds (not an exaggeration, I’ve timed it), and the included CDN means your blog loads fast everywhere. It costs a bit more than ScalaHosting, but if you want the best WordPress hosting experience without thinking about server management, WPX is it.
If you’re on a tight budget, Bluehost starts at $2.95/month and is decent for brand-new blogs. Just know you’ll outgrow shared hosting within 12-18 months if your blog gains traction.
- From $14.95/month
- Managed VPS (dedicated resources)
- SPanel + SShield security
- Free migration + daily backups
- Best for: bloggers who want VPS power at shared prices
- From $20.83/month
- Managed WordPress hosting
- Custom CDN + 37 edge locations
- 30-second support response
- Best for: bloggers who want hands-off speed
- From $2.95/month
- Shared hosting
- Free domain for 1 year
- 1-click WordPress install
- Best for: brand-new bloggers on a tight budget
Full comparison: Complete WordPress Hosting Comparison
Test Before You Commit
Before spending money on hosting, you can test WordPress for free. I recommend this if you’ve never touched WordPress before. Play around with the dashboard, try installing a theme, create a test post. Get comfortable.
| Feature | ScalaHosting | WPX Hosting | Bluehost |
|---|---|---|---|
| Starting Price | $14.95/mo | $20.83/mo | $2.95/mo |
| Hosting Type | Managed VPS | Managed WordPress | Shared |
| Dedicated Resources | ✓ Full VPS isolation | ✓ Managed environment | ✗ Shared with other sites |
| Free CDN | ✗ Add Cloudflare free | ✓ Custom CDN (37 locations) | ✗ Add Cloudflare free |
| Free Migration | ✓ | ✓ Unlimited | ✓ 1 site |
| Daily Backups | ✓ | ✓ | ✗ Paid add-on |
| Control Panel | SPanel (custom) | Custom dashboard | cPanel |
| Security | SShield (99.998% block rate) | DDoS protection + malware removal | Basic SSL + SiteLock (paid) |
| Support Speed | Live chat (minutes) | 30-second avg response | Live chat (varies) |
| Best For | Growing blogs | Speed-focused bloggers | Tight budgets |
| My Rating | ★★★★★ | ★★★★★ | ★★★☆☆ |
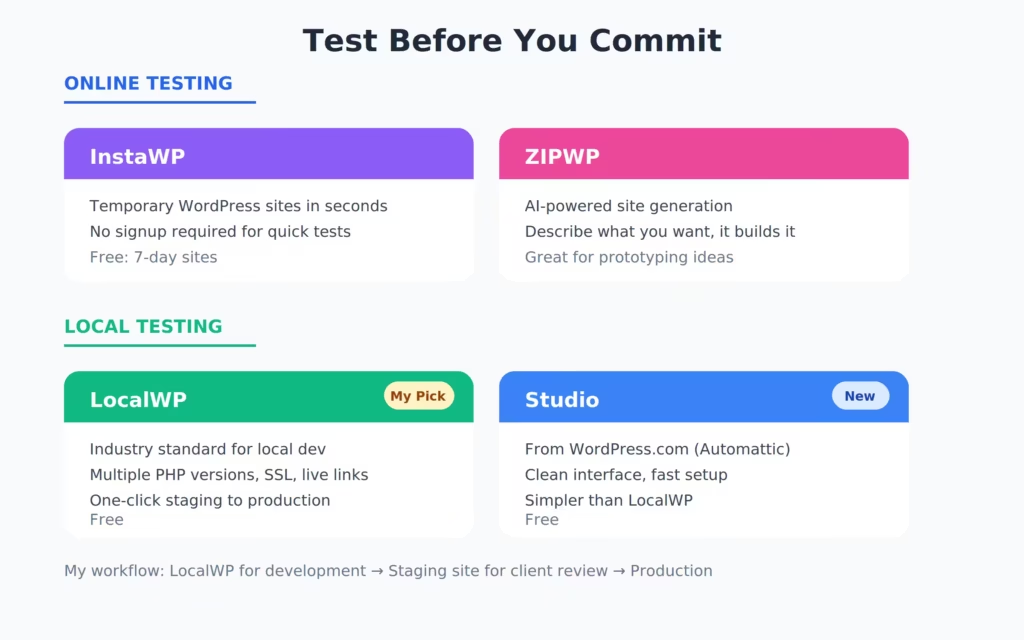
Online Testing Tools
- InstaWP — Spin up a disposable WordPress site in seconds. No signup needed. My go-to for testing plugins and themes.
- ZIPWP — AI-powered WordPress site generator. Creates a full site from a description.
- Studio by WordPress.com — Official WordPress testing environment.
Local Testing Tools
- LocalWP — The best local WordPress development tool. Free. Runs WordPress on your computer.
Spend an afternoon testing. It’ll save you frustration later.
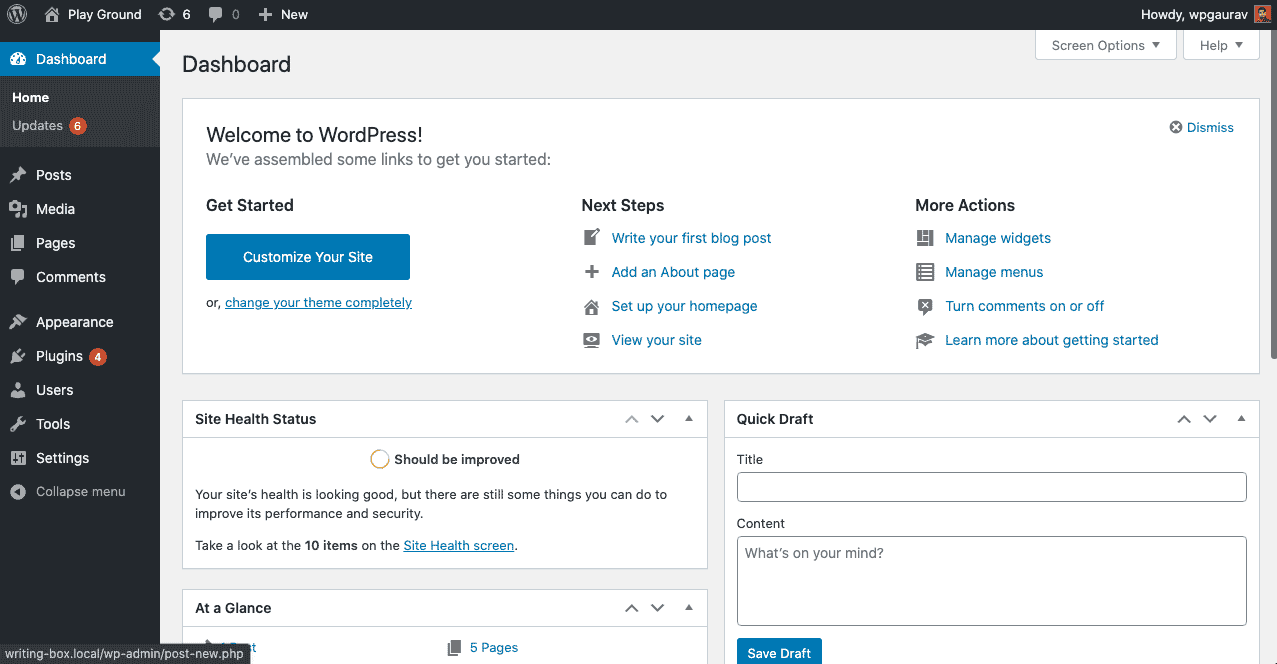
Set Up Your WordPress Site
Once you’ve purchased hosting, WordPress installation takes about 5 minutes. Every hosting company I recommended above offers 1-click WordPress installation.
After installing, log in to your WordPress dashboard at yourdomain.com/wp-admin. You’ll see a standard dashboard with menus on the left side: Posts, Pages, Appearance, Plugins, Settings.
Do these things immediately:
- Settings > Permalinks: Change to “Post Name.” This makes your URLs clean and SEO-friendly (
yourblog.com/post-titleinstead ofyourblog.com/?p=123). - Settings > General: Set your site title and tagline.
- Settings > Reading: Set “Your homepage displays” to “Your latest posts” (you can change this later).
- Delete default content: Trash the “Hello World” post and “Sample Page.” They’re useless.
- Settings > Discussion: Uncheck “Allow people to submit comments on new posts” if you don’t want comments. I turned mine off years ago, zero regret.
Understanding Your Dashboard
WordPress can look overwhelming at first. It isn’t. You’ll use about 20% of the dashboard for 80% of your work:
- Posts: Where you write and manage blog articles
- Pages: For static pages like About, Contact, Privacy Policy
- Appearance > Themes: Where you install and customize your theme
- Plugins: Where you add functionality
- Settings: Site-wide configuration
Don’t touch anything in “Tools” yet. Ignore “Customize” until you’ve picked a theme. And don’t install 20 plugins on day one. Keep it minimal.
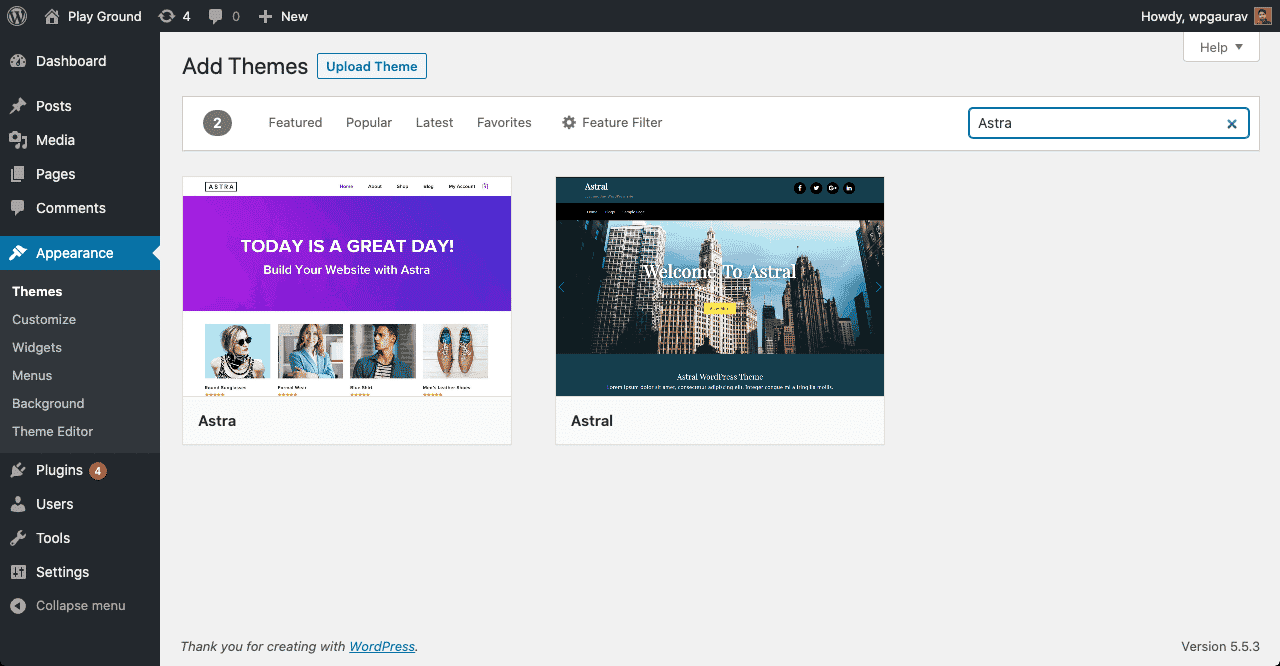
Install a Proper Theme
Your theme controls how your blog looks. Pick one that’s fast, well-coded, and easy to customize. Don’t pick one because it has flashy demos. Those demos are built with dozens of plugins and won’t look like that out of the box.
My theme stack for the past 4 years:
- Under 30KB page size (lightest WordPress theme)
- 100/100 Google PageSpeed scores out of the box
- Full Site Editing support with clean code output
- $59/year for up to 500 sites
GeneratePress is the fastest WordPress theme I’ve tested. Period. It outputs clean HTML, loads in under 30KB, and scores 100/100 on Google PageSpeed without any optimization. I’ve used it on my own sites and for dozens of client projects. It just works.
Other solid options if GeneratePress isn’t your style (see my full list of free blogging themes for new bloggers):
- Astra — Most popular lightweight theme. Great starter templates. Free version is capable.
- Kadence — Strong free version with a modern design system. Good for beginners who want more visual control.
- Blocksy — Newer theme with impressive customization. Best free theme for WooCommerce blogs.
Don’t spend more than a day picking a theme. They all look good with proper content. Your content matters more than your design.
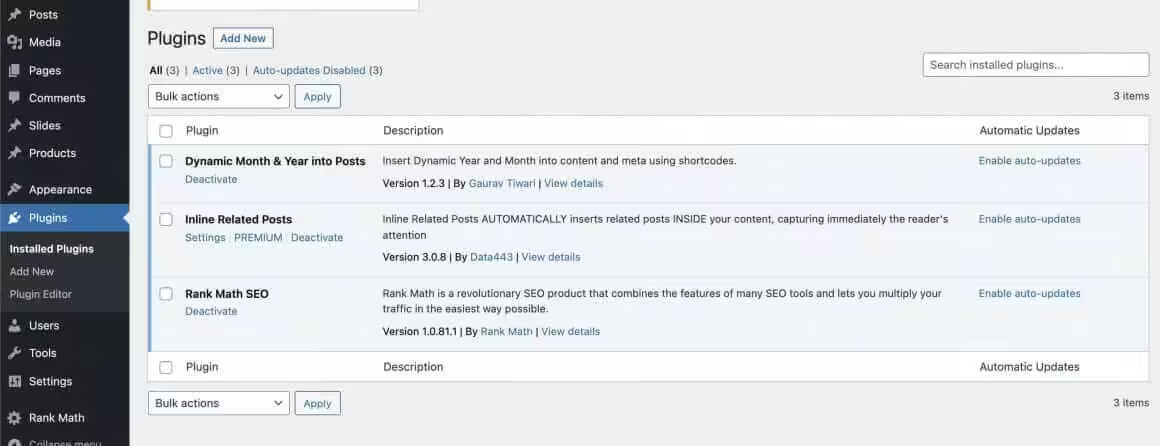
Install Essential Plugins
Plugins add functionality to WordPress. You need a few good ones, not fifty mediocre ones. Every plugin you install adds code to your site, which means more potential for conflicts, security holes, and slower load times. My rule: if I can do it without a plugin, I skip the plugin.
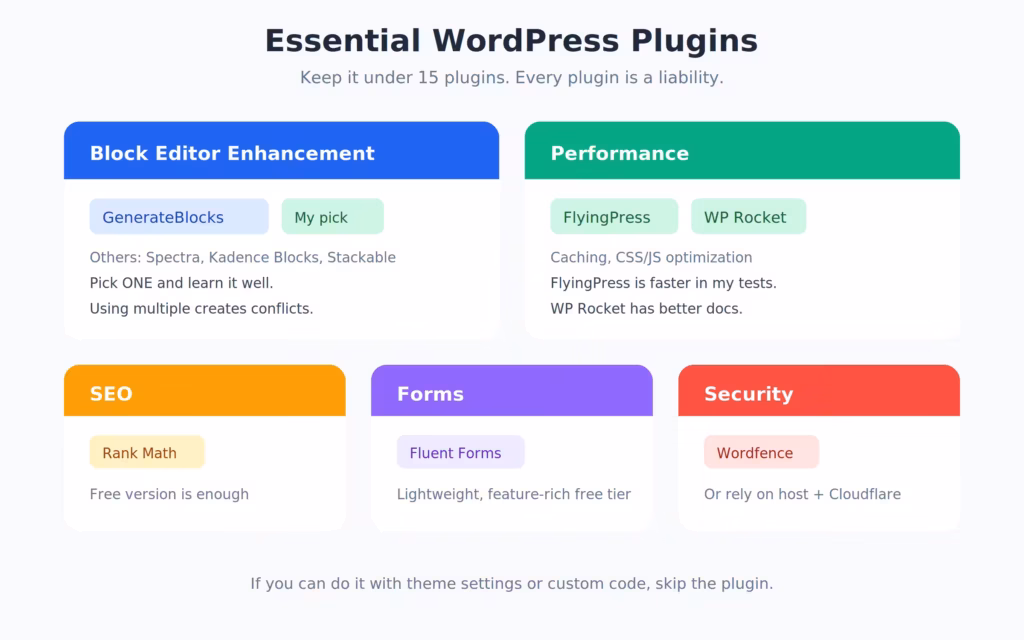 WordPress plugins infographic showing the five categories of plugins every new blog needs: SEO, caching, forms, blocks, and backups” class=”wp-image-1147484″/>
SEO Plugin
- Free version covers everything a new blogger needs
- Built-in schema markup, sitemap, and redirect manager
- AI-powered SEO suggestions (Pro)
Rank Math is the SEO plugin I use on every site. The free version handles everything a new blogger needs: meta titles, descriptions, sitemaps, schema markup, and content analysis. I switched from Yoast three years ago and haven’t looked back. It’s faster, has more features in the free tier, and the interface is cleaner.
Caching Plugin
A caching plugin stores pre-built versions of your pages so they load instantly. Skip this for the first month while you’re setting things up. When you’re ready:
- WP Rocket — Easiest to configure. Install, activate, done. Worth the $59/year if you don’t want to think about caching settings.
- FlyingPress — Slightly faster than WP Rocket once configured. My personal choice. Requires 15-20 minutes of setup.
Read my full caching plugin comparison if you want the details.
Form Plugin
You’ll need a contact form at minimum. Fluent Forms is the lightest option I’ve found. The free version handles contact forms, newsletter signups, and basic surveys. Don’t install a bloated form builder when all you need is a contact page.
Block Editor Plugins
The WordPress block editor (Gutenberg) is good out of the box. If you want more design control:
- GenerateBlocks — My pick. Adds container, headline, button, and image blocks with full CSS control. Lightweight. Works perfectly with GeneratePress.
- Kadence Blocks — More beginner-friendly with pre-built sections. Good if you want drag-and-drop simplicity.
Other Plugins to Consider
- Akismet — Spam protection for comments (if you enable comments)
- UpdraftPlus — Free backup plugin. Set it to backup weekly to Google Drive or Dropbox.
- Redirection — Free. Manages 301 redirects when you change URLs.
- A WordPress security plugin — Wordfence or Sucuri for firewall and malware scanning.
That’s it. 6-8 plugins total. Don’t install more unless you have a specific need. Check my full list of Gutenberg block plugins if you want more editor options.
See: My complete list of recommended tools and plugins
Set Up Analytics
You can’t improve what you don’t measure. Set up two things on day one:
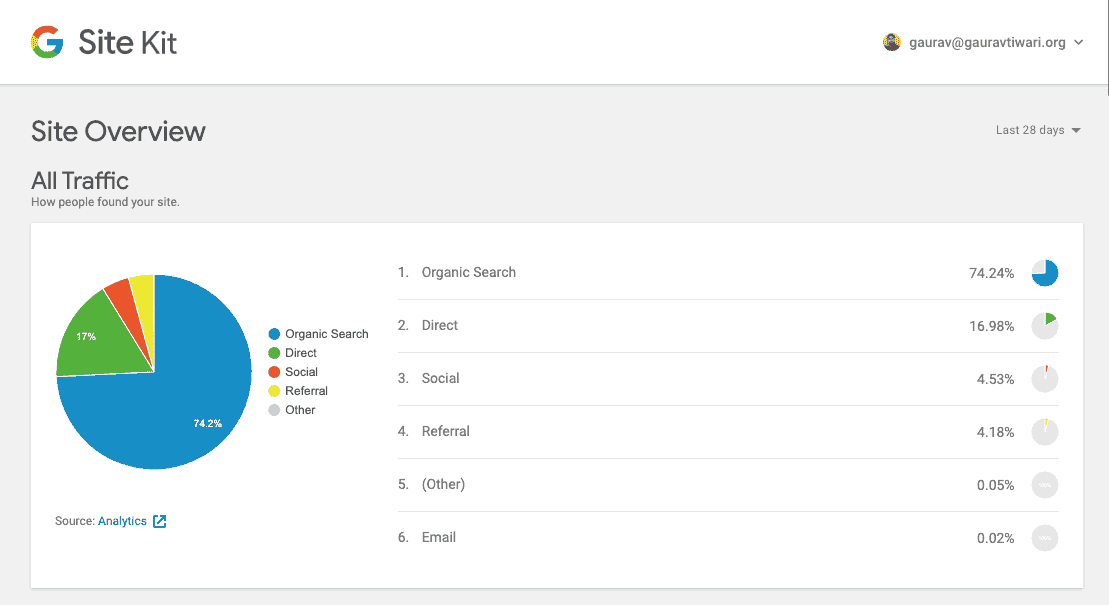
Google Analytics 4 (GA4): Tracks who visits your site, where they come from, and what they do. Install it through the Site Kit plugin (free, by Google) or add the tracking code manually in your theme settings.
Google Search Console: Shows which keywords bring people to your site, your average position in search results, and any technical problems Google finds. This is more useful than Analytics for bloggers because it tells you exactly what Google thinks about your content.
Connect both to your blog and check them weekly. Don’t obsess over daily numbers. Weekly trends tell a more accurate story.
Step-by-step: Complete Google Search Console Setup Guide
Critical Setup Steps
Don’t skip these. Every one of them affects either your security, your SEO, or your ability to grow:
- Install an SSL certificate. Most hosting companies include this free. Your site should load on
https://, nothttp://. Google penalizes non-SSL sites, and browsers show “Not Secure” warnings that scare visitors away. - Set up automated backups. Your hosting may include this. If not, install UpdraftPlus and schedule weekly backups to cloud storage. I’ve seen bloggers lose months of work because they had no backup. Don’t be that person.
- Create essential pages. You need About, Contact, and Privacy Policy pages before publishing your first post. These build trust with both readers and search engines. Google wants to see that a real person runs the site (this is part of their E-E-A-T framework).
- Submit your sitemap to Google. Go to Google Search Console, click “Sitemaps,” and submit
yourdomain.com/sitemap_index.xml(Rank Math generates this automatically). This tells Google your blog exists and where to find your content. - Set up a professional email. Use
hello@yourdomain.cominstead of a Gmail address. Most hosting includes free email. It costs nothing and makes you look serious.
What to Write (And What to Avoid)
Not all blog content is created equal. Some types of posts attract search traffic consistently. Others get a brief spike and die. After 1,800+ published articles (and plenty of amateur blogging mistakes early on), I can tell you exactly what works.
Content types that consistently perform:
- How-to guides: “How to set up WordPress multisite” — people search for problems, and how-to posts answer them directly.
- Listicles: “10 best WordPress caching plugins” — these rank well, earn affiliate income, and readers love scanning numbered lists.
- Comparisons: “WP Rocket vs FlyingPress” — people search these when they’re about to buy. High-intent traffic.
- Tutorials: Step-by-step walkthroughs with screenshots. Time-consuming to create, but they build serious authority and rank for years.
- Product reviews: Honest, detailed reviews with pros and cons. Not the fake “everything is amazing!” kind.
Content types to avoid (especially early on):
- Opinion pieces without data. Nobody cares about your opinion on AI until you have authority. Earn it first.
- News and trends. These get a traffic spike and die in a week. Unless you’re a news blog, skip them.
- Overly personal posts. “My week in review” is a diary, not content strategy. Save personal updates for your newsletter.
- Posts targeting zero-volume keywords. If nobody’s searching for it, nobody will find it. Check search volume first, always.
Finding Topics to Write About
You don’t need inspiration. You need data. Here’s my process for finding blog topics that actually get traffic:
Step 1: Keyword research. Open Semrush (or any keyword tool). Enter your niche topic. Look for keywords with 500+ monthly searches and a keyword difficulty under 30 (if your blog is new). That’s your sweet spot: enough traffic to matter, low enough competition to rank.
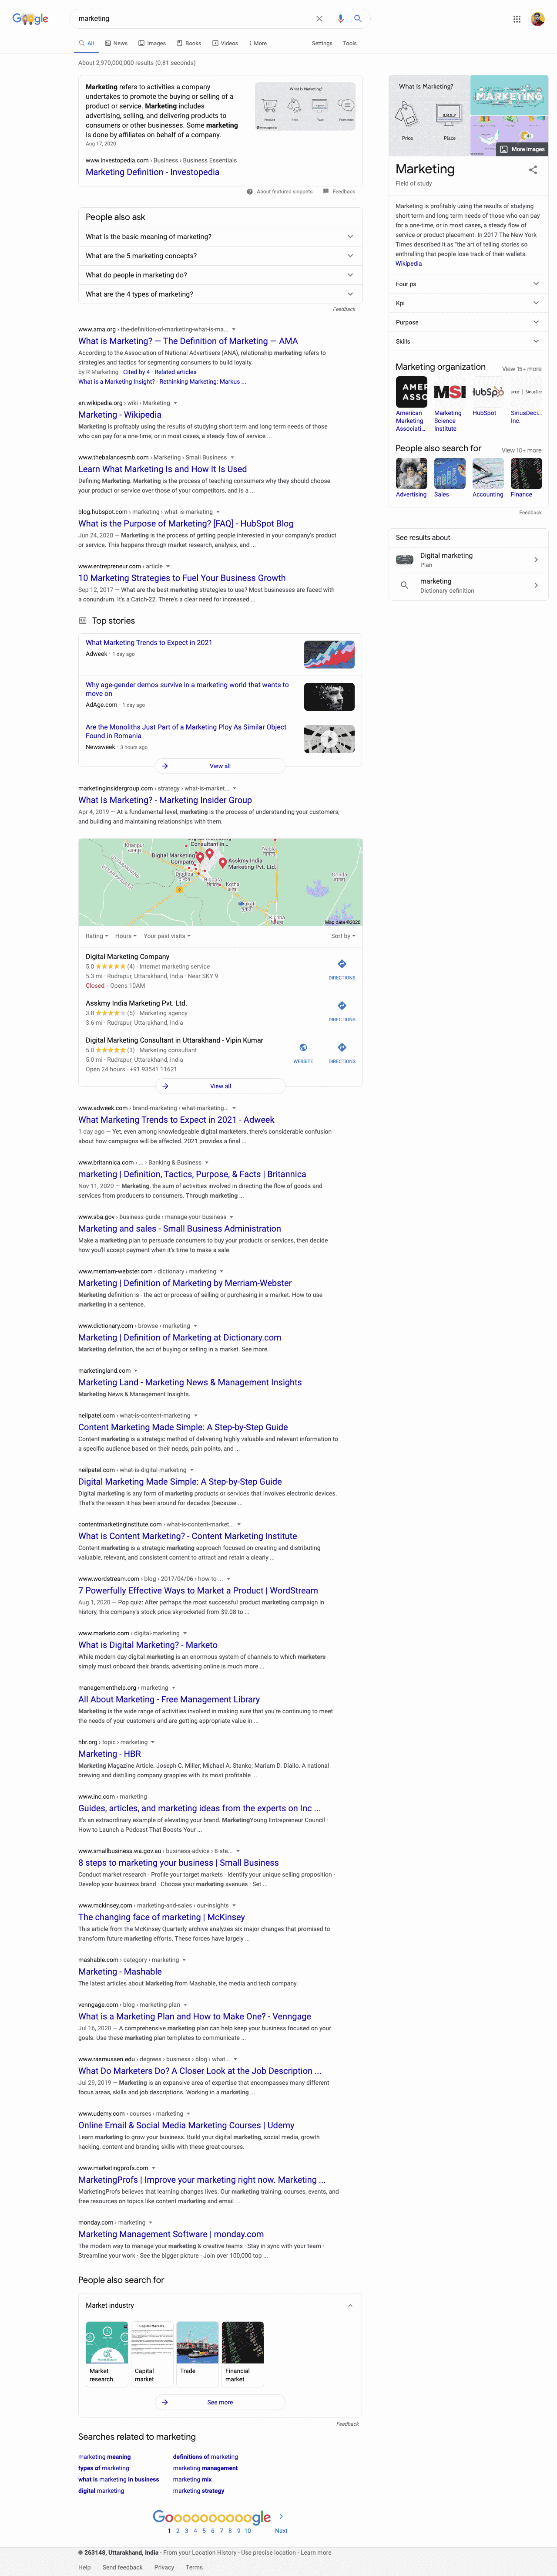
Step 2: Google autocomplete. Start typing your niche topic into Google. Watch the suggestions drop down. Each suggestion is a real search query. Type “WordPress” and you’ll see “WordPress hosting,” “WordPress themes,” “WordPress tutorial.” Each of those is a potential blog post.
Step 3: Check “People Also Ask.” Search any topic and expand the “People Also Ask” boxes in Google results. These are questions your readers are asking. Answer them as blog posts or as sections within a larger post.
Step 4: Competitor analysis. Find 3-5 blogs in your niche. Plug them into Semrush or Ahrefs. Look at their top-performing pages. What topics bring them the most traffic? Write better versions of those posts.
Step 5: Reader questions. If you have any audience (even 10 email subscribers), ask what they’re struggling with. Reader questions are content gold because you know the demand is real.
I batch this process once a month. I spend 2-3 hours finding 10-15 topics, create outlines, and then write them throughout the month. Batching beats sporadic brainstorming every time.
Related: 25 Blog Post Ideas That Actually Drive Traffic
75 Profitable Blog Niches
Choosing a niche is one of the hardest decisions for new bloggers. I’ve grouped these into three categories based on what I’ve seen work over 16 years. High RPM niches earn more per visitor through ads and affiliates. High traffic niches get lots of readers but earn less per visitor. Evergreen niches have consistent year-round demand.
High RPM Niches ($$$ per visitor): Personal finance, investing, insurance, credit cards, SaaS tools, web hosting, VPN services, legal topics, real estate, mortgage, cybersecurity, B2B software, forex/crypto trading, online business, tax planning
High Traffic Niches (volume play): Recipes/cooking, travel, fashion, entertainment, celebrity news, gaming, sports, DIY/crafts, parenting, pets, relationships, self-improvement, photography, music, movies/TV
Evergreen Niches (consistent demand): Health/fitness, technology tutorials, WordPress/blogging, education/study tips, career advice, home improvement, gardening, personal development, coding/programming, marketing, freelancing, remote work, writing, meditation/mindfulness, productivity
Best niches for beginners (based on competition + monetization balance): WordPress tutorials, personal finance for millennials, niche cooking (keto, air fryer, meal prep), pet care for specific breeds, budget travel for couples, SaaS tool reviews, home office setup, study tips for specific exams, plant care, and running/fitness for beginners.
If you want a complete breakdown with traffic data and monetization strategies for each one, check my 130+ profitable niches list.
Writing Content That Ranks
Writing well and writing for search engines aren’t the same thing, but they overlap more than people think. Google wants to show the best answer to a searcher’s question. If you write the best answer, you’ll rank.
Here’s what “best answer” means in practice:
Match search intent. When someone searches “best WordPress hosting,” they want a comparison list, not a 3,000-word essay about what hosting means. Check what currently ranks for your target keyword. Match that format. My content optimization guide covers this in detail.
Use your keyword naturally. Put your primary keyword in the title, the first paragraph, one H2, and the meta description. Don’t stuff it everywhere. Google is smarter than that, and readers can feel when content is written for robots.
Structure for scanning. Use H2 and H3 headings. Use short paragraphs (3-5 sentences max). Use bullet points for lists. Bold key phrases. Most readers scan before they read, so make your content scannable.
Go deeper than competitors. If the top-ranking post covers 5 hosting companies, cover 10. If they have 1,500 words, write 3,000 better words. Not longer for the sake of length. More detailed, more specific, more helpful.
Add internal links. Every post should link to 3-5 other posts on your blog. This helps Google understand your site structure and keeps readers on your site longer. I link to related posts naturally within the text, not in a “related posts” widget at the bottom.
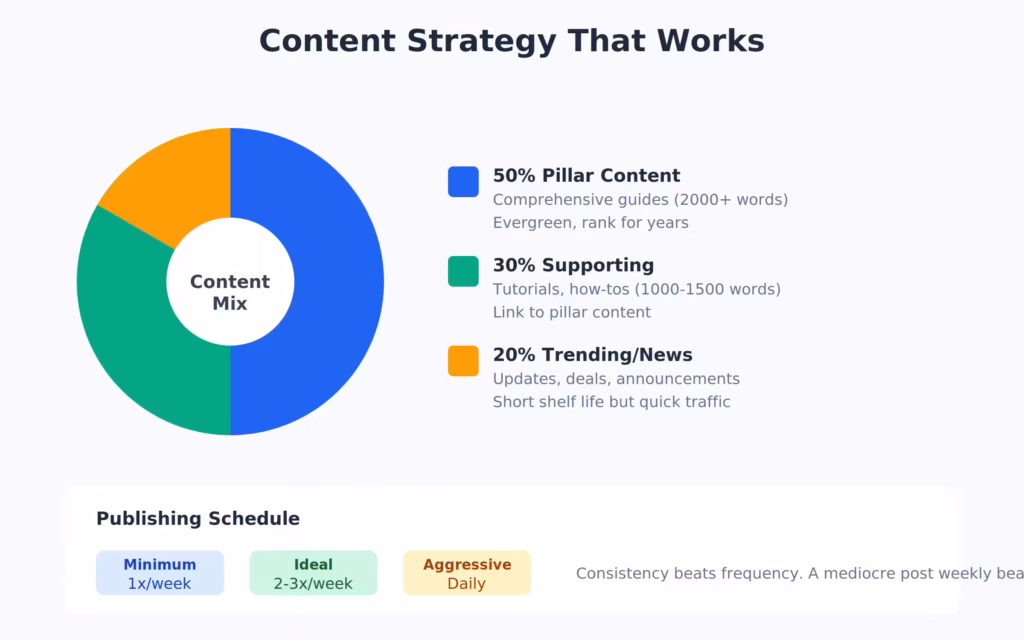
Write a longer, detailed article when the topic demands it. Short posts work for simple questions. But for “pillar” content that you want to rank for competitive keywords, 2,000-5,000 words is the range that performs best in my experience.
AI and the Future of Blogging
AI won’t kill blogging. But it will kill lazy blogging.
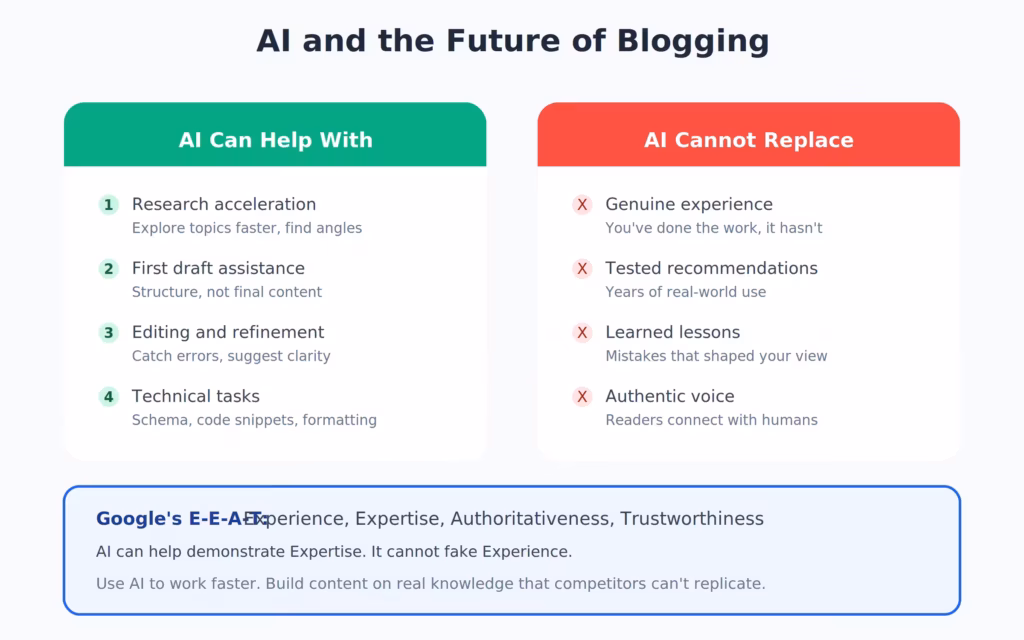
I use AI writing tools every day. Claude helps me outline posts, brainstorm angles, and edit drafts. But AI can’t replace the specific opinions, real-world experience, and hard-won perspective that makes content worth reading. An AI can write “10 best hosting companies” in 30 seconds. It can’t tell you that WPX support responded to a critical server issue at 2am on a Saturday. That’s lived experience. That’s what readers trust.
What AI changes about blogging:
Content production speeds up. You can publish more, faster. But “more” only matters if each piece is genuinely good. I’d rather publish 2 excellent posts per week than 10 AI-generated posts that read like every other blog.
Quality floor rises. When anyone can generate a 2,000-word article in minutes, the minimum standard for “good content” goes up. You need original data, personal experience, unique angles, or superior depth to stand out.
Google is adapting. The search engine is increasingly rewarding content that shows first-hand experience (the “E” in E-E-A-T). Content written from a chair by someone who’s never done the thing they’re writing about will rank less. Content by practitioners will rank more.
My approach: I use AI for research, outlining, and first-draft acceleration. The voice, opinions, specific examples, and final polish are all mine. Every fact gets verified. Every recommendation comes from personal use. If I haven’t tested something myself, I say so.
The bloggers who’ll thrive in an AI world are the ones who have something AI can’t generate: real experience, specific expertise, and authentic opinions backed by evidence. If that’s you, blogging hasn’t been this exciting in a decade.
Promoting Your Content
Publishing a blog post is the start, not the finish. New blogs don’t have Google authority yet. Your first 20-30 posts won’t get much search traffic. You need to promote actively while your SEO builds.
Search engine optimization (SEO): This is your long game. Keyword-targeted content with proper on-page SEO will bring organic traffic within 3-6 months. SEO traffic is the best kind: it’s free, it’s consistent, and it compounds. But it takes time. Don’t expect results in week one.
Email marketing: Start building your email list from day one, even if you only have 5 subscribers. An email list is the only audience you truly own. Use Kit (ConvertKit) for email. It’s free for up to 10,000 subscribers and built specifically for bloggers. Send a weekly email with your latest post. That’s enough to start.
Social media: Pick one platform where your audience hangs out. Don’t try to be everywhere. For B2B/professional niches, LinkedIn works well. For lifestyle/visual niches, Instagram or Pinterest. For tech, Twitter/X. Share your posts, but also engage with others in your niche. Comment on their content. Share their work. Relationships lead to backlinks and referral traffic.
Online communities: Reddit, Quora, and niche forums have active communities for almost every topic. Don’t spam your links. Answer questions genuinely and link to your post only when it adds real value. I’ve gotten some of my best early traffic from Quora answers that linked back to detailed blog posts.
Guest posting: Write articles for other blogs in your niche with a link back to your site. This builds backlinks (which help SEO) and puts you in front of an existing audience. I’ve compiled a list of 700+ guest posting sites to help you find opportunities. Start with smaller blogs that accept contributors. Quality beats quantity here.
Deep dive: Email Marketing for Beginners
Improving Your Blog Over Time
A blog is never “done.” The bloggers who earn consistently are the ones who keep improving. Here’s where to focus your effort after the initial setup.
Speed Up Your Site
Page speed affects both user experience and search rankings. Aim for under 2 seconds load time.
- Install a caching plugin (WP Rocket or FlyingPress)
- Compress images before uploading (use ShortPixel or Imagify)
- Use a WordPress CDN (Cloudflare’s free plan is enough for most blogs)
- Remove unused plugins and themes
- Choose a lightweight theme (GeneratePress, Astra, or Kadence)
I check my site speed quarterly using Google PageSpeed Insights and GTmetrix. If anything dips below 90/100, I investigate.
Focus on Search
After 3-6 months, check Google Search Console for:
- Keywords you’re ranking on page 2 for. These are the easiest wins. Update those posts with more detail, better structure, and fresh internal links. A bump from position 15 to position 8 can double your traffic for that keyword. Read my guide on content decay for a full process.
- Pages with high impressions but low clicks. Your content ranks but the title/description doesn’t convince people to click. Rewrite your meta title and description.
- Technical errors. Fix broken links, crawl errors, and mobile usability issues.
Build Relationships
Building genuine relationships leads to natural backlinks, guest post opportunities, and referral traffic. Comment on other bloggers’ posts. Share their work on social media. Email them when you genuinely appreciate something they wrote. This isn’t networking strategy. It’s how you build a community around your niche.
Build an Email List
Email marketing is the highest-ROI channel for bloggers. For every $1 spent on email marketing, the average return is $36-42.
Start simple: offer a free resource (checklist, template, mini-guide) in exchange for an email address. Add opt-in forms to your most popular posts. Pick the right platform from the best email marketing software options. Send a weekly email with your latest content and one useful tip. That’s it. Don’t overcomplicate it.
I regret not starting my email list sooner. It took me 4 years to take email seriously. Once I did, it became my most reliable traffic and revenue source.
Making Money From Your Blog
Here’s where things get exciting. Once you have traffic (even 1,000 visitors/month), you can start monetizing.

Display Advertising
The easiest monetization method. You put ads on your site and earn money when people see or click them. Options:
- Google AdSense: No traffic minimum. Pays $1-5 per 1,000 views for most niches. Good for starting out, but you won’t earn much until you hit 10,000+ monthly visitors. See my list of AdSense alternatives when you’re ready to upgrade.
- Mediavine: Requires 50,000 sessions/month. Pays 3-5x more than AdSense. This is the upgrade most bloggers aim for.
- AdThrive (Raptive): Requires 100,000 monthly pageviews. Premium ad network with the highest RPMs.
I used AdSense for my first year. Then Mediavine. The difference in earnings was dramatic, about 4x more for the same traffic.
Affiliate Marketing
You recommend products and earn a commission when readers buy through your link. This is my primary income source ($650K+ lifetime from affiliate marketing alone).
Find products your readers already need. Write honest reviews and comparisons. Disclose your affiliate relationships. Don’t recommend products just because they have high commissions, recommend products you’ve actually used and would recommend to a friend.
Good affiliate programs for new bloggers: Amazon Associates (low commissions but broad), hosting affiliate programs (high commissions, $50-200 per sale), and SaaS tools like Semrush ($200 per referral). Check my list of the best affiliate marketing programs for beginners for more options.
Sponsored Content
Brands pay you to write about their products. This typically requires 10,000+ monthly visitors and strong niche authority. Rates range from $200 to $5,000+ per post depending on your traffic and niche.
I’m selective about sponsors. I only accept brands I’ve personally used or would genuinely recommend. Your readers trust you. Don’t sell that trust for a quick payment.
Digital Products
Create and sell your own products: courses, templates, ebooks, printables, membership sites. This has the highest profit margin (no commission splits) but requires the most upfront work.
I’ve sold WordPress themes, plugins, and consulting packages through my blog. Digital products work best once you have an engaged email list of at least 1,000 subscribers.
Full guide: How to Monetize Your Blog from Day One
How Much Does It Cost to Start a Blog?
This is one of the most common questions I get. The honest answer: you can start a blog for under $100 in your first year. Here’s the actual breakdown:
Minimum budget ($50-100/year):
- Domain name: $10-15/year (Namecheap)
- Hosting: $36-60/year (Bluehost or Hostinger)
- Theme: $0 (free themes like Astra, Kadence, or GeneratePress free)
- Plugins: $0 (Rank Math free, UpdraftPlus free, Fluent Forms free)
Recommended budget ($150-300/year):
- Domain name: $10-15/year (Namecheap)
- Hosting: $180-250/year (ScalaHosting or WPX)
- Theme: $59/year (GeneratePress Premium)
- Caching: $59/year (WP Rocket) or $0 (use host-level caching)
- Email tool: $0 (Kit free plan, up to 10,000 subscribers)
My first year of blogging cost me about $120 total. Domain, shared hosting, and a free theme. I upgraded as my income grew. Don’t overspend before you’re earning. The tools I recommended in the “minimum budget” are genuinely enough to build a profitable blog. I’ve seen bloggers earning $3,000/month on $60/year hosting plans.
| Item | Minimum Budget | Recommended Budget | Notes |
|---|---|---|---|
| Domain Name | $10-15/yr | $10-15/yr | Namecheap. Avoid “free” bundled domains. |
| Web Hosting | $36-60/yr | $180-250/yr | Bluehost (min) vs ScalaHosting/WPX (rec) |
| WordPress Theme | $0 | $59/yr | Free Astra/Kadence (min) vs GeneratePress Premium (rec) |
| SEO Plugin | $0 | $0 | Rank Math free covers everything for new blogs |
| Caching Plugin | $0 | $0-59/yr | Host-level caching (min) vs WP Rocket/FlyingPress (rec) |
| Email Marketing | $0 | $0 | Kit (ConvertKit) free up to 10,000 subscribers |
| Backup Plugin | $0 | $0 | UpdraftPlus free. Backup weekly to Google Drive. |
| Form Plugin | $0 | $0 | Fluent Forms free handles contact + signups |
| Total Year 1 | $50-100 | $150-300 | Upgrade as your income grows. Don’t overspend early. |
The biggest investment isn’t money. It’s time. Expect to spend 10-15 hours per week on your blog for the first 6 months. Writing content, learning SEO, setting up systems. That time investment is what separates blogs that earn from blogs that sit dormant after 3 posts.
Related guides: Best Indian Bloggers · Guest Posting Sites · FSE Migration Guide
Frequently Asked Questions
How much does it cost to start a blog?
You can start a blog for as little as $3-5/month for hosting plus about $10-15/year for a domain name. WordPress itself is free. I’d budget around $100-150 for your first year including hosting, domain, and possibly a premium theme.
Is blogging still profitable in 2026?
Yes. There are over 600 million blogs online, and businesses with blogs get 67% more leads. Full-time bloggers earn an average of $45,000-75,000/year. I’ve personally earned over $650,000 in affiliate commissions alone. The key is treating it like a business from day one.
How long does it take to make money from a blog?
Realistically, 6 to 18 months for your first meaningful income. My first real income took 3 years, but once momentum built, it jumped 2X-3X every year. Most people quit before the 6-month mark, which is exactly when things start compounding.
Do I need to know coding to start a blog?
No. WordPress handles the technical side. You pick a theme, install plugins, and start writing. The dashboard is straightforward once you spend 30 minutes exploring it. If you can use email, you can manage a WordPress blog.
What should I blog about?
Pick a niche you know well and that people actively search for. The best blogs focus on topics where you have genuine experience. Write content that answers real questions and solves actual problems. Avoid writing about everything. Specificity wins.
Why WordPress instead of Wix or Squarespace?
WordPress powers 43% of all websites for a reason. You own your content and data completely. There’s no platform lock-in. The plugin ecosystem is massive, and you have full control over monetization. With Wix or Squarespace, you’re renting. With WordPress, you own.
How often should I publish blog posts?
Quality over quantity. One well-researched, genuinely helpful post per week beats five thin posts. Focus on keyword research and writing content that answers real questions. Consistency matters more than frequency.
Your Next Steps
You have everything you need. The plan is clear: pick a niche, grab hosting, install WordPress, and publish your first post.
Don’t wait until everything is perfect. My first blog post was terrible. My first theme was ugly. My first year of traffic was embarrassing. But each post got a little better. Each month, traffic climbed a little higher. And three years in, the income started flowing and hasn’t stopped since.
The difference between bloggers who earn and bloggers who don’t isn’t talent or luck. It’s consistency. Show up, publish useful content, learn from what works, and keep going when it feels like nothing is happening. The compound effect will catch up.
Start today. Not next week. Not when you “have more time.” Today.
Disclaimer: This site is reader-supported. If you buy through some links, I may earn a small commission at no extra cost to you. I only recommend tools I trust and would use myself. Your support helps keep gauravtiwari.org free and focused on real-world advice. Thanks. - Gaurav Tiwari