
 by
by
You can create a payable invoice in FluentCart with a native manual order. If you need a dedicated workspace to prepare bills and reuse customer details, GT Extensions adds a Custom Invoices module with a draft-to-issue workflow.
I’d start with the workflow your sale needs. A customer buying a catalog product at its listed price needs little preparation. For agreed work, you may need a bill with details specific to that job.
Watch the complete Custom Invoices tutorial first, or follow the written steps below:
Choose Your Invoice Workflow
FluentCart already has native invoicing features. Its manual-order documentation describes creating an order and providing a payment link. It also documents editable PDF invoice templates. The PDF templates need the Fluent PDF add-on licensed through FluentCart Pro, and those PDFs go out by email. The documented manual order adds products from your catalog.
The practical choice depends on the job:
- A straightforward catalog sale: Start with a native manual order when you need to select a customer and add existing products.
- A different invoice document design: Check FluentCart’s PDF templates before adding another invoicing tool.
- A custom bill you prepare repeatedly: Consider the Custom Invoices module for custom line items, a dedicated draft-to-issue workflow and reusable customer details.
- A price the buyer hasn’t accepted yet: Use a request-a-quote and proposal workflow before making the invoice payable.
Custom Invoices is part of GT Extensions for FluentCart, my FluentCart add-on. Its useful difference is how you prepare and manage the invoice around the native order.
Set Up FluentCart Custom Invoices
The invoice module needs FluentCart 1.6.4 or newer. That requirement matters because the module relies on the native commerce workflow underneath it.
To get started:
- Open FluentCart > GT Extensions.
- Enable Custom Invoices and save the module settings.
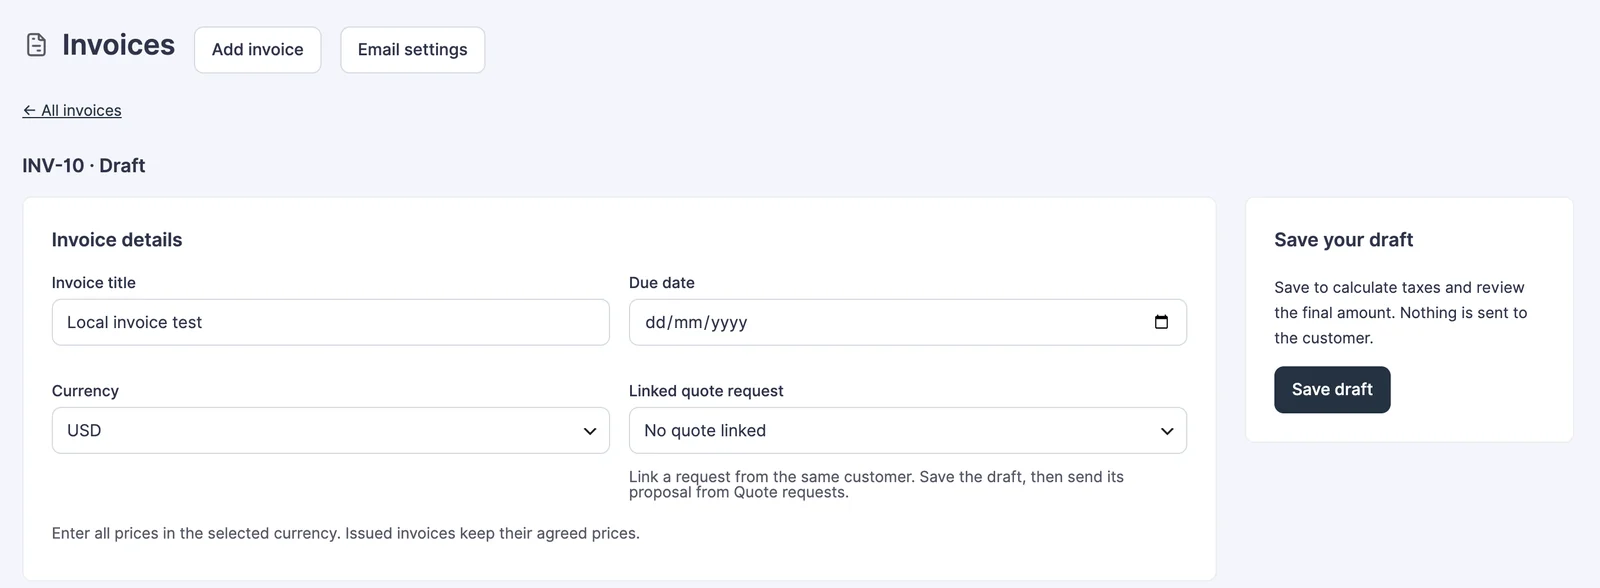
- Open FluentCart > Invoices and click Add invoice.
- Select the customer or enter the details for the new bill.
- Add an invoice title, due date and currency before entering amounts.
- If the bill follows a quote, choose the matching Linked quote request for the same customer.
Enter prices in the currency selected for the invoice. If you’ve selected USD, enter the intended dollar amount; copying an INR amount into that field won’t convert it for you.
Prepare the Customer and Items
An invoice should make the agreed work recognizable. Say you sell a website audit with an additional migration-planning session. The audit can be a catalog product, while the extra work can be a custom item if it isn’t something you list in the store.
That lets you describe the actual job without adding a public product for every small variation in scope.
The draft supports these details:
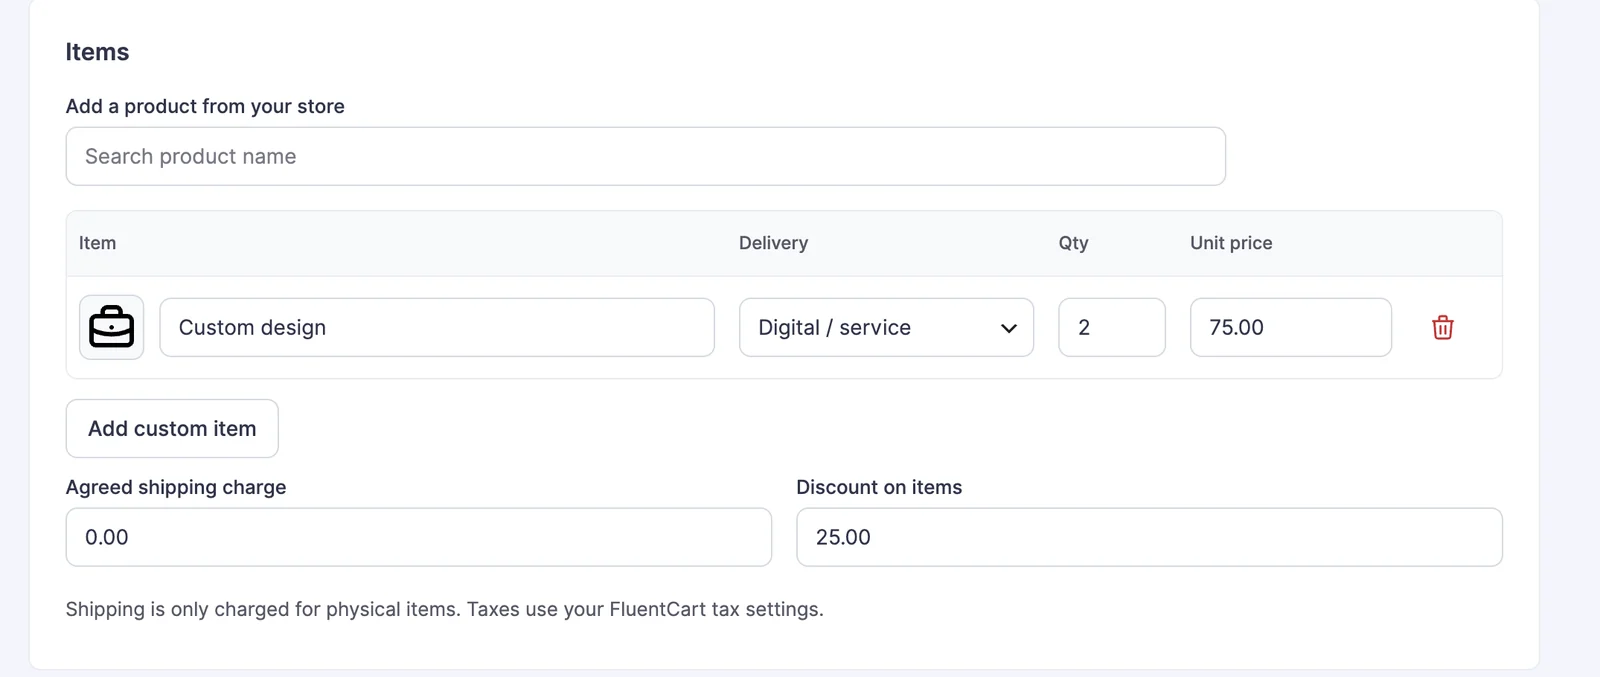
- Catalog or custom items: Select products you already sell or enter the agreed items for this bill.
- Customer billing details: Check the company and address against the buyer’s billing instructions.
- Separate delivery details: Use these when the delivery destination differs from the billing address.
- Delivery type: Each item has a title, quantity and unit price. Choose Physical when the line needs shipping, or Digital / service for work and digital delivery.
- Item images or icons: Catalog images are picked up automatically. Click an item’s thumbnail to choose an invoice-specific image or a bundled icon; the override doesn’t change the product.
- Agreed charges: Add a shipping charge for physical items and a discount on items. Taxes follow FluentCart’s tax settings and the customer details you enter.
- Customer message and private note: The message appears on the customer’s invoice. The private note stays with your team.
Here’s how the amounts work: 2 design sessions at USD 75 each make a USD 150 item subtotal. A USD 25 discount brings it to USD 125 before any shipping or tax. The saved preview should show the amount you agreed with the customer.
Customer details deserve particular attention. The Save these details to the customer profile for future invoices option creates or updates the native customer details when you save the draft. If a change belongs only to this job, clear that option and keep it as an invoice-only override.
Saving updates the native FluentCart customer and primary billing address, including company, apartment or suite, phone and Tax / VAT number. A separate delivery address can be saved too. On the next invoice, search for the customer by name or email: the saved details fill the form and stay editable.
For example, a returning buyer may ask you to bill a different branch for this project. Saving that address globally could make the next invoice start with the wrong branch. The checkbox determines whether you’re changing this bill or the details you’ll reuse later.
Add Your Seller Details
Open Invoice appearance from the Invoices screen and click Import from FluentCart. Review the imported values, then use the visibility checkboxes to choose what appears on the invoice.
Available information includes:
- Store name and company logo.
- Company name and store address.
- Legal registration ID, Tax ID and VAT ID.
Editing these values here doesn’t change FluentCart Store Setup, and empty fields are left off the invoice. Click Save invoice appearance when you’re done. A consulting company, for example, can show its logo, registered name, office address and VAT ID while hiding an unused registration field.
The module captures those settings when you issue a new invoice. An invoice you’ve already issued keeps its original seller details, so a later branding change doesn’t silently rewrite that document.
I’d check which seller and tax details your business must include before issuing the invoice. The available fields help you record those details, but they don’t decide your billing requirements.
Review, Issue and Send
I recommend reviewing the calculated tax and totals while the invoice is still a draft. Issuing and sending are separate actions, so check both before expecting a customer response.
The sequence is:
- Save the draft. Check the customer, currency and items.
- Review the totals. Resolve unexpected charges before issuing.
- Issue the invoice. The module creates a native FluentCart order and locks the issued version.
- Send the payment link. Issuing the invoice alone doesn’t send it. Use Email payment link, or copy the customer payment link.
- Follow the native order. FluentCart handles the payment and subsequent order workflow.
An issued invoice is a bill awaiting payment, not evidence that money has arrived. The customer view reflects its status, and a paid invoice no longer presents a payment button.
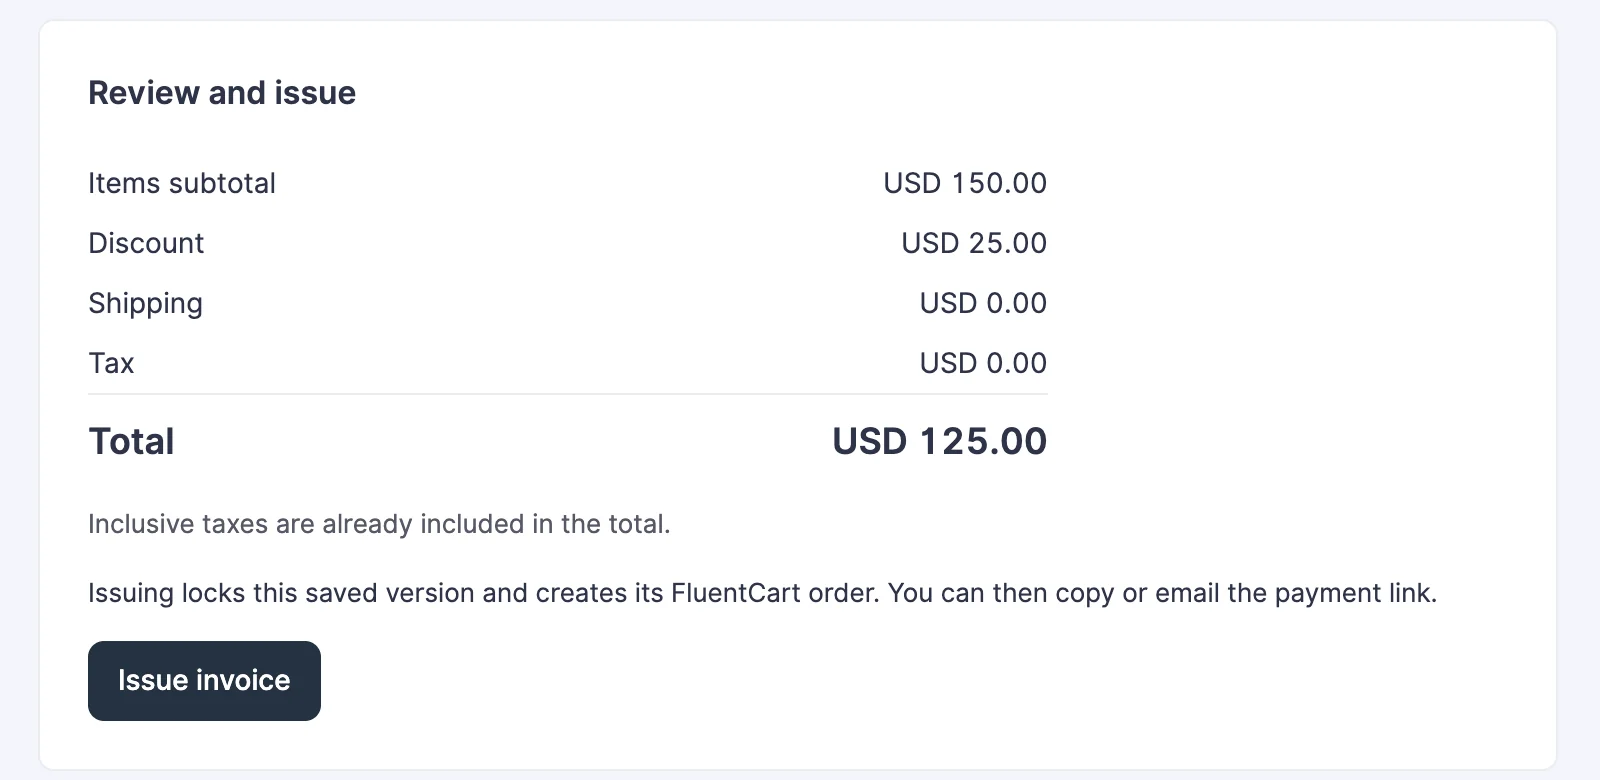
The total calculates when you save, so review the saved draft rather than the unsaved form. Issuing again reuses the same invoice and order instead of creating a second bill.
Share the Invoice and Follow Up
An issued, unpaid invoice gives you Preview invoice, the customer payment link, Email payment link, Send reminder and cancellation controls.
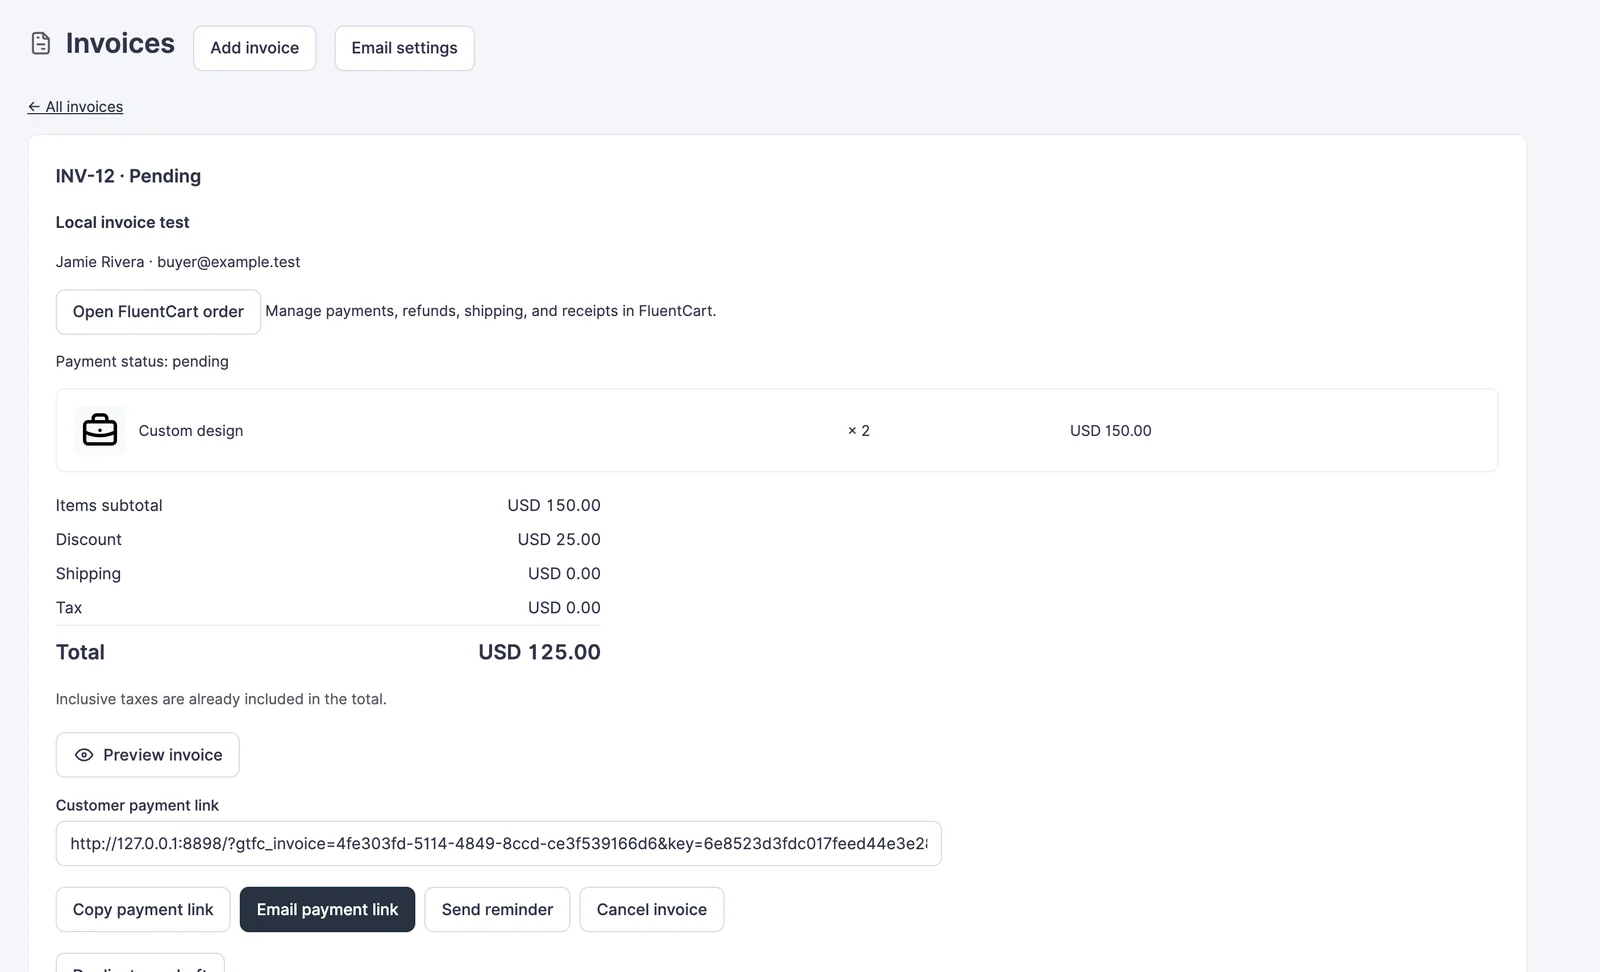
The customer preview shows the bill, its status, the line items and the payment button, plus a print control. Treat that link as private: anyone who has it can open the invoice.
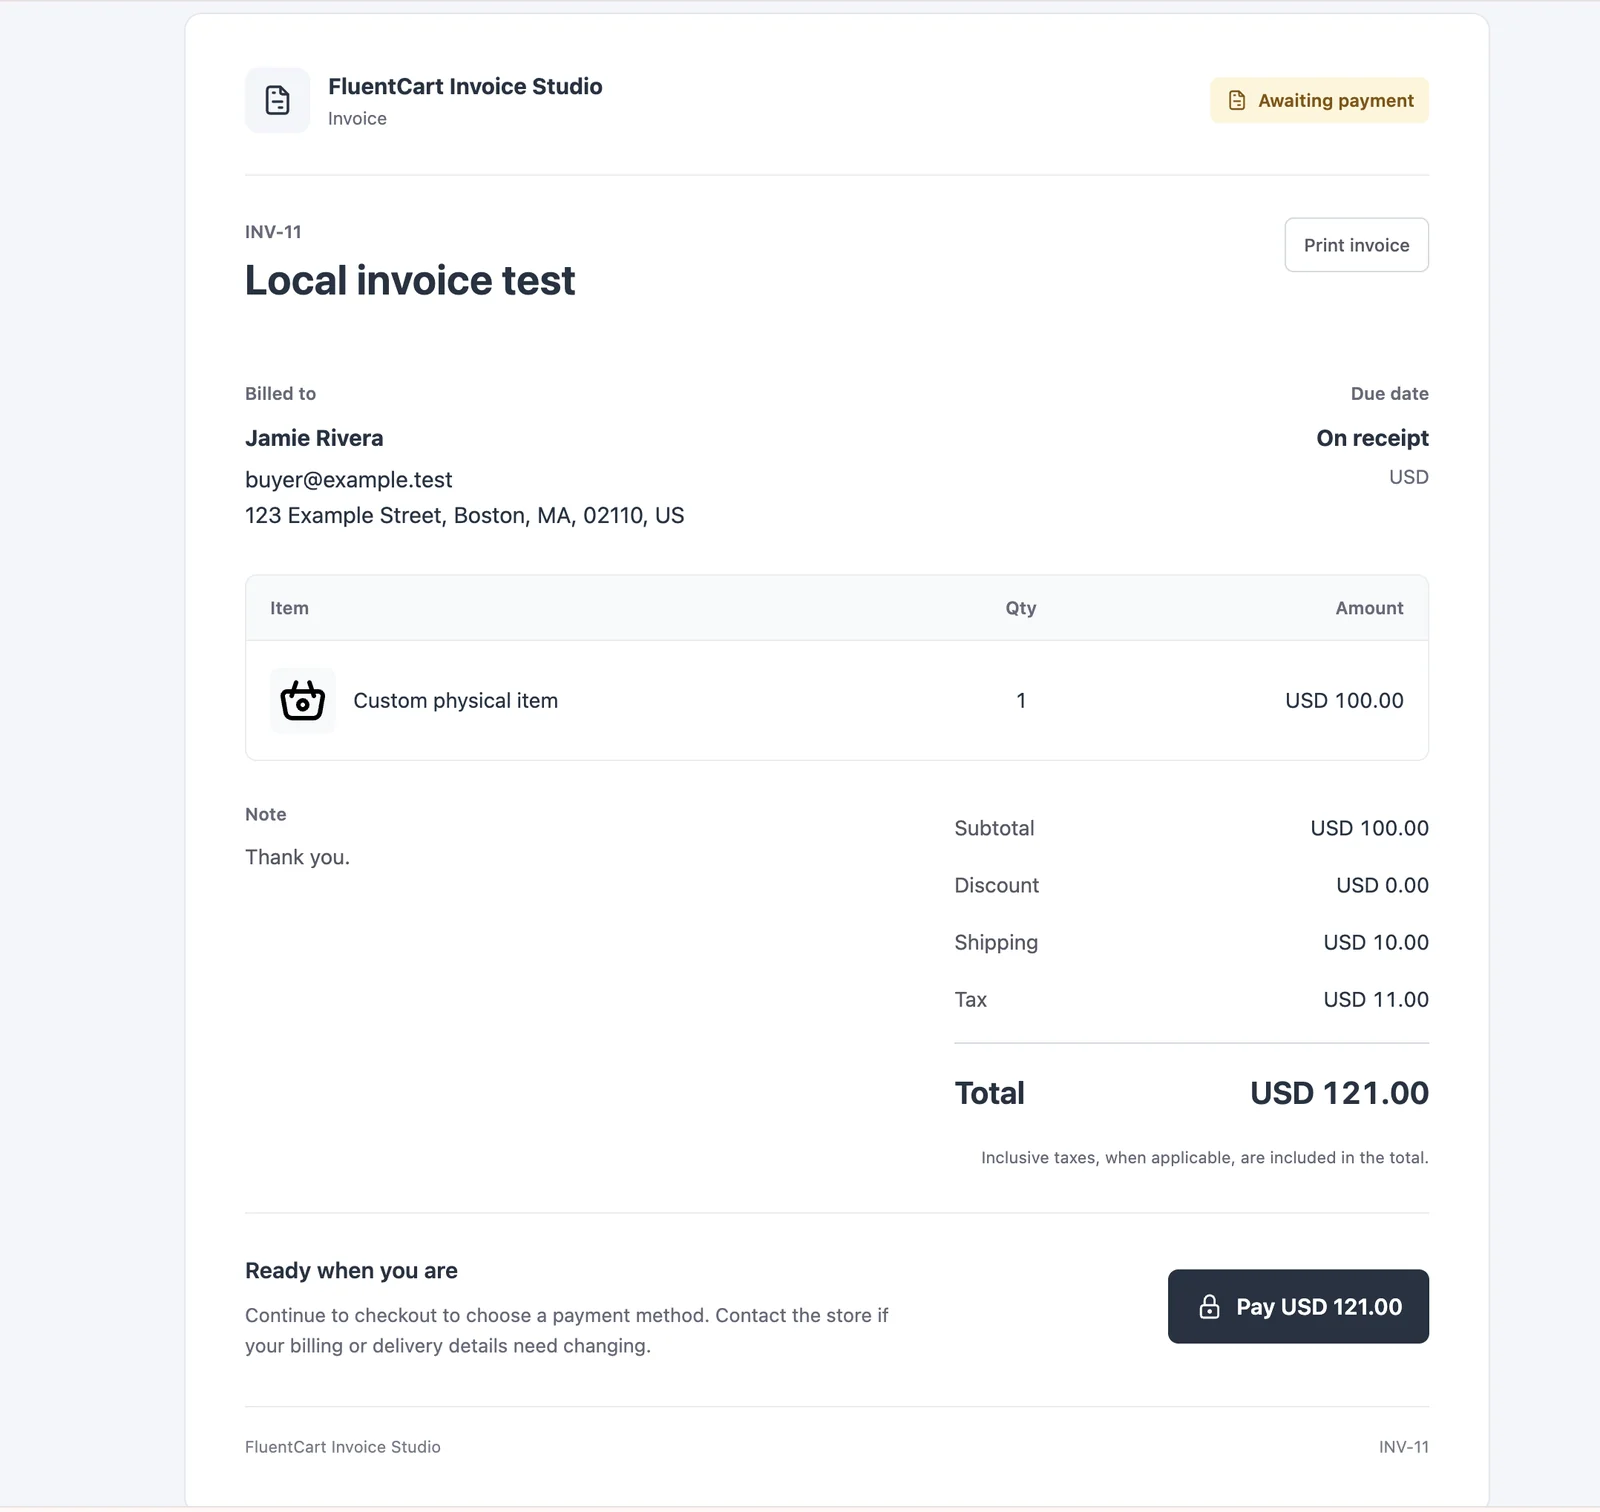
After payment, the preview link still works without a payment button. Open the FluentCart order to manage payments, refunds, fulfillment and receipts. The status filters on the invoice list separate drafts, pending, paid and cancelled invoices.
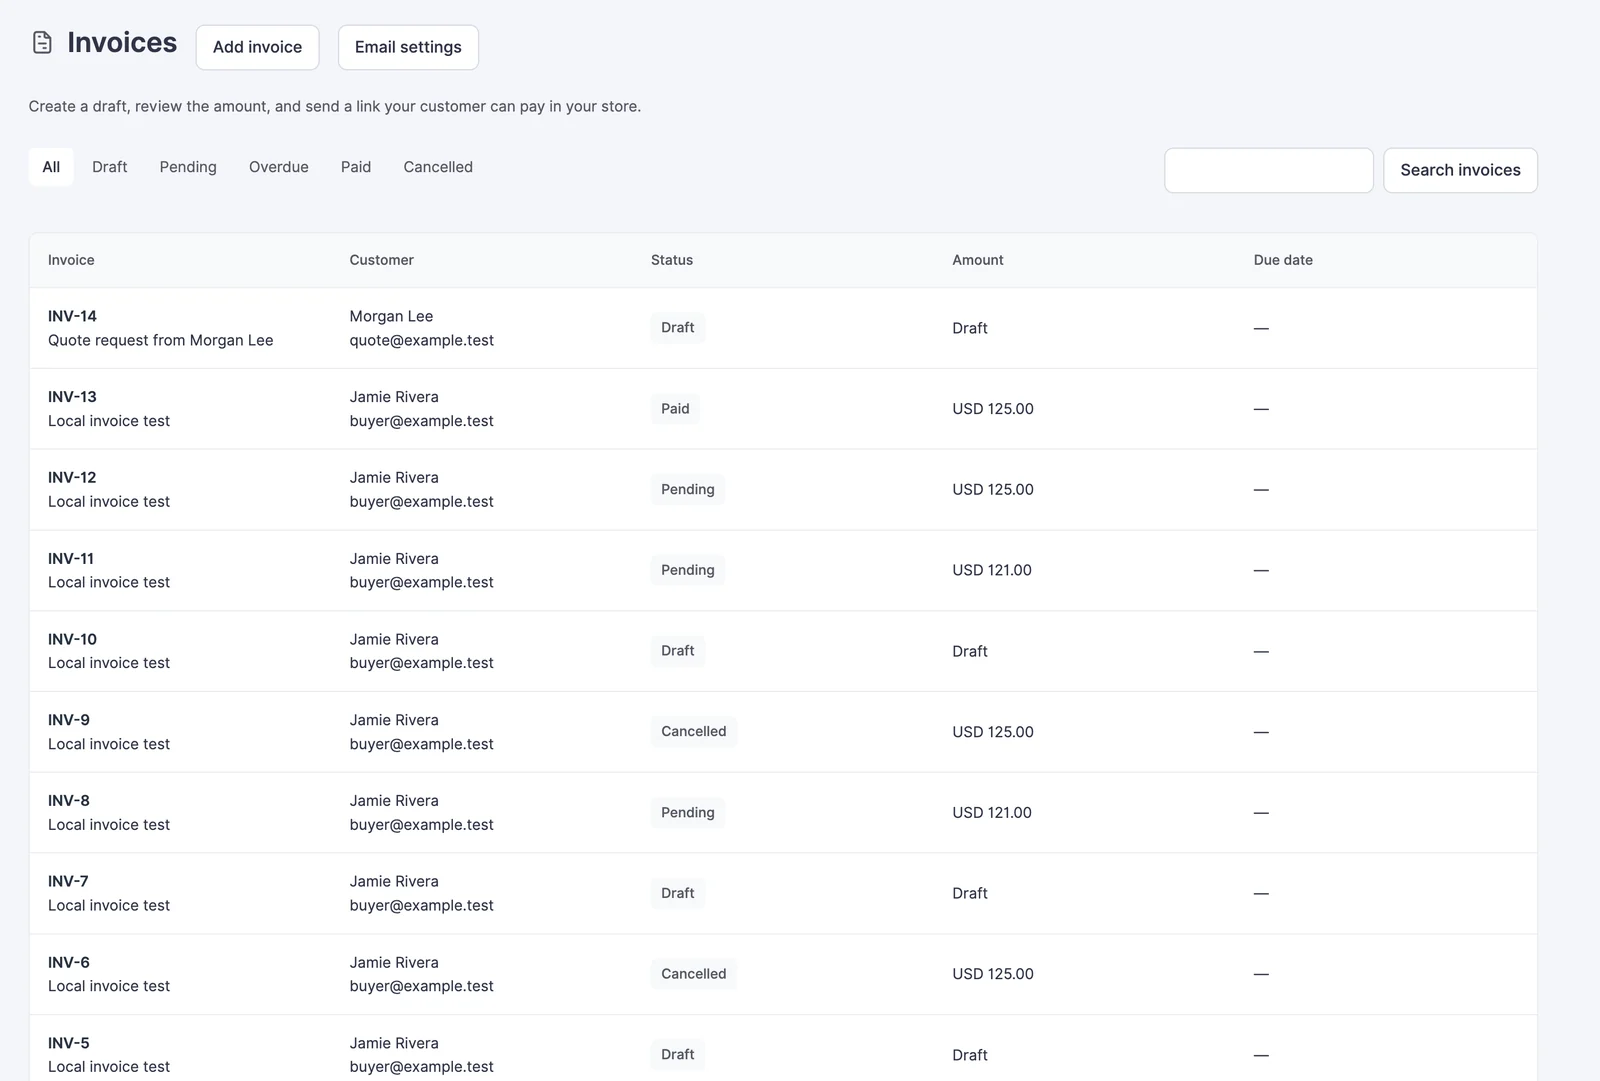
Invoice Email Settings
Email settings hold the subject and body for the payment request and for the reminder. These tokens fill in per invoice:
{customer_name}{invoice_number}{invoice_title}{amount}{due_date}{pay_url}{store_name}
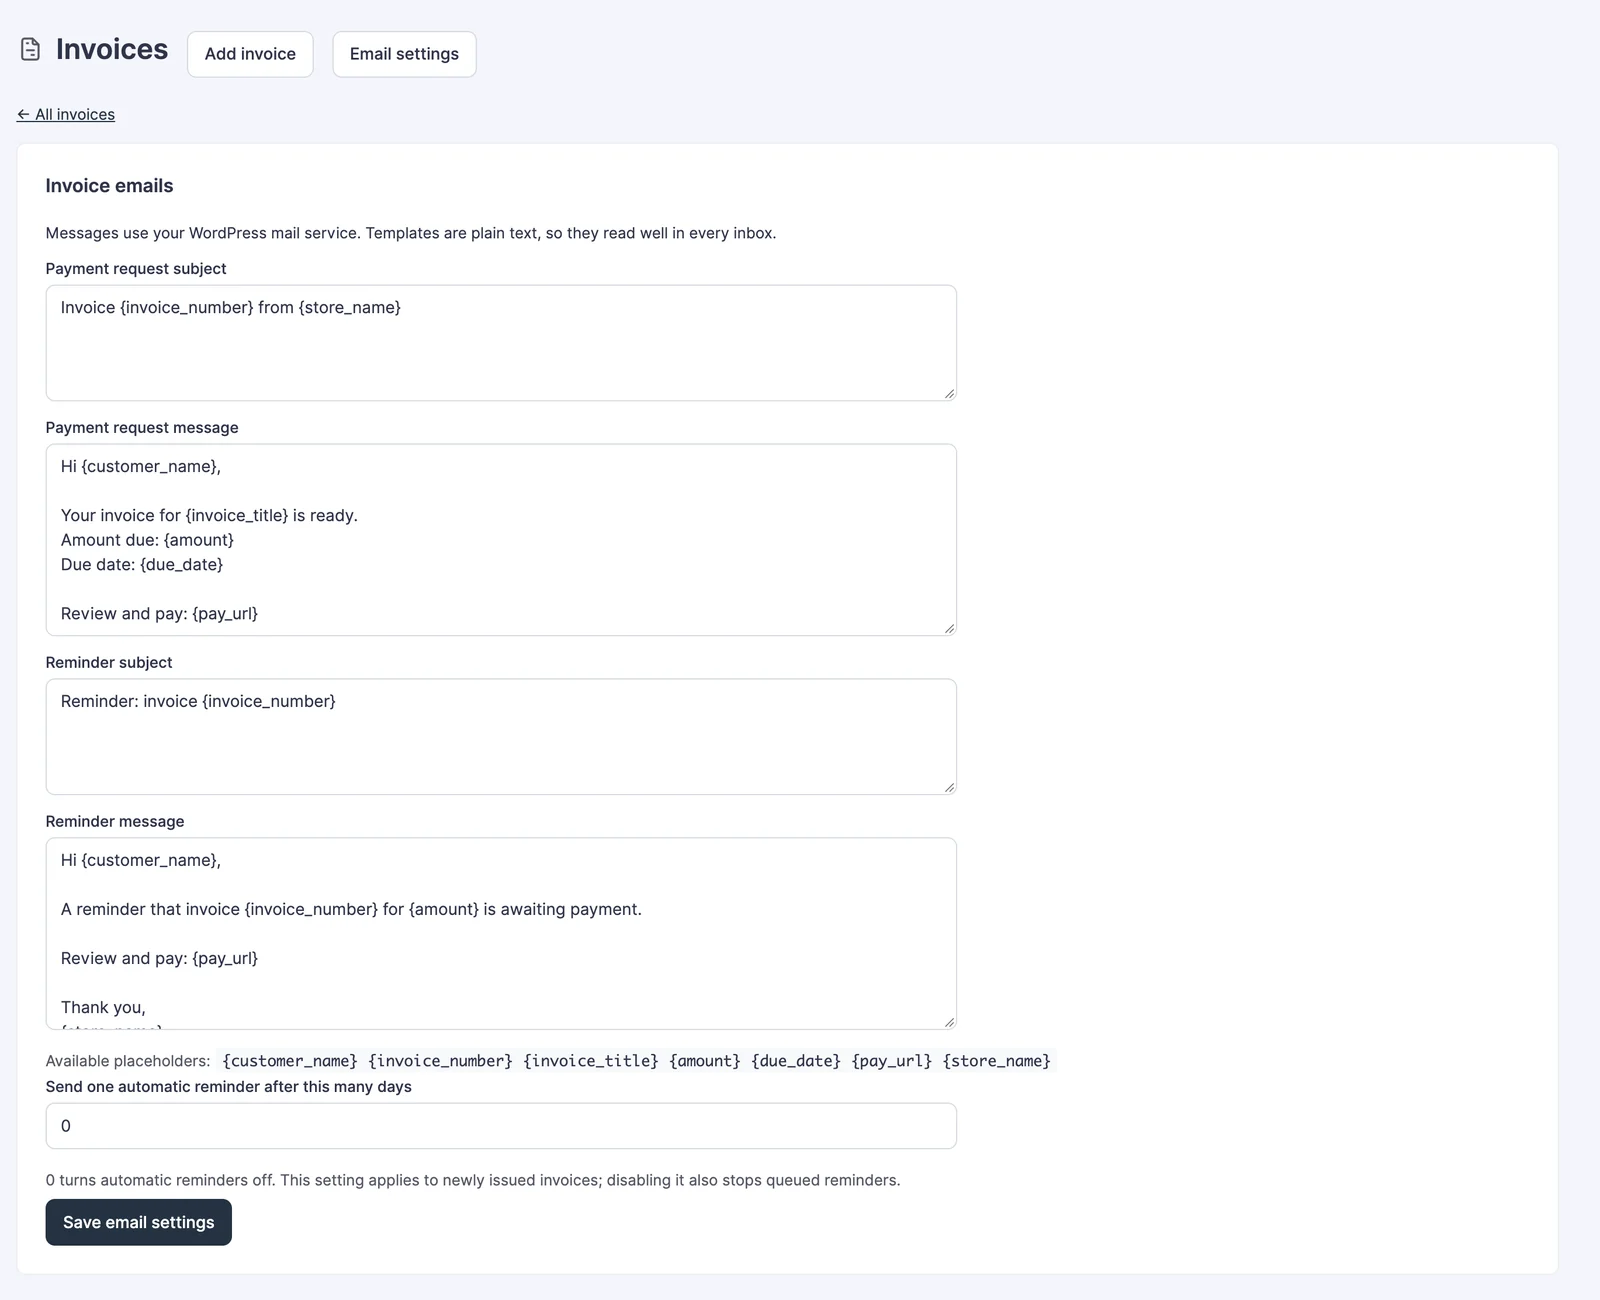
Set automatic reminder days to 0 to turn reminders off. Otherwise the module sends a single follow-up for an eligible unpaid invoice; partly paid, refunded, paid and cancelled invoices are skipped. WordPress has to be able to send mail for any of these messages to reach the customer.
Correct an Issued Invoice
An issued invoice is locked. If you need to revise it, use Duplicate as draft instead of changing the bill behind a payment link you’ve already shared.
Duplicating does not, by itself, tell the customer which bill they should pay. You still need to deal with the original appropriately:
- If no payment has been recorded: Review whether the old invoice should be cancelled before sending its replacement. Cancellation blocks its payment links and open invoice checkouts.
- If a payment has been recorded: Manage the linked order in FluentCart. The invoice cancellation action doesn’t replace the native payment or refund workflow.
Keep the original bill and revised draft clearly identified so your customer knows which amount they’re being asked to pay.
The Limits
Custom Invoices suits a defined one-time bill. It doesn’t cover every way a business might charge for work.
The current boundaries are:
- One-time invoices: The module doesn’t provide recurring invoice schedules.
- No online partial-balance collection: Don’t build a deposit-and-remainder promise around this invoice checkout.
- Native payments: The module doesn’t add a payment gateway or approve your merchant account for a currency.
- Separate service delivery: Receiving payment doesn’t perform the work described on the bill.
If your existing native order screen already covers the sale, it is sensible to keep using it. The dedicated workspace earns its place when the preparation and reuse save you repeated manual handling.
Prepare Your First Invoice
Start with one representative bill and check whether the customer-facing description is enough for the buyer to recognize the agreement. A clear scope matters more than an elaborate invoice design.
The Create and Manage FluentCart Invoices lesson in the GT Extensions training course covers the module setup step by step. Keep the review, issue and send sequence beside you until those actions become familiar.
Tell Google you want more of this.
Add Gaurav Tiwari as a preferred sourceOne tap, and this site shows up more often in your own Top Stories, AI Overviews and AI Mode. Remove it any time.
Disclaimer: This site is reader-supported. If you buy through some links, I may earn a small commission at no extra cost to you. I only recommend tools I trust and would use myself. Your support helps keep gauravtiwari.org free and focused on real-world advice. Thanks. - Gaurav Tiwari