
 by
byHalloween is the one week kids will happily do science, as long as something foams, glows or flies. The trouble is that most Halloween experiment lists stop at the fun part. They skip the science, give no measurements, and a few still suggest an open flame or a sealed canister of fizzing tablets.
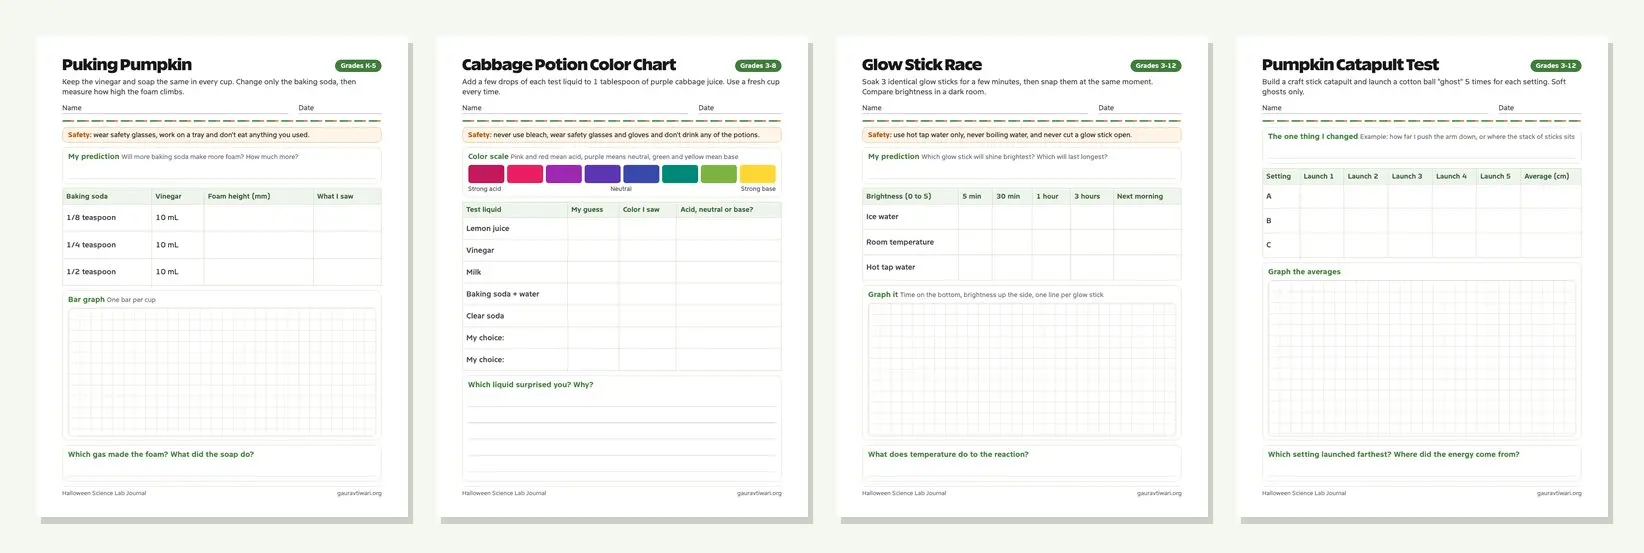
These 16 Halloween science experiments use kitchen and drugstore supplies, and each one comes with the real science behind it, a grade range, one variable students can change and a safety note where it’s needed. The free lab journal turns any of them into a proper experiment, with a prediction, a data table and a graph.
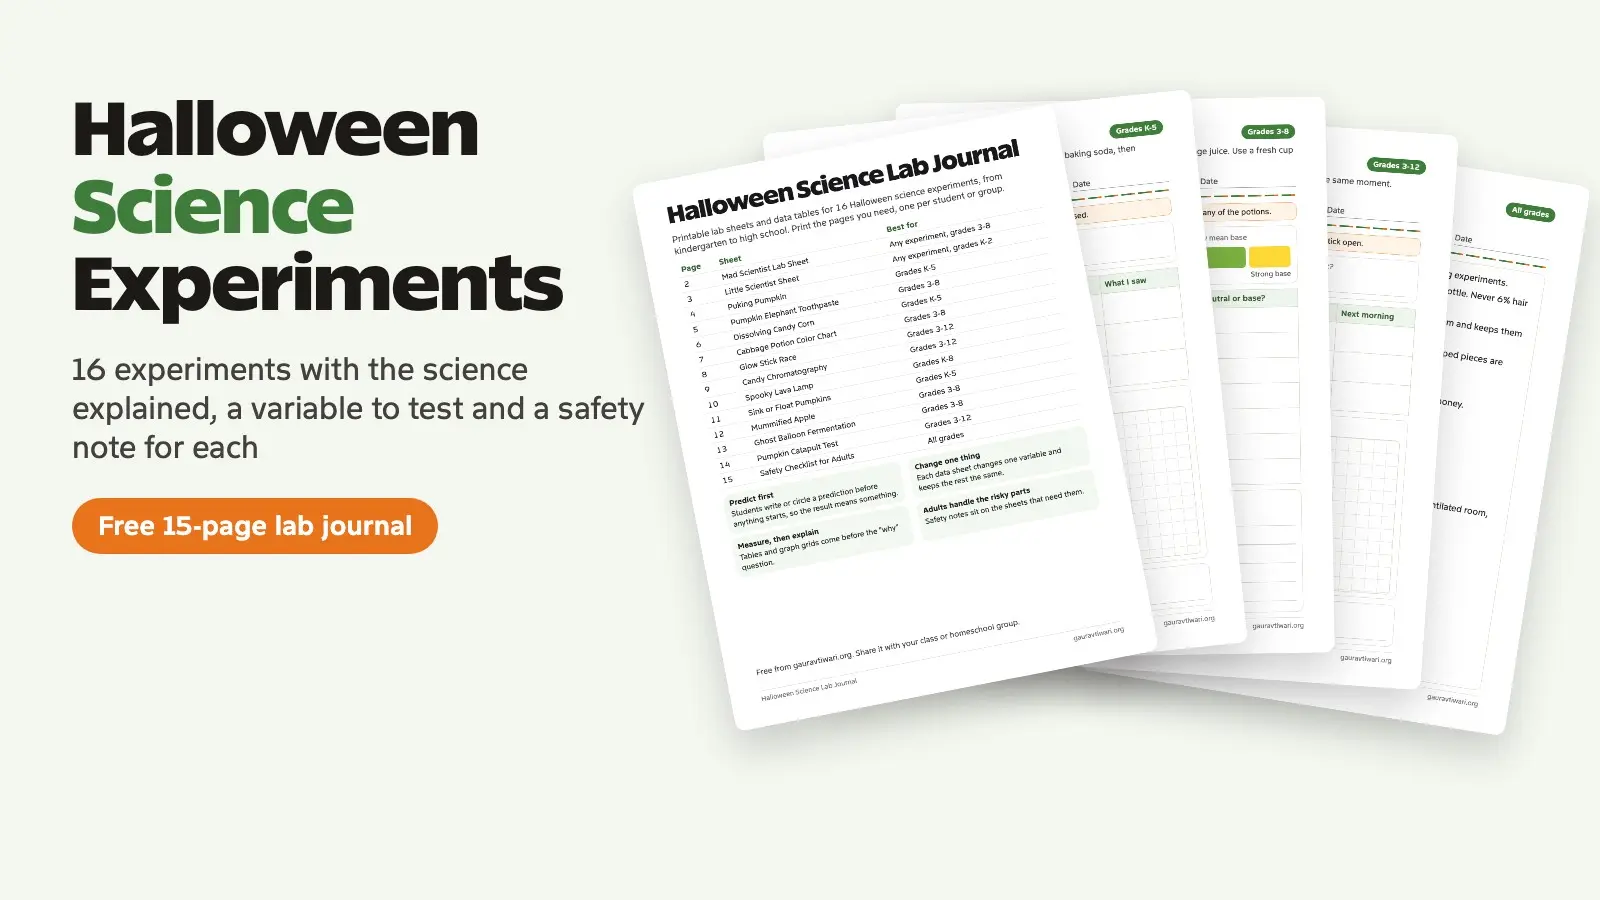
Pick an Experiment by Grade
The table lists all 16 Halloween science experiments with their grade range, time, mess level and the step an adult should handle. Kindergarten classes get the most out of the visual ones, such as the puking pumpkin, the floating ghosts and the sink-or-float test. Middle and high school students should go for the glow sticks, the chromatography and the catapult, where the numbers carry the lesson.
| Experiment | Grades | Time | Mess | Adult needed for |
|---|---|---|---|---|
| Puking Pumpkin | K-5, 6-8 extension | 10-15 min | High | Carving the pumpkin |
| Pumpkin Elephant Toothpaste | 3-8 | 20 min | High | Pouring the peroxide |
| Dissolving Candy Corn | K-5 | 30-40 min | Low | Hot water |
| Color-Changing Cabbage Potion | 3-8 | 45-60 min | Medium | Cleaning products |
| Glow Stick Temperature Race | 3-12 | 20 min + overnight | Low | Hot water |
| Glowing Tonic Water | 3-12 | Under 10 min | Low | The UV light |
| Candy Chromatography | 3-12 | 30 min | Low | Nothing |
| Floating Dry-Erase Ghosts | K-5 | 10-20 min | Low | Alcohol cleanup |
| Dancing Tissue Ghosts | K-5 | 10-15 min | None | Balloons for kids under 8 |
| Oobleck Monster Mud | K-5 | 20-30 min | High | Nothing |
| Spooky Lava Lamp | K-8 | 30-45 min | Medium | The tablets |
| Sink or Float Pumpkins | K-5 | 20-30 min | Medium | Water play, cutting |
| Apple Mummy | 3-8 | 45 min + 7 days | Low | Cutting apples |
| Yeast Ghost Balloons | 3-8 | 15 min + 45 min wait | Low | Balloons, hot water |
| Candy Pumpkin Towers | K-8 | 20-30 min | Low | Toothpick points |
| Pumpkin Catapult | 3-12 | 30 min | Low | Nothing |
Halloween Chemistry Experiments
Seven of the experiments are chemistry: something new forms, dissolves, changes color or gives off light. These are the ones that look most like a witch’s potion, which helps.
Puking Pumpkin
Grades K-5, with a 6-8 extension. 10-15 minutes. High mess.
A carved pumpkin throws up orange foam through its mouth. It’s the classic baking soda and vinegar reaction with dish soap added to trap the gas.
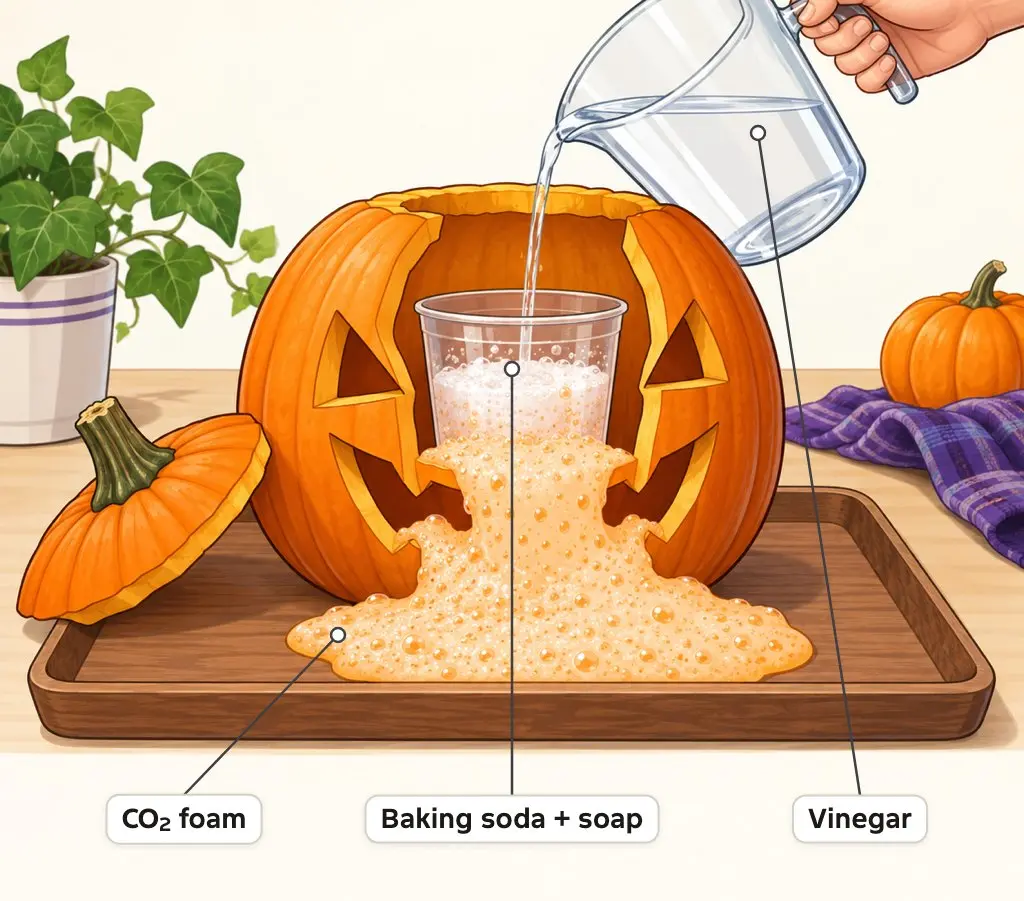
You need:
- A small pumpkin, hollowed out and carved by an adult, with a cup or jar inside
- 3 tablespoons baking soda
- 1 teaspoon dish soap
- A few drops of food coloring
- 1/2 to 1 cup white vinegar
- A tray and safety glasses
- Put the baking soda, soap and food coloring in the cup inside the pumpkin.
- Pour in the vinegar and step back.
- Watch the foam spill out of the pumpkin’s mouth.
Why it works: Vinegar is acetic acid, and baking soda is sodium bicarbonate. They react to make sodium acetate, water and carbon dioxide gas (C2H4O2 + NaHCO3 → NaC2H3O2 + H2O + CO2). The soap traps the gas in bubbles, which is what turns a fizz into foam. A gas that wasn’t there before is the evidence that a chemical change happened.
Make it an experiment: keep the vinegar at 10 mL and change the baking soda: 1/8, 1/4 and 1/2 teaspoon in clear cups, then measure the foam height. Page 4 of the lab journal has the table. Older students get a surprise here. 10 mL of 5% vinegar holds enough acid for only about 0.7 g of baking soda, a little under 1/4 teaspoon, so the foam stops growing once the vinegar runs out. That’s a limiting reactant.
Safety: wear safety glasses, because vinegar stings eyes. Work on a tray and don’t eat anything used in the experiment.
Pumpkin Elephant Toothpaste
Grades 3-8. About 20 minutes. High mess.
Put the bottle inside a hollow pumpkin, or drip orange and green food coloring down the inside so the foam comes out looking like pumpkin guts.
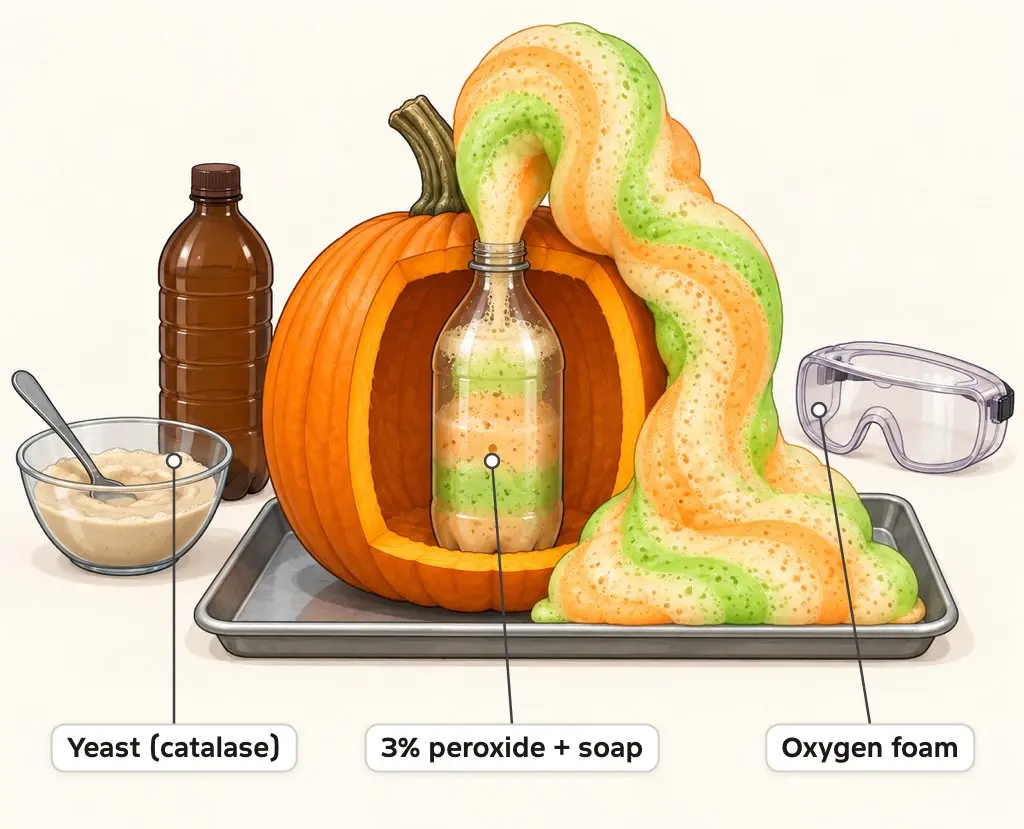
You need:
- An empty plastic bottle
- 1/2 cup 3% hydrogen peroxide
- A big squirt of dish soap
- Food coloring
- 1 tablespoon dry yeast mixed with 3 tablespoons warm water for about 30 seconds
- A tray or tub and safety glasses
- An adult pours the hydrogen peroxide into the bottle.
- Add the dish soap and swirl.
- Add the food coloring.
- Pour in the yeast mixture and step back.
Why it works: Hydrogen peroxide slowly breaks down into water and oxygen gas (2H2O2 → 2H2O + O2). Yeast contains catalase, an enzyme that acts as a catalyst and makes that breakdown happen in seconds. The catalyst speeds up a reaction that was already happening; it doesn’t create one. The soap catches the oxygen as foam, and the reaction stops when the peroxide or the active yeast runs out.
Make it an experiment: change the amount of yeast (1/2, 1 and 2 tablespoons) and measure the foam height after 30 seconds. Run one bottle with no yeast as the control. Page 5 of the journal has the table.
Safety: use 3% household hydrogen peroxide only. Hair bleach is 6-10%, and “food grade” peroxide is 35%, which can cause serious internal burns if swallowed. Everyone wears safety glasses, and the foam is not toothpaste.
Dissolving Candy Corn
Grades K-5. 30-40 minutes. Low mess.
Which potion melts candy corn fastest? It makes a good first fair test, because the only thing that changes is the liquid.
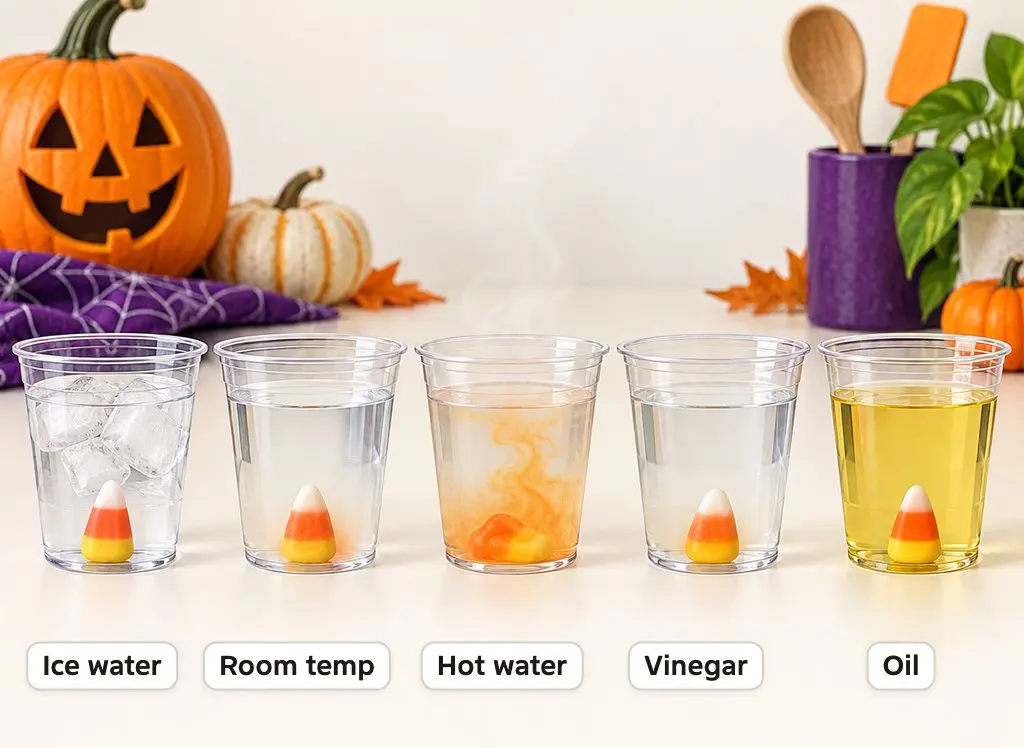
You need:
- 5 clear cups with 1/3 cup each of ice water, room-temperature water, hot tap water, white vinegar and vegetable oil
- 5 candy corns
- A timer
- Drop a candy corn into each cup at the same moment.
- Check every 5 minutes for 30 minutes.
- Write down when the stripes disappear in each cup.
Why it works: Candy corn is mostly sugar and corn syrup. Sugar molecules are polar, so polar water molecules pull them into solution, while oil is nonpolar and barely touches it. Vinegar is mostly water, so it behaves much like water. Hot water dissolves the candy fastest because its molecules move faster and hit the candy harder and more often.
Make it an experiment: the liquid is the variable. For a cleaner test, use only water and change the temperature. Students can time how long the stripes last, or weigh the candy before and after 10 minutes. Page 6 of the journal has the table.
Safety: hot tap water can burn, so an adult pours it. Candy is a choking hazard for children under 4, and Brach’s candy corn contains sesame oil, gelatin and honey, so check allergies first.
Color-Changing Cabbage Potion
Grades 3-8. 45-60 minutes. Medium mess, because cabbage juice stains.
A purple witch’s potion turns pink, green or yellow depending on what you pour in.
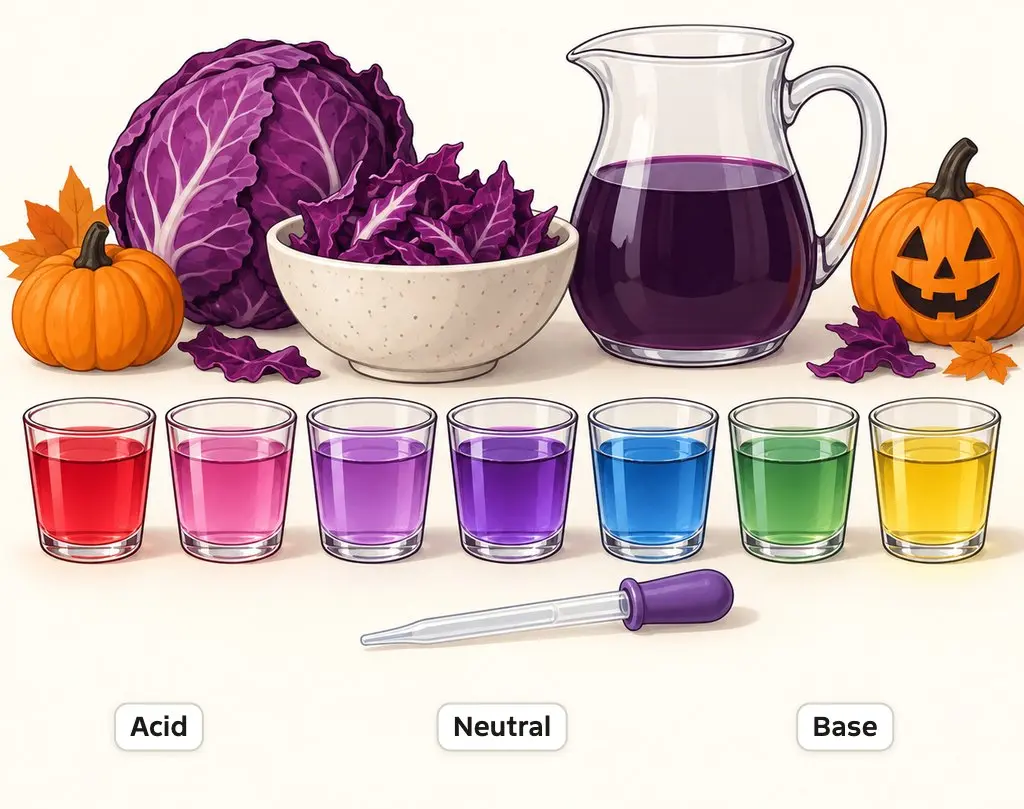
You need:
- Several red cabbage leaves torn into pieces
- About 1 cup of water in a zip-top bag
- Small clear cups and a dropper or straw
- Test liquids: lemon juice, vinegar, clear soda, milk, a baking soda solution and a liquid cleaner (never bleach)
- Squish the cabbage in the water for a couple of minutes until the water turns dark purple-blue, then pour off the liquid.
- Put about 1 tablespoon of the purple liquid in each cup.
- Add a few drops of one test liquid to each cup and record the color.
Why it works: Red cabbage contains anthocyanin, a natural acid-base indicator. In neutral water it looks purple or blue. Acids change the shape of the molecule so it looks pink or red, and bases change it a different way so it looks green or yellow.
Make it an experiment: rank the test liquids from most acidic to most basic using the color scale on page 7 of the journal. Older students can add baking soda solution drop by drop to vinegar-pink potion and count the drops it takes to turn purple, then green.
Safety: never use bleach, read the cleaner labels, and wear safety glasses and gloves. Nobody drinks the potions.
Glow Stick Temperature Race
Grades 3-12. 20 minutes, plus checks overnight. Low mess.
Three glow stick ghosts in three cups. Which one shines brightest, and which one is still glowing in the morning?
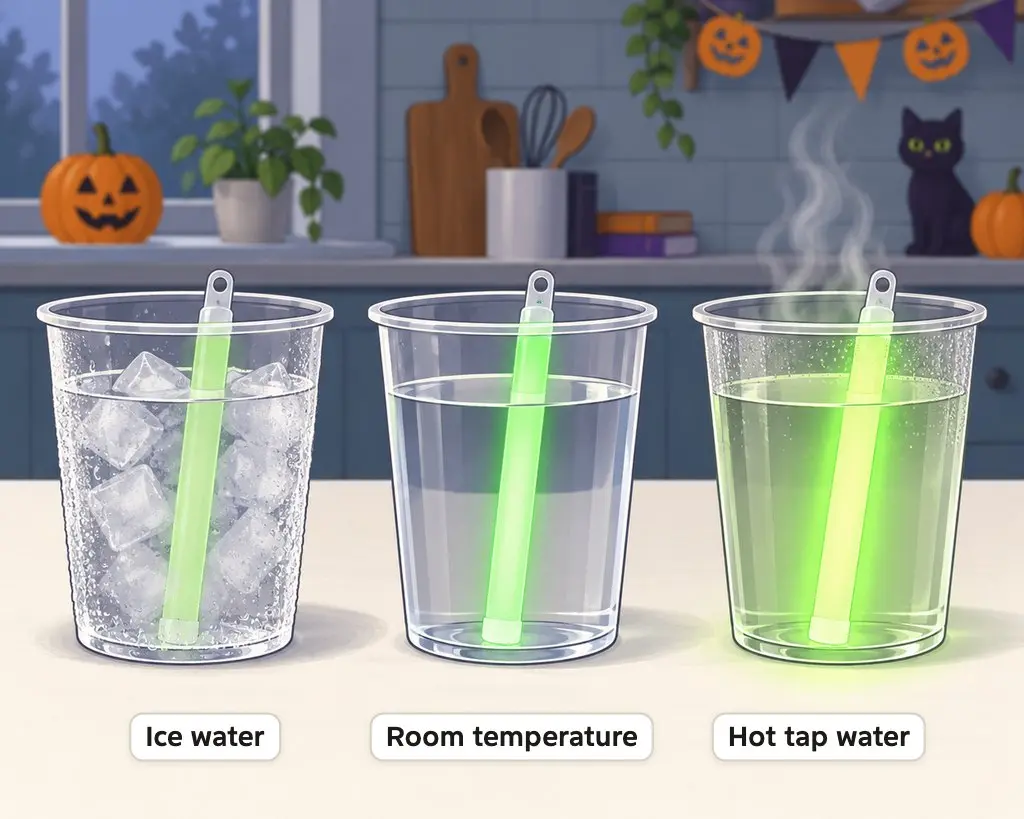
You need:
- 3 identical glow sticks, same brand and color
- 3 cups: ice water, room-temperature water and hot tap water
- A dark room and a timer
- Soak the unsnapped glow sticks in the cups for a few minutes.
- Snap all 3 at the same moment and put them back.
- Compare brightness, then check every hour to see which one fades first.
Why it works: Snapping the stick breaks an inner capsule so 2 solutions mix. Hydrogen peroxide reacts with a phenyl oxalate ester to make an unstable compound that breaks into carbon dioxide and gives its energy to a dye, and the dye releases that energy as light. Warm molecules move faster and collide harder, so the reaction runs faster: a brighter glow that ends sooner. Cold slows it down, which is why a glow stick in the freezer lasts longer.
Make it an experiment: water temperature is the variable. Rate the brightness from 0 to 5 at fixed times and note when each stick stops glowing. High school students can graph brightness against time and connect it to reaction rate and temperature. Page 8 of the journal has the table and graph grid.
Safety: use hot tap water, never boiling water, and never cut a glow stick open. The liquid irritates skin and eyes.
Glowing Tonic Water
Grades 3-12, as a demo for younger kids. Under 10 minutes. Low mess.
A clear “ghost potion” that glows blue the moment a black light hits it.
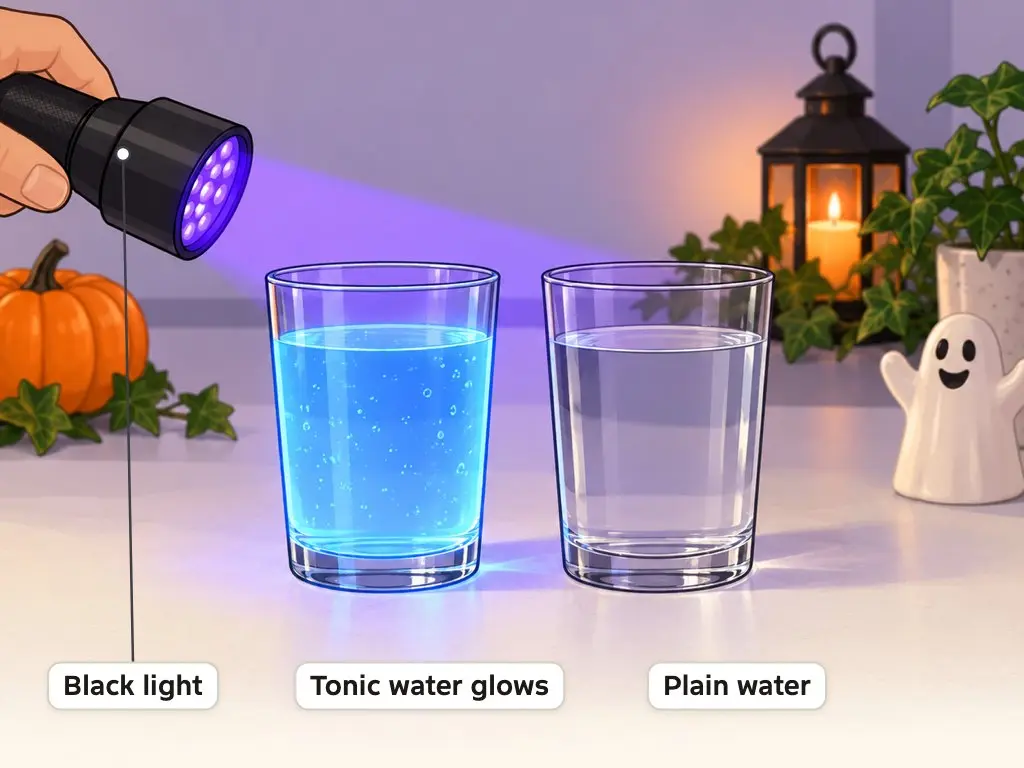
You need:
- About 1 cup of regular tonic water, which contains quinine
- A clear plastic cup
- A UV black light and a dark room
- Pour the tonic water into the cup.
- Darken the room.
- Shine the black light on the cup from the side.
Why it works: Quinine absorbs ultraviolet light, which we can’t see, and gives off blue light, which we can. That’s fluorescence. In tonic water, quinine absorbs most strongly at about 360 nm and emits at about 455 nm. US rules cap quinine in drinks at 83 parts per million, which is still plenty to glow.
Make it an experiment: dilute the tonic water with tap water to 50%, 25%, 10% and 5%, then find the weakest mix that still visibly glows.
Safety: don’t look into the black light or shine it on skin, because UV can damage eyes and skin.
Candy Chromatography
Grades 3-12. About 30 minutes. Low mess.
Which trick-or-treat candy is hiding a secret color? Compare the same color from different brands.
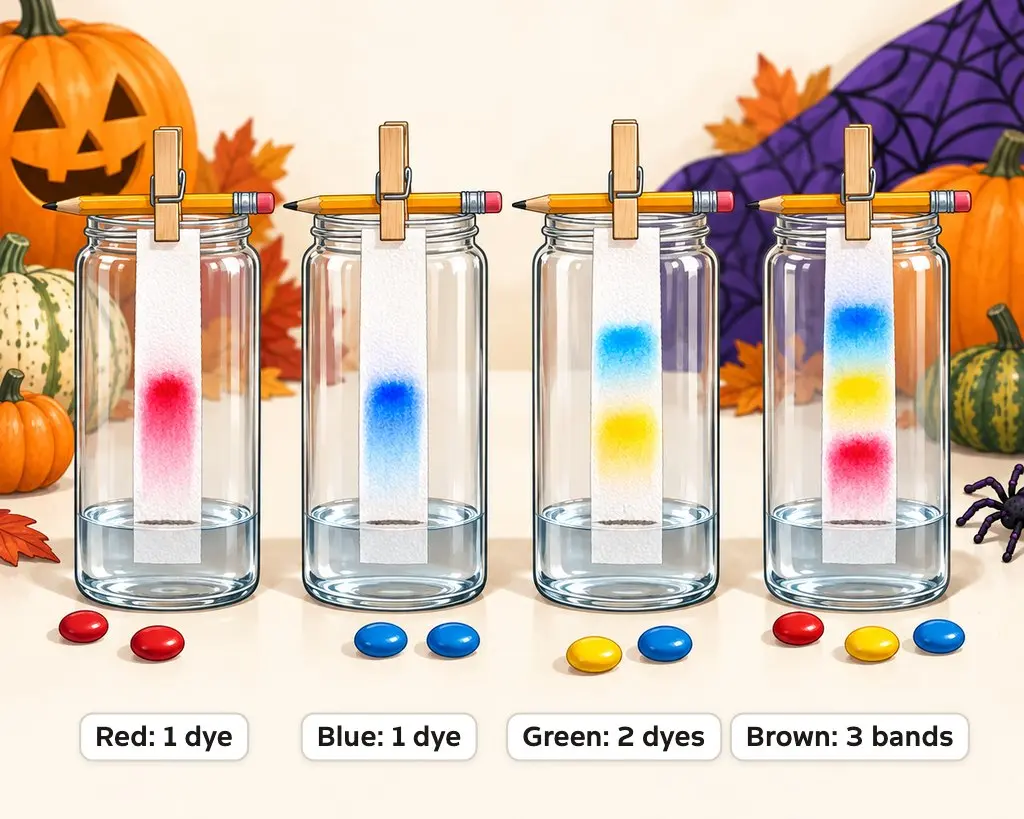
You need:
- Thick paper towel cut into 1-inch strips, a little longer than your jar is tall
- A pencil
- Salt water: 1/8 teaspoon salt in 4 cups of water, about 1 inch deep in a tall jar
- Candy-coated chocolates or other colored candy, and a plate
- Draw a pencil line 1 inch from the bottom of each strip.
- Set a candy on a drop of water for 3 minutes, flip it for 3 more, then dab the colored water on the line.
- Hang the strip so its end just touches the salt water, and wait about 10 minutes until the water nears the top.
- Let the strip dry and look at the bands.
Why it works: Water climbs the paper by capillary action and carries the dyes with it. Dyes that dissolve more easily in the water travel farther, so a color made from 2 dyes splits into 2 bands. Green and brown candy shells usually split into 2 or more bands, while red, yellow and blue usually show 1.
Make it an experiment: measure how far each dye and the water traveled, then work out Rf = dye distance ÷ water distance. Page 9 of the journal has the table. Older students can change the liquid to compare plain water and salt water.
Halloween Physics Experiments
The physics experiments are about how things move, float and stick. They’re the best fit for younger children, because the result is easy to see and nothing gets used up.
Floating Dry-Erase Ghosts
Grades K-5. 10-20 minutes. Low mess.
Draw a ghost on a plate, pour in water and the ghost lifts off and floats.
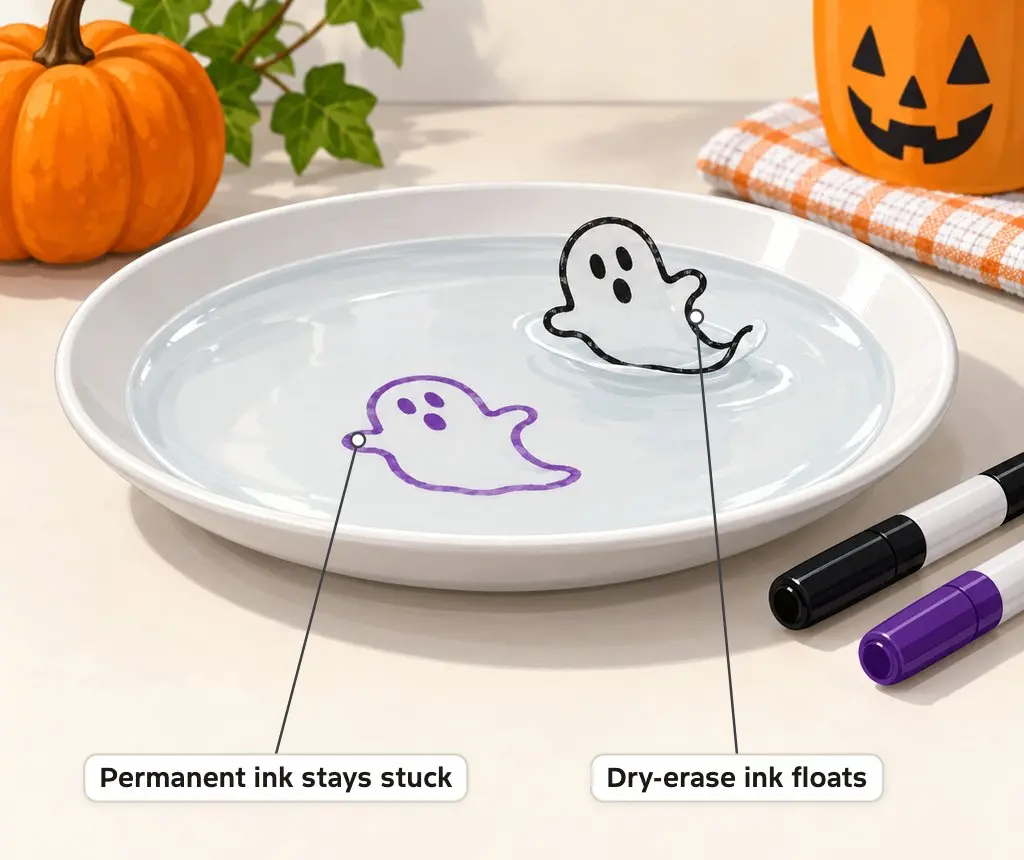
You need:
- A smooth ceramic plate or glass dish
- Dry-erase markers
- A permanent marker for comparison
- A cup of room-temperature water
- Draw a small ghost with the dry-erase marker and let it dry for a few seconds.
- Pour water slowly beside the drawing until it’s covered. Shake the plate gently if the ghost sticks.
- Try the same thing with a permanent marker.
Why it works: Dry-erase ink contains an oily silicone release agent that keeps it from sticking to the plate, so water slides underneath. The dried ink is lighter than water, so it floats. Permanent marker ink uses an acrylic resin that grips the surface, which is why it stays put.
Make it an experiment: test different marker colors or brands, or different surfaces, and count how many of 5 ghosts lift off in one piece.
Dancing Tissue Ghosts
Grades K-5. 10-15 minutes. No mess.
Tissue paper ghosts rise off the table and dance toward a balloon without anyone touching them.
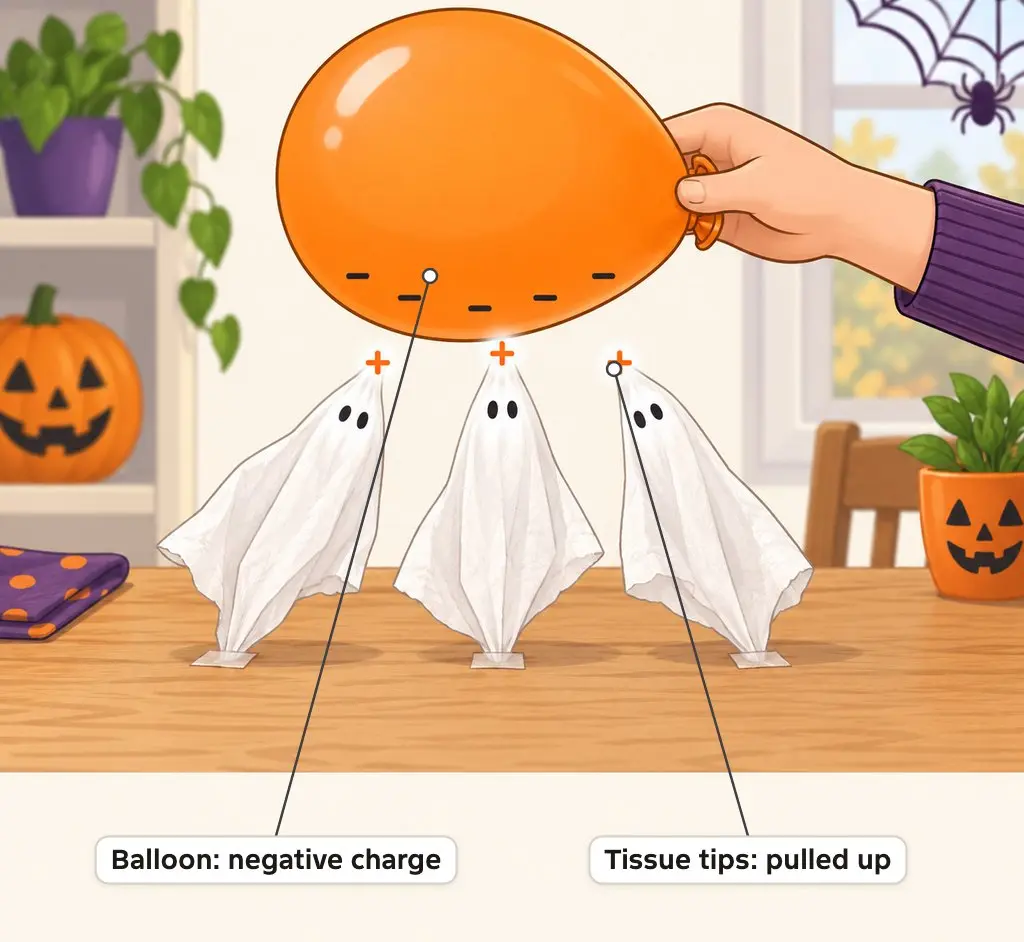
You need:
- Single-ply tissue (peel 2-ply tissue apart)
- Scissors and a marker
- A balloon
- Tape
- Cut ghosts about 1.5 inches (4 cm) tall and tape the bottom tip of each one to the table.
- Rub the balloon on your hair for about 10 seconds.
- Bring the balloon slowly toward a ghost.
Why it works: Rubbing moves electrons from your hair onto the balloon, so the balloon becomes negatively charged. The tissue starts out neutral, but the charged balloon pushes some of its electrons away, leaving the near side slightly positive. Opposite charges attract, so the ghost lifts toward the balloon.
Make it an experiment: change what you rub the balloon on (hair, wool, cotton, polyester) or how many times you rub, and measure the highest point from which the ghost still lifts.
Safety: balloons are a choking risk for children under 8, so an adult handles them and picks up popped pieces right away.
Oobleck Monster Mud
Grades K-5. 20-30 minutes. High mess.
Green swamp monster mud that turns solid when you punch it and runs through your fingers when you stop.
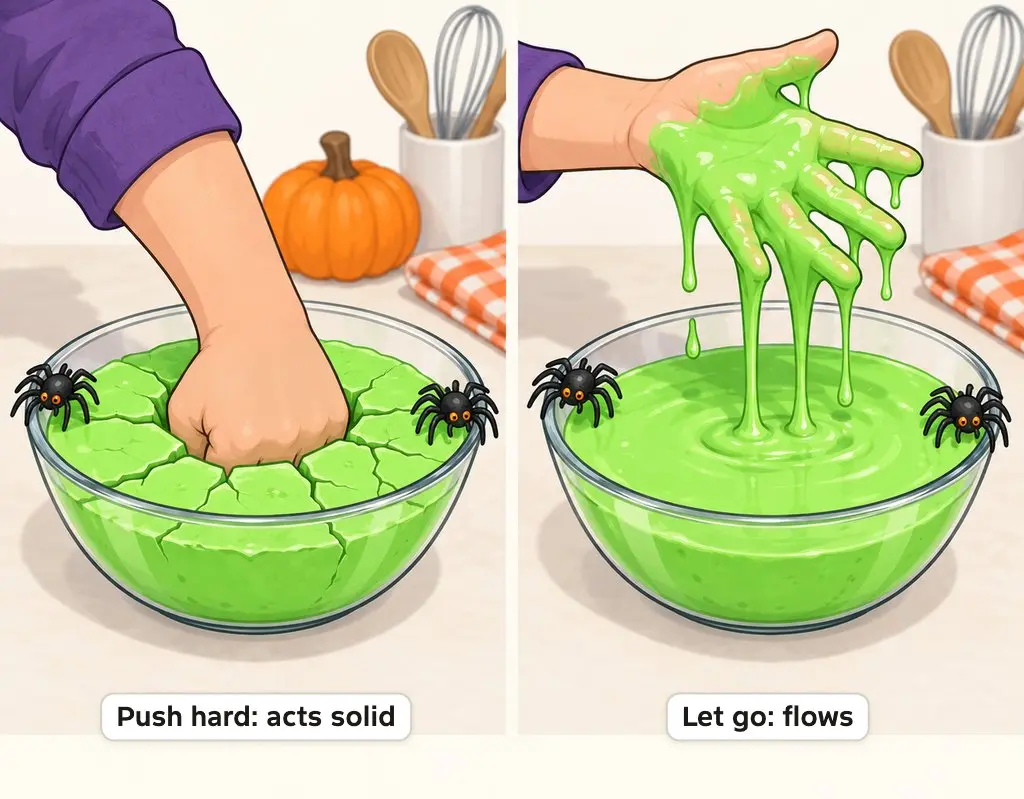
You need:
- 1 tablespoon cornstarch in a small bowl
- A cup of water and a medicine dropper
- A fork
- Green food coloring, if you like
- Add water a drop at a time, stirring every 20 drops.
- After 100 drops, stir every 10.
- Stop when it all flows together, usually around 150 to 170 drops.
Why it works: Oobleck is a non-Newtonian fluid. Poking or squeezing it makes it act like a solid, and the harder you push, the more solid it gets. Leave it alone and it flows like a liquid. Scale it up in a pie tin for messy hands-on play.
Make it an experiment: change the number of water drops per tablespoon of cornstarch (130, 150, 170, 190) and time how long a coin takes to sink to the bottom.
Safety: oobleck goes in the trash. Pouring it down the drain can clog the pipes.
Spooky Lava Lamp
Grades K-8. 30-45 minutes. Medium mess.
Draw a jack-o’-lantern face on the bottle and fill it with orange water for a glowing potion lamp.
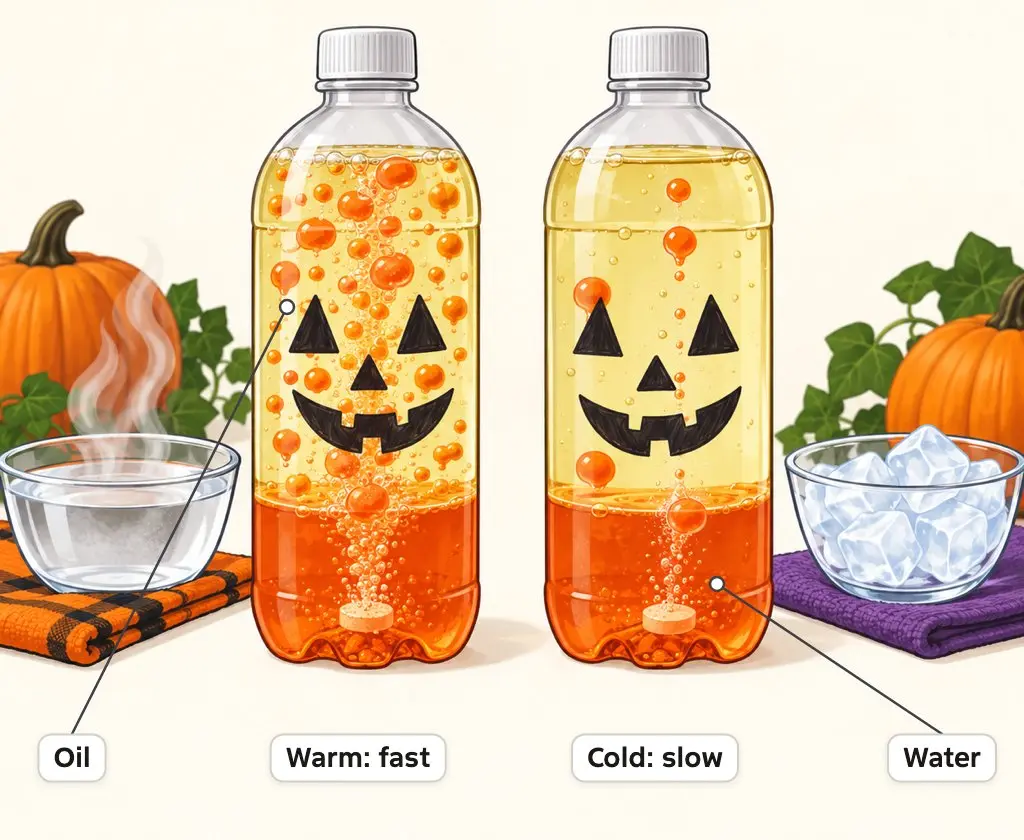
You need:
- 2 identical clear bottles
- 1 to 2 inches of water in each, with 5 drops of food coloring
- Vegetable oil to fill each bottle at least 3/4 full
- 1 effervescent antacid tablet cut into quarters by an adult
- A bowl of hot water and a fridge
- Warm one bottle in the hot water and chill the other in the fridge.
- Drop a quarter tablet into each bottle.
- Start the timer when the tablet reaches the water.
Why it works: Oil and water don’t mix, and the oil floats on top. The tablet sinks to the water and reacts, with citric acid and sodium bicarbonate making carbon dioxide. Gas bubbles drag blobs of colored water up through the oil, then the gas escapes at the top and the blobs sink again. The warm bottle reacts much faster: the tablet is gone in about 20-30 seconds, while in cold water it takes a couple of minutes.
Make it an experiment: water temperature or tablet size (a whole tablet against quarters) is the variable. Time how long the tablet lasts and count the blobs in 30 seconds. Page 10 of the journal has the table.
Safety: Alka-Seltzer and similar tablets contain aspirin, and the label warns against giving it to children and teens recovering from flu-like illness or chickenpox. An adult handles the tablets. Throw the used oil in the trash rather than pouring it down the drain.
Sink or Float Pumpkins
Grades K-5. 20-30 minutes. Medium mess.
Will a big pumpkin sink? Many children guess it will, because it feels so heavy.
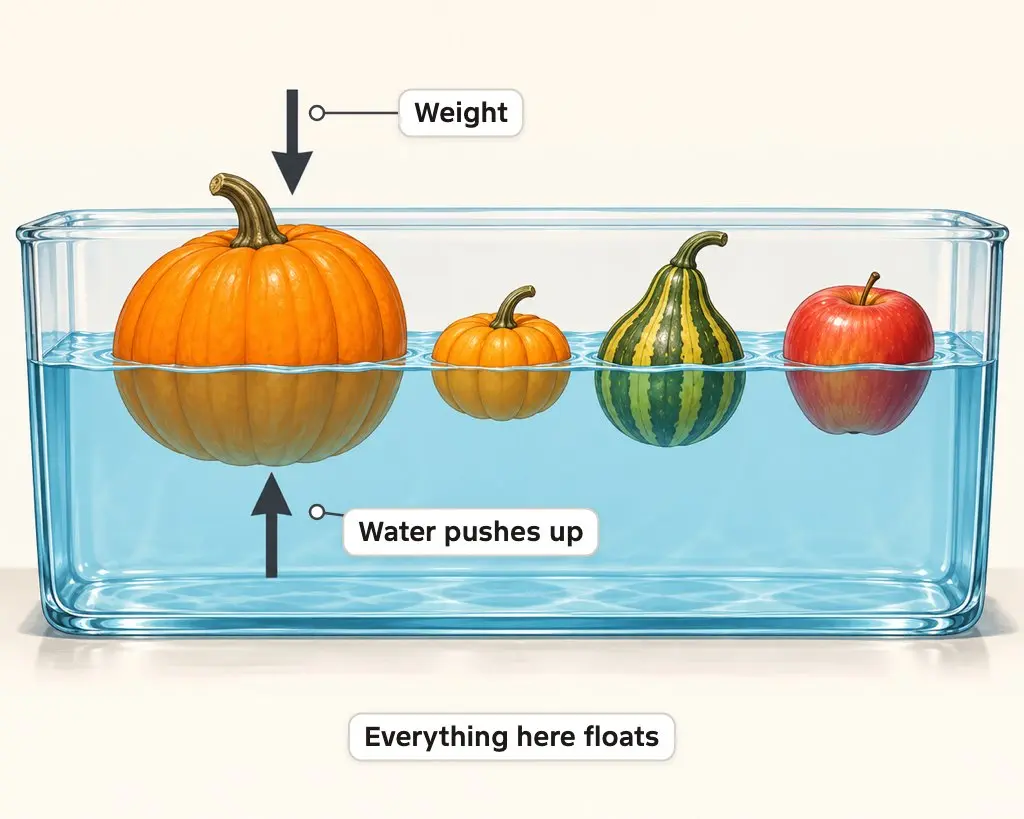
You need:
- A tub or sink of water
- Pumpkins and gourds of different sizes
- Pumpkin pieces: rind, flesh and seeds
- A kitchen scale and a measuring cup for grades 3-5
- Predict sink or float for each item.
- Place each one gently in the water and record what happens.
- Grades 3-5 can weigh an item and measure the water it pushes aside.
Why it works: An object floats when it’s less dense than water. A pumpkin is mostly hollow inside, so for its size it’s light and pushes aside a lot of water. The water pushes back up with a force equal to the weight of the water moved aside, which is Archimedes’ principle.
Make it an experiment: compare whole, hollowed and cut pumpkins, then calculate density as mass (g) ÷ water pushed aside (mL). Page 11 of the journal has both tables.
Safety: watch young children closely around tubs of water, and an adult does the cutting.
Halloween Biology Experiments
These two work with living things, or things that used to be living, so they take patience. Both make good science fair projects because they produce real numbers.
Apple Mummy
Grades 3-8. 45 minutes to set up, then 7 days. Low mess.
Mummify an apple the way Egyptian embalmers dried a body, then wrap the winner in gauze for display.
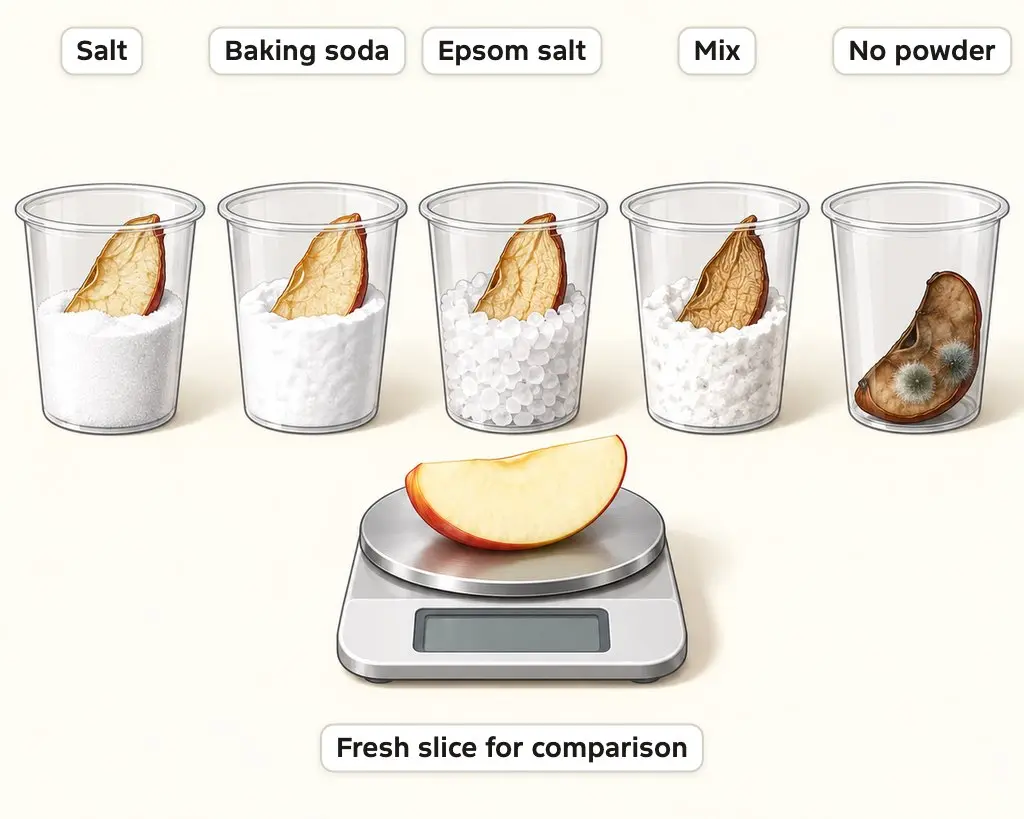
You need:
- An apple cut into equal slices by an adult
- Cups and labels
- 1/2 cup each of table salt, baking soda and Epsom salt, plus a salt and baking soda mix
- One empty cup as the control
- A kitchen scale
- Weigh each slice and write the mass on its cup.
- Cover each slice completely with one powder. Leave the control slice uncovered.
- Wait 7 days, brush the powder off without rinsing, and weigh each slice again.
Why it works: Salt and baking soda are desiccants. They draw water out of whatever they touch, and without water the bacteria and mold that cause rot struggle to grow. Egyptian embalmers used natron, a natural mix of salts that includes sodium carbonate, sodium bicarbonate and salt. It isn’t the same thing as baking soda, despite what a few lesson plans say.
Make it an experiment: the powder is the variable. Work out percent mass lost = (start mass – day 7 mass) ÷ start mass × 100. Page 12 of the journal has the table.
Safety: nobody eats the slices. Keep the control cup covered, because it will rot, and throw everything away at the end.
Yeast Ghost Balloons
Grades 3-8. 15 minutes, then a 45-minute wait. Low mess.
White balloons with ghost faces blow themselves up on top of bottles. No breath needed.
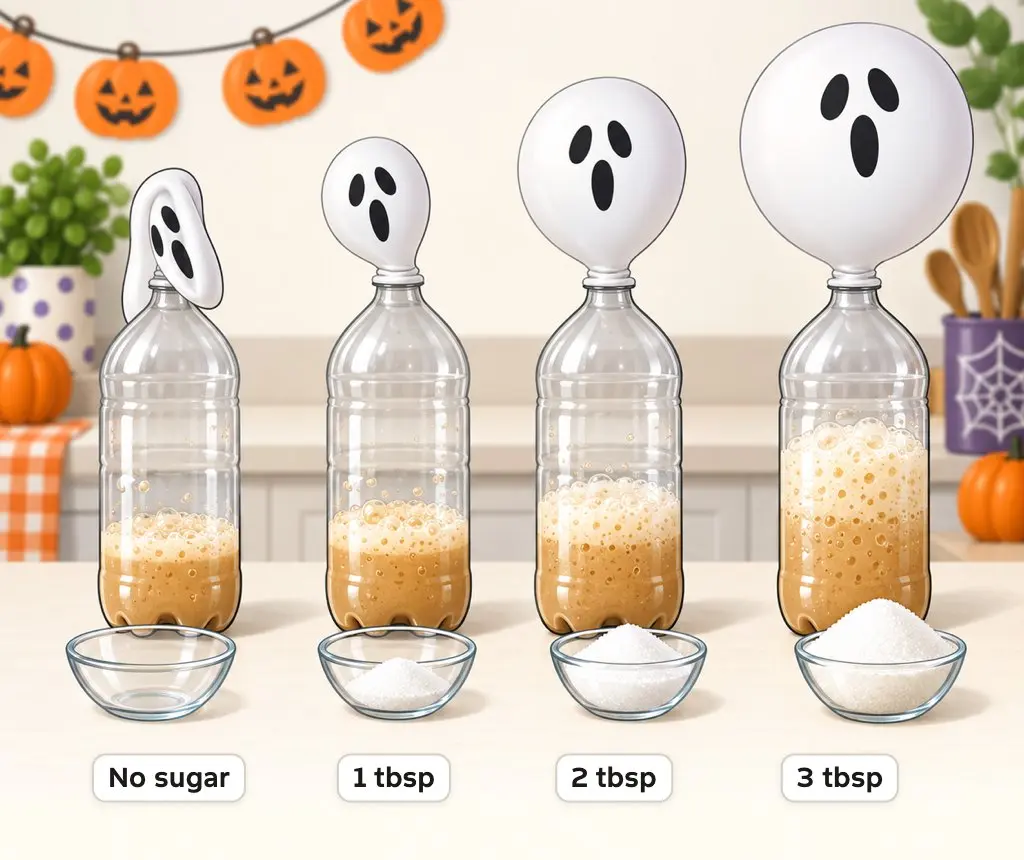
You need:
- 3 or 4 two-liter bottles
- 2 packets of dry yeast per bottle
- Sugar (0, 1, 2 and 3 tablespoons)
- About 2 1/2 cups of very warm tap water per bottle
- White balloons with ghost faces drawn on
- A string and a ruler
- Add the sugar and warm water to each bottle and shake.
- Add the yeast and swirl.
- Stretch a balloon over each neck.
- Leave the bottles somewhere warm, out of direct sun, for 45 minutes.
Why it works: Yeast is a single-celled fungus. It eats sugar for energy and releases carbon dioxide, which fills the balloon. That process is fermentation. With no sugar, the yeast has nothing to eat and the balloon stays flat.
Make it an experiment: the amount of sugar is the variable. Wrap a string around each balloon at 15, 30 and 45 minutes to measure it. Page 13 of the journal has the table.
Safety: balloons are a choking risk for children under 8, and the hot tap water can be very hot. Pour the used yeast outside or dilute it well before it goes down a drain.
Halloween STEM Challenges
The last two are engineering challenges, where students design, test and improve something. They’re the easiest Halloween STEM activities to run with a whole class, because each group needs only candy, sticks and a few rubber bands.
Candy Pumpkin Towers
Grades K-8. 20-30 minutes. Low mess.
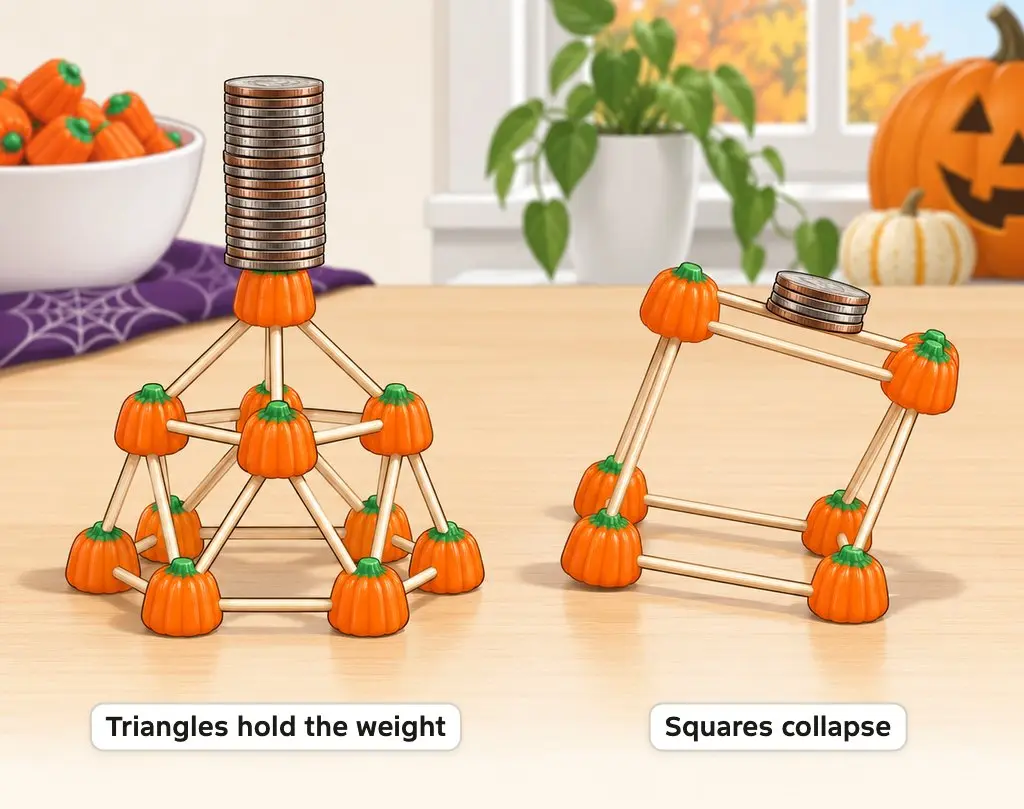
Build the tallest haunted tower or the strongest dome from candy pumpkins, gumdrops and toothpicks.
You need:
- Soft candy such as candy pumpkins or gumdrops (11 for a dome)
- Toothpicks (25 for a dome)
- Coins or small weights for load testing
- For a dome, make a pentagon base, then add 2 upward toothpicks per candy to form 5 triangles.
- Join the tops into a second pentagon and finish with 5 toothpicks meeting at one top candy.
- Test how many coins the dome holds before it fails.
Why it works: Triangles are rigid, and a network of triangles spreads a load across the whole structure. That’s why a geodesic dome holds a lot of weight for the little material it uses.
Make it an experiment: compare a dome with a cube built from the same number of candies and toothpicks, or a triangle base with a square one, and record the load each one holds.
Safety: toothpick points are sharp, and candy is a choking hazard for children under 4. Keep building candy out of mouths.
Pumpkin Catapult
Grades 3-12. About 30 minutes. Low mess.
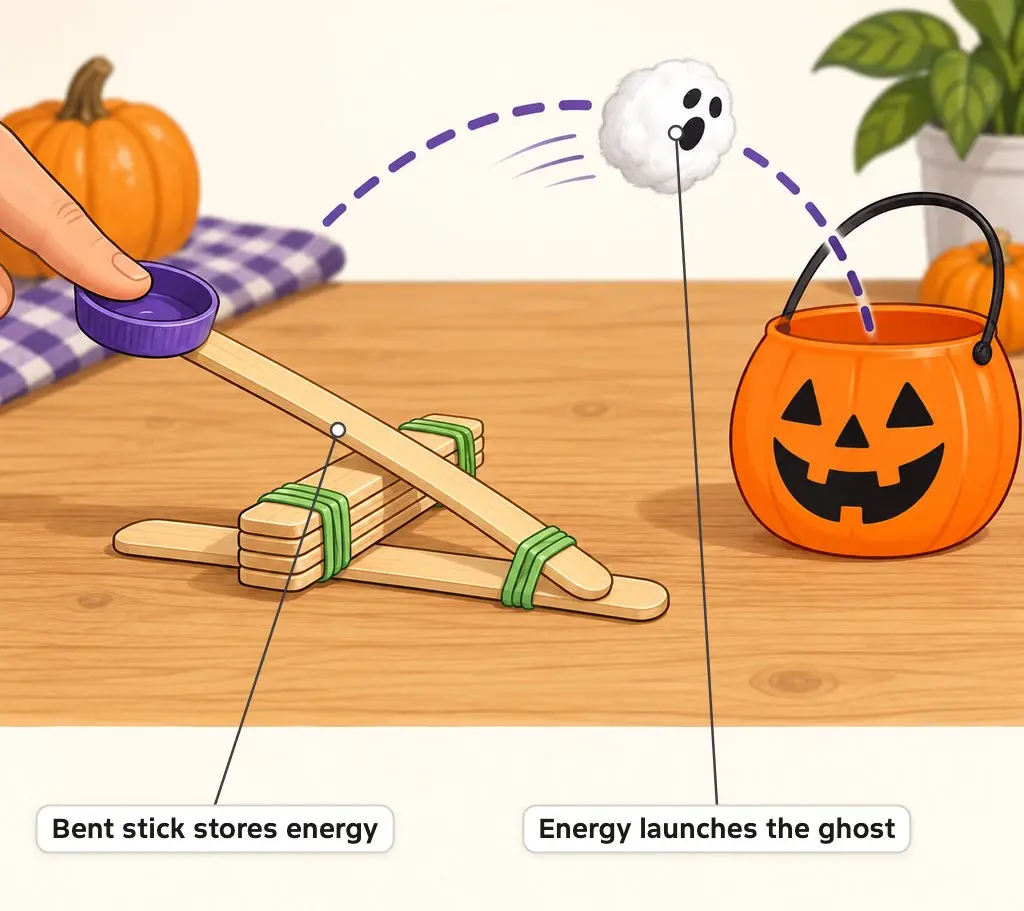
Launch cotton ball ghosts at a jack-o’-lantern bucket with a catapult made from craft sticks.
You need:
- 8 craft sticks
- At least 5 rubber bands
- Glue and a plastic bottle cap
- Cotton balls with ghost faces drawn on
- A tape measure
- Stack 6 sticks and band both ends.
- Cross a launch stick over the stack and band them together in an X.
- Band a base stick to one end of the launch stick and glue the bottle cap on the other end as the cup.
- Push down on the cup and let go.
Why it works: Bending the launch stick stores elastic potential energy. Letting go turns it into kinetic energy, which passes to the cotton ball. Pushing down farther stores more energy, so the ghost flies farther, and moving the stack of sticks changes the launch angle.
Make it an experiment: change the push-down distance or the position of the stack, launch 5 times for each setting and average the distances. Page 14 of the journal has the table. High school students can estimate launch speed from the distance.
Safety: launch soft things only. A hard object turns this into something that can hurt someone, and nobody aims at people.
Adult-Only Demo: Dry Ice Witch’s Brew
Dry ice makes the best cauldron fog there is, and it’s the one Halloween experiment I’d keep in adult hands. It’s solid carbon dioxide at -78.5 °C (-109.3 °F), and it turns straight into gas as it warms. These are the rules from science museum and poison center safety guides:
- Never put dry ice in a sealed or airtight container. The gas builds pressure and the container can explode.
- Use it only in an open, well-ventilated room. A lot of carbon dioxide in a closed space, such as a car, can leave too little oxygen to breathe.
- Handle it with gloves or tongs. Bare skin gets a frostbite-type burn.
- Never put it in a drink. Swallowing a piece can cause internal burns.
- Store it in an insulated cooler that isn’t sealed shut, not in the freezer, and let leftovers turn to gas outside.
Halloween Science Safety Rules
Most of these experiments are gentle, but a few household products are stronger than they look. These rules cover every experiment on this page, and the last page of the lab journal turns them into a checklist:
- Hydrogen peroxide: 3% household strength only, kept in its original bottle.
- Effervescent tablets: they contain aspirin, so an adult handles them.
- Balloons: a choking risk for children under 8.
- Candy: no hard or sticky candy for children under 4, and check allergies. Candy corn contains sesame oil.
- Glow sticks: never cut one open.
- Black lights: nobody looks into the light or shines it on skin.
- Safety glasses: for anything that fizzes, foams or splashes.
- Food: nothing used in an experiment gets eaten.
Keep the Science Going After Halloween
If one of these experiments hooks your child, a monthly science kit keeps it going without you hunting for supplies:
- MEL Science sends a box of experiments every month, with STEM kits for ages 5 and up, physics for 8 and up and chemistry for 10 and up. The first chemistry box includes a home lab kit, and you can pause or cancel the subscription from your account.
- KiwiCo sells a Spooky Halloween Science kit built on static electricity, so it pairs well with the dancing ghosts.
If you’re planning a full Halloween week, my free Halloween math worksheets cover kindergarten to high school with answer keys, and the pumpkin catapult pairs well with the quadratic launch sheet. For the rest of the year, I keep a list of STEM websites for students, and homeschool families can find more in my roundup of the best homeschooling websites.
FAQs on Halloween Science Experiments
What is the easiest Halloween science experiment for preschoolers?
The floating dry-erase ghosts and the sink-or-float pumpkins need almost no setup and nothing dangerous. The puking pumpkin works too if an adult carves the pumpkin and pours the vinegar.
How does the puking pumpkin work?
Vinegar (acetic acid) reacts with baking soda (sodium bicarbonate) to make carbon dioxide gas, water and sodium acetate. Dish soap traps the gas in bubbles, so the pumpkin fills with foam that spills out of its mouth.
Is pumpkin elephant toothpaste safe for kids?
Yes, with 3% household hydrogen peroxide, safety glasses and an adult pouring the peroxide. Never use hair bleach strength or “food grade” peroxide, and don’t let anyone touch the foam to their mouth.
Which Halloween experiments work for a science fair?
Pick one with a number to measure: the glow stick temperature race, the apple mummy, the yeast ghost balloons or the pumpkin catapult. Change one variable, repeat each test at least 3 times and graph the averages.
What Halloween science experiments suit middle and high school?
The glow stick race (reaction rate and temperature), candy chromatography (Rf values), the puking pumpkin with a limiting reactant, glowing tonic water (fluorescence) and the catapult (energy and projectile motion).
Can I print the lab journal for my whole class?
Yes. Print as many copies as you need for your class, homeschool group or school. Please link to this page instead of reposting the file.
Final Remarks
Pick 1 or 2 experiments that fit your grade and the mess you can live with, print the matching journal page, and have students write their prediction before anything starts. The prediction is what turns a Halloween trick into a science lesson.
Tell Google you want more of this.
Add Gaurav Tiwari as a preferred sourceOne tap, and this site shows up more often in your own Top Stories, AI Overviews and AI Mode. Remove it any time.
Disclaimer: This site is reader-supported. If you buy through some links, I may earn a small commission at no extra cost to you. I only recommend tools I trust and would use myself. Your support helps keep gauravtiwari.org free and focused on real-world advice. Thanks. - Gaurav Tiwari