
 by
by
Apple’s laptops still ship with fewer ports than a desk needs, and with MacBook Neo, the M5 MacBook Pro and the new Mac mini all on sale at the same time, the hub that suits one of them is often the wrong buy for another. So, if you are looking for the best USB-C hub for MacBook Pro, MacBook Air, MacBook Neo or a Mac mini, this guide can surely help.
My own desk runs a 16-inch MacBook Pro, an M1 MacBook Air and an M4 Mac mini through one 4K USB-C monitor, so the display and charging questions in this guide are the ones I deal with every day.
Every Mac has a different display limit, a different charging need and, in Neo’s case, two USB-C ports that are not equal, so just one hub cannot fit all of them. But in this guide I will try my best to cover the 8 hubs that solve the common jobs properly, and the checks that stop you buying the wrong one.
In addition to that, there is a listing checklist near the end that you can run through on the Amazon page before you pay. Or, if your setup is unusual and you would rather ask, I am always available for a chat. Let’s get started.
Best USB-C Hubs for MacBook at a Glance
Find your Mac and your job in the table, then jump to that hub. Port count is not a column on purpose, because it is the least useful number on any hub listing.
| Best for | Hub | Display | Data, network and cards | Charging to the Mac | Main limit |
|---|---|---|---|---|---|
| Most MacBook buyers in India | UGREEN Revodok Pro 109 | 1 HDMI, 4K60 | USB-C 10Gbps, USB-A 10Gbps + 2 x 5Gbps, Gigabit Ethernet, SD + microSD | 100W PD input; net to Mac not published | UGREEN doesn’t state the wattage that reaches the laptop |
| Budget desks | TP-Link UH9120C | 1 HDMI, 4K60 | USB-C 5Gbps, 3 x USB-A 5Gbps, Gigabit Ethernet, SD + microSD UHS-I | 100W PD input | No 10Gbps port for a fast SSD |
| Creators and 16-inch MacBook Pro | Plugable USBC-9IN1E | 1 HDMI, 4K60 | USB-C 10Gbps, 2 x USB-A 10Gbps, USB 2.0, Gigabit Ethernet, SD + microSD UHS-II | 125W to host with a PD 3.1 charger; 85W with a 100W charger | One display; India stock is patchy |
| Travel | Satechi OntheGo 7-in-1 | 1 HDMI, 4K60 | 2 x USB-A 5Gbps, Gigabit Ethernet, SD + microSD UHS-I | 100W input, up to 80W to host | No USB-C data port |
| Flush fit on a MacBook | Satechi Pro Hub Slim | USB4 up to 6K60 plus HDMI 4K60 | USB4 40Gbps, USB-C 10Gbps, 2 x USB-A 10Gbps, SD + microSD UHS-I | Up to 100W through the USB4 port | Uses 2 MacBook ports; no Ethernet |
| Thunderbolt SSDs and multi-display desks | CalDigit Element 5 | Through Thunderbolt or USB-C adapters | 3 x Thunderbolt 5, 3 x USB-A 10Gbps, 2 x USB-C 10Gbps | 90W, from its own 180W supply | No HDMI, Ethernet or card slot on the box |
| MacBook Neo | Satechi USB-C Snap Hub | 1 HDMI, 4K60 | USB-C 5Gbps, USB-A 5Gbps, SD + microSD UHS-I | 100W input, up to 45W to host | Neo only; occupies both ports |
| Mac mini M4, M4 Pro and the 2026 models | UGREEN 65487 dock | None | 3 x USB-A 10Gbps, 2 x USB-A 5Gbps, 2 x USB-C 10Gbps, SD + microSD, M.2 NVMe slot | Doesn’t charge the Mac mini | Everything shares one 10Gbps link to the Mac |
Read the charging column twice. The number on the box is what goes into the hub, and on most hubs a smaller number comes out the other side.
The 8 below cover those jobs, grouped by the Mac they fit:
- MacBook Pro and MacBook Air: UGREEN Revodok Pro 109, TP-Link UH9120C, Plugable USBC-9IN1E, Satechi OntheGo 7-in-1, Satechi Pro Hub Slim and CalDigit Element 5
- MacBook Neo: Satechi USB-C Snap Hub
- Mac mini: UGREEN 65487 dock with an NVMe slot
Which USB-C Hub Should You Buy?
If you already know your monitor, your Mac and how much charging you need, the decision takes a minute. This is how I’d route it.
- One 4K60 monitor, Ethernet, card slots and everyday accessories: UGREEN Revodok Pro 109
- The same list on a tighter budget: TP-Link UH9120C
- Fast card imports and more than 85W into the MacBook: Plugable USBC-9IN1E
- A hub that lives in a bag: Satechi OntheGo 7-in-1
- No cable hanging off the laptop: Satechi Pro Hub Slim
- Several Thunderbolt SSDs or a 3-monitor M5 Pro desk: CalDigit Element 5
- MacBook Neo: Satechi USB-C Snap Hub
- Mac mini M4, M4 Pro or the 2026 models: UGREEN 65487
Before going into the detail, I want to ensure four terms are clear, because every listing hides behind them:
- 4K60: 3840 x 2160 pixels at 60 frames a second. A hub that says only “4K HDMI” is usually 4K30, and 30Hz makes the cursor and scrolling feel sticky.
- PD (Power Delivery): the USB-C charging standard. “100W PD” on a hub is the input rating; the laptop receives less once the hub takes its share.
- 10Gbps and 5Gbps: the two common USB data speeds. A portable SSD needs 10Gbps to run near its rated speed; keyboards, mice and hard drives are fine at 5Gbps.
- UHS-I and UHS-II: SD card reader classes. UHS-I tops out around 104MB/s, UHS-II around 312MB/s, and a fast card in a slow reader runs at the reader’s speed.
Check Your Mac Before You Buy a Hub
The Mac decides what a hub can do, not the other way round. Apple sets the number of external displays each chip can drive, and no hub, dock or adapter can push past it. This is where most competing buying guides go wrong, because they list a dual-HDMI hub for a Mac that can only drive one screen.
| Mac | External displays | What it means for the hub |
|---|---|---|
| MacBook Air M1 or M2 | 1, up to 6K60 | A dual-HDMI hub won’t give you 2 independent screens |
| MacBook Air M3 | 1 with the lid open; a 2nd with the lid closed | Two monitors means running it closed |
| MacBook Air M4 or M5 | 2, with the built-in display still on | A USB4 or Thunderbolt connection can carry both |
| MacBook Neo | 1, up to 4K60, from the left port only | Plug the hub into the left port |
| MacBook Pro M5 | 2, with the built-in display on | The hub can’t raise this |
| MacBook Pro M5 Pro | 3 | Thunderbolt 5 starts to earn its price |
| MacBook Pro M5 Max | 4 | Exact combinations depend on resolution and refresh rate |
| Mac mini M4 or M4 Pro | 3 | A Mac mini dock needs no display output of its own |
Apple lists 1 external display for the M1 and M2 MacBook Air, adds a second on the M3 Air only with the lid closed, and gives the M4 and M5 Air 2 external displays with the built-in one still running. The M5 MacBook Pro line goes 2, 3 and 4 across the base, Pro and Max chips, and the M4 Mac mini drives up to 3. The exact numbers and resolutions are in Apple’s MacBook Pro display support page, the Mac mini page and the MacBook Neo tech specs.
A hub can only hand out the displays your Mac already has. It cannot add one.
That one sentence rules out a good number of the hubs sold as “dual 4K” on Amazon India, which is worth knowing before you spend.
Native Displays, MST and DisplayLink on a Mac
There are generally three ways a hub gets a picture onto a second screen, and only one of them behaves the way the Amazon listing implies on a Mac.
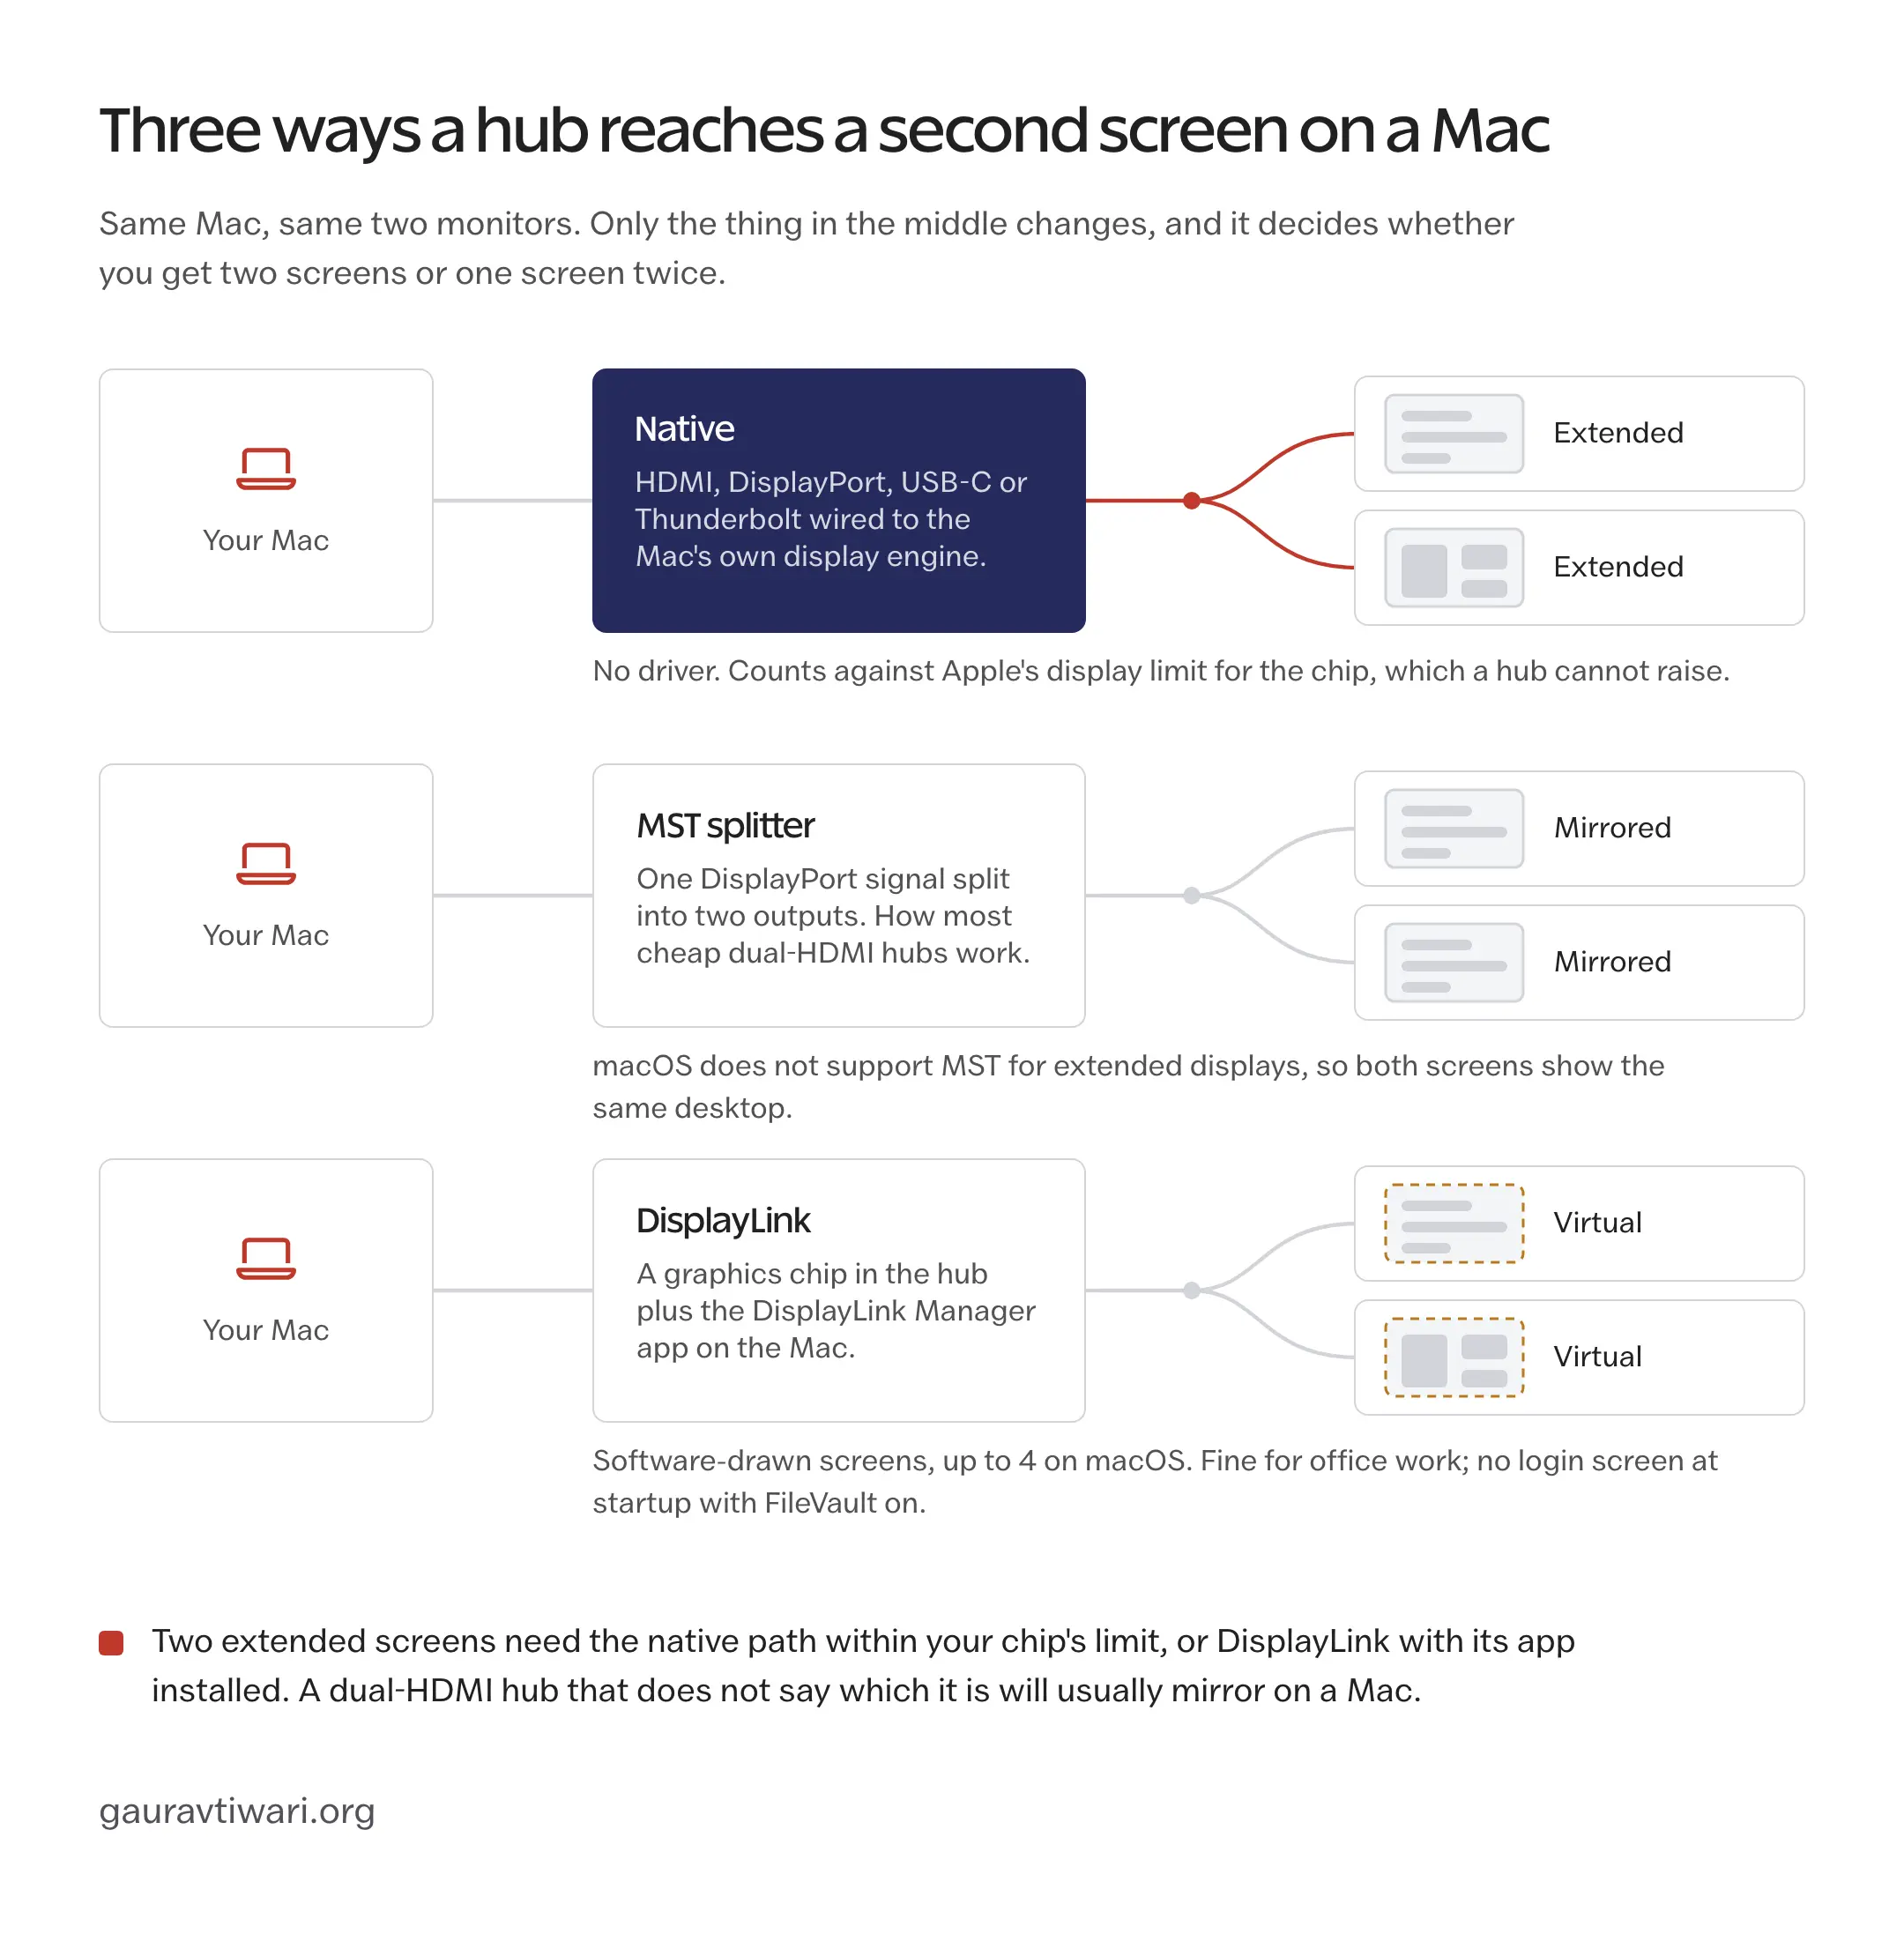
The first is a native connection. HDMI, DisplayPort, USB-C and Thunderbolt outputs on a good hub are wired straight to the Mac’s own display engine, so the monitor behaves exactly as if you had plugged it into the Mac. No driver, no compression, and it counts against Apple’s limit in the table above.
The second is MST, or Multi-Stream Transport, which is how most cheap dual-HDMI hubs split one DisplayPort signal into two. Windows extends the desktop across both. macOS does not support MST for extended displays, so the two screens mirror each other, which is why so many 1-star Amazon reviews on those hubs come from Mac owners. Plugable’s knowledge base says it plainly: MST-connected displays on macOS are mirrored, not extended.
The third is DisplayLink. The hub carries its own graphics chip, a piece of software called DisplayLink Manager runs on the Mac, and the screen becomes a virtual display drawn by that software. It works, and it is the only way to get past Apple’s display count on an M1 or M2 Air. It also has edges: Synaptics, which makes DisplayLink, notes that macOS allows at most 4 virtual displays and that a DisplayLink screen won’t show the login screen at startup when FileVault is on. I read it as a workaround for office work, not a way to run a color-critical or gaming monitor.
| Method | Driver needed | Independent displays on macOS | Best use |
|---|---|---|---|
| Native Thunderbolt, USB4, HDMI or DisplayPort | No | Yes, up to the Mac’s limit | Your main work monitors |
| MST dual-output hub | No | No, the screens mirror | Avoid for a 2-screen Mac desk |
| DisplayLink | Yes | Yes, as virtual displays | Extra office screens when the chip’s limit is in the way |
So the rule is simple: if you want two extended screens from a Mac, the hub has to be native within the chip’s limit, or DisplayLink with the driver installed. None of the 8 hubs in this guide use MST.
How I Picked These 8
These picks come from each maker’s current spec sheet and the Amazon India listing, not from a bench. I have not run every hub in this guide through my own Macs yet, and where a maker prints only “100W PD” I do not assume the Mac receives 100W. The things that moved a hub up or down the list:
- display output the Mac can actually use, at 4K60 as the floor for a desk hub
- a port mix that covers a real job, not the largest number on the box
- the wattage the maker states as delivered to the laptop, not the input rating
- USB and card reader speed on the ports you will use for storage
- physical fit, including whether the hub hangs from the port or rests on the desk
- availability and warranty in India, because a great hub you can’t buy here is not a recommendation
There are no scores out of 10 here. A number like that only means something when every product goes through the same test with the same gear, and until that happens the category award is the honest way to rank them.
Best USB-C Hubs for MacBook Pro and Air
Read the 6 listings below back to back and they blur into one pitch: 4K HDMI, 100W, 9-in-1. The differences that matter are in the small print, which port runs at 10Gbps, how much of that 100W leaves the hub, and whether the card reader is UHS-I or UHS-II. Most portable hubs work the same on a MacBook Air as on a Pro, so I’ve kept the two families together and split the products by the job instead. One difference is worth saying up front: a 14-inch or 16-inch MacBook Pro already has HDMI and an SD slot on the body, so for that machine a hub is mostly about Ethernet, USB-A and a one-cable desk. The Air has none of those, and that is where the HDMI and card slots on a hub earn their place.
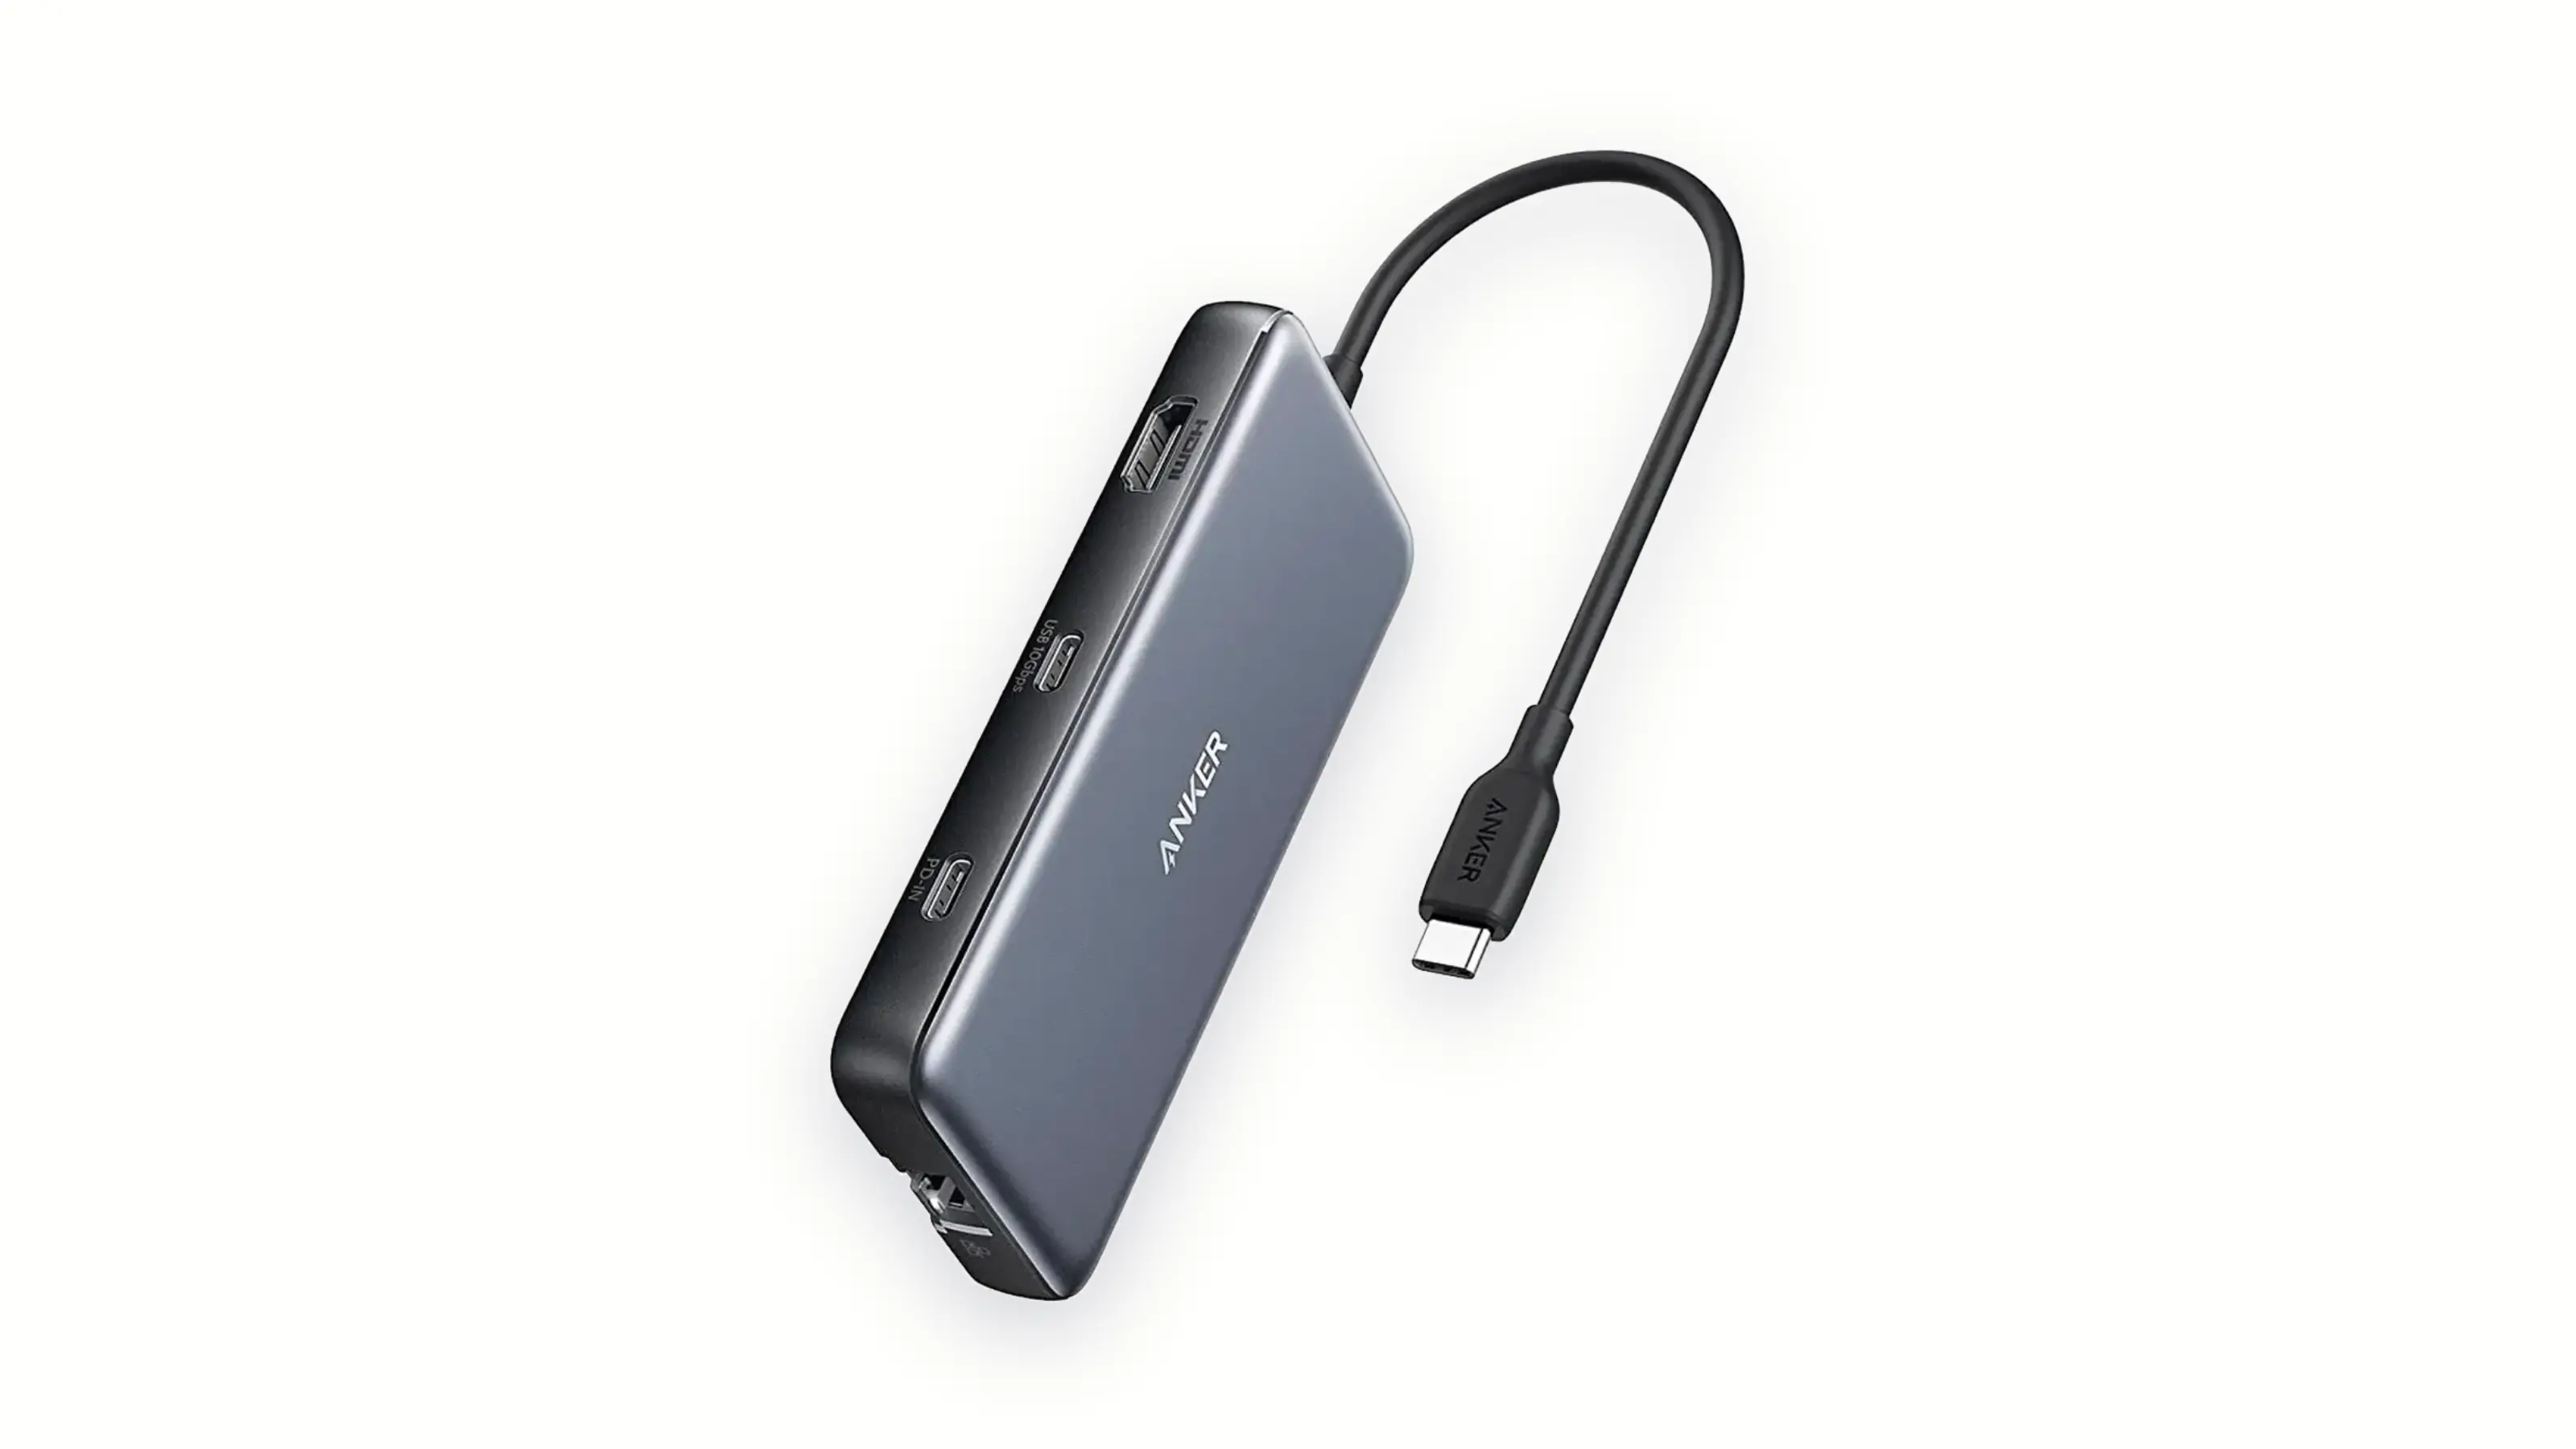
UGREEN Revodok Pro 109
The Revodok Pro 109 is my pick for most MacBook Pro and Air owners in India, because it is the cheapest hub here that gets every basic right at the same time: 4K60 out, a 10Gbps port for an SSD, wired Ethernet, both card slots and 100W pass-through. It is a one-cable hub with 9 ports, aimed at the developer or creator with one monitor, a wired network and the occasional SD card.
- HDMI 2.0, up to 4K at 60Hz
- 1 x USB-C data, 10Gbps
- 1 x USB-A 10Gbps and 2 x USB-A 5Gbps
- Gigabit Ethernet
- SD and microSD readers, UHS-I
- USB-C PD input, 100W listed
- Series Revodok Pro 109, SKU 15532
The 10Gbps pair is what separates it from the TP-Link below and from most hubs at its price. Plug a portable SSD into the USB-C port and it runs close to its rated speed instead of the 5Gbps ceiling that budget hubs quietly impose. Against the Anker 555, which used to sit at the top of this guide, the UGREEN takes 100W in rather than 85W and generally costs less on Amazon India, and the port mix is otherwise the same.
What UGREEN does not do is tell you how much of that 100W reaches the laptop. Its page says “100W Power Delivery” and stops there, so the honest reading is that a 14-inch MacBook Pro or any Air will charge normally through it, and a 16-inch under a heavy render may hold or lose a little charge. The card slots are UHS-I as well, which is fine for phone-sized transfers and slow for a day of raw photos.
It should be skipped if you import from UHS-II cards every day or need more than 85W going into the Mac; that is the Plugable’s job. If the 10Gbps ports mean nothing to you, the TP-Link next saves money for the same desk.
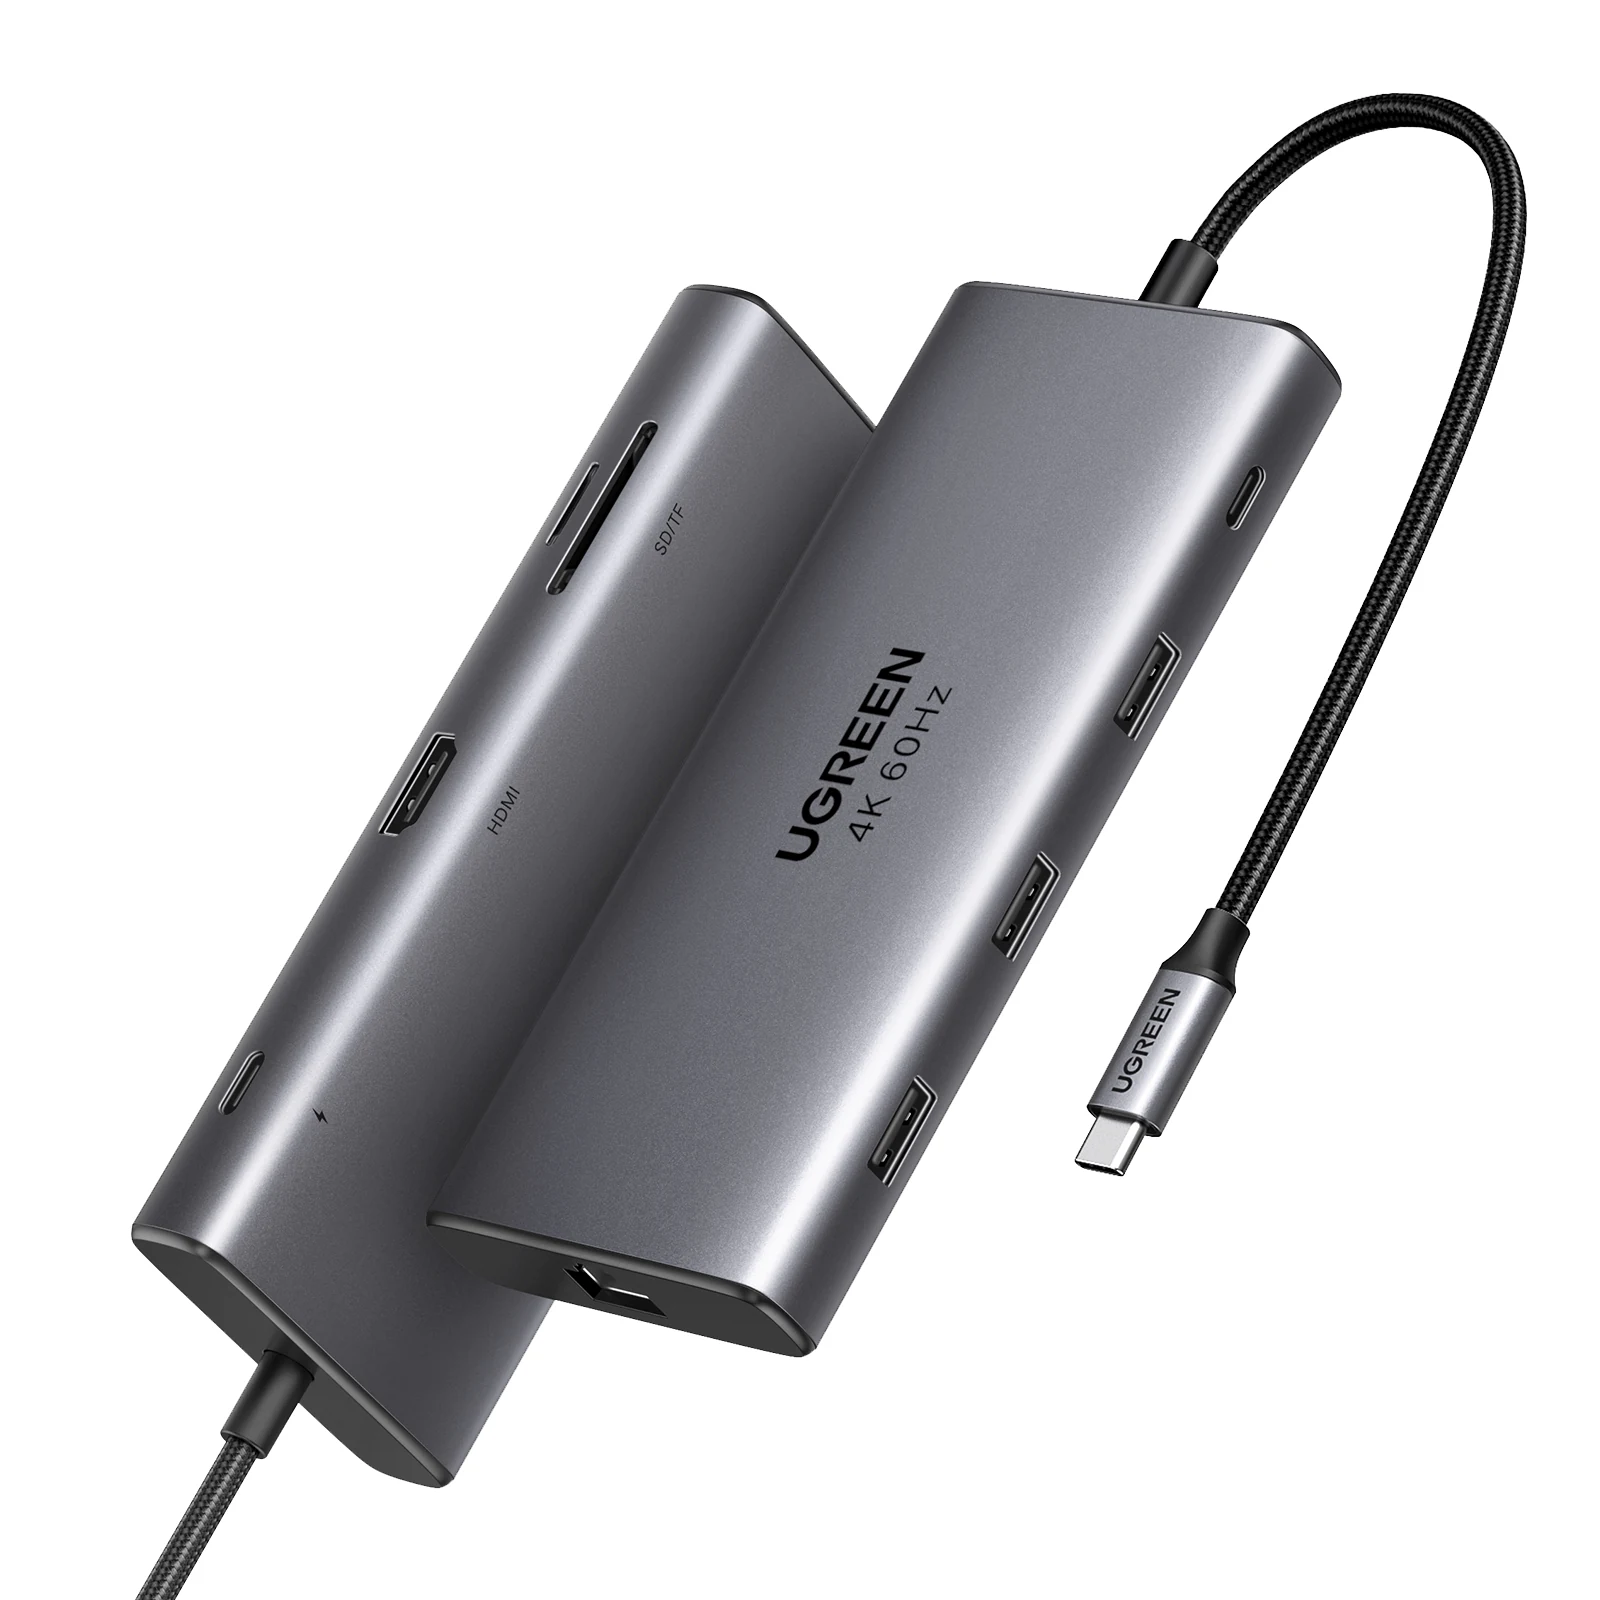
UGREEN Revodok Pro 109 9-in-1 USB-C Hub
- 4K60 HDMI plus 10Gbps USB-C and USB-A data ports
- Gigabit Ethernet with SD and microSD readers
- 100W USB-C Power Delivery input
- One cable, 9 ports, small enough for a bag
TP-Link UH9120C
The UH9120C is the budget pick, and I’d rather send a reader here than to a no-name 11-in-1 at the same price. It covers the same jobs as the UGREEN, one 4K60 monitor, Gigabit Ethernet, both card slots and 100W pass-through, from a brand with a service network in India.
- HDMI, up to 4K at 60Hz
- 1 x USB-C data, 5Gbps
- 3 x USB-A, 5Gbps each
- Gigabit Ethernet
- SD and microSD, UHS-I up to 104MB/s, both slots usable at once
- USB-C PD input, 100W listed
The step down from the UGREEN is the data speed. Every USB port here is 5Gbps, so a modern portable SSD copies at roughly half of what it would through a 10Gbps port, and the card readers are UHS-I. For a keyboard, a mouse receiver, a hard drive and the odd flash drive, none of that matters, and that is who this hub is for. TP-Link’s page says it delivers up to 100W to the PC, which I’d treat as a listing claim rather than a measurement until it is checked under load.
Give it a miss if you copy large video files from a fast SSD as part of your day. Everyone else gets the UGREEN’s desk for less money.
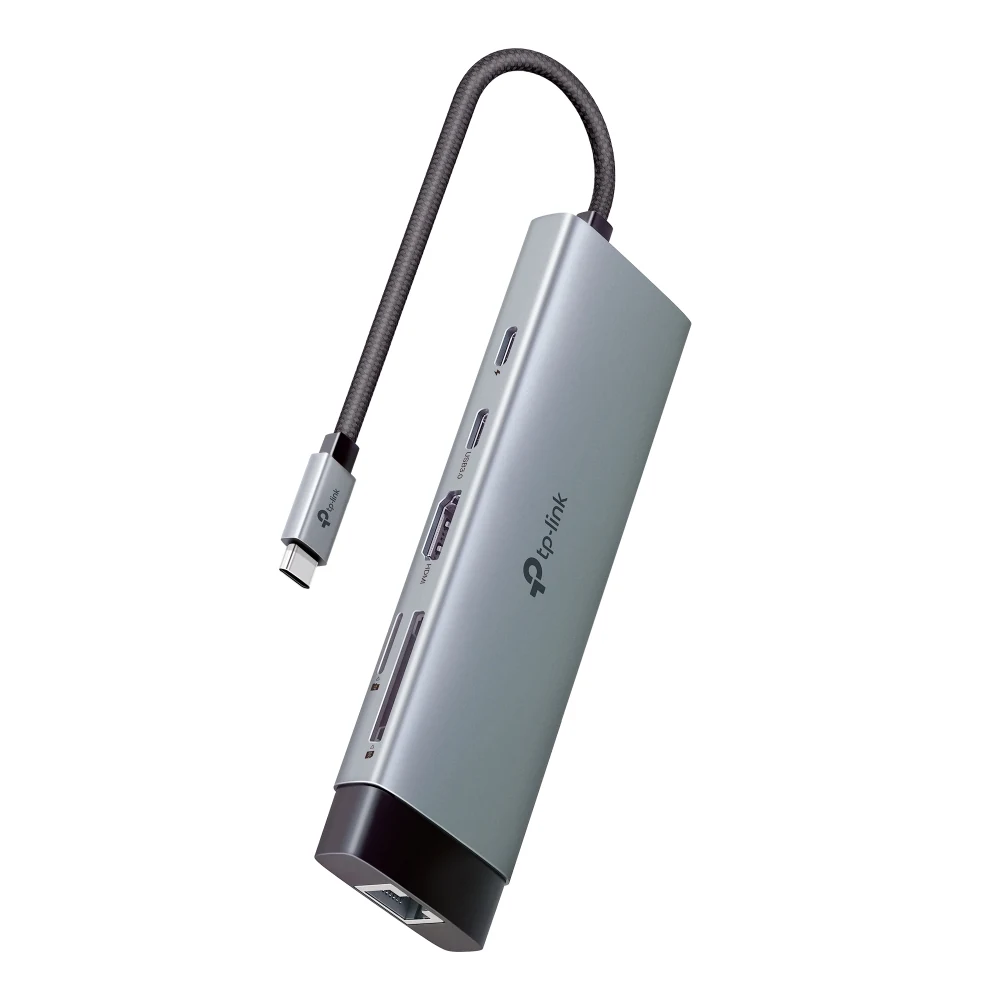
TP-Link UH9120C 9-in-1 USB-C Hub
- 4K60 HDMI output
- Gigabit Ethernet and dual card readers that work at the same time
- 1 USB-C and 3 USB-A ports at 5Gbps
- 100W Power Delivery input
Plugable USBC-9IN1E
The Plugable is the strongest ordinary hub in this guide, and the only one that documents charging the way every maker should. The nine ports are not the point. The point is UHS-II card readers and a spec sheet that says exactly how many watts reach the laptop under each charger.
- HDMI 2.0, one display up to 4K at 60Hz, with HDR
- 1 x USB-C data, 10Gbps, no video output
- 2 x USB-A 10Gbps and 1 x USB-A 2.0 at 480Mbps
- Gigabit Ethernet
- SD and microSD, UHS-II up to 312MB/s
- With a PD 3.1 EPR charger: 140W in, up to 125W to the host
- With a PD 3.0 charger: 100W in, up to 85W to the host
- SKU USBC-9IN1E
That last pair of lines is why it is here. Plugable says out loud that the hub keeps some power for itself, and gives the number for both charger classes, which is exactly the figure UGREEN and TP-Link leave out. For a 16-inch MacBook Pro it is the only portable hub in this list that can push past 85W, provided the charger, the cable and the Mac all speak PD 3.1 EPR. Photographers get the other half of the value: a UHS-II card reads at up to 3 times the speed of the UHS-I slots on every other hub here.
There are two limits. It drives one display only, and the USB-C data port carries no video. And Amazon India stock for this exact SKU comes and goes, so it can’t be the default India recommendation; the Amazon.com listing is steady and a search for USBC-9IN1E on Amazon India will show you whether it is in stock today. Be careful with the name, too: older buying guides still push a “Plugable 7-in-1” that is an HDMI 1.4, 4K30 product, and that is not this hub.
It is the wrong buy for anyone who will never own a UHS-II card and whose Mac charges fine at 85W. The UGREEN does the rest for less.
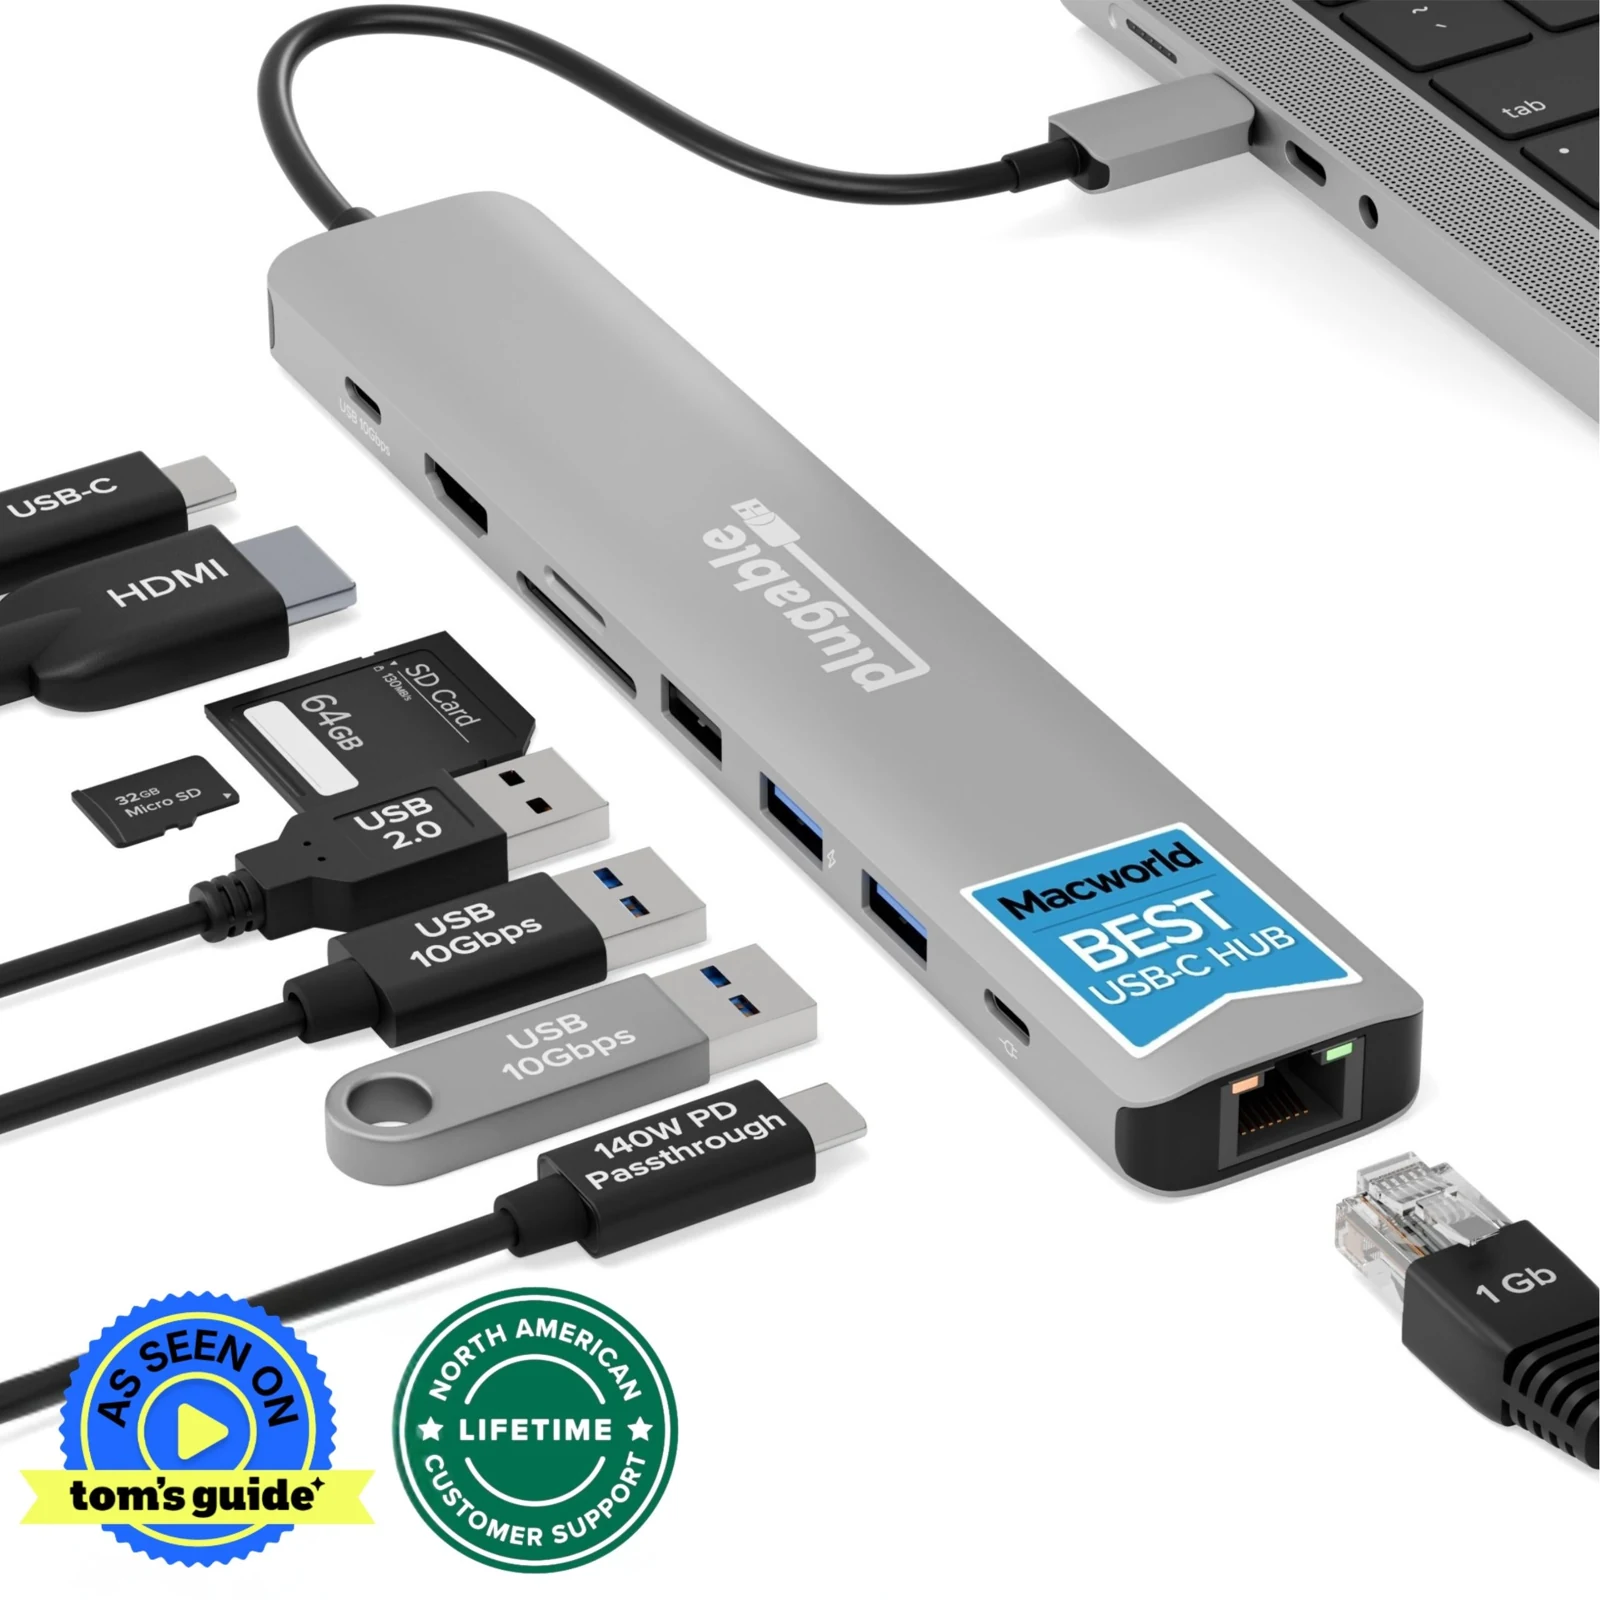
Plugable USBC-9IN1E 9-in-1 USB-C Hub
- UHS-II SD and microSD readers, up to 312MB/s
- Up to 125W to the laptop with a PD 3.1 EPR charger
- 4K60 HDMI with HDR, 3 x 10Gbps data ports
- Gigabit Ethernet in a portable body
Satechi OntheGo 7-in-1
This is the hub I’d put in a bag, and not because it is fast. The 13cm braided host cable coils into the body, a magnetic ring snaps the hub onto the included adhesive disc on a laptop lid or a desk, and the whole thing stops being a dongle that swings off the port every time you move the laptop. Most “portable” hubs are a rectangle with a short cable; this one was drawn for travel.
- HDMI, up to 4K at 60Hz
- Gigabit Ethernet
- 2 x USB-A, 5Gbps
- SD and microSD, UHS-I up to 104MB/s
- USB-C PD: up to 100W in, up to 80W out to the laptop
- SKU ST-POTG7C
Satechi is clear that the PD port is charging only, no data and no video, and it prints the 80W output figure instead of hiding behind the 100W input. That 20W gap is the honest number for this class of hub and a fair guide to the ones that don’t say.
It is not the hub for a desk with an SSD, because there is no USB-C data port and every peripheral port is 5Gbps. In a bag, with a hotel HDMI and a card to empty, it is the pick.
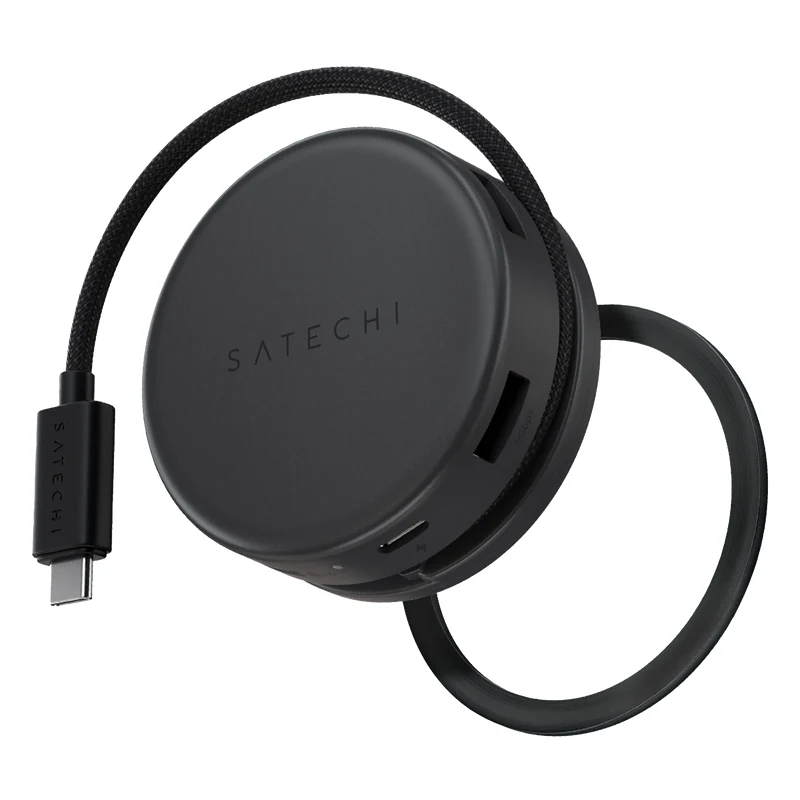
Satechi OntheGo 7-in-1 Multiport Adapter
- Host cable coils into the body, with a magnetic mount ring
- 4K60 HDMI and Gigabit Ethernet
- SD and microSD UHS-I readers
- 100W in, up to 80W to the laptop
Satechi Pro Hub Slim
For readers who hate a hub dangling off a cable, the Pro Hub Slim is the one I’d choose over the older Pro Hub Max. It plugs into two adjacent ports and sits flush with the MacBook’s edge, and its spec is more current than most direct-attach hubs: a USB4 pass-through at 40Gbps and three conventional 10Gbps data ports.
- USB4 pass-through: up to 40Gbps, up to 6K60 display output, up to 100W Power Delivery
- HDMI, up to 4K at 60Hz, with HDR
- 1 x USB-C data, 10Gbps, data only, no charging and no video
- 2 x USB-A, 10Gbps
- SD and microSD, UHS-I up to 104MB/s, both readable at once
The USB4 port is the useful part. It passes a Thunderbolt or USB-C monitor, an SSD or a charger through at full speed, so the hub costs you two ports and gives one of them back at 40Gbps. Satechi notes that dual external displays through it are not supported on M1 and M2 chips, which is Apple’s limit rather than the hub’s; on an M3 or newer MacBook that can drive two screens, the HDMI and the USB4 port can each carry one.
- It occupies 2 adjacent ports, and the fit is model specific
- There is no Ethernet
- A case, even a thin one, can stop both connectors seating fully
- A rigid hub puts more leverage on the MacBook’s ports than a cabled one
- It has no use on a Mac mini
Look elsewhere if you use a case, or if wired Ethernet is on your list. If the desk is clean and the case is off, it is the tidiest hub here.
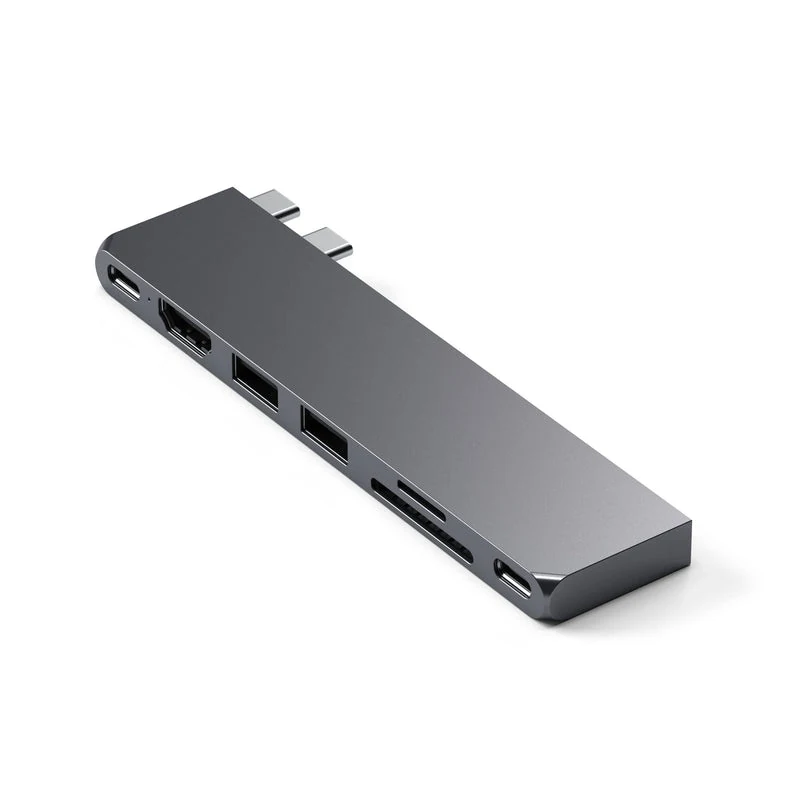
- USB4 pass-through at 40Gbps with up to 100W charging
- HDMI up to 4K60 plus display out over USB4
- 1 x USB-C and 2 x USB-A, all 10Gbps
- Flush dual-connector fit on MacBook Pro and Air
CalDigit Element 5
The Element 5 is a different kind of product, and I’d only send a reader here when the desk has already outgrown USB-C. It is a Thunderbolt 5 expansion hub with its own power supply, not an HDMI-and-Ethernet adapter, and it belongs in the same sentence as the UGREEN only because both plug into the same shaped port.
- 1 x Thunderbolt 5 host connection, up to 120Gbps
- 3 x Thunderbolt 5 downstream, 80Gbps each
- 3 x USB-A, 10Gbps
- 2 x USB-C, 10Gbps
- Up to 90W to the laptop, from the included 180W power supply
- 80Gbps in both directions, up to 120Gbps in Bandwidth Boost mode
- No HDMI, DisplayPort, Ethernet, card reader or audio on the box
What you get for the money is bandwidth and stability. Several fast SSDs, a Thunderbolt display, a capture device and an audio interface can all hang off it without sharing one 10Gbps line, and the 90W is consistent because it comes from the wall rather than from a pass-through. On my 16-inch M5 Pro MacBook Pro this is the first hub in the list that can make use of the chip’s three-display limit; CalDigit says M5 Pro and M5 Max Macs run triple displays through it, and Thunderbolt 4 Macs get two.
- It is too much hub for HDMI, Ethernet and a card reader; that job costs a fraction of the price
- 90W is below the 140W fast-charge path of a 16-inch MacBook Pro
- HDMI and Ethernet need USB-C adapters unless the monitor takes USB-C or Thunderbolt
- Older Thunderbolt 3 and 4 Macs work, at their own lower bandwidth and display count
I’d skip it if everything you plug in fits on the UGREEN, and buy it when the list of devices, not the list of ports, is what is slowing you down.
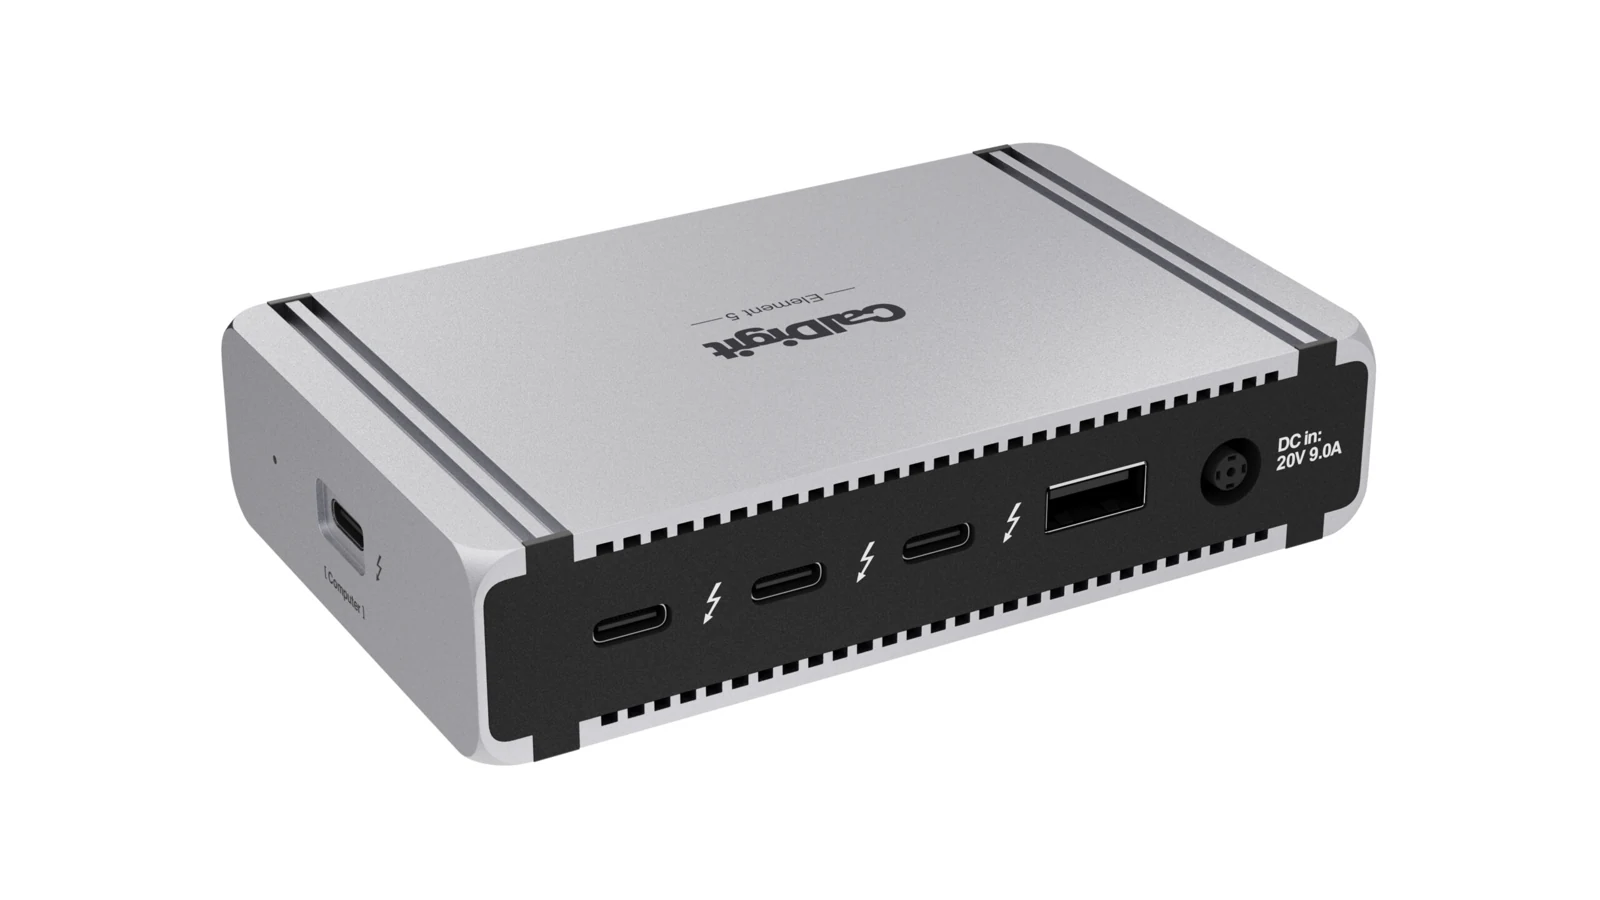
CalDigit Element 5 Thunderbolt 5 Hub
- 3 downstream Thunderbolt 5 ports at 80Gbps
- 5 conventional 10Gbps USB ports
- Consistent 90W charging from its own 180W supply
- Triple displays on M5 Pro and M5 Max Macs
Best USB-C Hub for MacBook Neo
MacBook Neo gets its own section because its two USB-C ports are not the same port. Plug a hub into the wrong one and the monitor stays black and the SSD crawls, and the hub gets the blame. This is what Apple says about the two:
- The left port supports USB 3 data at up to 10Gbps and one external display
- The right port runs USB 2 data at up to 480Mbps
- Either port can charge the machine
- The machine drives one external display, up to 4K at 60Hz
Apple sets this out on the MacBook Neo tour page and in the Neo tech specs. So any ordinary single-cable hub in this guide works on a Neo, as long as it goes into the left port, and the UGREEN or the TP-Link is a fine desk hub for one. The problem is the dual-connector hubs built for MacBook Pro and Air, because those assume both ports are equal and one of their two plugs lands on the USB 2 side.
Satechi USB-C Snap Hub
The Snap Hub is the pick for Neo because it was drawn around that layout rather than adapted to it. Its main connector takes the left, video-capable port and the second connector takes the right, so the HDMI and the fast data land where the Mac can use them, and the hub sits flush instead of hanging off one side.
- HDMI, up to 4K at 60Hz
- 1 x USB-C data, 5Gbps
- 1 x USB-A, 5Gbps
- SD and microSD, UHS-I up to 104MB/s
- USB-C PD: 100W in, up to 45W out to the Neo
- Colors matched to Neo: Citrus, Blush, Indigo and Silver
It is slower and plainer than the main picks, with no Ethernet, no Thunderbolt and 5Gbps on every data port, and it occupies both of Neo’s ports. Satechi rates it at up to 45W into the laptop, so I’d feed it with Apple’s own charger rather than a weak one. For a Neo owner who wants a monitor, a card slot and a mouse receiver in one clean piece, it does the job the way nothing else currently does.
It should be skipped if you already own a good single-cable hub; use the left port and keep your money. The Snap Hub is the best integrated option for Neo, not the only compatible one.
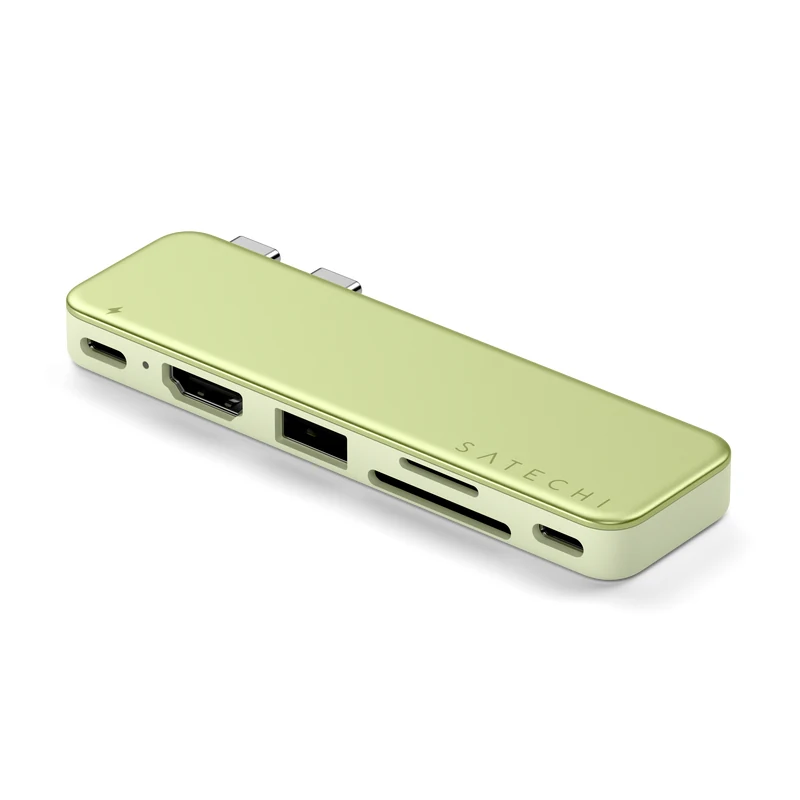
Satechi USB-C Snap Hub for MacBook Neo
- Dual connectors matched to Neo's fast left port and USB 2 right port
- 4K60 HDMI output
- USB-C and USB-A data at 5Gbps, SD and microSD UHS-I
- Up to 45W charging to the Neo; 4 matching colors
Best USB-C Hub for Mac mini
A Mac mini asks different questions of a hub. It does not need charging, it already has display outputs on the back, and what it lacks is ports on the front and cheap storage. So the things to check before buying a Mac mini base are not the ones on a MacBook list:
- Does it block the airflow under the chassis?
- Is the power button, which Apple put on the underside, still reachable?
- How fast is the single link back to the Mac, and what shares it?
- Which NVMe sizes and capacities fit the slot?
- Are the USB-C ports data, charging or video, because they are rarely all three
- Is it cut for this exact chassis, since the M4 body is smaller than the older one?
- Does Wi-Fi or Bluetooth stutter when several fast USB devices are active?
- Can the NVMe drive shed heat during a long copy?
Apple’s August 2026 refresh added M6 and M5 Pro chips and kept the same enclosure as the 2024 M4 model, so a base cut for the M4 should fit the new machines. UGREEN’s US listing already names the M6, while the India listing still says M4 and M4 Pro, so I’d read it again before ordering for an M6 or an M5 Pro.
UGREEN 65487 Mac mini M4 Dock
The 65487 is my pick for a Mac mini because it solves the two things the machine actually lacks, front-facing ports and affordable storage, without pretending to be a display dock. It is a stand with 7 USB data ports, both card slots and an M.2 slot underneath, and it sits under the Mac mini as if Apple had made it a little taller.
- 3 x USB-A 10Gbps and 2 x USB-A 5Gbps
- 2 x USB-C 10Gbps, data only, no video and no charging
- SD and microSD readers, rated up to 170MB/s
- M.2 NVMe slot for 2230, 2242, 2260 and 2280 drives, up to 8TB, on a 10Gbps interface
- A 5V USB-C input that powers the dock side only
- Cut for the Mac mini M4 and M4 Pro chassis; the SSD is sold separately
The whole dock talks to the Mac over one 10Gbps link, so a copy from the NVMe drive, an SD import and a USB SSD transfer running together share that line. For a single big transfer that is plenty, since a 10Gbps NVMe enclosure lands around the speed of a good portable SSD. For two at once, expect each to slow. It does not output video, it does not charge the Mac mini, and it will not fit the older, larger Mac mini body.
It is the wrong base if what you really want is more displays or Thunderbolt storage; that is the Mac mini’s own back panel or the CalDigit. For front ports and a few terabytes at a sensible price, this is the base to buy.
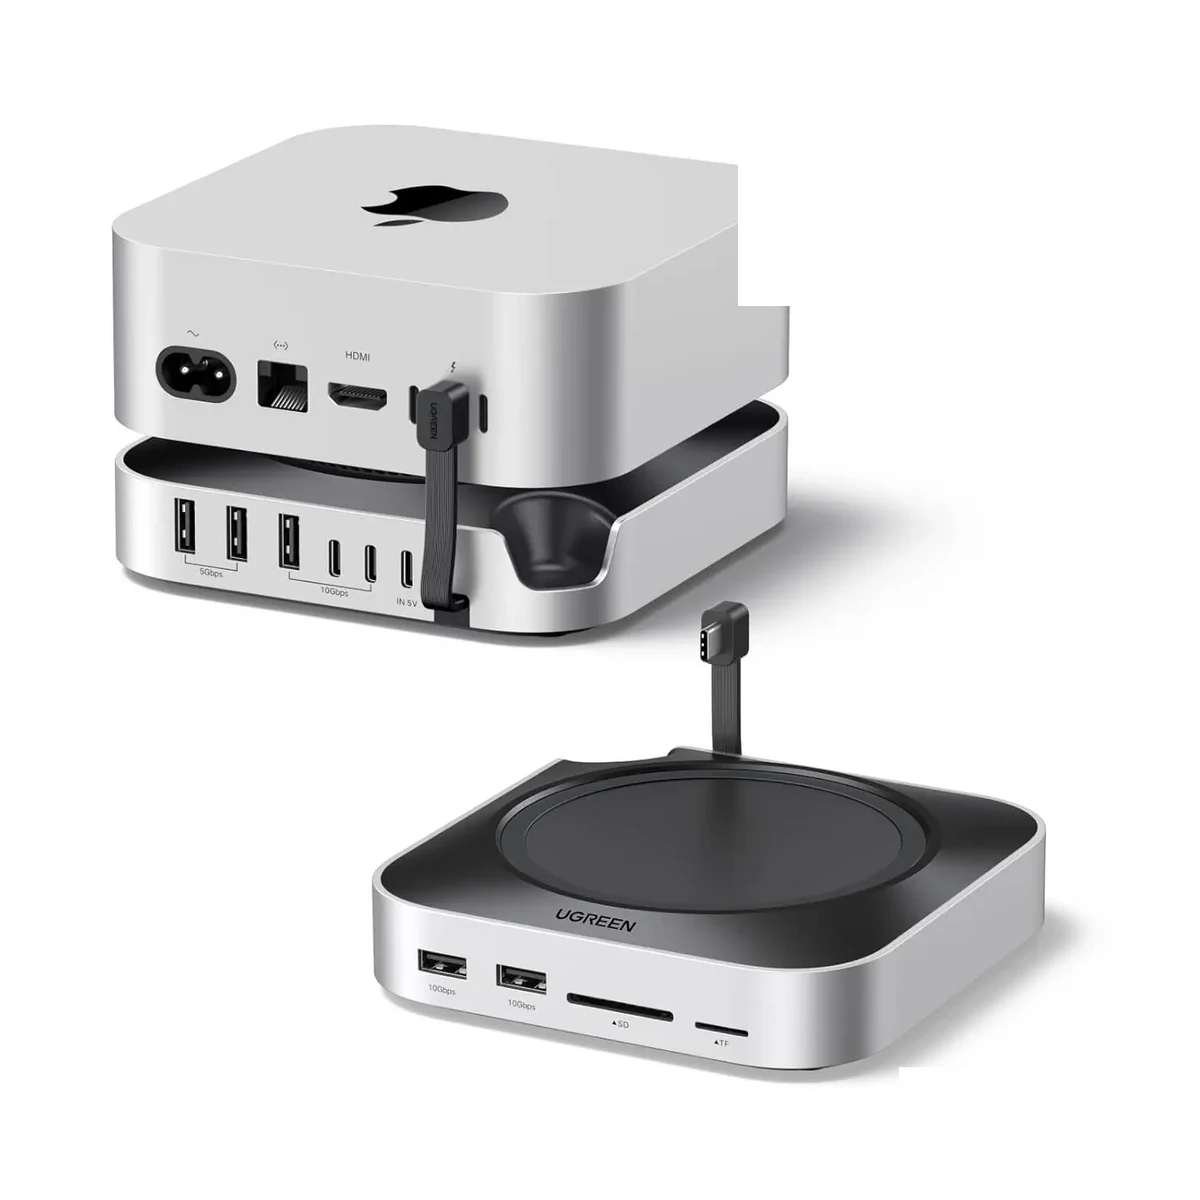
UGREEN 65487 Mac mini M4 Dock with NVMe Slot
- Stand and hub cut for the Mac mini M4 and M4 Pro chassis
- M.2 NVMe slot for 2230 to 2280 drives, up to 8TB
- 3 x USB-A 10Gbps, 2 x USB-A 5Gbps, 2 x USB-C 10Gbps
- SD and microSD readers up to 170MB/s
How to Choose a USB-C Hub for Your Mac
The order matters here. Most people start from the hub listing and work backwards to their desk, and that is how a 4K30 hub ends up driving a 4K monitor. Start from the monitor, then the Mac, then the charger, and the hub picks itself.
Start With Your Monitor
The monitor should choose the hub, not the reverse. Before reading a single listing, write down:
- how many monitors, now and in the next year
- the input each one takes: HDMI, DisplayPort, USB-C or Thunderbolt
- resolution and the refresh rate you actually want to run
- whether HDR matters to you
- whether the monitor already has USB ports on the back
- whether it charges the MacBook over USB-C, and at how many watts
A monitor that charges at 65W or more and carries a couple of USB ports is already most of a hub. Plenty of readers only need something small for Ethernet and a card slot after that. If you are still choosing the screen, my 4K monitors for programming guide is the place to settle that first.
Treat 4K60 as the Floor for Desk Work
A 4K30 hub is acceptable for slides, a projector, a television or a mostly static second screen. It is not acceptable for the screen you scroll code or spreadsheets on all day, because cursor movement, window drags and scrolling all update at half the rate and the whole desk feels sticky. The difference is obvious inside a minute and impossible to fix later without buying another hub.
Listings hide this behind the phrase “4K HDMI”. If the refresh rate is not printed next to the resolution, assume 30Hz and move on.
4K120 and 4K144 Need a Different Path
A hub that says “4K” or even “8K” on the box is not a promise of 4K at 120Hz. The HDMI 2.0 port on the UGREEN, TP-Link, Plugable and Satechi OntheGo is a 4K60 product and nothing more. For a high-refresh monitor, the workable routes are:
- connect the monitor straight to the Mac over USB-C or Thunderbolt
- use a USB-C to DisplayPort 1.4 or HDMI 2.1 adapter that lists your exact mode
- use a Thunderbolt hub with the display bandwidth to carry it, such as the CalDigit
- check whether your mode depends on Display Stream Compression, and whether the whole chain supports it
The hub is the wrong place to spend for a 144Hz screen. Put the money into the cable or adapter that actually carries the signal.
Leave Charging Headroom
There are six numbers between the wall and the battery, and listings only ever print one of them:
- the charger’s output
- the hub’s PD input rating
- the hub’s own overhead, usually 10W to 20W
- the maximum the hub passes to the host
- what the MacBook will accept
- the cable’s rating and whether it carries an E-marker chip for anything above 60W
What most listings print:
100W PD charging.
What the spec sheet means:
100W in from the charger, about 20W kept for the hub and its devices, up to 80W out to the laptop.
Same hub, same box. The second version is the one that decides whether a 16-inch MacBook Pro gains or loses charge during an export.
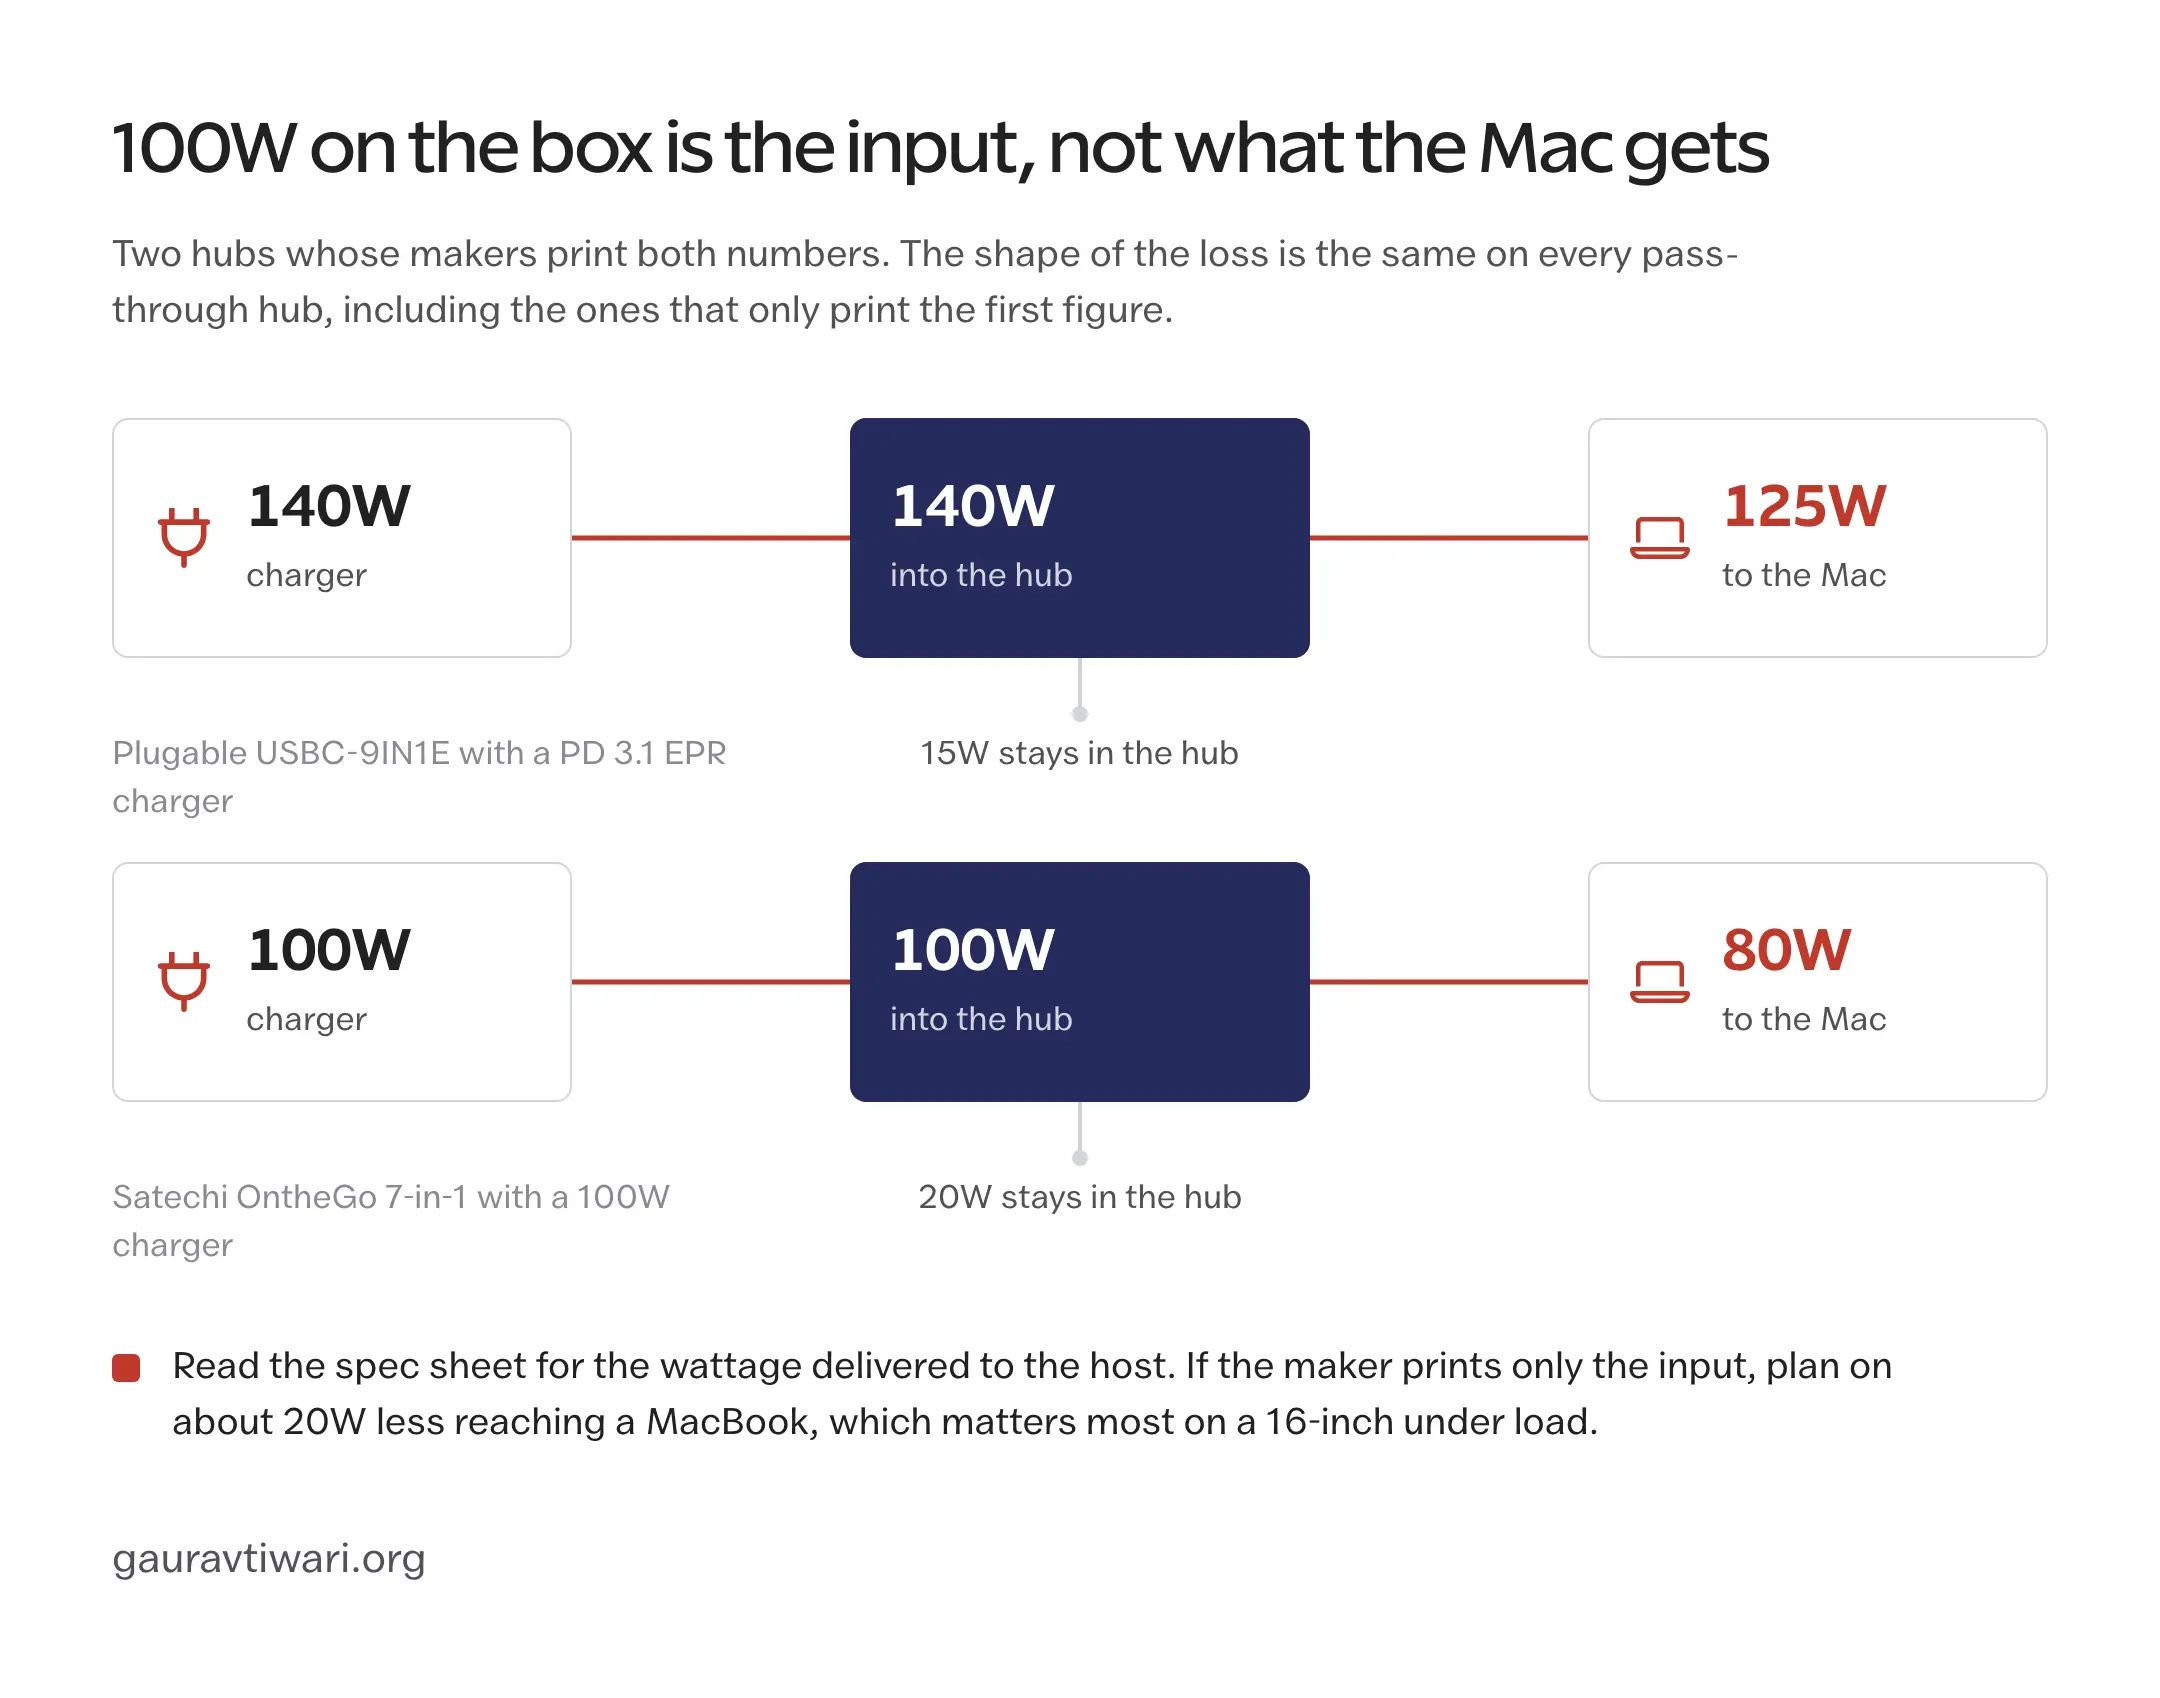
The hubs in this guide make the gap easy to see:
- Satechi OntheGo: 100W in, up to 80W to the host
- Plugable USBC-9IN1E: 140W in, up to 125W to the host with a PD 3.1 EPR charger; 100W in, up to 85W out with a normal charger
- CalDigit Element 5: a steady 90W from its own 180W supply
- Satechi Snap Hub: 100W in, up to 45W to the Neo
- Anker 555: 85W maximum, in and out
- UGREEN Revodok Pro 109 and TP-Link UH9120C: 100W in, output not published
For scale, Apple’s fast-charge page lists a 67W or 70W adapter for the MacBook Air, 96W for the 14-inch MacBook Pro and 140W for the 16-inch. My own monitor, an LG 27UP850-W, gives 4K60 and up to 96W over one USB-C cable, which is enough for the Air and for a one-cable desk, and below the 140W path my 16-inch would use for fast charging. That is the trade almost every USB-C monitor makes, and it is fine as long as you know you made it.
Match the Data Speed to the Job
The speeds on a hub listing are ceilings for the connection, not promises for the device. This is what each one is for:
| Connection | Advertised rate | What it is for |
|---|---|---|
| USB 2.0 | 480Mbps | Keyboard, mouse, printer, wireless receivers |
| USB 5Gbps | 5Gbps | Hard drives, flash drives, everyday accessories |
| USB 10Gbps | 10Gbps | Portable SSDs and large transfers |
| USB4 and Thunderbolt 4 | 40Gbps | Fast storage, displays, daisy chains |
| Thunderbolt 5 | 80Gbps both ways, up to 120Gbps for displays | Several fast devices and displays at once |
One thing the table can’t show: every device on an ordinary hub shares the single link back to the Mac. Four 10Gbps ports on a 10Gbps uplink do not add up to 40Gbps; they add up to 10Gbps divided between whatever is busy. If a fast SSD is the reason you are buying, my external SSD guide for creators covers which drives actually reach 10Gbps in the first place.
Check the Card Reader Class
- UHS-I readers top out around 104MB/s in every hub here except one
- UHS-II reads up to 312MB/s, and only the Plugable USBC-9IN1E has it in this list
- a UHS-II card in a UHS-I reader runs at the reader’s speed, so the card’s rating is wasted
- if you shoot on two card types, check that the SD and microSD slots can run at the same time; the TP-Link and the Pro Hub Slim say yes
For a phone-sized transfer the class does not matter. For a wedding’s worth of raw files it is the difference between an import that finishes over lunch and one that finishes after it.
Gigabit or 2.5GbE
Gigabit Ethernet is enough for almost every home internet connection in India and for a normal office network. 2.5GbE earns its place only when the rest of the chain can use it:
- a router or switch with a 2.5GbE port
- a NAS on the same network
- regular multi-gigabit file copies between machines
- an internet plan above 1Gbps
A 2.5GbE port does nothing for a 300Mbps connection except cost more. Every hub in the main list is Gigabit, and that is the right call for most desks.
Cabled or Direct-Attach
The two layouts solve different annoyances, and neither is simply better.
A cabled hub, like the UGREEN, TP-Link, Plugable and OntheGo, gives you:
- less strain on the MacBook’s ports, because the hub rests on the desk
- a fit with any case
- freedom to put the hub where the cables want it
- a hub that also works on a Mac mini, an iPad or a Windows laptop
A direct-attach hub, like the Pro Hub Slim and the Snap Hub, gives you:
- a clean edge with nothing dangling
- two host ports, so it can offer more functions than one cable can carry
And it costs you:
- both ports on one side
- a fit that is specific to the model, and broken by most cases
- more strain on the connectors when the hub is knocked
- any use on a desktop Mac
My own preference is cabled for a desk and direct-attach only for a bare laptop that travels light. The cases are the deciding factor more often than people expect.
Don’t Pay Dock Money for Travel Ports
A reader who needs one HDMI connection, Ethernet, a card slot and a mouse receiver needs a portable hub in the 2,000 to 6,000 rupee range, and gains nothing from Thunderbolt 5. The CalDigit only becomes a rational buy when you already own, or are about to buy, several devices that each want a 40Gbps lane: Thunderbolt SSDs, a Thunderbolt display, capture hardware. My MacBook Pro accessories guide makes the same point about docks in general: they are the last thing to buy, after the workflow has proved it needs one.
USB-C Hub vs Thunderbolt Hub vs Dock
These names get used as if they were interchangeable, and comparing a CalDigit against a 3,000 rupee UGREEN as though they were the same product is how readers end up disappointed by one or overpaying for the other. This is how the categories actually split:
| Category | Power | Bandwidth | Best for |
|---|---|---|---|
| Portable USB-C hub | Bus powered, or PD pass-through | 5Gbps or 10Gbps | Travel, HDMI, cards, Ethernet |
| Direct-attach MacBook hub | Bus powered, or PD pass-through | 10Gbps up to USB4 | A clean edge, no cable |
| Powered Thunderbolt hub | Its own power supply | 40Gbps to 80Gbps | SSDs, displays, daisy chains |
| Full desktop dock | A large power supply | Thunderbolt or USB4 | A one-cable desk with network, audio, displays and charging |
| Mac mini stand hub | From the host, or a small auxiliary input | Usually 10Gbps | Front ports and internal NVMe storage |
Pick the row first and the product second. If your desk needs the fourth row, my home office setup guide covers the docks and the rest of the one-cable desk; this guide stops at hubs on purpose.
Check the Exact Listing Before You Buy
Amazon titles lead with the biggest number and bury the operating detail, and one listing often holds several variants with different ports and prices under the same reviews. The USB-C ports are where the title misleads most, because the same connector does five different jobs and only the spec sheet says which.
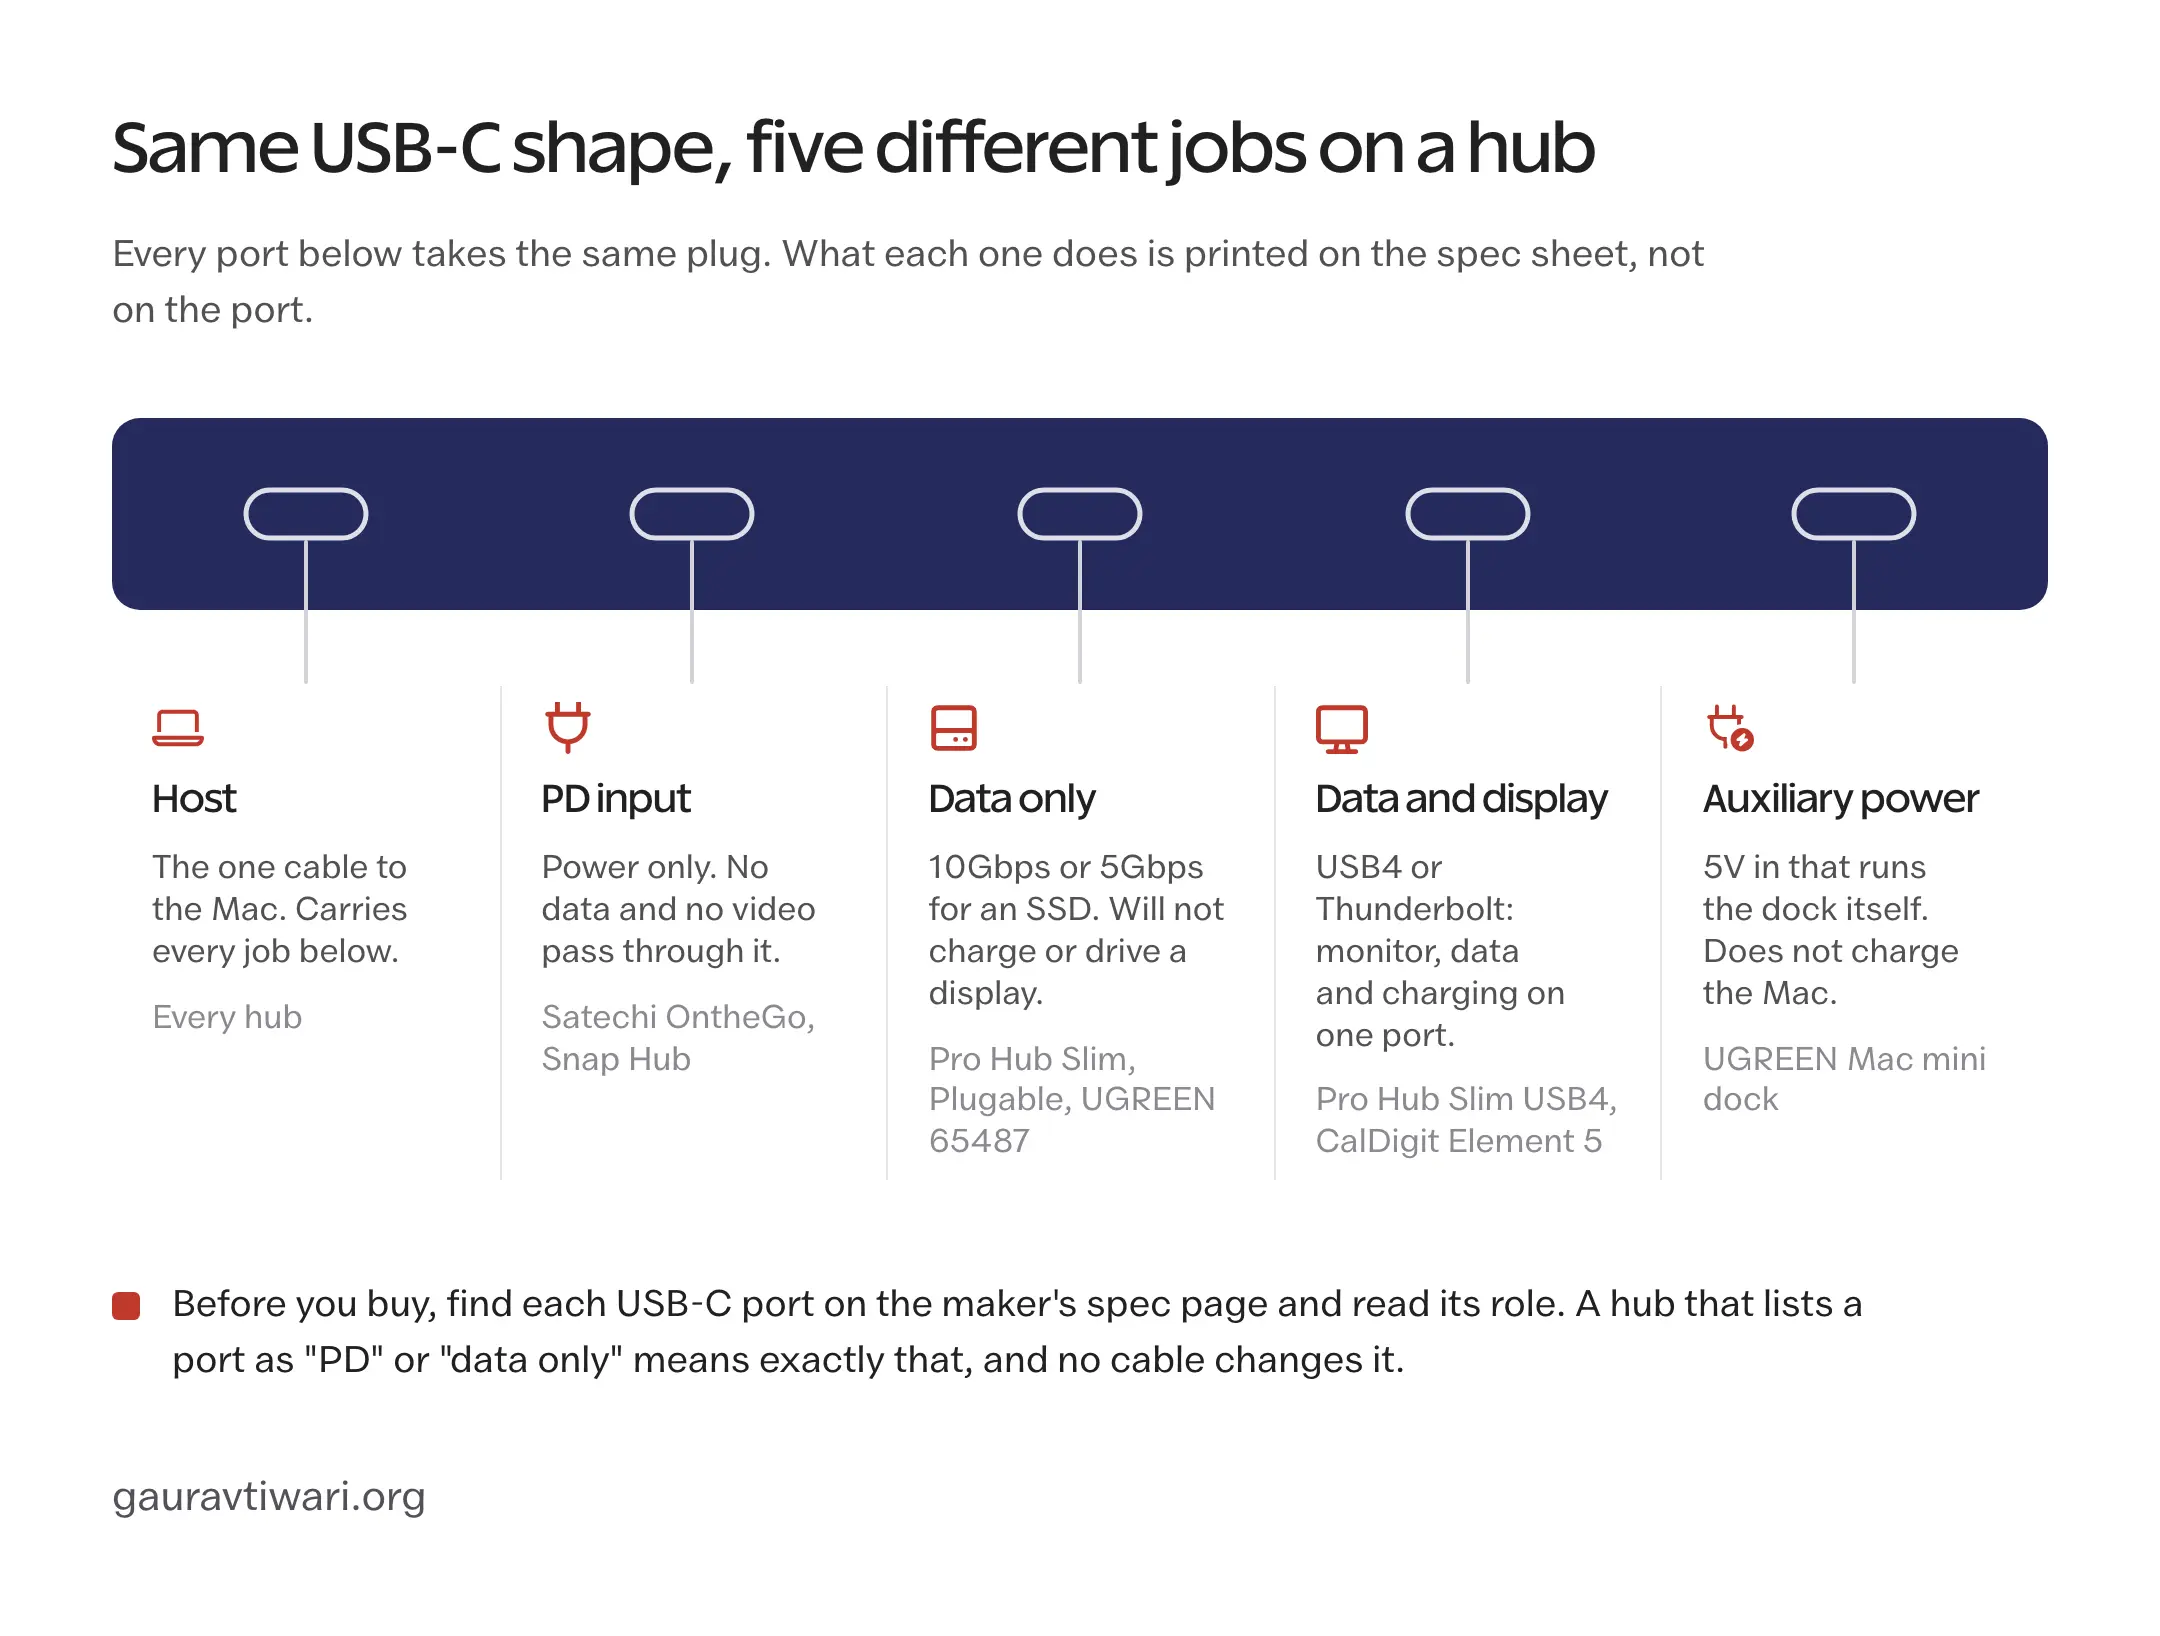
Before paying, check these on the page:
- the exact model name and the maker’s SKU, and that they match the product page linked here
- the ASIN, since color variants and older generations often sit under separate ones
- the port illustration, and that it shows the same ports the title claims
- HDMI resolution with its refresh rate, not “4K” on its own
- the USB speed of each port individually, because 10Gbps in the title may describe one port
- whether each USB-C port is data only, power only or video capable
- PD input versus the power stated as delivered to the Mac
- what is in the box: charger, cables and their length
- who the seller is, and whether the Indian warranty is theirs or the brand’s
- the return window and whether replacement is offered for a dead port
- whether the reviews are pooled across variants that are not this one
Where the Amazon title and the manufacturer’s page disagree, the manufacturer’s page wins. Keep it open in the next tab while you read the listing.
Alternatives Considered
These lost their place on the main list to a neighbor that does the same job better or cheaper, not because they stopped being good.
Anker 555 USB-C Hub, model A8383. It sat at the top of the earlier version of this guide, and it is still a balanced hub: two USB-A 10Gbps ports, a 10Gbps USB-C data port, 4K60 HDMI, Gigabit Ethernet, UHS-I card slots and 85W maximum PD. It moved down because the UGREEN Revodok Pro 109 covers the same desk with 100W input at a lower Indian price. If the Anker is cheaper on the day, buy it without a second thought. Amazon India listing and Anker’s specifications.
UGREEN Revodok 105 5-in-1, SKU 15495. It was the travel pick before, and it is fine for a keyboard, a mouse and a presentation. Its HDMI is 4K30, one USB-A runs at 5Gbps and the other two are USB 2.0, and there is no Ethernet, card reader or USB-C data port, which is not a hub to put in front of a 4K desk. Amazon India listing and UGREEN India’s specifications.
CalDigit Thunderbolt 4 Element Hub. The discount route into the CalDigit design when the Element 5 is much dearer. The newer model raises host charging from 60W to 90W, adds the USB-C data ports and moves the host link from Thunderbolt 4 to 5; on a Thunderbolt 4 Mac the older hub gives up less than the price gap suggests. Amazon India listing.
Satechi Pro Hub Max. The older direct-attach hub, with an Ethernet port the Slim lacks but slower downstream ports and no USB4 pass-through. It is the one to pick only if wired network on a flush hub matters more than 10Gbps data. Amazon India listing.
Satechi Mac mini M4 Stand and Hub. The strongest rival to the UGREEN base, and Satechi has already updated its listing for the M6 and M5 Pro machines. It is worth the look if you prefer Satechi’s design or need UHS-II card speed under the Mac mini; compare the exact port count, SSD support and India price on the day. Amazon India listing and Satechi’s product page.
The Limits
This guide can tell you which hub fits which Mac and what each maker promises. It cannot yet tell you what each one delivers under load, because the throughput, charging, heat and sleep-wake figures come from spec sheets, not from a bench with the same SSD, card and charger run through every hub. Those numbers will appear here as they are measured, and until then the wattage and speed claims are the manufacturer’s.
It also cannot promise that a given hub and a given monitor agree. HDMI handshakes go wrong in ways no spec sheet predicts, especially on wake from sleep, so keep the return window in mind for the first week.
Indian stock and prices move faster than the specs. A hub that is the value pick this month can be out of stock or noticeably dearer next month, which is why there are no prices in the prose and why the Plugable is not the India default.
DisplayLink behavior depends on the macOS release and on the driver version, and Apple changes the rules for virtual displays more often than for native ones. Treat any DisplayLink setup as something to re-check after a major macOS update.
And the fit of the UGREEN base on the 2026 Mac mini rests on Apple keeping the enclosure and on UGREEN’s US listing naming the M6; the India listing has not caught up. Check it for an M6 or M5 Pro before ordering.
What Quietly Ruins a Hub Purchase
Buying by port count. An 11-in-1 with two USB 2.0 ports and a 4K30 HDMI reads as more hub than a 7-in-1 with 10Gbps and 4K60. The two extra ports end up carrying a mouse and a receiver, while the SSD and the monitor get the slower parts.
Trusting the wattage on the box. 100W goes in, 80W or less comes out, and the 16-inch MacBook Pro that was supposed to charge at the desk drains slowly through a render. The number you need is the host output, and if the maker doesn’t print it, the safe assumption is 20W below the input.
Plugging a Neo hub into the right-hand port. The monitor stays dark and the SSD runs at USB 2 speed, and the hub goes back to Amazon as faulty when the only fault was the side.
Buying a dual-HDMI hub for two extended screens on a Mac. It is an MST hub, macOS mirrors the outputs, and no driver or setting changes that. The listing rarely says MST anywhere.
Letting a heavy hub hang from the port. A short cable with a metal hub swinging off the MacBook, or a direct-attach hub forced on over a case, puts leverage on the connector that it was never built for. The intermittent disconnects that follow months later look like a bad hub and are usually a worn port.
Running a bus-powered SSD from a bus-powered hub on a weak charger. The drive draws its power from the same pool the hub is trying to send to the laptop, and the first symptom is a copy that drops out halfway with no error worth reading. Give the SSD a 10Gbps port on a hub that is being fed properly, or plug it into the Mac directly.
FAQs on USB-C Hubs for MacBook
What is the best USB-C hub for MacBook Pro?
For most MacBook Pro owners in India it’s the UGREEN Revodok Pro 109, because it pairs 4K60 HDMI with 10Gbps data, Gigabit Ethernet, both card slots and 100W pass-through at a sensible price. Creators who import from UHS-II cards or need more than 85W into a 16-inch model should look at the Plugable USBC-9IN1E, and a Thunderbolt-heavy desk should look at the CalDigit Element 5.
Does the same USB-C hub work with a MacBook Air?
Usually, yes. A portable hub that works on a MacBook Pro works the same way on an Air, because both use the same USB-C and Thunderbolt connection. What changes is the display count: an M1 or M2 Air drives 1 external display, an M3 Air adds a second only with the lid closed, and the M4 and M5 Air drive 2 with the built-in display still on.
Which USB-C port should I use on MacBook Neo?
The left one. Apple’s tech specs give the left port USB 3 data at up to 10Gbps and the machine’s single external display, while the right port is USB 2 at up to 480Mbps. Either port charges the Neo, so a single-cable hub should always go on the left.
Can a USB-C hub run two independent monitors on a Mac?
Only when the Mac’s chip supports 2 external displays and the hub carries them natively, over Thunderbolt, USB4 or separate native outputs, or uses DisplayLink with its software installed. A dual-HDMI hub that splits one signal uses MST, and macOS mirrors those outputs instead of extending them.
Will a 100W USB-C hub give my MacBook 100W?
Not usually. The hub keeps 10W to 20W for its own electronics and the devices plugged into it, so a hub rated at 100W input often passes 80W to 85W to the laptop. Look for the host output figure on the spec sheet; Plugable and Satechi print it, and many makers don’t.
Is 85W enough for a 16-inch MacBook Pro?
It’ll charge the laptop, but it’s below Apple’s 140W fast-charge path, so a 16-inch under a sustained heavy load can hold its charge or lose it slowly rather than gain. For everyday work it’s fine; for renders and exports at the desk, keep the 140W charger on the other port.
Do I need Thunderbolt 5 for a MacBook hub?
Only if the desk has several devices that each want a 40Gbps lane, such as Thunderbolt SSDs, a Thunderbolt display or capture hardware, or if you want to use the 3-display limit of an M5 Pro. HDMI, Ethernet and a card reader don’t need it, and a portable USB-C hub does that job for a fraction of the price.
Will a Thunderbolt 5 hub work with a Thunderbolt 4 Mac?
Yes. CalDigit says the Element 5 works on Thunderbolt 4 Macs and Thunderbolt 3 Intel Macs, but the connection drops to the host’s own bandwidth and display count, which on a Thunderbolt 4 Mac means 40Gbps and 2 displays through the hub.
Does a USB-C hub slow down an external SSD?
It can. The SSD shares the hub’s single link to the Mac with everything else that’s plugged in, and on a hub whose ports are 5Gbps the drive is capped at roughly half its rated speed. For a fast SSD, use a 10Gbps port on a 10Gbps hub, or plug the drive into the Mac directly.
Is a UHS-II card reader worth paying for?
Yes if you empty fast UHS-II camera cards regularly, because it reads at up to 312MB/s against about 104MB/s for UHS-I. For occasional transfers from ordinary cards the UHS-I slot on a cheaper hub is fine, and a UHS-II card won’t go any faster in it.
Do direct-attach hubs work with MacBook cases?
Not reliably. Even a thin case can stop the 2 connectors seating fully, and a half-seated hub disconnects at random. If you keep a case on, buy a cabled hub instead.
Should I use my USB-C monitor’s ports instead of a hub?
Often, yes. A monitor that charges the MacBook at 65W or more and has a few USB ports already does most of a hub’s job over one cable. Add a hub only for what the monitor lacks, usually Ethernet, a card reader or a 10Gbps port for an SSD.
Does the UGREEN Mac mini dock charge the Mac mini?
No. The Mac mini runs on its own mains cable, and the dock’s USB-C input powers the dock side only. It doesn’t output video either; it adds front ports, card readers and an NVMe slot, nothing more.
Do USB-C hubs normally get warm?
Yes, especially while carrying a display, charging and a sustained transfer at the same time. Warm is normal, but a hub that’s uncomfortable to hold, or that drops the SSD or the Ethernet link when it heats up, is the one to return.
Final Remarks
If you have read this far, you already know that the hub is the last thing to choose, not the first. The monitor decides the display path, the Mac decides how many screens, the charger decides the wattage, and the hub only has to carry what those three have agreed on. That is the part I want to leave you with.
When someone asks me what to buy for a new Mac desk, I tell them the same three things. Buy for the monitor you own today, not the one you plan to buy, because the hub that suits a 4K60 panel is not the hub for a 4K144 one and you will end up owning both. Keep the Apple charger in the bag even after the hub arrives, because the day the pass-through is not enough is always the day with a deadline. And look at the back of the monitor before buying anything, because a screen with 90W and a few USB ports already is a hub, and a lot of people buy a second one they never needed.
The listing checklist above is the part to keep. Run it on the Amazon page before you pay, since the sellers and variants under one listing change more often than the specs do. And if your setup is stranger than the 8 jobs here, I am always available for a chat.
That is all from my side. I hope it helps you pick right. Best of luck.
Tell Google you want more of this.
Add Gaurav Tiwari as a preferred sourceOne tap, and this site shows up more often in your own Top Stories, AI Overviews and AI Mode. Remove it any time.
Disclaimer: This site is reader-supported. If you buy through some links, I may earn a small commission at no extra cost to you. I only recommend tools I trust and would use myself. Your support helps keep gauravtiwari.org free and focused on real-world advice. Thanks. - Gaurav Tiwari