
 by
by
What if I told you that you can send an invoice from WooCommerce? I know you will say, “Is that a joke?” WooCommerce has no invoice screen or feature, but apparently it can do it now with my amazing Stackless for WooCommerce plugin.
More about that later. What happens in WooCommerce generally is that when you bill for custom work, like a site build, a monthly retainer or a bulk order for a trade buyer, you have to send the invoice from somewhere else – a third-party invoicing tool.
Most of what you find when you search for a WooCommerce invoice plugin doesn’t help either, because those plugins only make PDFs of orders you already have.
That leaves you running 2 billing systems, and it costs you every month:
- The same customer sits in 2 places, and payments land in 2 places.
- An invoicing tool like FreshBooks costs $23 a month for up to 5 clients, and $43 a month once you pass that.
- Every invoice paid outside the store is a payment you match by hand.
- Your accountant gets 2 exports every quarter instead of 1.
So, the fix is to send the invoice from WooCommerce itself. Then the invoice is an order, the customer pays through the gateways you already use and the payment shows up in the same reports as any shop sale.
Stackless for WooCommerce is a plugin I built that does exactly this. Its Custom Invoices and Request a Quote modules run on core WooCommerce. It costs $39 a year or $99 lifetime at the current early adopter price, and both licenses cover unlimited sites. I sell it, so I’ve kept its limits right next to each feature, and I’ll tell you where a separate accounting tool is the better pick.
Quick Comparison
There are broadly three ways to invoice when your store runs on WooCommerce. Here is how they differ on the points that decide it.
| What matters | WooCommerce alone | FreshBooks or Wave | Stackless |
|---|---|---|---|
| Where the customer lives | Your store ✅ | The invoicing tool | Your store ✅ |
| How the customer pays | Your store’s gateways ✅ | The tool’s own payment setup ❌ | Your store’s gateways ✅ |
| Own invoice numbers, due dates and reminders | No ❌ | Yes ✅ | Yes ✅ |
| Works best for | One-off manual orders | Clients who never shop with you ❌ | Your store’s own customers ✅ |
| Cost | Free ✅ | Wave from $0, FreshBooks from $23 a month ❌ | $39 a year or $99 once, unlimited sites ✅ |
My short take: if the people you invoice also buy from your store, invoice from WooCommerce. If you need proper books, keep an accounting tool for that job and let it receive your paid orders.
What WooCommerce Can Do on Its Own
WooCommerce can already take payment for work that was never in a cart. This is the built-in way:
- Go to WooCommerce → Orders → Add order.
- Pick a customer, or leave the order as a guest.
- Add products, a fee, shipping and tax.
- Set the status to Pending payment and save.
- Under Order actions, choose “Send order details to customer”.
The customer gets an email with a “Pay for this order” link. You can also copy the “Customer payment page” link from the order screen and paste it into your own email.
A guest can pay from that link, while a registered customer has to log in first. WooCommerce’s notes on paying for orders explain the extra checks for guests.
For a one-off manual order over the phone, this is enough. It falls short once you invoice every week. Here is what’s missing, next to what Stackless adds:
| What you need | WooCommerce alone | With Stackless |
|---|---|---|
| Bill work that isn’t in your catalog | A manual order with a fee line | Custom invoice lines and saved items |
| Invoice numbers | Shares the order number | Its own sequence, such as INV-0042 |
| Due date | None | Yes, from your payment terms |
| Reminders | None, the email goes once | Up to 4, including an overdue notice |
| Deposit | Not possible on 1 order | A deposit invoice, then an automatic balance invoice |
| Recurring billing | You create each order by hand | A weekly, monthly or yearly schedule |
| What the customer sees | WooCommerce’s order email and pay page | A branded invoice page with a Pay button |
| Fixing a sent invoice | You edit the order in place | You reopen it, and old pay links stop working |
| Quote first | No | A proposal the customer accepts online |
What about the plugins that rank for “WooCommerce invoice plugin”? PDF Invoices & Packing Slips, YITH’s PDF Invoice and the marketplace’s Print Invoices & Packing Lists all make a PDF for an order that already exists. Print Invoices alone is $79 a year, as I noted in my WooCommerce extensions cost breakdown.
That’s useful paperwork for shop orders. None of them can bill work that has no order yet, though. If numbered PDFs on shop orders are all you need, pick one of those and stop here.
Separate Invoicing Tool or WooCommerce?
I’d decide this on one question: where should the customer record live?
With FreshBooks, Wave or Zoho Books, the client, the invoice and the payment all live in that tool. Your store keeps a separate copy of the same customer. In return, you get proper books:
- a ledger and expense tracking
- bank feeds and reconciliation
- a login for your accountant
- reports that are ready for filing
That’s the right trade for a consultant whose clients never buy from the shop. My FreshBooks vs Wave vs QuickBooks comparison covers those plans. You can also look at FreshBooks, Wave and Zoho Books directly.
A standalone WordPress invoice plugin has the same catch. It keeps its own client list, so you’re back to 2 records on 1 site.
With WooCommerce, the invoice is an order and the customer is the same one who bought from you last month. The payment arrives through the Stripe or PayPal account you already reconcile, and a paid invoice counts in WooCommerce Analytics like any sale.
What you don’t get is books. Your accountant still works from WooCommerce exports, or from whatever sync your store already feeds.
So invoice your store’s customers from WooCommerce. If you need books, keep an accounting tool for that job only. Wave’s $0 Starter plan does it for a small store, and my invoice generators roundup covers the rest.
How a Stackless Invoice Works
Before the setup steps, here is the life of one invoice. Once this is clear, the settings make sense.
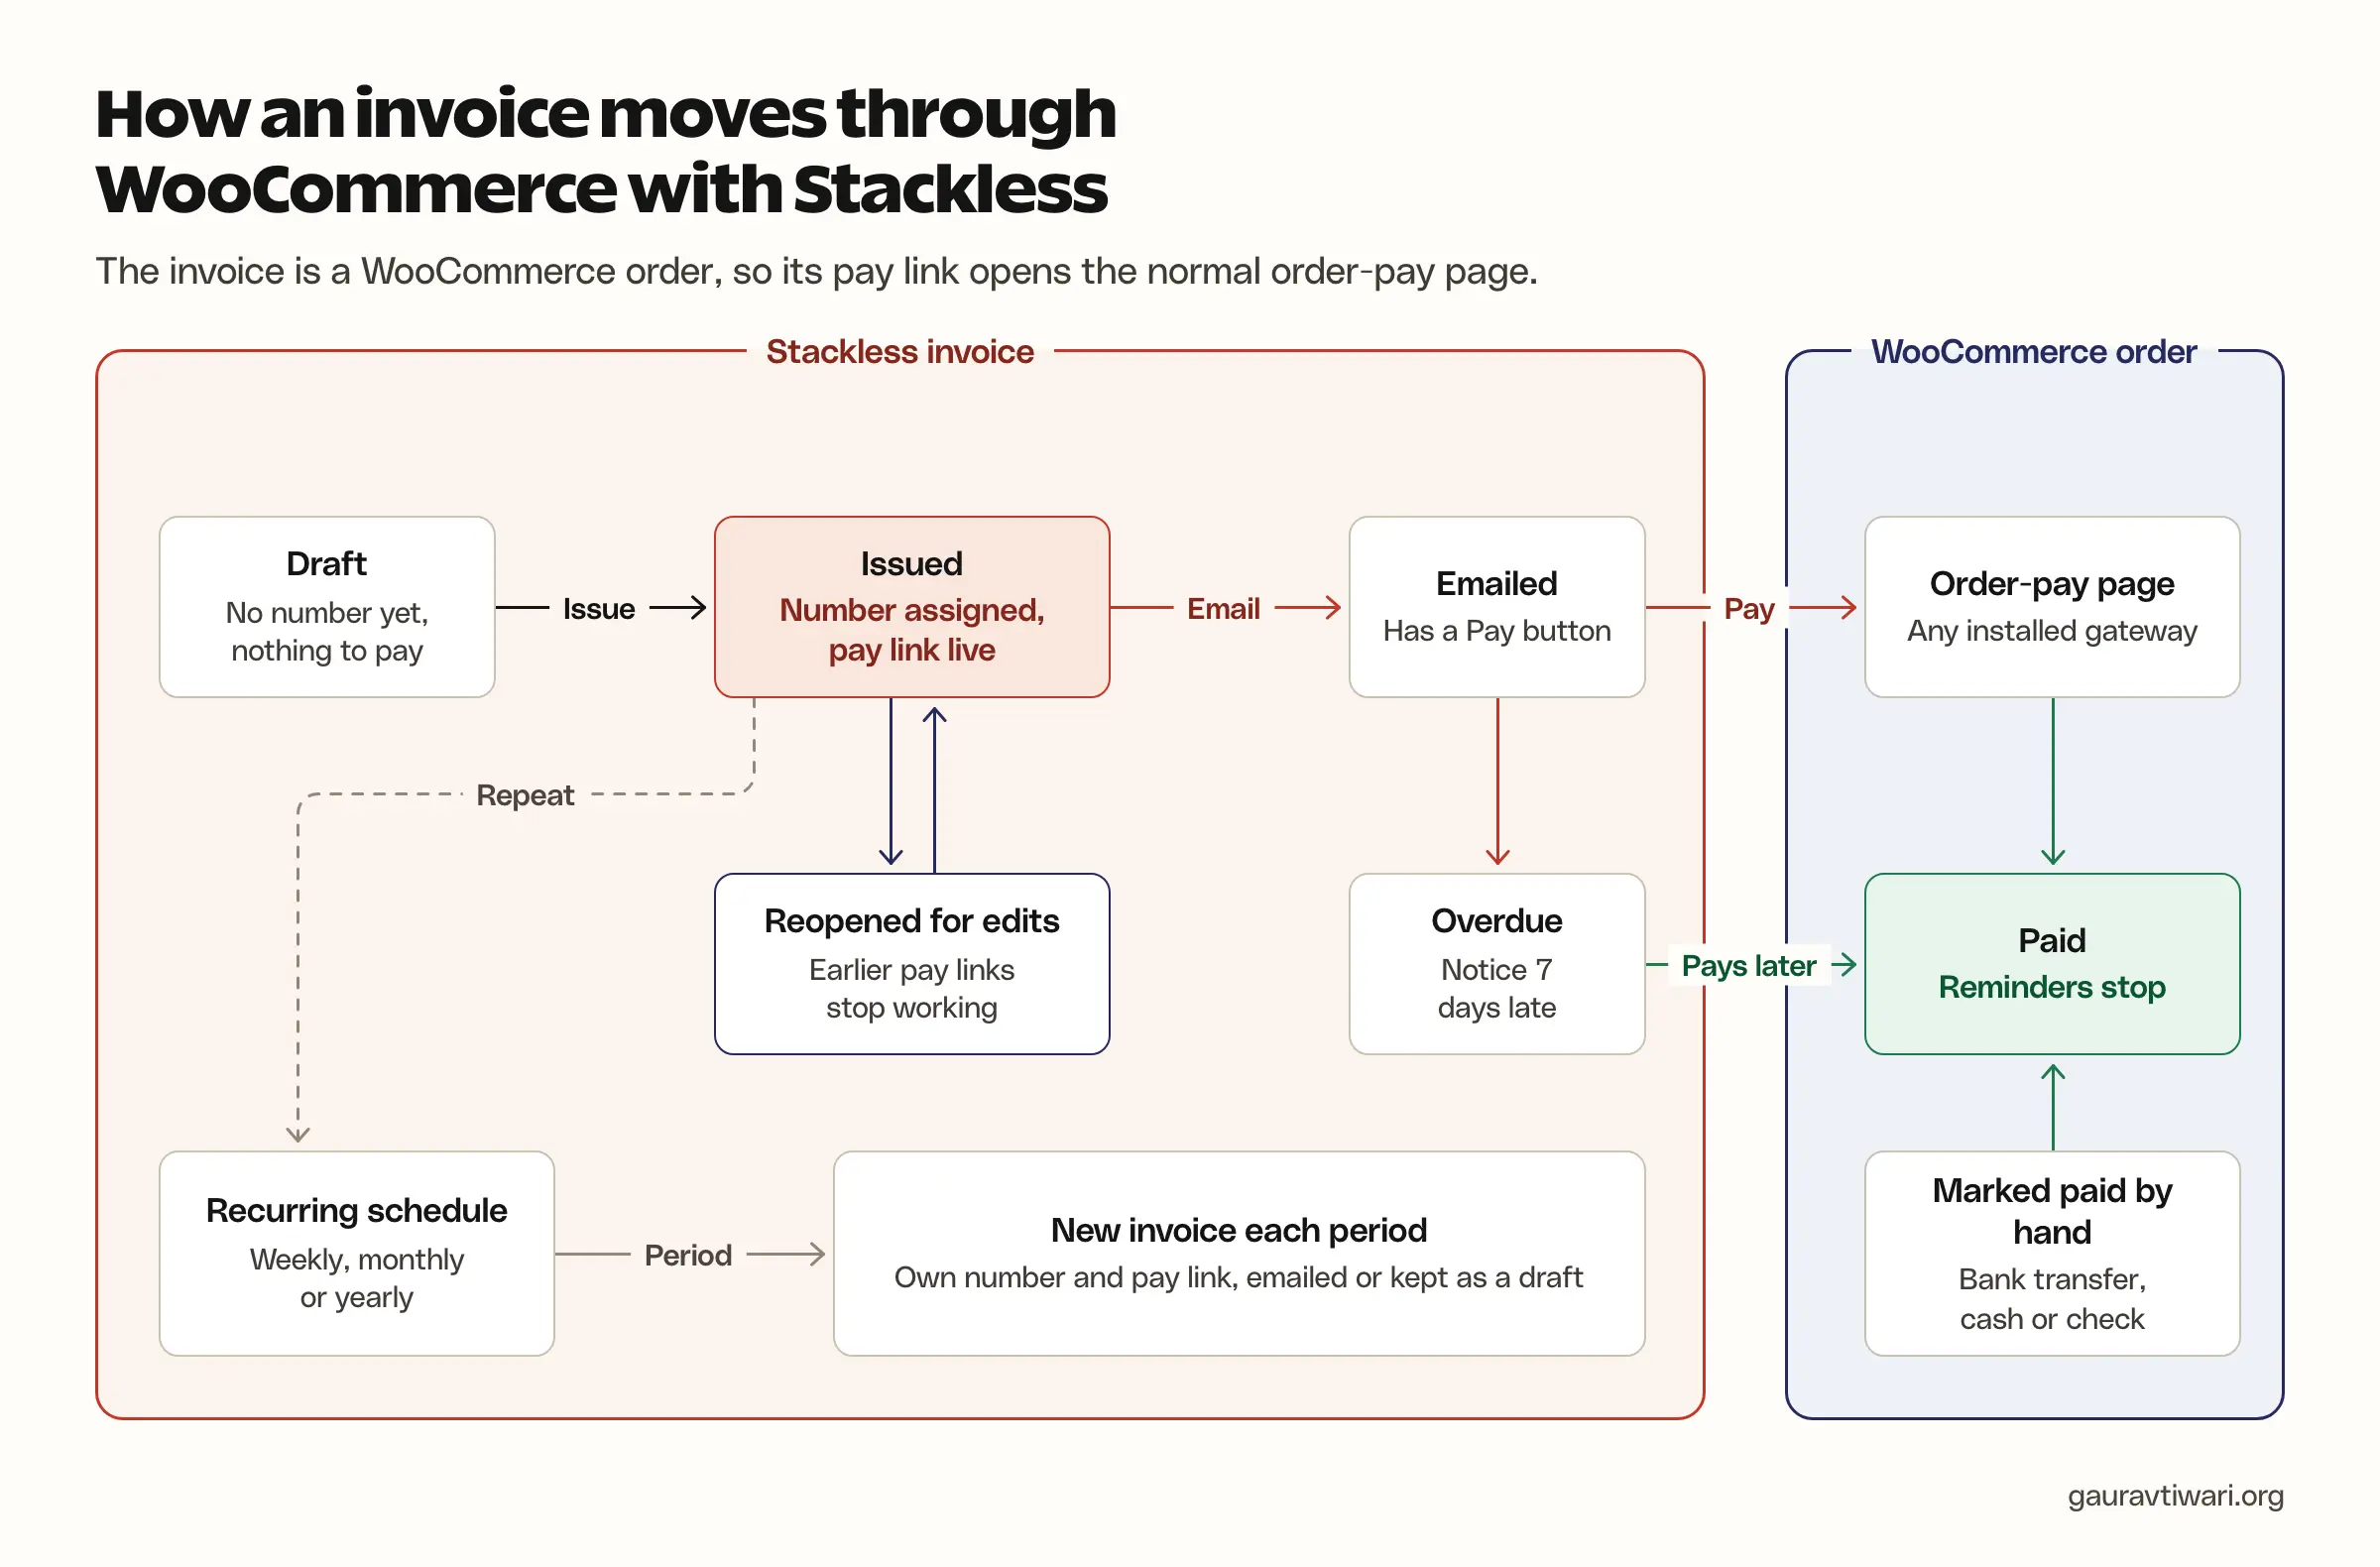
- Draft. The invoice is a WooCommerce order in an “Invoice draft” status. No gateway can take payment for it yet.
- Issued. It gets the next invoice number and a copy of your business details, the order moves to Pending payment and the pay link switches on.
- Sent. The customer gets an email with a link to your branded invoice page.
- Paid. The Pay button opens WooCommerce’s own payment page, with whichever gateways you have installed. The invoice turns paid the moment the order does.
A few rules hold at every stage:
- The pay link is private. It carries a 10-character code and a signed key. Reopening or reissuing the invoice changes the key, so old links stop working.
- Bank transfers work too. If a customer pays by invoice with a bank transfer, cash or check, you click Mark paid and add the reference.
- Unpaid invoices can be fixed. Reopen one for edits. It keeps its number and gets a fresh link when you issue it again.
- Paid invoices are locked. If the amount was wrong, refund the order in WooCommerce and send a new invoice.
- Customers can find them. Account holders see issued invoices under My Account → Orders. Drafts stay hidden there and are left out of WooCommerce Analytics.
- Physical items still ship. A service invoice completes on payment, while one with physical items goes to Processing so you can ship it.
One thing to watch: every step after “Issued” is an email from your WordPress site. If your invoice email isn’t sending, the invoice and the pay link still work, but the customer never hears about it. Stackless writes a note on the invoice when a send fails, and an order note is a quiet place to keep bad news.
How to Send an Invoice From WooCommerce
The setup takes one sitting. After that, each invoice is just a customer, a few lines and a button.
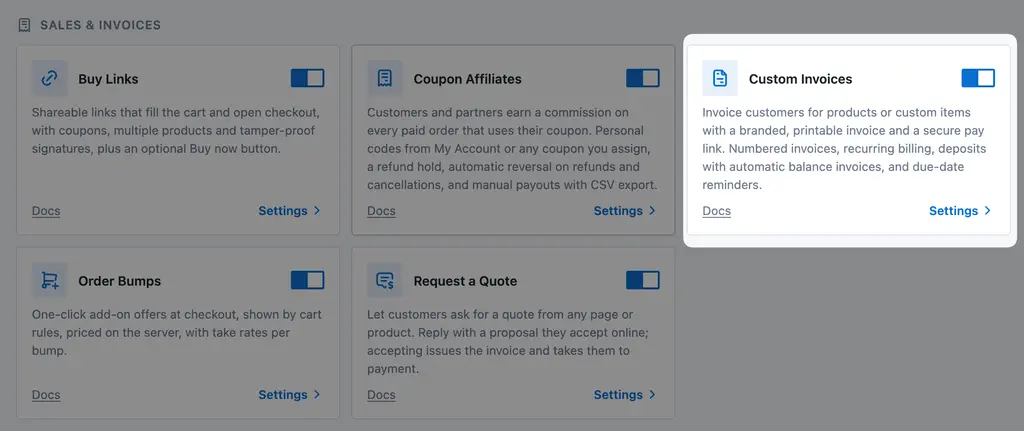
Step 1: Switch on the module. Go to Stackless → Dashboard and turn on Custom Invoices. Turn on Request a Quote too if you quote before you bill.
Step 2: Set your invoice numbers. You’ll find these under Stackless → Settings → Custom Invoices:
- Choose a prefix (INV- by default) and an optional suffix.
- Build a format from tokens like {prefix}, {number} and {year}. For example, {prefix}{year}-{number} gives INV-2026-42.
- Pad the number if you like, so 42 becomes 0042.
- Set the Next number to carry on from your old tool. It only moves forward.
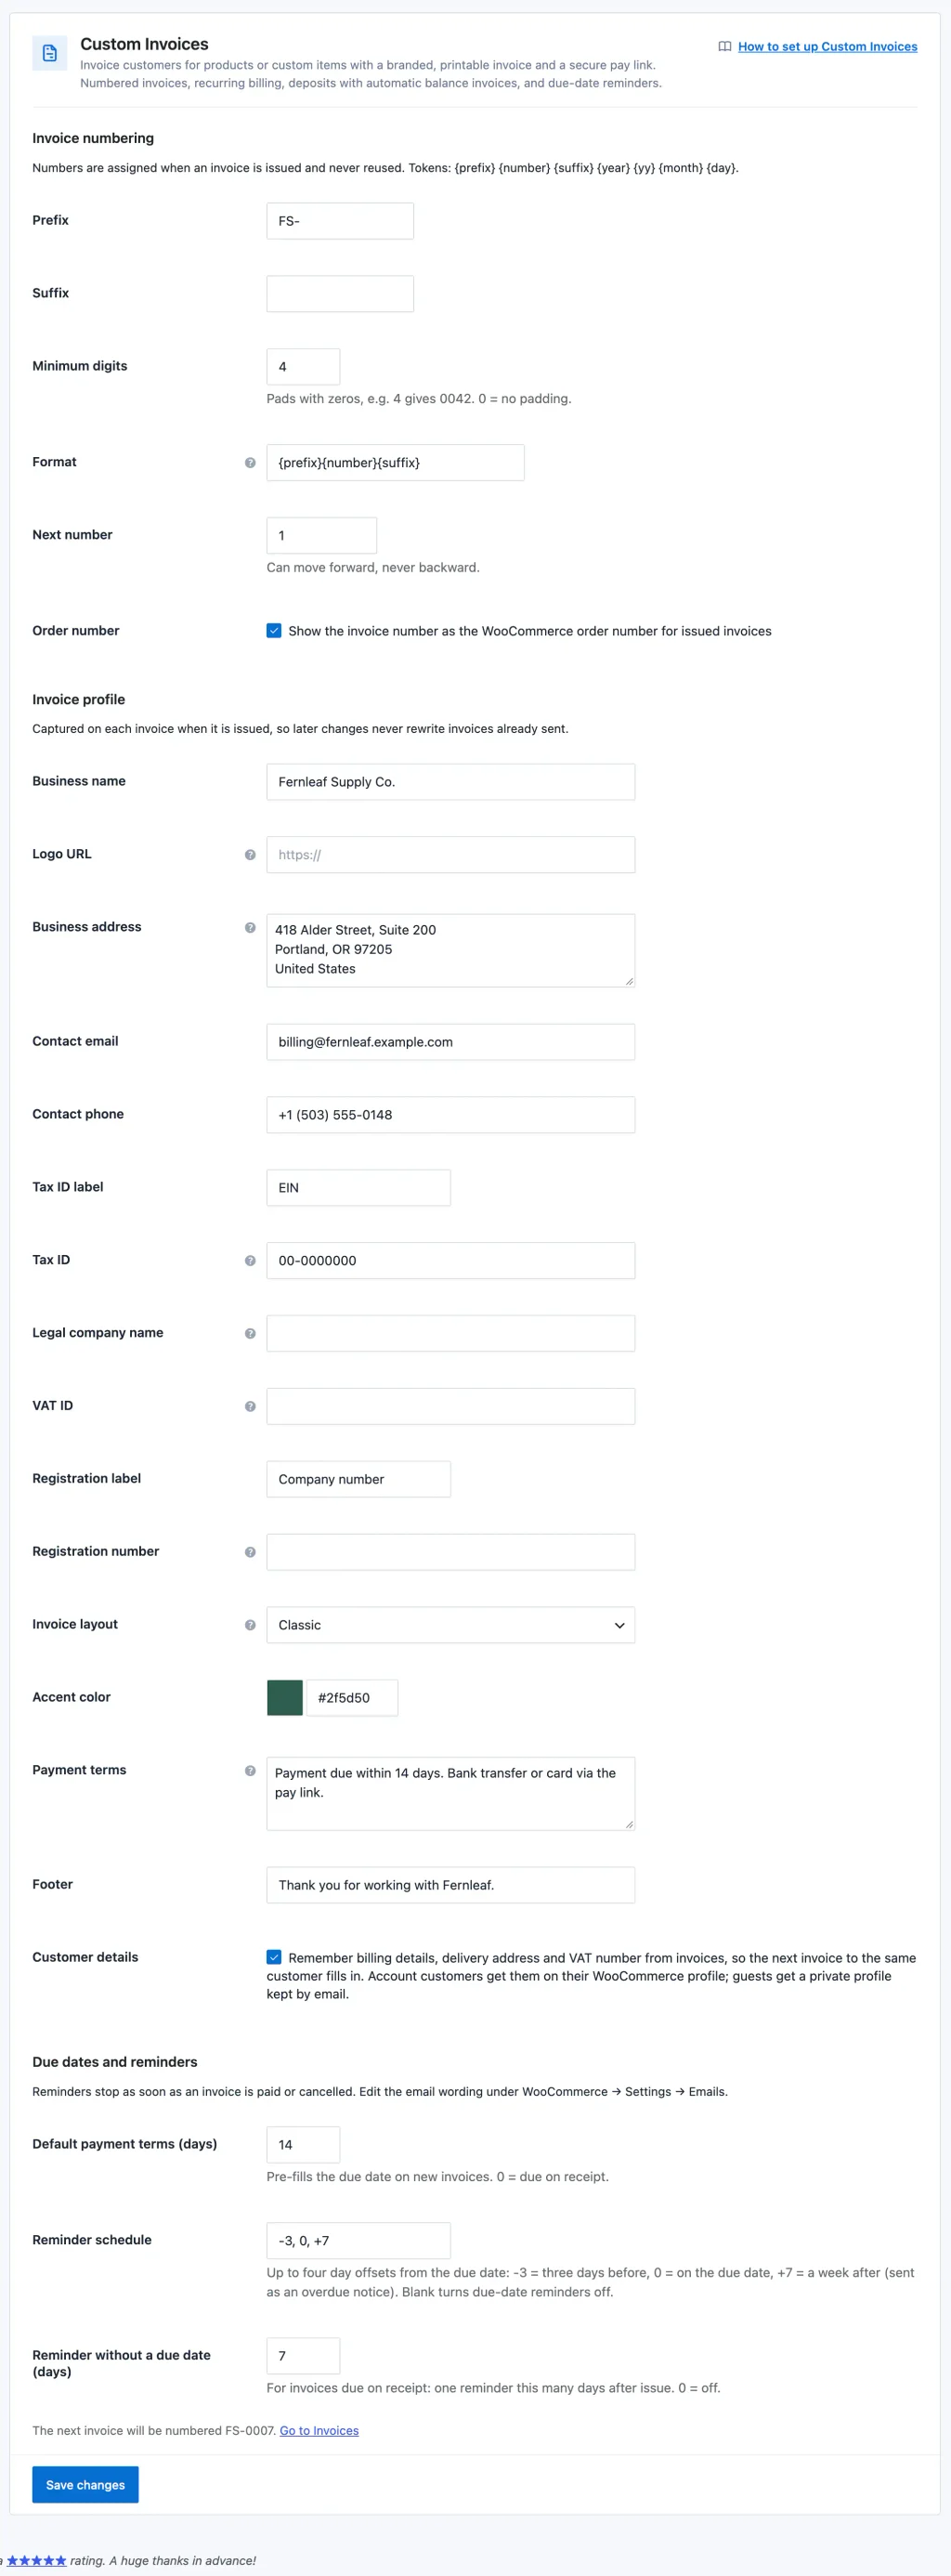
Numbers are given out when an invoice is issued, and they’re never reused.
Step 3: Fill in your business details. These print on every invoice:
- business name, logo, address, email and phone
- a tax ID, plus a legal company name, VAT ID and company registration number if you need them
- the payment terms text under the totals, such as your bank details, and a footer
- one of 6 layouts (Classic, Centered, Compact, Amount first, Letterhead and Ledger) and an accent color
Stackless copies these onto each invoice when you issue it. Changing your settings later never rewrites an invoice you already sent.
Step 4: Set payment terms and reminders. The default is 14 days, and 0 means due on receipt. Reminders have their own section below.
Step 5: Create the invoice. Go to Invoices → New invoice. Pick an existing customer or type a guest name and email, and add a VAT number if the invoice needs one. Then add lines:
- a store product, with its price and tax class filled in
- a custom line with a name, description, quantity, price and tax class
- a saved item, if you ticked “Save to item library” on a line before
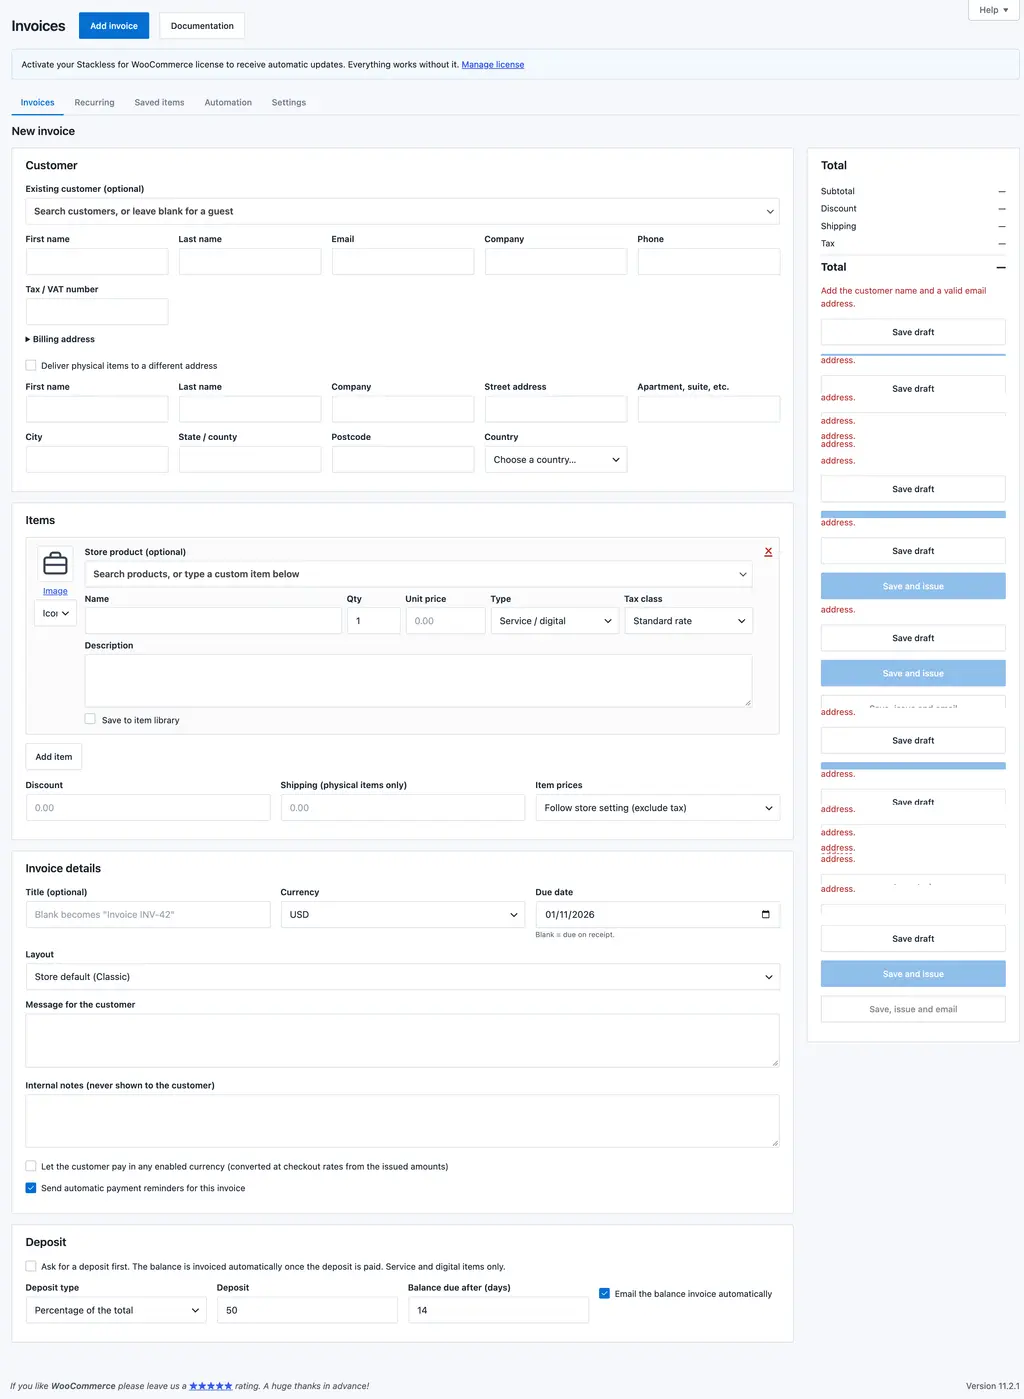
Below the lines, add a discount, shipping for physical items, a title, the due date, the currency, a message for the customer and private notes.
Step 6: Issue it. Choose Save draft, Save and issue, or Save, issue and email. Stackless checks that the total you saw is the total it issues, so a price that changed in the background gets caught first.
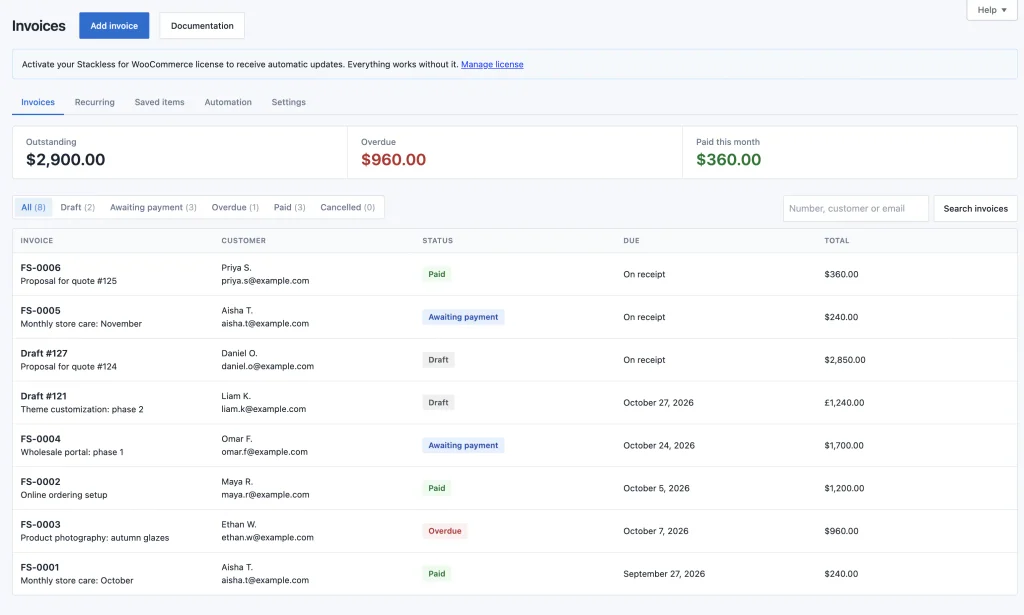
After issuing, the invoice screen gives you:
- a link to copy, which is the payment link you can paste into any email or chat
- a preview of the customer’s invoice page
- Resend invoice, and Send reminder, which becomes Send overdue notice once the invoice is late
- Duplicate, for the next job for the same client
- Reopen for editing and Cancel invoice
Two small things save time later:
- The invoice number shows as the order number in WooCommerce, so the Orders list stays readable. You can turn this off.
- Customer details are remembered. An account customer’s addresses and VAT number save to their profile. A guest gets a private profile by email, so the next invoice fills itself in.
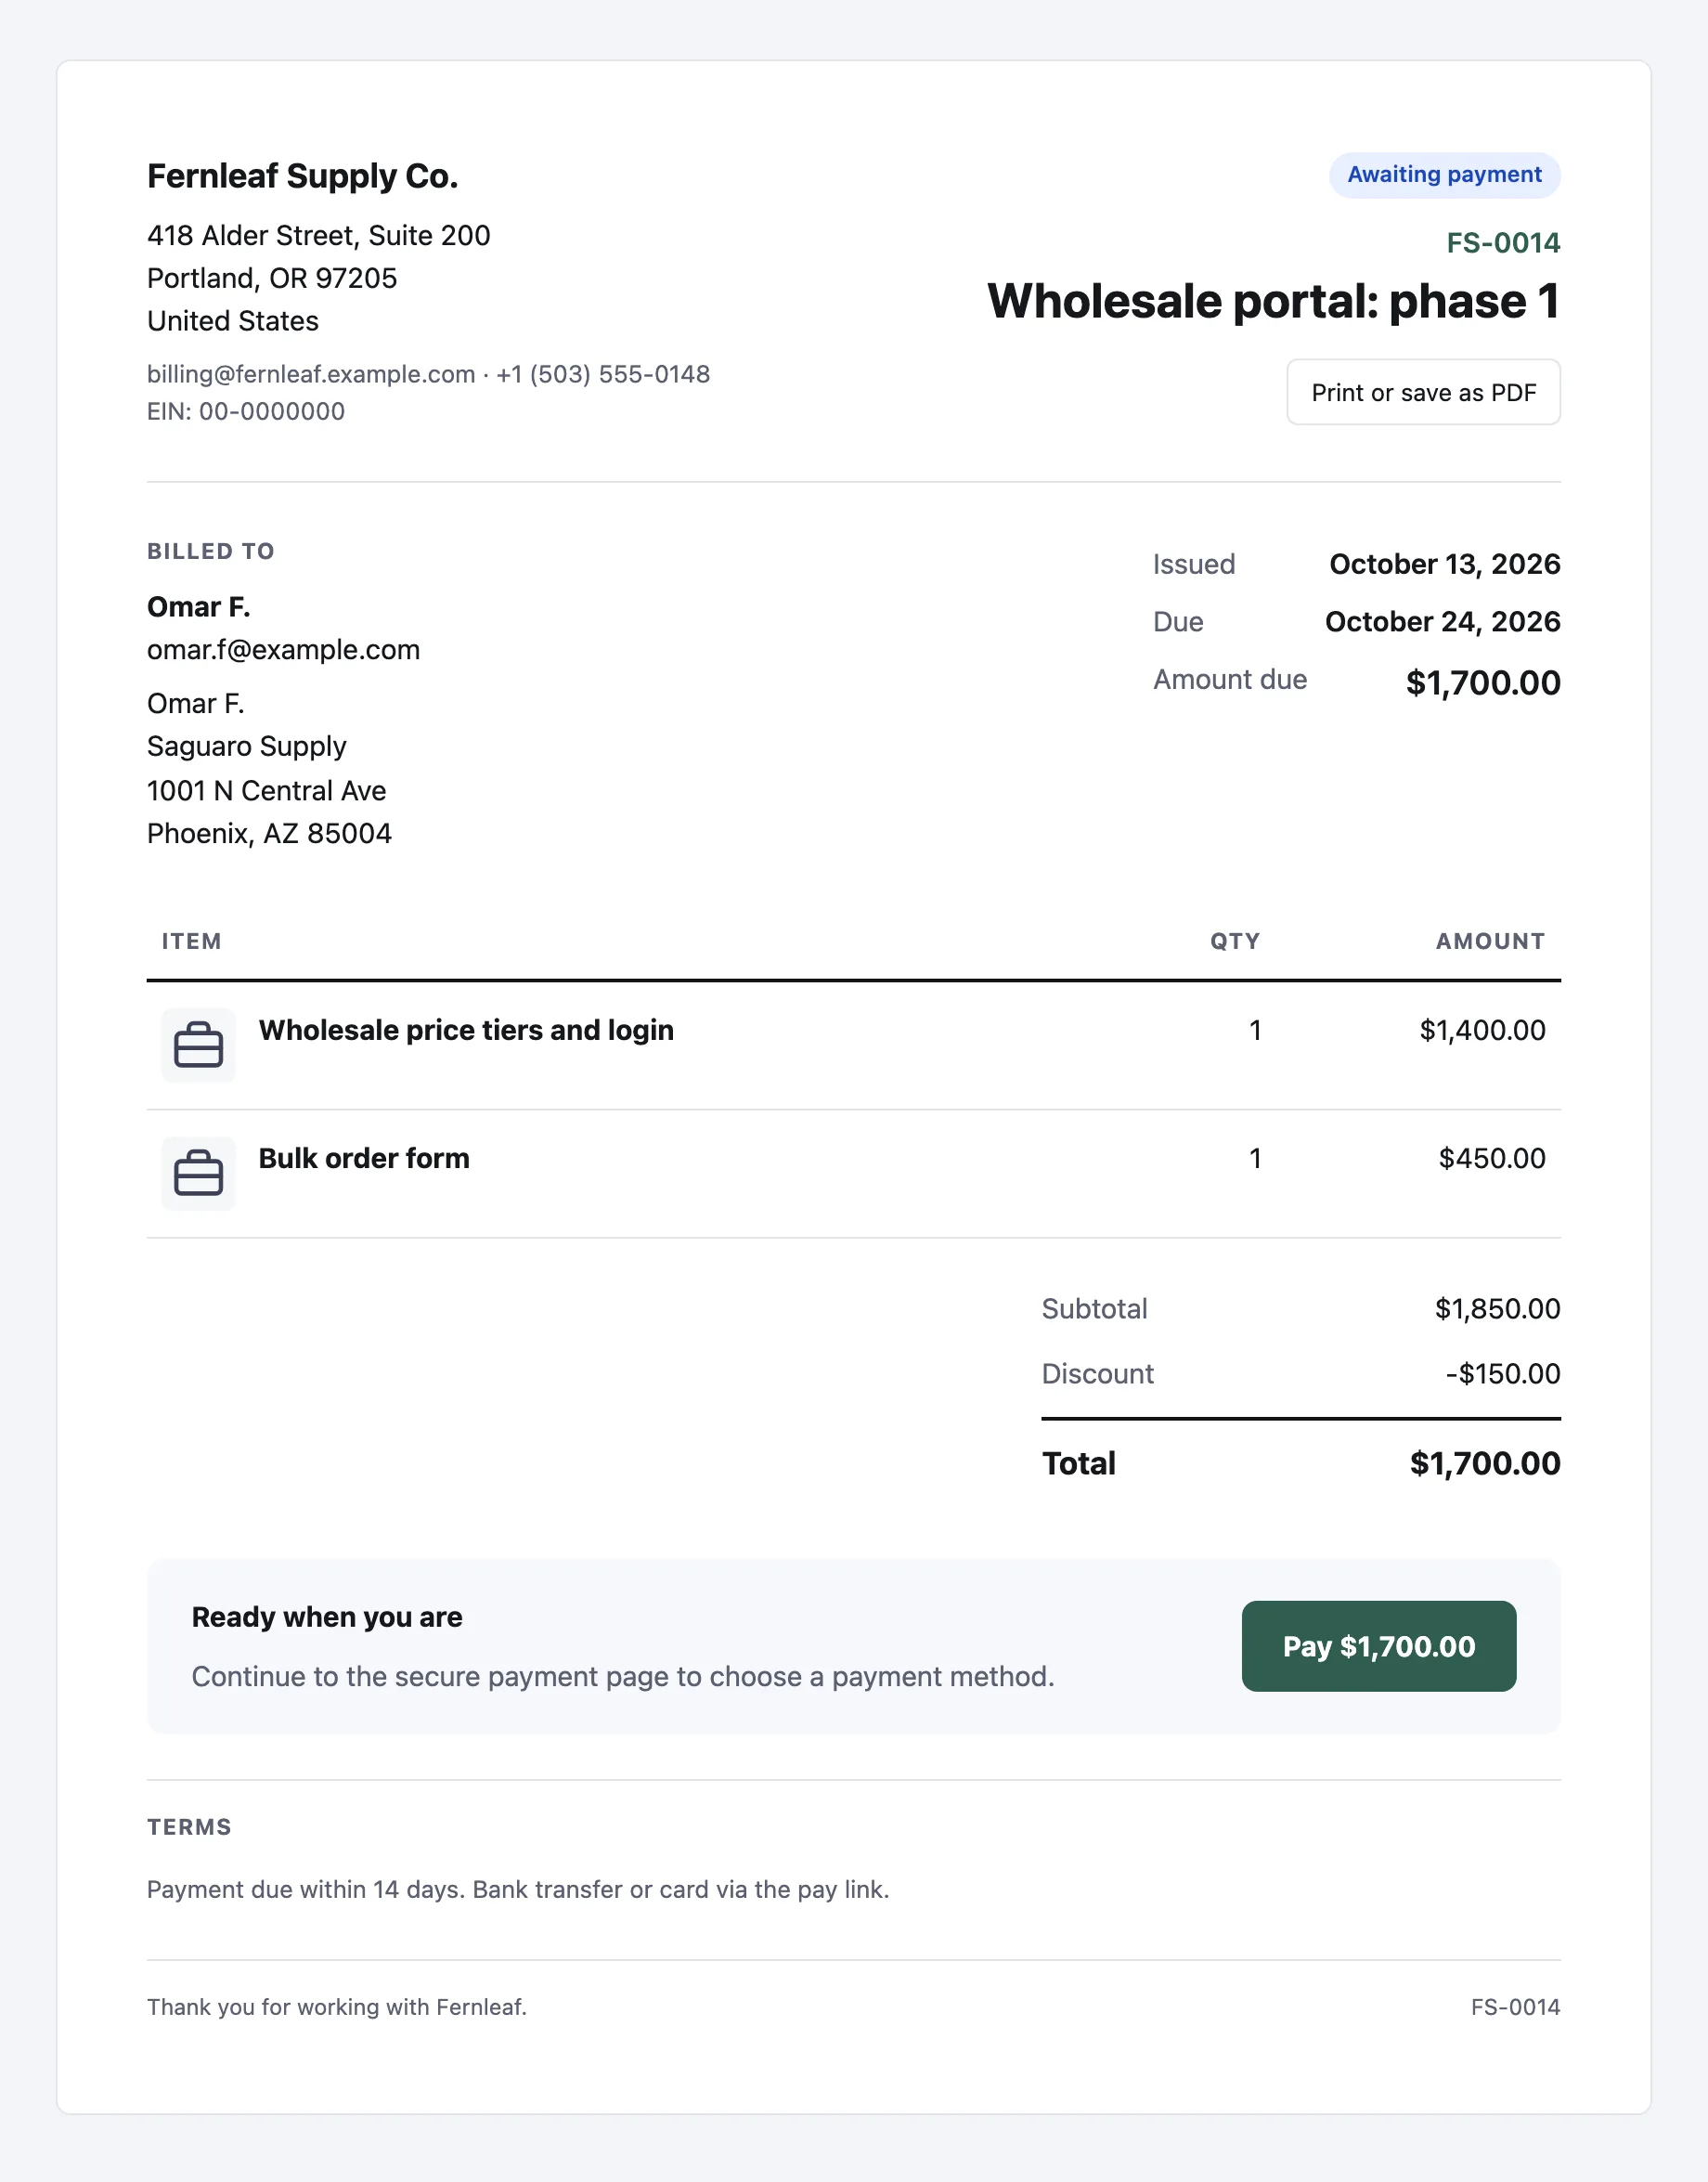
The customer’s invoice page is a printable document with a “Print or save as PDF” button. That’s also how you get a PDF.
The email doesn’t attach one. It carries a summary, the page link and the pay link. If a client’s accounts team wants an attachment, save the PDF and attach it yourself.
How to Take a Deposit on a WooCommerce Invoice
A deposit is a single tick box in the invoice editor. You choose:
- a percentage from 1 to 99, or a fixed amount
- how many days after the deposit the balance is due (14 by default)
- whether the balance invoice is emailed automatically
I’d leave the automatic email on. The balance invoice is the one people forget to send, and the reason you took a deposit was to stop chasing the rest.

Here is how it plays out on a $2,000 job with a 30% deposit. This is an example, not a real invoice:
| Invoice | Amount | When it’s due |
|---|---|---|
| Deposit invoice | $600 | On the due date you set |
| Balance invoice | $1,400 | Created and emailed once the $600 is paid, due 14 days later |
| Both together | $2,000 | They always add up to the full total and the full tax |
The details worth knowing:
- The customer sees every line item, plus the total, the deposit, the tax inside it and the amount due now.
- Tax is split in the same ratio, so your rates are never charged twice. Any rounding difference goes to the balance.
- The split is locked when you issue the deposit invoice. If you reopen it and change the total, it’s worked out again.
And the limits:
- Deposits work on service and digital invoices only. Add a physical item and the editor won’t allow one.
- This is the only partial payment an invoice takes: 1 deposit and 1 balance, not an installment plan.
- A deposit invoice can’t repeat on a schedule or switch currency.
- If the balance invoice ever fails to create, a note on the deposit invoice tells you to duplicate it and bill the balance by hand.
How to Set Up Recurring Invoices in WooCommerce
A recurring invoice is an issued invoice that repeats. It gives you recurring billing for a retainer, without turning your client into a subscriber.
Issue the first invoice as usual, open it and fill in “Repeat this invoice”:
| Setting | Your options |
|---|---|
| Repeat every | 1 to 12 weeks, months or years |
| First invoice on | Any date after today |
| Ends | Never, after 1 to 500 invoices, or on a date |
| Each new invoice | Issued and emailed, or saved as a draft for you to check |
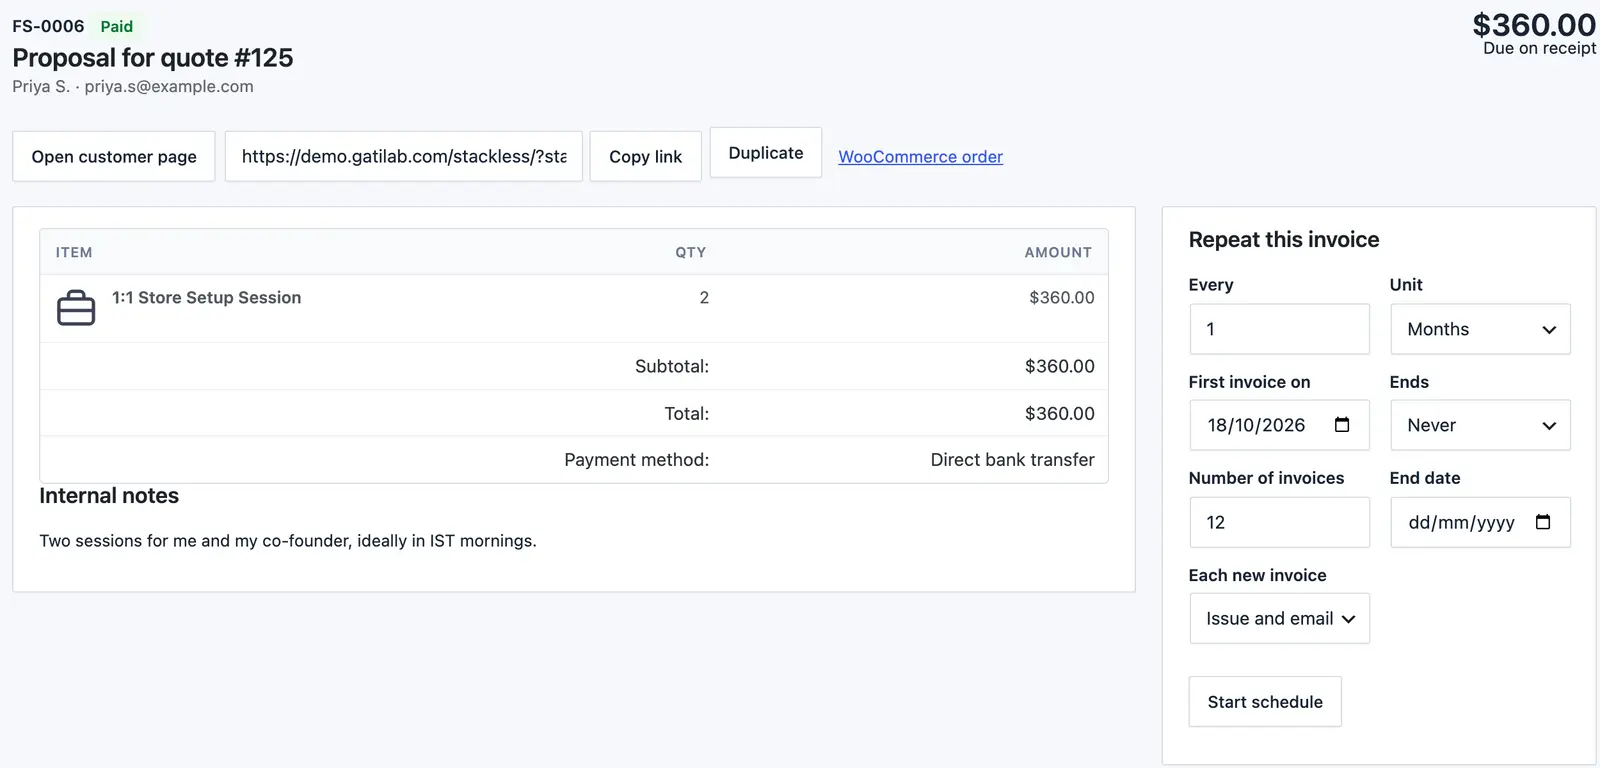
Each period creates a fresh invoice with its own number and pay link. Its due date keeps the same gap as the first invoice. A schedule set on the 31st uses the last day of shorter months, then goes back to the 31st.
What happens when something goes wrong matters more than the form:
- Timing is predictable. An hourly check creates each invoice at 8 in the morning, site time, on its date.
- Failed runs retry. If an invoice fails to save, issue or email, Stackless tries again with a growing delay. It reuses the draft and never emails the same invoice twice.
- A failure never skips a period. Periods that come due during retries are billed afterwards.
- Downtime doesn’t double-bill. If your site stopped running scheduled tasks, one invoice is created when it’s back, and the missed periods are noted as skipped instead of billed in a lump.
- Staging copies bill nobody. Schedules and reminders wait until the copy is confirmed as your live store.
One limit decides whether this suits you. A recurring invoice sends a pay link each time and never charges a saved card.
If you want the card charged on the 1st without the client clicking anything, sell a subscription product through checkout instead. My WooCommerce Subscriptions alternatives post covers that route.
For most agency retainers, a pay link is what the client expects anyway. You can pause, resume or stop a schedule at any time, and cancelling the first invoice ends its schedule too. Invoices already sent stay as they are.
Due Dates and Reminders
Every invoice gets a due date from your payment terms. Leave it blank and the invoice is due on receipt. From the day after the due date, it shows as Overdue in your list and on the customer’s page.
Reminders are timed from the due date, and you can set up to 4 of them. The default looks like this:
| When | Email sent |
|---|---|
| 3 days before the due date | Payment reminder |
| On the due date | Payment reminder |
| 7 days after the due date | Overdue notice |
| No due date set | 1 reminder, 7 days after you issue it |
A few rules:
- Each reminder goes out at 9 in the morning, site time.
- Reminders stop the moment the invoice is paid or cancelled.
- A retried job never sends the same reminder twice.
- You can turn reminders off for a single invoice.
- You edit the wording of all 3 emails (Invoice, Payment reminder and Overdue notice) under WooCommerce → Settings → Emails.
Reminders depend on your site sending email. When one fails, Stackless writes “could not be sent” on the invoice and carries on, and nothing alerts you. I’d move the store to a transactional mail service before relying on them.
From Request a Quote to Invoice
For custom work, the invoice usually follows a quote. The Request a Quote module does what a separate WooCommerce request a quote plugin would, and then it hands the result straight to an invoice.
You can place the form on any page with a block or the [stackless_request_quote] shortcode. It can also show as a button on products you mark “Request a quote” or “Quote only”, or on every product. The form asks for:
- a name, an email and what the customer needs
- optionally a company, phone, country, and a product with a quantity
You can try it on the demo store’s request a quote page.
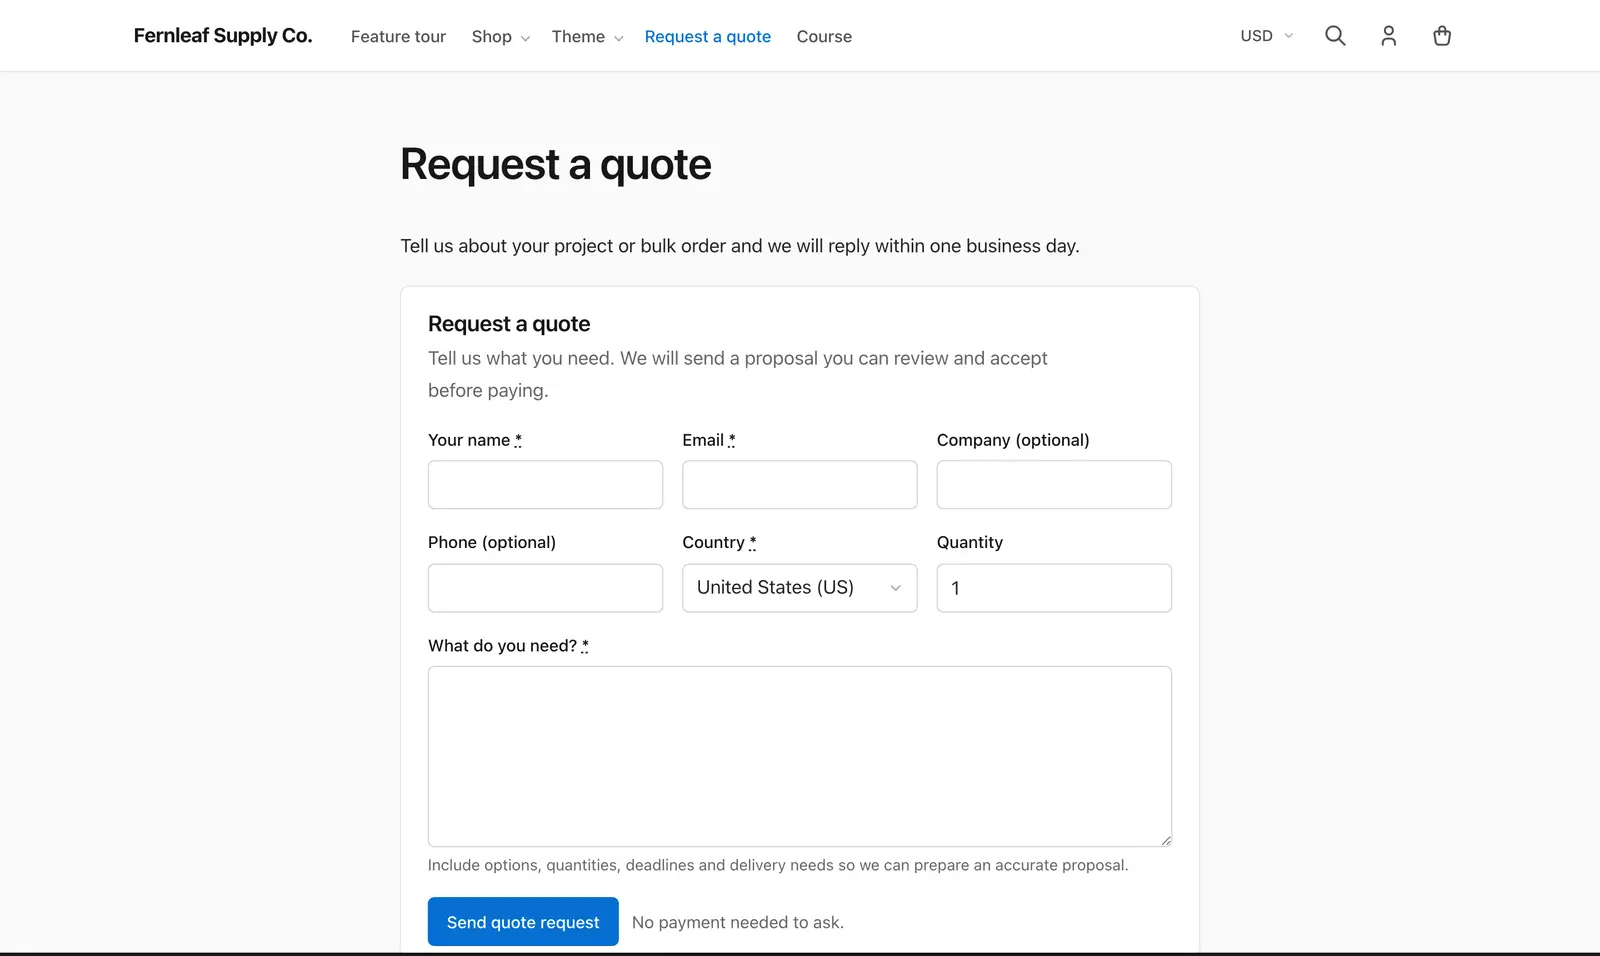
This is the flow from request to payment:
- The customer sends the form. You get an email, and they get a confirmation.
- You open the request and prepare a proposal, which is a draft invoice linked to it. A store product arrives priced, while a custom request arrives as a “Custom work” line for you to price.
- You set how long the proposal is valid (14 days by default, up to a year) and click Save and send proposal.
- The customer opens the proposal page and accepts or declines it.
- Accepting issues the invoice, exactly as you sent it, and takes them straight to payment.
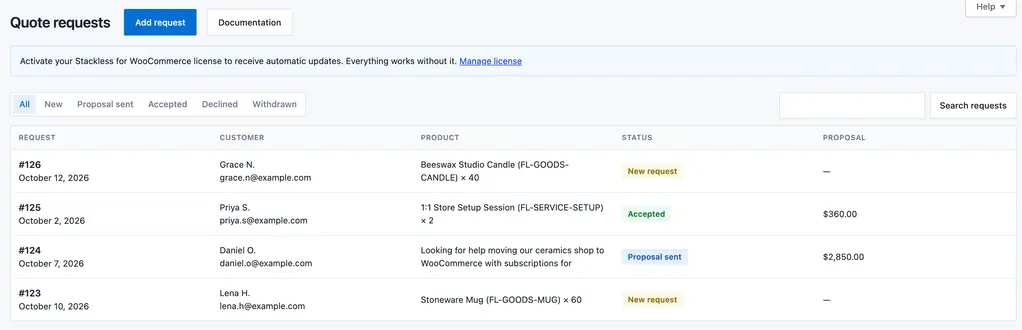
Good to know:
- If you edit a proposal after sending it, the customer can’t accept it until you resend it.
- One reminder goes out 2 days before a proposal expires.
- Withdrawing a proposal kills its link.
- For trade buyers who want a proforma invoice before paying, the proposal page does that job. It shows the lines and the total, and nothing is charged until they accept.
- The form takes 1 product or 1 description per request. You add more lines in the proposal, which is how most trade quotes work anyway.
If you run FluentCart too, my FluentCart request a quote guide shows the same flow there.
Invoices in Another Currency
With the Multi-Currency Checkout module on, you can issue an invoice in any currency your store has enabled.
- Custom lines take whatever price you type.
- Store products need a typed price in a non-base currency. The editor won’t convert the catalog price for you.
- The customer can switch currency before paying, if you tick “any currency” on that invoice.
- Switching back is exact. Amounts always convert from the issued invoice, so there’s no rounding drift. If you reopen and reissue, the new amounts become the starting point.
- Deposit and balance invoices can’t switch currency.
The Limits
Stackless is a billing tool, and this is where it stops:
- No books. There’s no ledger, expense tracking, bank feed or tax return. Your accounting tool keeps doing that.
- No e-invoicing network. If a client’s country needs PEPPOL or a government portal, you submit the document yourself.
- Invoices are orders. Paid ones count in Analytics, refunds happen in WooCommerce, and a staging copy holds all invoice emails.
If You Already Use Another Tool
If FreshBooks or Zoho Books is paid up for the year and works fine, stay until renewal. There’s nothing in a half-used annual plan worth throwing away, and I’d say that even though the plugin is mine.
When renewal comes, use the same test as above. If your invoices go to your own store’s customers, move them into WooCommerce. Keep the accounting tool only if it does your books.
The move itself is small:
- Set the Next number to continue your sequence.
- Copy your legal details into the invoice profile.
- Type each client’s details on their first invoice. Stackless remembers them after that.
FAQs on WooCommerce Invoice Plugins
Create the order under WooCommerce → Orders → Add order, set it to Pending payment and choose “Send order details to customer”. The email carries a “Pay for this order” link. You won’t get your own invoice numbers, due dates, reminders, deposits or recurring invoices.
Yes. An issued invoice is a WooCommerce order, so a paid one counts in WooCommerce Analytics like a shop sale. Drafts are left out until you issue them.
Yes. Type a guest name and email on the invoice. Stackless keeps a private profile by that email, so the next invoice fills itself in, and the pay link works without an account.
No. Each period creates a new invoice with a pay link. To charge a saved card automatically, sell a subscription product through checkout with a gateway that supports it, such as Stripe or PayPal.
If it’s unpaid, click Reopen for editing. It keeps its number, old pay links stop working and you issue it again with a fresh link. If it’s paid, refund the order in WooCommerce and send a new invoice.
No. The email links to the invoice page, which has a “Print or save as PDF” button. Save the PDF from there if a client needs an attachment.
Yes. With Stackless the invoice email carries a pay link to WooCommerce’s payment page, so the customer pays by card, PayPal or whichever gateway you have. If they pay by bank transfer, you mark the invoice paid and keep the reference on the order.
Not on its own. Stackless adds a deposit of 1 to 99 percent or a fixed amount on service and digital invoices, and invoices the balance automatically once the deposit is paid. There’s no installment plan beyond that 1 deposit and 1 balance.
Final Remarks
At $39 a year or $99 once, Stackless costs less than most invoicing subscriptions. The better reason to invoice from WooCommerce, though, is having one customer record: one order history, one set of gateways and one set of reports.
Keep an accounting tool if you need books. Just stop keeping a second customer list only to send an invoice.
Tell Google you want more of this.
Add Gaurav Tiwari as a preferred sourceOne tap, and this site shows up more often in your own Top Stories, AI Overviews and AI Mode. Remove it any time.
Disclaimer: This site is reader-supported. If you buy through some links, I may earn a small commission at no extra cost to you. I only recommend tools I trust and would use myself. Your support helps keep gauravtiwari.org free and focused on real-world advice. Thanks. - Gaurav Tiwari