WordPress Developer Cheat Sheet: WP-CLI, REST API, Hooks & Redis
If you build or maintain WordPress sites for a living, the browser admin is the slow lane. The fast lane is the terminal and the code layer: WP-CLI for bulk operations, the REST API for integrations, WooCommerce hooks for store customization, and Redis for object caching. This is the consolidated reference I keep open across client work.
Everything here is copy-paste ready and battle-tested on production sites. Use the table of contents to jump to WP-CLI commands, REST API examples, WooCommerce hooks, or Redis object caching. Destructive commands are flagged, so back up before you run them.
WP-CLI: 60+ Commands I Use Weekly
WP-CLI is the command-line interface for WordPress. Bulk-update 50 sites in one loop, rebuild thumbnails in one command, or search-replace a 50,000-row database in seconds.
WP-CLI is the command-line interface for WordPress. Once you’ve used it for a week, the WordPress admin starts feeling slow. Bulk-updating 50 sites? One loop. Rebuilding image thumbnails after a theme change? One command. Search-replacing a domain in a 50,000-row database? Five seconds.
This is the cheat sheet I keep open in a tab. Every command here is one I run regularly across client sites. Organized by job, with the flags I actually use, the gotchas I’ve hit, and the destructive commands flagged so you don’t paste them into the wrong terminal.
Install and config
wp core download --version=6.5
wp config create --dbname=wpdb --dbuser=root --dbpass=secret --dbhost=localhost
wp core install --url=example.com --title="Site" --admin_user=admin --admin_email=you@example.com --admin_password=strong
wp core update
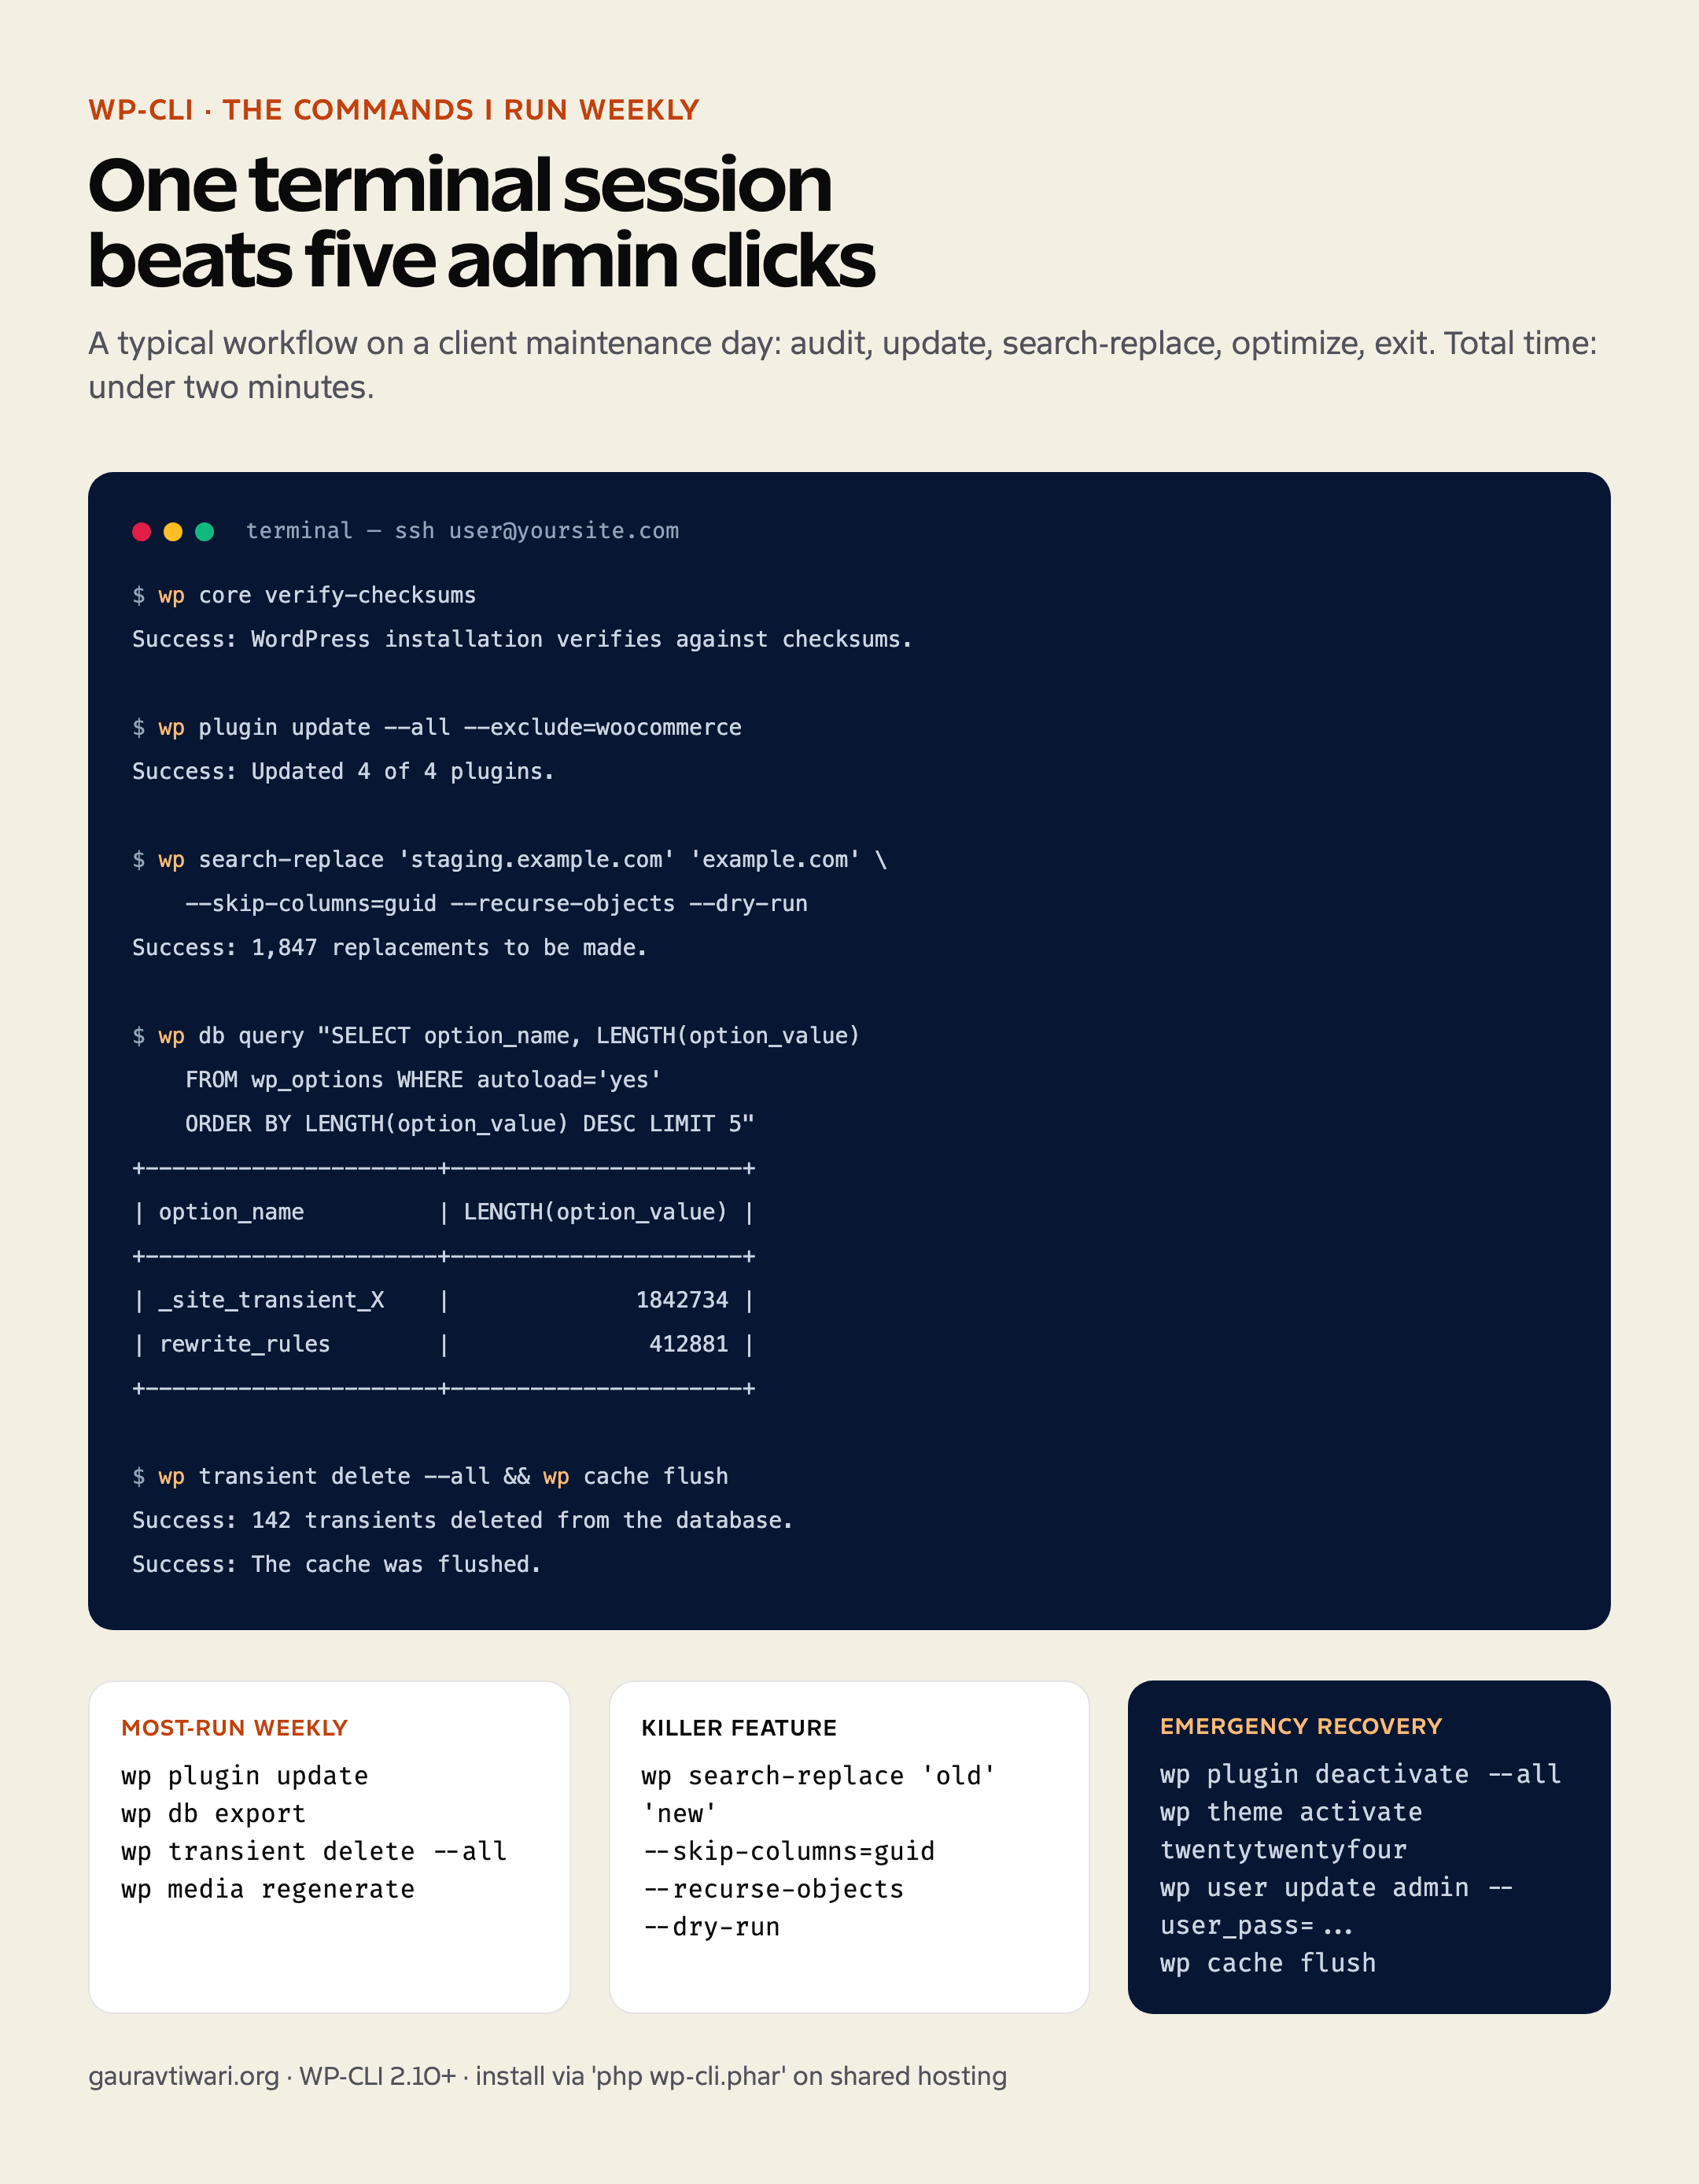
wp core verify-checksums
wp config get table_prefix
wp option get siteurlwp core verify-checksums compares your WordPress core files against official ones — first thing I run when I suspect a hacked site. Mismatched files almost always mean injected backdoors.
Plugins and themes
wp plugin list --status=active --field=name
wp plugin install rank-math --activate
wp plugin update --all --exclude=woocommerce
wp plugin deactivate --all     # nuclear: deactivate everything
wp plugin toggle akismet       # flip current state
wp theme list
wp theme install astra --activate
wp theme delete twentytwentythree
wp plugin deactivate --all is the troubleshooting move when something breaks — deactivate everything, reactivate one at a time, find the culprit. Beats the white-screen-of-death debugging cycle every time.
Content and meta
wp post list --post_type=post --posts_per_page=10
wp post create --post_type=page --post_title="About" --post_status=publish
wp post update 123 --post_status=draft
wp post meta get 123 _yoast_wpseo_focuskw
wp post meta update 123 rank_math_focus_keyword "WordPress hosting"
wp post delete 123 --force
wp media regenerate --yes        # rebuild all thumbnails
wp media import ./folder/*.jpg --post_id=42
Search-replace (the killer feature)
The single command that justifies WP-CLI’s existence. Migrating from staging to production? wp search-replace 'staging.example.com' 'example.com' --skip-columns=guid --recurse-objects. Always include --dry-run on the first run to see the count.
wp search-replace 'old.com' 'new.com' --dry-run
wp search-replace 'old.com' 'new.com' --skip-columns=guid --recurse-objects
wp search-replace 'http://' 'https://' --all-tables
wp search-replace 'old@email.com' 'new@email.com' wp_users wp_usermeta
--skip-columns=guid is non-negotiable: GUIDs in WordPress are permanent unique identifiers and must never change, even on domain migration. Forgetting this corrupts feed subscribers and breaks analytics historical data.
Users
wp user list --role=administrator
wp user create newadmin you@example.com --role=administrator --user_pass=strong
wp user update 1 --user_pass=newpassword
wp user delete olduser --reassign=1
wp user meta get 1 wp_capabilities
Database, cron, and cache
wp db export backup-$(date +%Y%m%d).sql
wp db import backup.sql
wp db optimize
wp db size --tables
wp db query "SELECT * FROM wp_options WHERE autoload='yes' ORDER BY LENGTH(option_value) DESC LIMIT 10"
wp cron event list
wp cron event run --due-now
wp cron event delete some_hook
wp cache flush
wp transient delete --all
The autoloaded-options query is the #1 thing I run when investigating WordPress slowness — oversized autoload entries are the most common hidden cause of slow page loads.
Multisite
wp site list
wp site create --slug=newsite --title="New Site" --email=admin@example.com
wp site activate 5
wp site deactivate 5
wp --url=site2.example.com plugin list   # operate on a specific subsite
wp site list --network --field=url | xargs -I {} wp --url={} plugin update --all
Emergency recovery commands
Site locked out, password forgotten, fatal error blocking the admin? These bring it back without touching the database directly.
# Reset admin password
wp user update admin --user_pass=NewSecurePassword123

# Switch to default theme to escape a broken theme
wp theme activate twentytwentyfour

# Disable all plugins (keeps them installed)
wp plugin deactivate --all

# Find and remove suspicious admin users
wp user list --role=administrator
wp user delete suspicious_user --reassign=1

# Clear all transients (often fixes weird display bugs)
wp transient delete --all
wp cache flush

# Re-permission file system after FTP weirdness
sudo find /path/to/wp -type d -exec chmod 755 {} \;
sudo find /path/to/wp -type f -exec chmod 644 {} \;
WordPress REST API: 12 Examples Beyond /posts
The REST API has shipped in core since WordPress 4.7 and powers the block editor. The real work is in custom endpoints, authenticated mutations, and ACF integration.
The WordPress REST API is shipped in core since 4.7 (December 2016) and powers the entire block editor, but most tutorials cover only the basic /wp/v2/posts endpoint. The interesting work happens in custom endpoints, authenticated mutations, custom post type integration, and webhook patterns.
This guide is 12 working examples I use on client projects, each with the curl command, the JavaScript fetch equivalent, and the PHP registration code where relevant. Built-in endpoints, custom endpoints, authentication patterns, ACF integration, and the gotchas that bite first-time users.
Authentication: Application Passwords
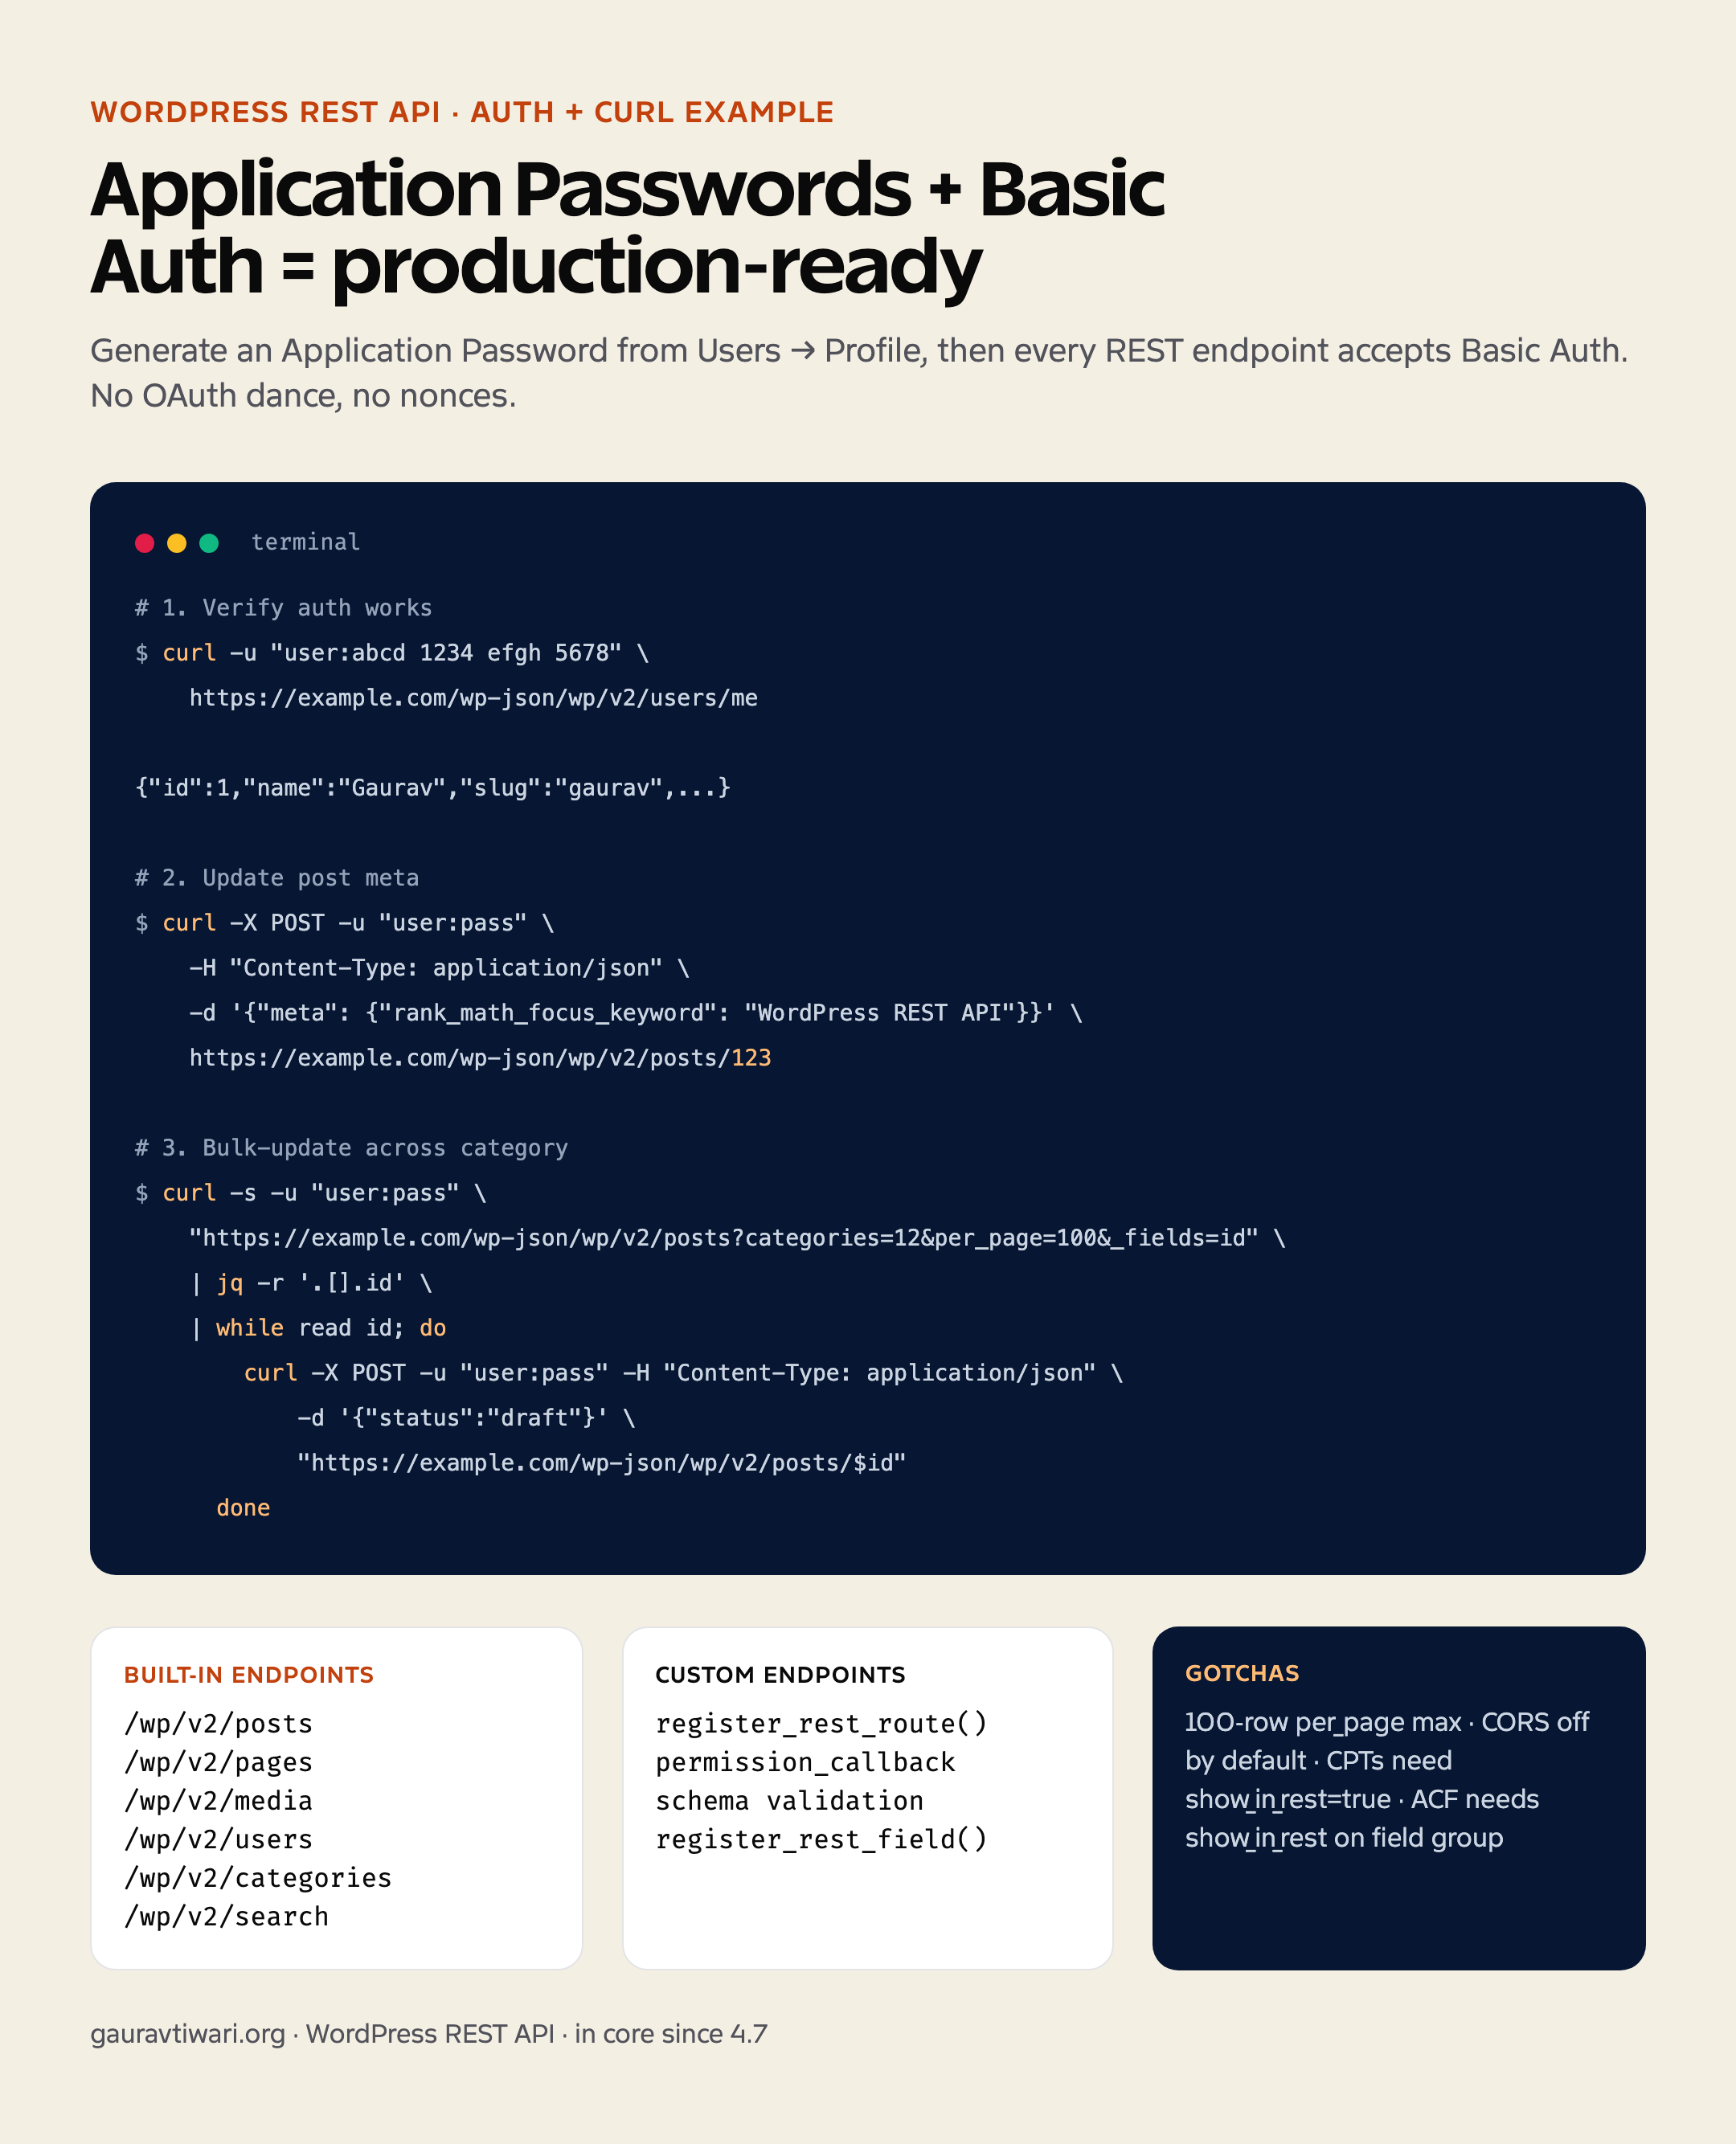
Application Passwords ship in WordPress 5.6+ and are the standard auth method for REST API requests. Generate one from Users → Profile → Application Passwords. Then use Basic Auth with the format username:app-password:
curl -u "username:abcd 1234 efgh 5678 ijkl 9012" \
  https://example.com/wp-json/wp/v2/users/me
Don’t use cookie auth for external apps — it requires a nonce and only works inside the WordPress session. Application Passwords are the right choice for build scripts, sync jobs, and external tooling.
Example 1: Bulk-update post meta across 50 posts
# Get all posts in category 12, then update meta on each
curl -s -u "user:pass" \
  "https://example.com/wp-json/wp/v2/posts?categories=12&per_page=100&_fields=id" \
  | jq -r '.[].id' \
  | while read id; do
      curl -X POST -u "user:pass" \
        -H "Content-Type: application/json" \
        -d '{"meta": {"_my_custom_key": "value"}}' \
        "https://example.com/wp-json/wp/v2/posts/$id"
    done
Example 2: Register a custom REST endpoint
add_action( 'rest_api_init', function() {
    register_rest_route( 'mysite/v1', '/contact', array(
        'methods'  => 'POST',
        'callback' => 'mysite_handle_contact',
        'permission_callback' => '__return_true',
        'args' => array(
            'name'    => array( 'type' => 'string', 'required' => true ),
            'email'   => array( 'type' => 'string', 'required' => true, 'format' => 'email' ),
            'message' => array( 'type' => 'string', 'required' => true ),
        ),
    ) );
} );

function mysite_handle_contact( WP_REST_Request $request ) {
    $name    = sanitize_text_field( $request['name'] );
    $email   = sanitize_email( $request['email'] );
    $message = sanitize_textarea_field( $request['message'] );

    wp_mail( get_option( 'admin_email' ), 'New contact', $message, array( "From: $name <$email>" ) );

    return new WP_REST_Response( array( 'ok' => true ), 200 );
}
Example 3: Expose a custom post type
Custom post types need show_in_rest set to true at registration. Then they’re available at /wp/v2/{rest_base}:
register_post_type( 'product_box', array(
    'public'       => true,
    'show_in_rest' => true,
    'rest_base'    => 'product-boxes',
    'supports'     => array( 'title', 'editor', 'custom-fields' ),
) );
Example 4: Expose ACF fields in the REST response
ACF fields don’t appear by default. Either toggle “Show in REST API” on the field group, or use register_rest_field() for fine control:
add_action( 'rest_api_init', function() {
    register_rest_field( 'post', 'acf_fields', array(
        'get_callback' => function( $post ) {
            return get_fields( $post['id'] );
        },
    ) );
} );
Example 5: Filter the REST response globally
// Add author display name to every post response
add_filter( 'rest_prepare_post', function( $response, $post ) {
    $response->data['author_name'] = get_the_author_meta( 'display_name', $post->post_author );
    return $response;
}, 10, 2 );
Example 6: Restrict an endpoint to logged-in users
register_rest_route( 'mysite/v1', '/dashboard', array(
    'methods'  => 'GET',
    'callback' => 'mysite_dashboard_data',
    'permission_callback' => function() {
        return current_user_can( 'edit_posts' );
    },
) );
Example 7: Pagination beyond 100 items
The default per_page max is 100. To paginate through all results:
let page = 1, all = [];
while (true) {
  const r = await fetch(`/wp-json/wp/v2/posts?per_page=100&page=${page}`);
  if (!r.ok) break;
  const data = await r.json();
  if (data.length === 0) break;
  all = all.concat(data);
  if (data.length < 100) break;
  page++;
}
Example 8: Upload media via REST
curl -X POST -u "user:pass" \
  -H "Content-Disposition: attachment; filename=image.jpg" \
  -H "Content-Type: image/jpeg" \
  --data-binary "@./image.jpg" \
  https://example.com/wp-json/wp/v2/media
Examples 9-12: webhooks, batch, search, and CORS
Webhook trigger: use the wp_after_insert_post action to fire a webhook to an external URL when a post saves. Batch: the core REST API doesn’t support batch — use Gutenberg’s /wp/v2/batch/v1 internal endpoint or roll a custom one. Search: /wp/v2/search?search=keyword queries across all public post types. CORS: add_filter( 'rest_pre_serve_request', function() { header( 'Access-Control-Allow-Origin: https://yourapp.com' ); } ); for cross-origin clients.
WooCommerce Hooks Reference: The Actions and Filters That Matter
WooCommerce exposes hundreds of hooks. These are the cart, checkout, order, and product hooks I reach for on almost every store build.
WooCommerce ships with hundreds of action and filter hooks. The full reference is overwhelming. In practice, you reach for the same 40 over and over: things that fire on cart change, checkout, order status transition, product display, and the email lifecycle.
This reference is organized by job. Each hook entry shows: when it fires, what arguments it passes, and a copy-paste example of how I actually use it on client sites. Skip to the section you need; bookmark the page for the next time.
Cart hooks
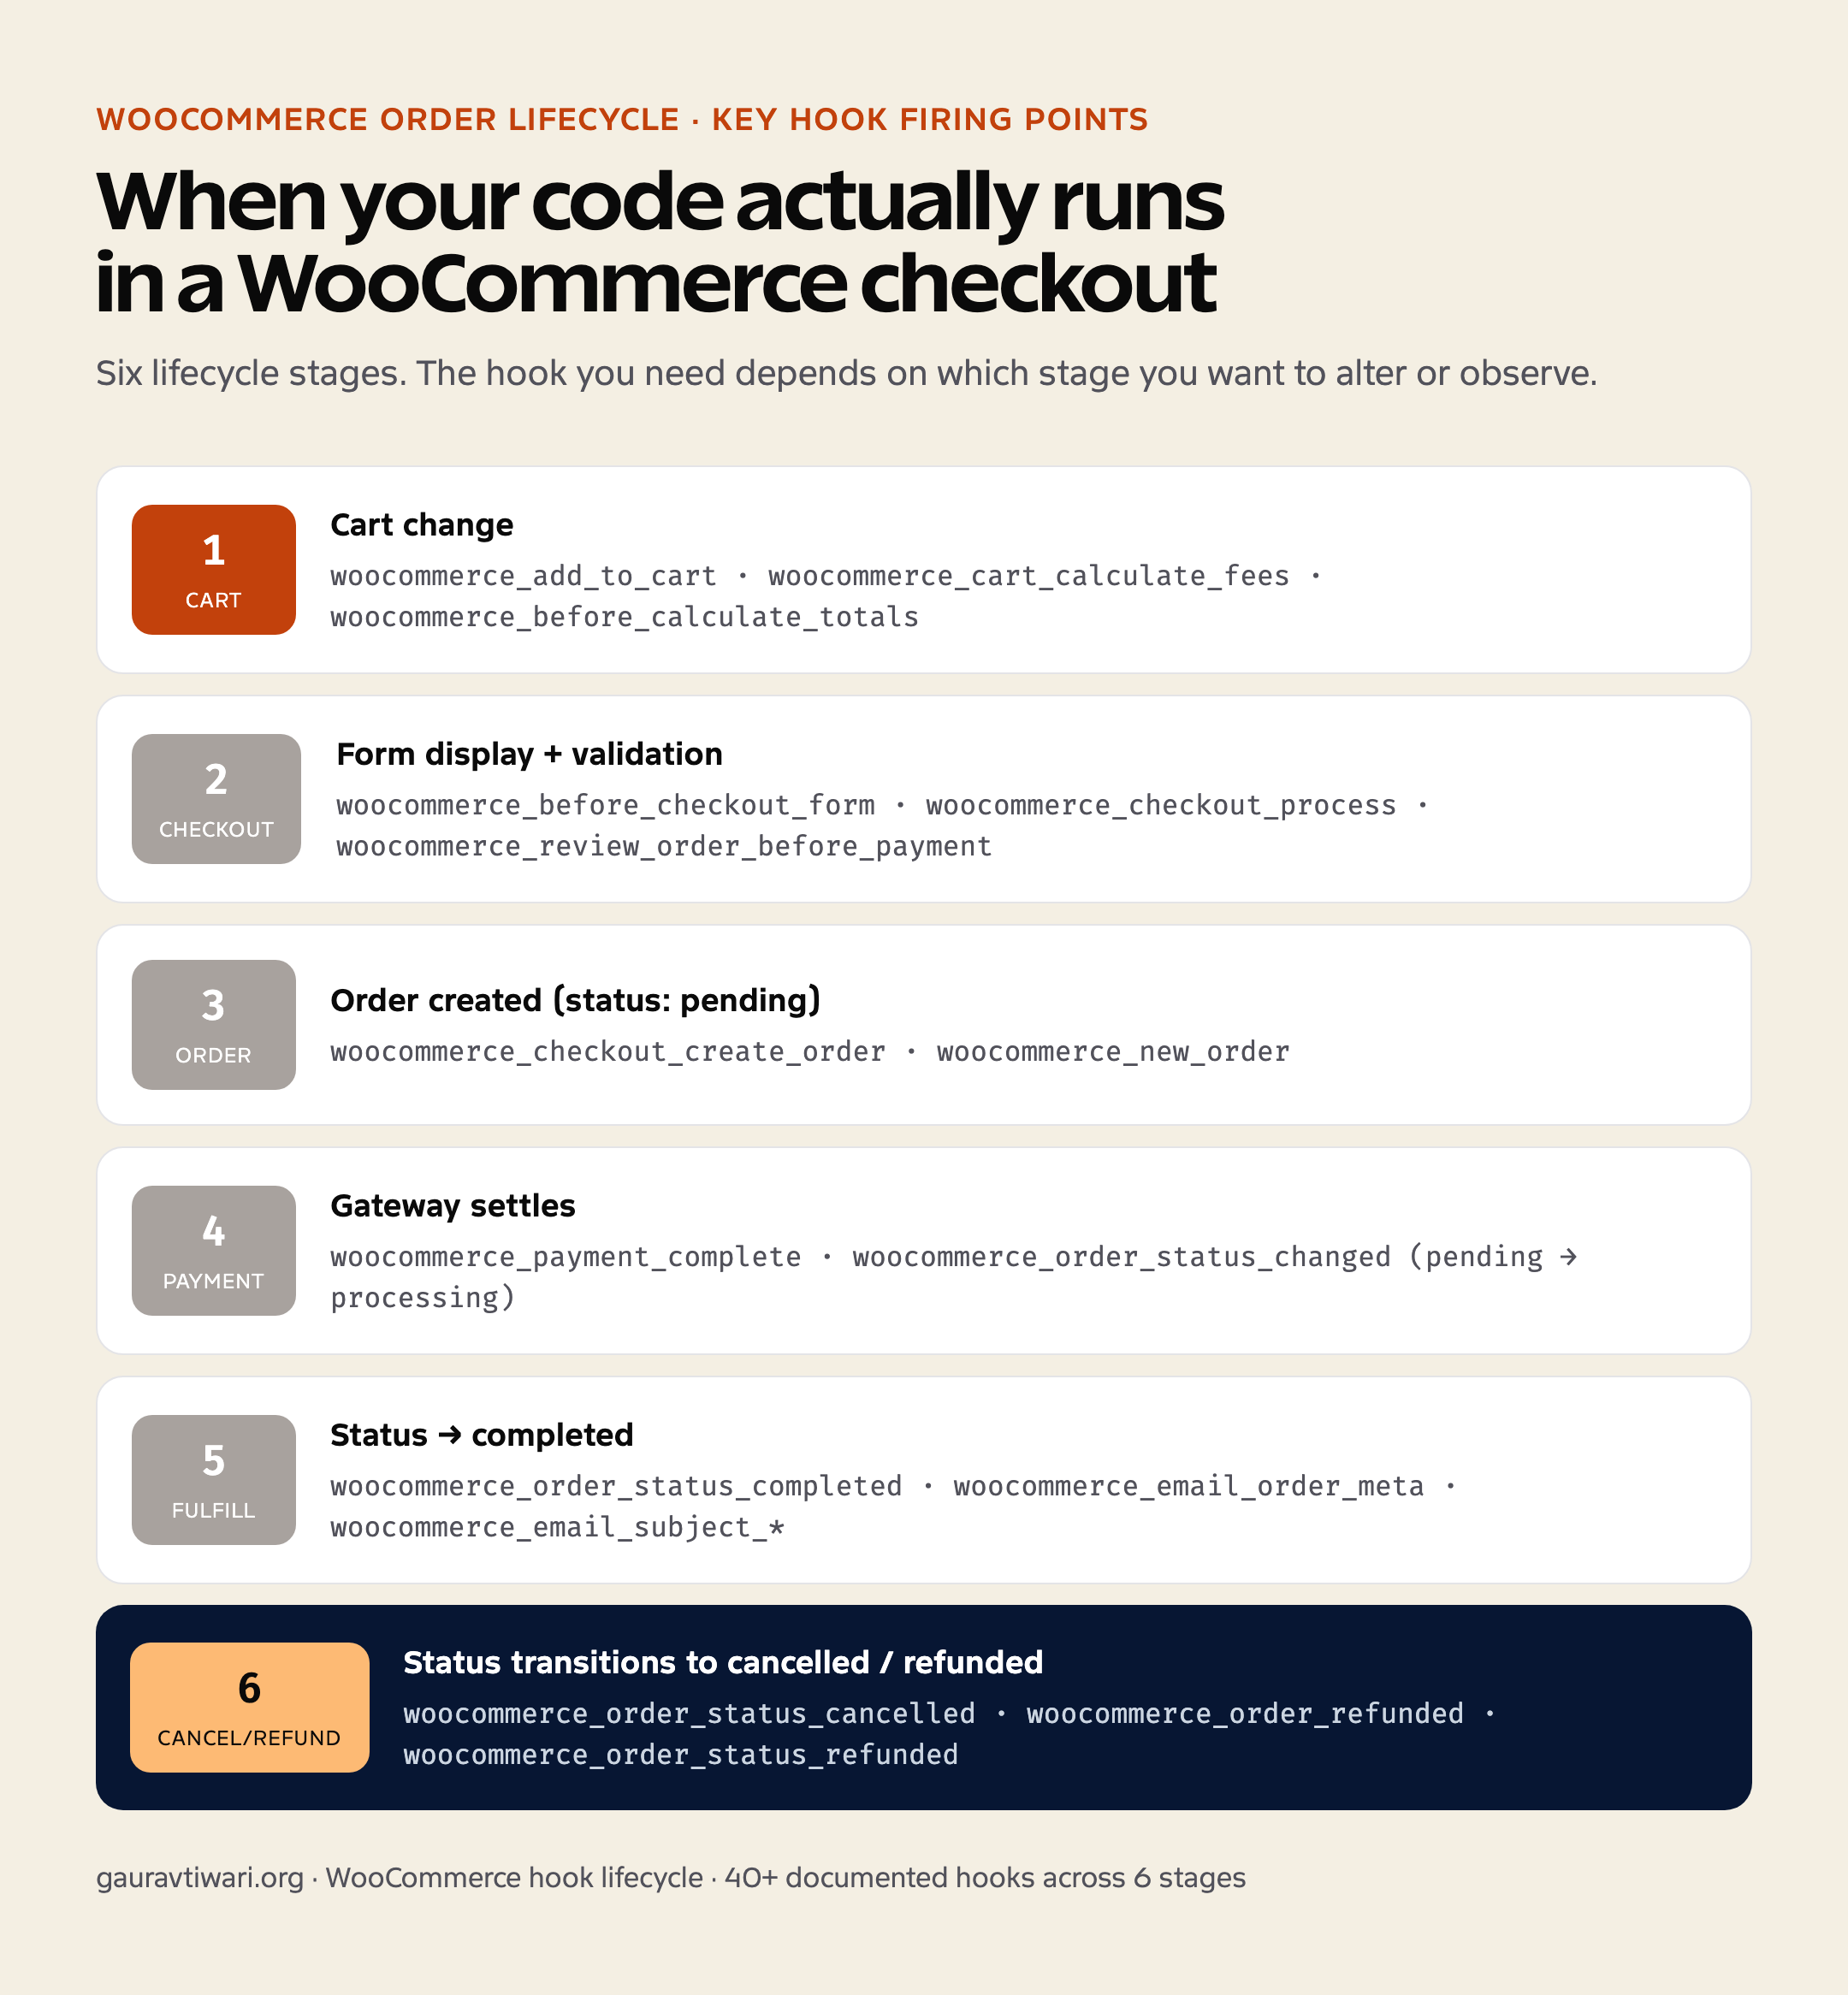
woocommerce_add_to_cart— fires after a product is added. Use it to log conversions, send GA4 events, or validate add-to-cart conditions.woocommerce_cart_calculate_fees— the canonical place to add custom fees (gift wrapping, surcharge, handling).woocommerce_before_calculate_totals— modify cart-item prices on the fly (subscriptions discount, role-based pricing).woocommerce_cart_item_removed— fires when a customer removes an item; useful for abandonment emails.
// Add a flat $5 handling fee on checkout
add_action( 'woocommerce_cart_calculate_fees', function( $cart ) {
    if ( is_admin() && ! defined( 'DOING_AJAX' ) ) return;
    $cart->add_fee( 'Handling', 5 );
} );

// Apply 20% role-based discount for subscribers
add_action( 'woocommerce_before_calculate_totals', function( $cart ) {
    if ( ! current_user_can( 'subscriber' ) ) return;
    foreach ( $cart->get_cart() as $item ) {
        $item['data']->set_price( $item['data']->get_price() * 0.8 );
    }
} );
Checkout hooks
woocommerce_before_checkout_form— render content above the entire checkout form.woocommerce_review_order_before_payment— inject content above the payment selector (trust badges, shipping notes).woocommerce_checkout_process— validate custom checkout fields; throwwc_add_notice( 'message', 'error' )to halt checkout.woocommerce_checkout_create_order— modify the order object before it’s saved (set custom meta, shipping rules).woocommerce_after_checkout_form— render content below the form (FAQ, return policy reminder).
// Require a custom field at checkout
add_action( 'woocommerce_checkout_process', function() {
    if ( empty( $_POST['gst_number'] ) ) {
        wc_add_notice( 'GST number is required for business orders.', 'error' );
    }
} );

// Save the GST number to order meta
add_action( 'woocommerce_checkout_create_order', function( $order ) {
    if ( ! empty( $_POST['gst_number'] ) ) {
        $order->update_meta_data( '_gst_number', sanitize_text_field( $_POST['gst_number'] ) );
    }
} );
Order status hooks
woocommerce_new_order— fires once when an order is created. Use for downstream integrations (CRM sync, accounting, fulfillment).woocommerce_order_status_changed— fires on any status transition; arguments are$order_id, $old_status, $new_status, $order.woocommerce_order_status_completed— fires when status becomes “completed”; the canonical hook for “send digital download”, “trigger fulfillment”.woocommerce_payment_complete— fires when payment is confirmed (different from completed status).
// Push order to a CRM when payment is confirmed
add_action( 'woocommerce_payment_complete', function( $order_id ) {
    $order = wc_get_order( $order_id );
    wp_remote_post( 'https://crm.example.com/api/orders', array(
        'body' => array(
            'order_id'  => $order_id,
            'email'     => $order->get_billing_email(),
            'total'     => $order->get_total(),
            'items'     => array_map( fn( $i ) => $i->get_name(), $order->get_items() ),
        ),
    ) );
}, 10, 1 );
Product display hooks
woocommerce_before_main_content/woocommerce_after_main_content— wrap shop, category, and single-product templates.woocommerce_before_single_product/woocommerce_after_single_product— specific to product pages.woocommerce_single_product_summary— the action that builds the right column on product pages; reorder by changing priorities (10=title, 20=price, 40=excerpt, 50=meta).woocommerce_after_shop_loop_item— runs after each product in the shop loop.
// Move price above the title
remove_action( 'woocommerce_single_product_summary', 'woocommerce_template_single_price', 10 );
add_action( 'woocommerce_single_product_summary', 'woocommerce_template_single_price', 5 );

// Add a stock-status badge under each product card
add_action( 'woocommerce_after_shop_loop_item', function() {
    global $product;
    if ( $product->is_in_stock() && $product->get_stock_quantity() < 5 ) {
        echo 'Only ' . esc_html( $product->get_stock_quantity() ) . ' left';
    }
}, 15 );
Email hooks
woocommerce_email_order_meta— inject custom meta into transactional emails.woocommerce_email_subject_*(e.g.,woocommerce_email_subject_customer_completed_order) — filter to customize subject lines per email type.woocommerce_email_recipient_*— add CCs to specific email types.woocommerce_mail_callback— replace the entire email-sending function (route through SendGrid, Postmark, etc.).
Redis Object Cache: Setup, Benchmarks, and Gotchas
A persistent object cache is the single biggest database-load win for a dynamic WordPress site. Here is how to set up Redis, what to expect, and where it bites.
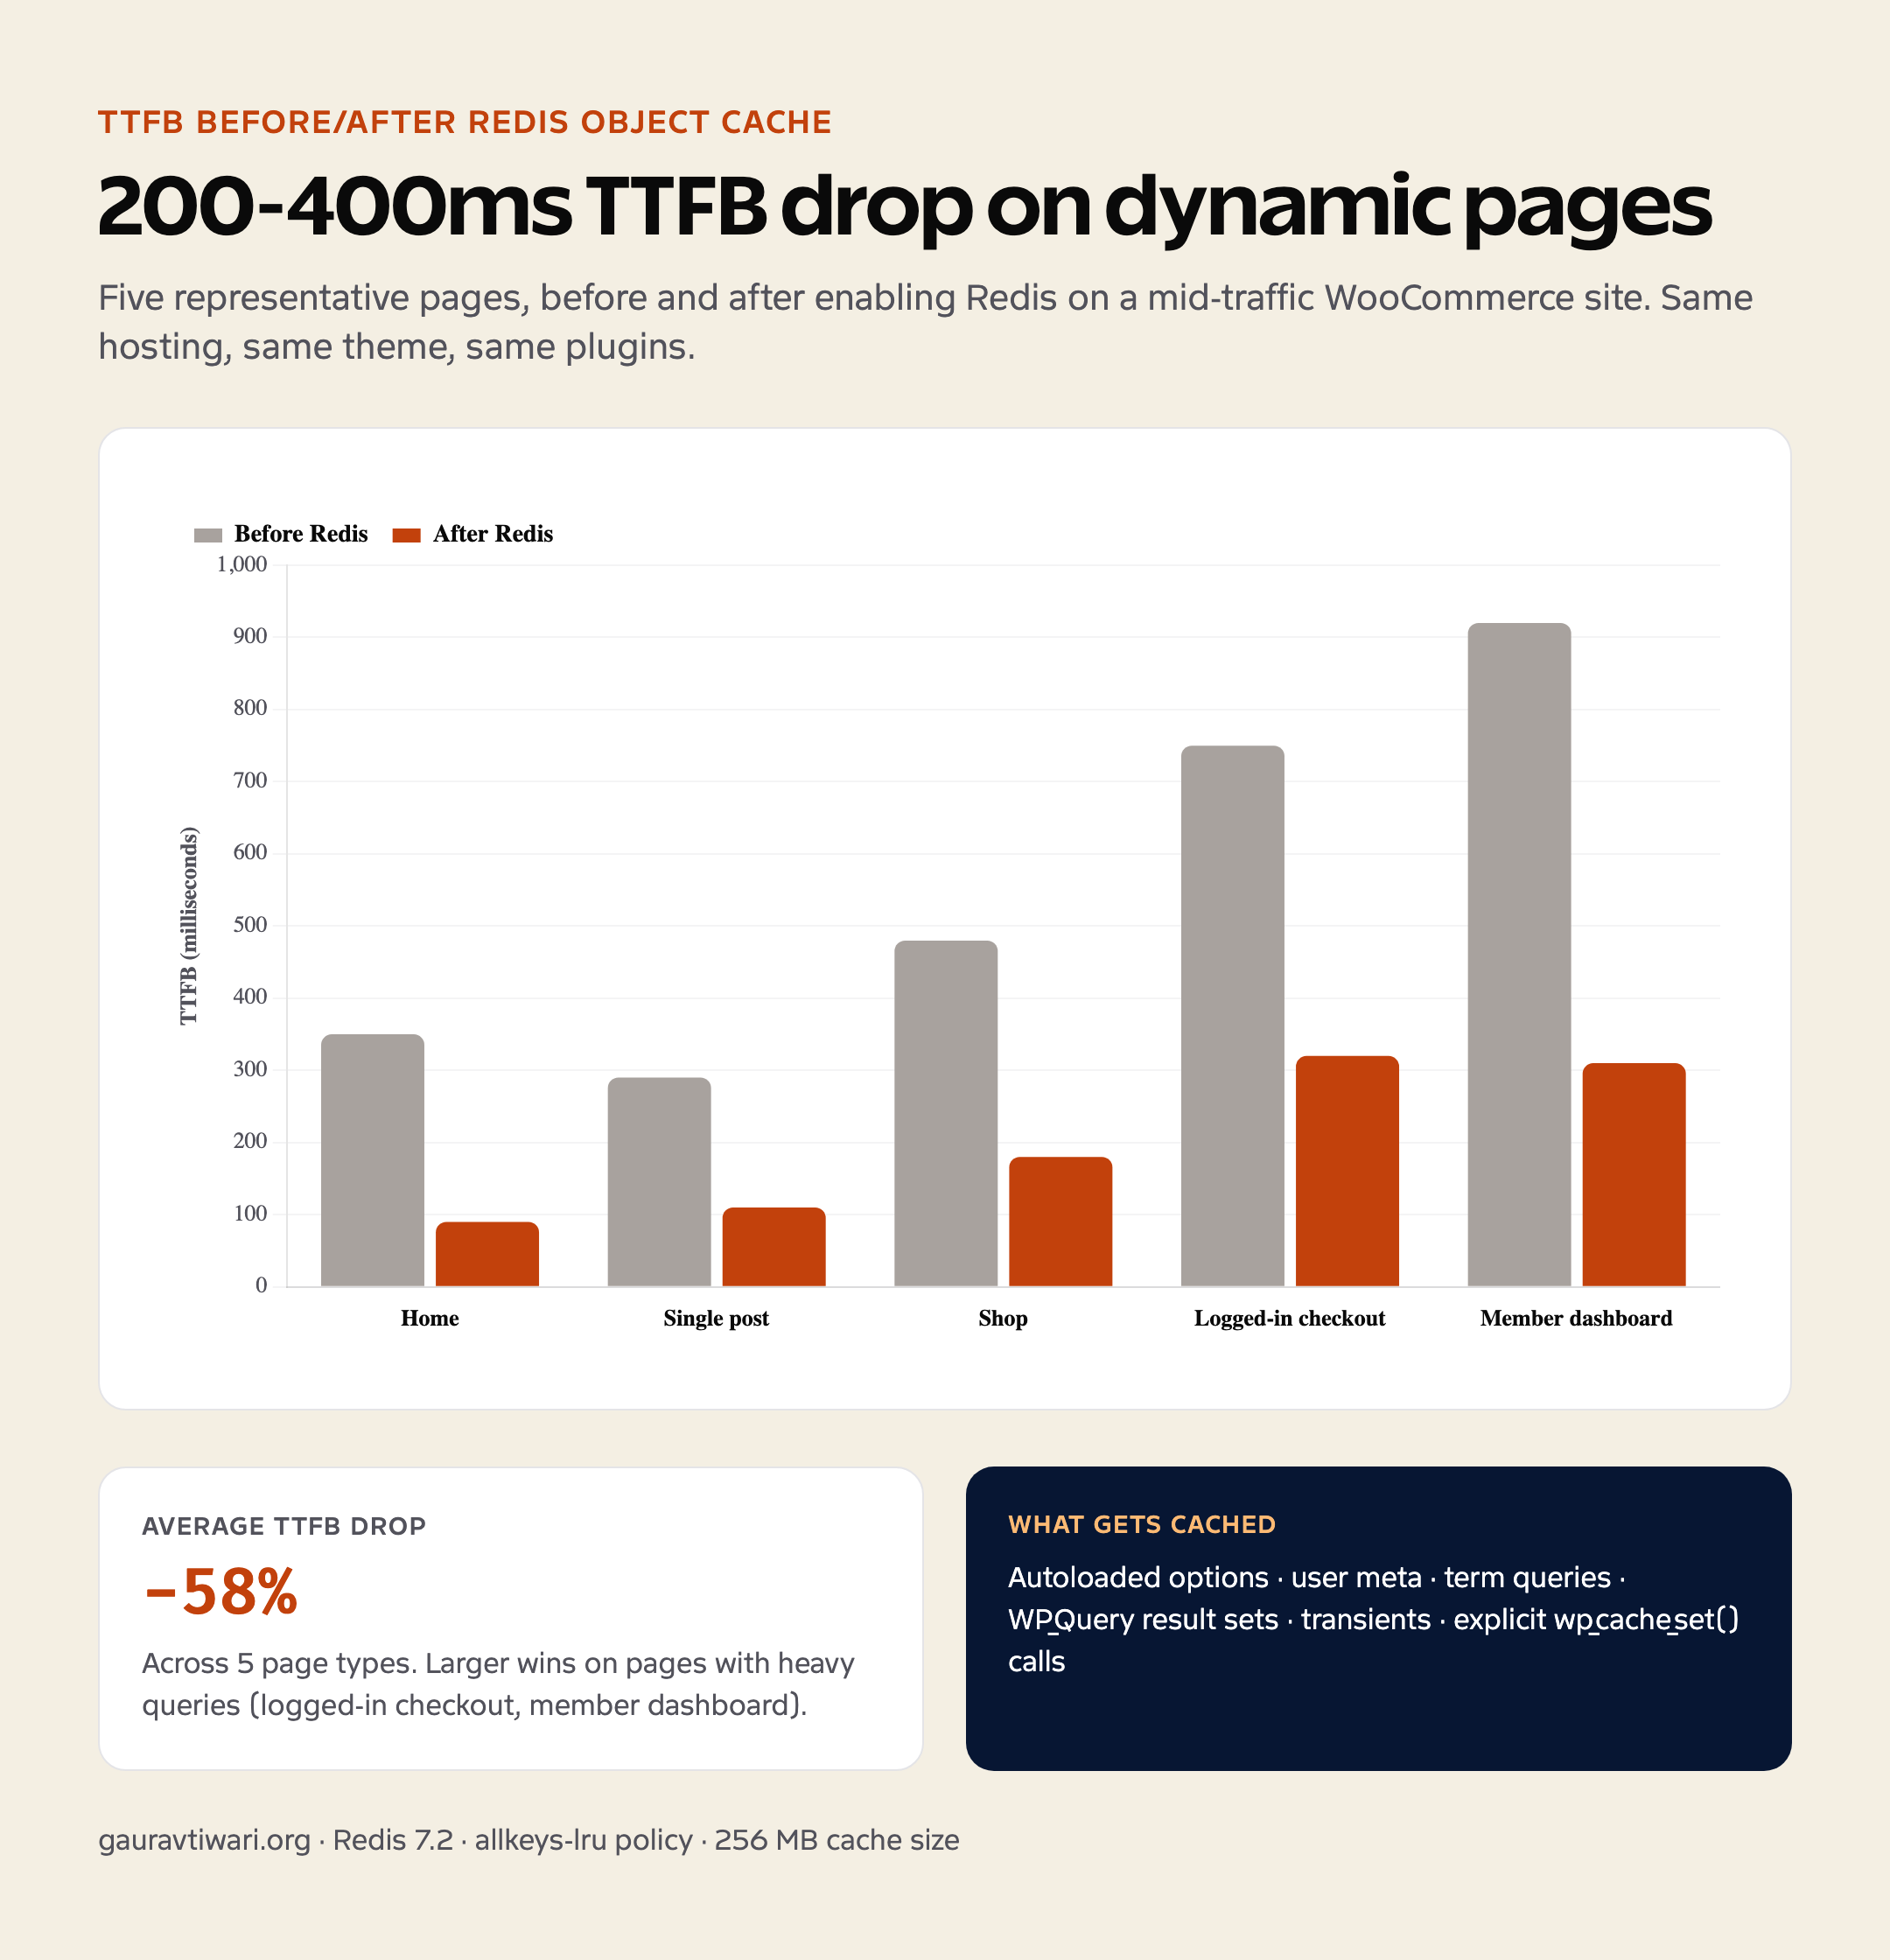
Redis object cache WordPress setup is worth doing when your site repeats the same database work on dynamic pages. It will not make static cached pages magically faster. But on WooCommerce, membership sites, LMS dashboards, search pages, and logged-in portals, Redis can cut query load and smooth out ugly TTFB spikes.
Think of Redis as memory for expensive database answers. WordPress asks the database a question, stores the answer in Redis, and reuses it instead of asking MySQL again on the next request. Simple idea. Big difference when the page cannot be fully cached.
Quick answer: use Redis object cache WordPress only after page caching and hosting are already sane. Install Redis on the server or enable it at the host, connect with a WordPress object cache plugin, add a unique cache key salt, then verify hits, memory use, evictions, and TTFB on dynamic pages.
What Redis Object Cache Actually Does
WordPress has an object cache API built in. By default, that cache lasts only for the current page request. Redis makes the object cache persistent, so query results, options, transients, and other objects can survive across requests.
That is useful when WordPress keeps asking for the same expensive data. Product lookups, permission checks, menu data, options, user metadata, and LMS progress data can all repeat. Redis reduces that repetition.
The official Redis Object Cache plugin is the usual starting point. Object Cache Pro is a stronger paid option for serious WooCommerce and enterprise setups, but most normal sites should prove the bottleneck before buying anything.
When Redis Helps WordPress
Redis helps when page caching cannot cover the request. Public blog posts are usually served as cached HTML. A logged-in course dashboard, cart page, admin screen, search result, or personalized membership page is different. WordPress has to run PHP and query data.
| Site type | Redis value | Reason |
|---|---|---|
| Blog with static posts | Low to medium | Page cache handles most public visits |
| WooCommerce store | High | Cart, checkout, product data, sessions, and admin screens stay dynamic |
| Membership site | High | Logged-in pages and permissions create repeated queries |
| LMS site | High | Progress, lessons, quizzes, and dashboards are dynamic |
| Large magazine | Medium | Menus, related posts, and options can repeat heavily |
If you are still choosing the hosting stack, read WordPress hosting first. Redis support is a hosting decision as much as a plugin decision.
Server Setup Checklist
Managed hosts often expose Redis as a toggle. VPS users usually install Redis, enable it as a service, and connect WordPress through a plugin. Either route is fine. What matters is verification.
- Confirm your host supports Redis or install Redis on the server.
- Install the WordPress Redis Object Cache plugin or your host’s supported object cache plugin.
- Add a unique
WP_CACHE_KEY_SALTinwp-config.php, especially on multisite or shared Redis servers. - Enable object cache in the plugin dashboard.
- Check status, hit ratio, memory use, and evictions.
- Benchmark dynamic pages before and after. Do not judge Redis by a fully cached homepage.
The GitHub repository for the Redis Cache plugin documents configuration constants if you need sockets, passwords, database numbers, or custom timeouts.
Benchmarks That Actually Matter
Do not test Redis by refreshing the homepage with page cache enabled. That proves nothing. Test pages where PHP still runs: cart, checkout, account pages, admin product lists, search, membership dashboards, and API-heavy templates.
I track four numbers: total queries, duplicate queries, object cache hit rate, and TTFB. If Redis is working, duplicate database work should drop and dynamic TTFB should become more stable. A 200 ms win on checkout matters more than a fake 5 ms win on a cached blog post.
Pair this with the WordPress caching plugin guide so full-page cache and object cache are not fighting each other.
Gotchas That Break Redis on WordPress
The most common Redis mistake is enabling it on a host that does not keep Redis stable. The second mistake is sharing one Redis database across multiple WordPress installs without a unique key salt. That can create messy cross-site cache behavior.
- No unique
WP_CACHE_KEY_SALTon multisite or shared Redis. - Redis memory limit too low, causing evictions during traffic spikes.
- Assuming Redis fixes front-end pages already served from page cache.
- Object cache enabled on staging and production with the same prefix.
- Ignoring slow uncached MySQL queries that need indexing or plugin cleanup.
How Redis Fits With the Speed Stack
Redis is not a replacement for page caching. It sits behind it. A typical stack is page cache for anonymous visitors, CDN for static assets and global delivery, and Redis for dynamic WordPress work that cannot be turned into static HTML.
For public speed work, start with FlyingPress vs WP Rocket, Perfmatters, and Cloudflare R2 for media delivery. Add Redis when query data says it belongs.
How to Tell Redis Is Actually Working
A working Redis object cache WordPress setup should show a healthy hit rate, stable memory use, and fewer repeated database queries on dynamic pages. Do not judge it by plugin status alone. A green badge only tells you Redis connected.
A proper Redis object cache WordPress setup should make dynamic WordPress calmer. That is the goal. Not a prettier plugin dashboard, not a one-time benchmark screenshot, and definitely not another thing to toggle when page cache is the real issue.
| Check | Healthy signal | Problem signal |
|---|---|---|
| Hit rate | Climbs after warmup | Always low on repeated pages |
| Memory | Stable under traffic | Evictions during normal use |
| Queries | Duplicate queries drop | Same repeated queries keep firing |
| TTFB | Dynamic pages stabilize | No change outside cached pages |
What Redis object cache actually does
WordPress runs an object cache by default — but the default is per-request only. Every page load starts with an empty cache, populates it during the request, and discards it at the end. A persistent object cache (Redis or Memcached) shares cached objects across requests, so the second visitor reads the same data from memory instead of from the database.
What gets cached: option values (the autoloaded options table), user meta, term queries, complete query results from WP_Query with the cache_results flag, transients, and anything explicitly cached via wp_cache_set(). The savings show up on pages that can’t be full-page cached — logged-in admin views, WooCommerce checkout, member-only content.
Server-side Redis install
On Ubuntu/Debian:
sudo apt update
sudo apt install redis-server php-redis
sudo systemctl enable --now redis-server
sudo systemctl status redis-server   # should be active (running)

# Verify the PHP redis extension loaded
php -m | grep redis
On a managed WordPress host (Kinsta, WP Engine, ScalaHosting, Cloudways), Redis is usually a one-click enable from the dashboard. Most don’t ship it on the lowest-tier plans — check first.
Edit /etc/redis/redis.conf for two important settings: maxmemory 256mb (limit Redis memory use; pick something safely under your server’s RAM headroom), and maxmemory-policy allkeys-lru (when memory is full, drop the least-recently-used keys). Restart with sudo systemctl restart redis-server.
WordPress plugin install and config
Install the Redis Object Cache plugin (by Till Krüss) from wp-admin or via WP-CLI: wp plugin install redis-cache --activate. Then add to wp-config.php above the “stop editing” line:
define( 'WP_REDIS_HOST', '127.0.0.1' );
define( 'WP_REDIS_PORT', 6379 );
define( 'WP_REDIS_TIMEOUT', 1 );
define( 'WP_REDIS_READ_TIMEOUT', 1 );
define( 'WP_CACHE_KEY_SALT', 'yoursite.com' );  // unique per site if multiple share Redis
Then activate from Settings → Redis: click “Enable Object Cache”. The plugin drops object-cache.php into wp-content. Verify with wp redis status — should show “connected” and “in-use”.
Frequently Asked Questions
How do I install WP-CLI on shared hosting?
Most managed WordPress hosts (Kinsta, WP Engine, ScalaHosting) ship WP-CLI pre-installed in SSH. For cPanel hosts, download wp-cli.phar to your home directory and run it as ‘php wp-cli.phar’ instead of ‘wp’.
Is WP-CLI safe to run on production?
Yes for read commands. For destructive commands (delete, search-replace, db import) always run –dry-run first and take a database backup. wp db export takes seconds and saves you from your own typos.
What’s the difference between wp-cli and wp-cli.phar?
wp is the installed binary; wp-cli.phar is the standalone PHP archive you can run anywhere PHP is available. Functionally identical. Hosts often install one or the other depending on their PHP setup.
Does WP-CLI work over SSH?
Yes — WP-CLI is its primary use case. SSH into your server, cd into the WordPress directory, and run wp commands. For multi-site management, use ‘ssh host wp …’ from your local machine.
Why is wp not found after installing?
Most likely: it’s not in your PATH. Either move wp-cli.phar to /usr/local/bin/wp (chmod +x) or call it explicitly with the full path. On managed hosts, check the host’s docs for the wp command path.
Is the WordPress REST API enabled by default?
Yes — since WordPress 4.7 (December 2016) the REST API ships in core and is enabled on every install. Test it by visiting /wp-json/ in your browser; you’ll get a JSON response describing all available endpoints.
How do I authenticate REST API requests?
Application Passwords (Users → Profile → Application Passwords). Use Basic Auth with username and the generated password. For OAuth flows or JWT tokens, install a plugin like miniOrange JWT Authentication.
Can I disable the REST API for non-logged-in users?
Yes, but think twice — many WordPress features depend on it (Gutenberg editor, block discovery, REST-driven theming). Better to restrict specific endpoints with permission_callback rather than disable wholesale.