Five Blogging Tips for New Photographers
You’ve got a camera, some decent shots, and a growing itch to share your work with people beyond your Instagram feed. A photography blog is how you do that properly. Not a social media profile that disappears into an algorithm. An actual website where your portfolio lives, your voice builds authority, and potential clients can find you through Google.
Blogging as a photographer is different from regular blogging. You’re working with large image files, visual-heavy layouts, and an audience that judges you by the quality of what they see. But here’s what most photography bloggers miss: the images alone won’t bring traffic. You need written content that search engines can index, a posting schedule you can maintain, and a strategy that turns casual visitors into paying clients or loyal followers.
Showcase Your Best Work, Not All Your Work
The fastest way to make your photography blog look amateur is to post every single shot from a session. Fifty photos from one wedding where 40 of them are slight variations of the same angle. That’s not a portfolio. That’s a hard drive dump.
Curate ruthlessly. For every shoot, select 8-15 of your absolute best images. Each one should show something different: a unique composition, a special moment, a lighting technique, or an emotional connection. If two photos are too similar, cut the weaker one. Your blog should feel like a greatest hits album, not an unedited roll of film.
When presenting your portfolio posts, tell the story behind the shoot. Where was it? What challenges did you face? What equipment did you use? This context transforms a gallery of pretty pictures into engaging content that keeps visitors reading and gives search engines something to index.
If you need inspiration, browse some outstanding photography portfolio examples. Notice how the best ones balance image quality with storytelling and maintain a consistent visual style across their entire collection.
Commit to a Realistic Posting Schedule
Consistency matters more than frequency. One great post per week beats three mediocre posts that you can’t sustain past the first month. I’ve seen countless photography blogs launch with a burst of 10 posts in the first week, then go silent for three months. That pattern kills audience trust and search engine credibility.
Pick a schedule you can maintain for at least a year:
- Once a week: Ideal for photographers who shoot regularly. Monday or Tuesday posts get the most traffic.
- Twice a month: Good for part-time photographers or those with demanding editing workflows.
- Once a month: Minimum viable frequency. Anything less and Google stops treating your site as active.
Use a content calendar. Plan your posts 2-4 weeks ahead so you’re never scrambling for ideas on publishing day. Batch your editing: process images for multiple posts in one session, then schedule the blog posts in advance. WordPress lets you schedule posts to publish automatically on your chosen date and time.
Build a “content bank” of 3-5 ready-to-publish posts. When life gets busy (and it will), you have a buffer. Write behind-the-scenes posts or gear reviews during slow weeks so you always have something in the queue.
Display Images the Right Way
As a photography blogger, your images are the main event. But how you display them matters just as much as the photos themselves. Listing images one after another in a single column gets boring fast. Mix up your presentation:
- Gallery grids for showing multiple images from a session (masonry layouts work particularly well)
- Full-width hero images for your strongest shots that deserve the spotlight
- Before-and-after sliders for editing tutorials (shows your editing skills)
- Image-text pairings where a photo sits next to a paragraph describing it
- Scroll-through carousels for telling a visual story in sequence
If you’re using WordPress (which I recommend for photography blogs), look for themes specifically designed for photographers. They come with gallery layouts, lightbox viewers, and portfolio templates built in. WordPress themes for photographers are purpose-built for displaying visual work beautifully while keeping your site fast.
Optimize Images for Speed Without Killing Quality
This is where most photography bloggers struggle. Your camera produces 20-50MB RAW files. Your blog visitors expect pages to load in under 3 seconds. Those two realities are in direct conflict, and resolving that conflict is one of the most important skills you’ll develop.
Here’s the workflow I recommend:
Step 1: Resize. Your blog doesn’t need 6000px-wide images. Resize to a maximum of 1600px on the longest edge for full-width display, or 1200px for in-content images. This alone reduces file size by 60-70%.
Step 2: Convert to WebP. WebP files are 30-40% smaller than JPEG at equivalent quality. Most modern browsers support WebP. Use WordPress plugins that automatically convert and serve WebP with a JPEG fallback for older browsers.
Step 3: Compress. Quality 80-85% is the sweet spot for web images. The visual difference between 85% and 100% quality is imperceptible on screen, but the file size difference is dramatic. Tools like ShortPixel, Imagify, or the free Squoosh app by Google handle this automatically.
Step 4: Lazy load. Only load images that are visible on screen. Images below the fold load as the user scrolls down. WordPress includes native lazy loading, and most caching plugins enhance it further.
Step 5: Add alt text. Every image needs descriptive alt text. Not “IMG_4392” but “golden hour portrait of bride and groom at lakeside venue.” Alt text helps visually impaired visitors, improves SEO, and shows as a description if the image fails to load.
Keep your full-resolution originals backed up on cloud storage (Google Drive, Dropbox). Only upload optimized versions to your blog. This protects your originals while keeping your site fast.
 Blogging Tips for New Photographers – Infographic 2″ class=”wp-image-1154382″/>
Protect Your Images
Your photos are your intellectual property. Once they’re online, protecting them takes deliberate effort.
Watermarking. A subtle watermark with your name or logo in the corner of each image discourages theft and promotes your brand. Don’t make it so large that it ruins the viewing experience. A small, semi-transparent mark in a consistent position works well.
Right-click protection. Some WordPress plugins disable right-click on images to prevent easy downloading. It won’t stop determined thieves (screenshot exists), but it prevents casual copying.
Embed copyright metadata. Add your name, copyright notice, and contact information to the EXIF data of every image before uploading. This metadata travels with the file if someone downloads it.
Reverse image search. Periodically run your key images through Google’s reverse image search or TinEye to find unauthorized uses. If someone is using your work without permission, a simple DMCA takedown request usually resolves it.
And always, always get permission before posting images of people. This is especially important for client work. Include a model release or portfolio usage clause in your photography contract that explicitly allows you to use images on your blog and marketing materials.
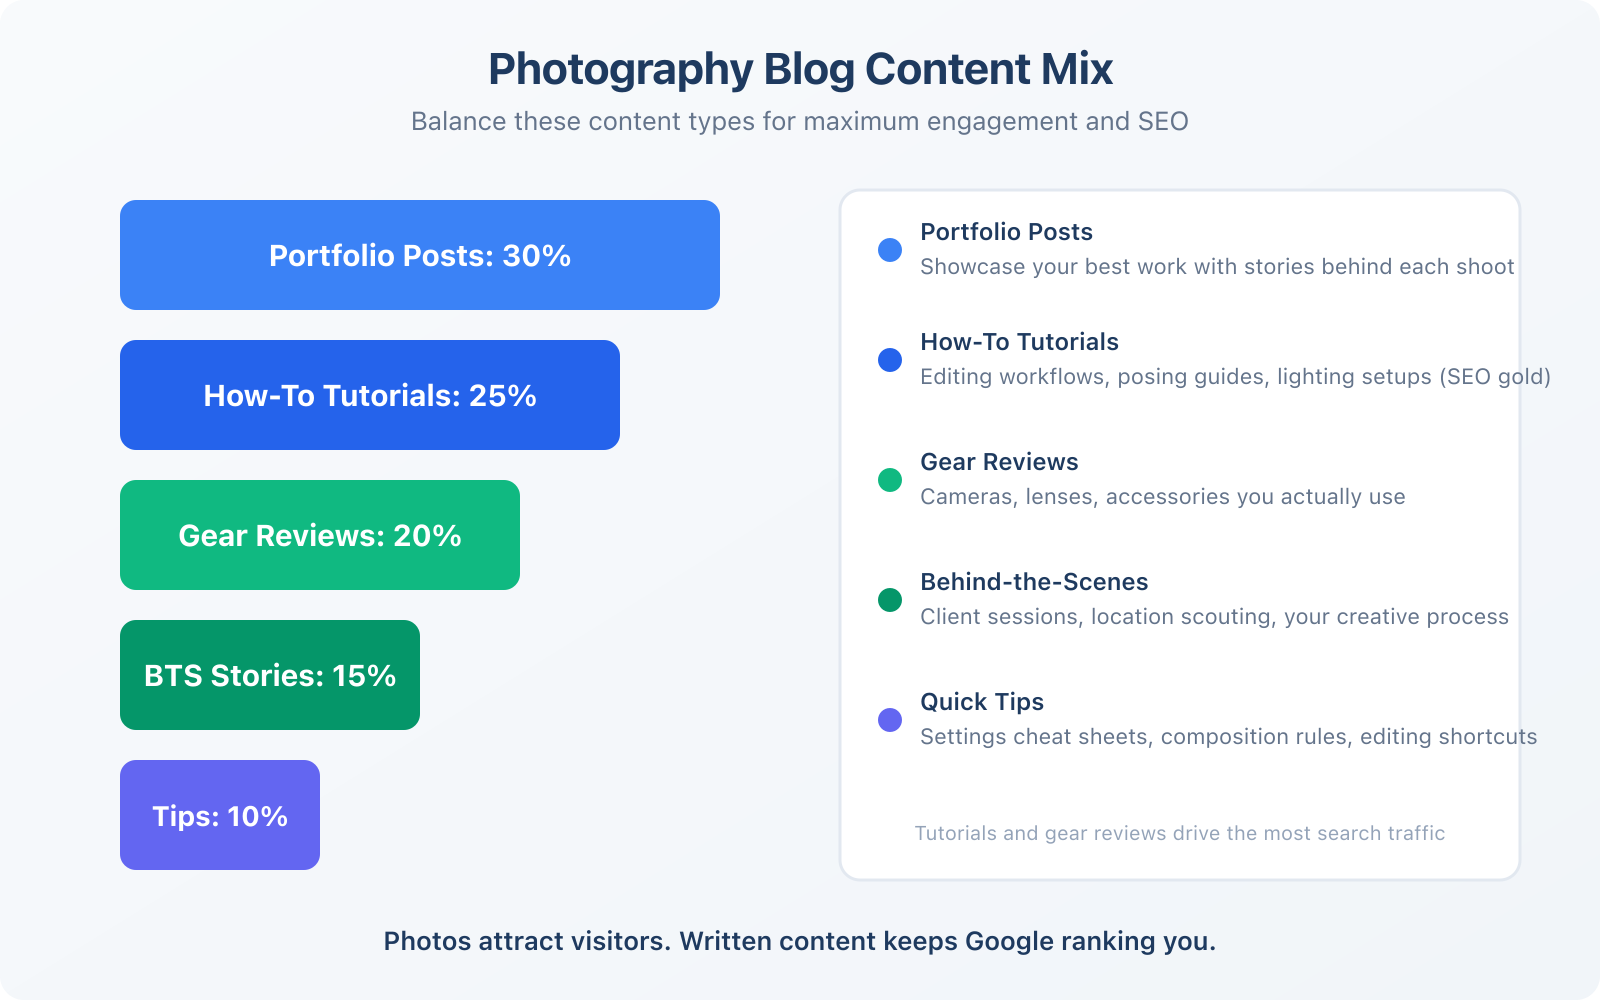
Write More Than You Think You Need To
Here’s the uncomfortable truth for photography bloggers: Google can’t see your images the way humans can. It reads text. Without written content, search engines don’t know what your site is about, which means your beautiful portfolio is invisible to anyone searching for a photographer in your area or niche.
Every blog post should include at least 300-500 words of written content alongside your images. For posts you want to rank in search results, aim for 1,000-1,500 words. That sounds like a lot, but it’s manageable when you break it into sections.
Content ideas that attract search traffic:
- “What to wear” guides for clients (e.g., “What to Wear to Your Family Photo Session”)
- Gear reviews of cameras, lenses, and accessories you actually use
- Editing tutorials showing your Lightroom or Photoshop workflow
- Location guides for photo shoots in your area
- Behind-the-scenes posts explaining your creative process
- Pricing guides answering “how much does photography cost” questions
- Camera comparison posts (these attract massive search traffic from gear-obsessed photographers)
These posts serve double duty: they bring organic traffic from Google AND they position you as an expert when potential clients check out your blog before booking.
SEO Basics for Photography Blogs
SEO for photographers comes down to a few fundamentals that most visual creatives overlook:
Use descriptive page titles. “Sarah and Mike’s Wedding” won’t rank for anything. “Lakeside Wedding Photography at [Venue Name], [City]” has a much better chance of appearing in search results when someone searches for wedding photographers in your area.
Write meta descriptions. The 150-character snippet that appears in search results. Include your location, specialty, and a compelling reason to click. “See our lakeside wedding photography at Maple Ridge. Natural light portraits with a documentary style. Based in Portland, OR.”
Optimize image filenames. Before uploading, rename files from “DSC_4392.jpg” to “portland-wedding-photographer-maple-ridge-ceremony.jpg.” Google reads filenames and uses them to understand image content.
Use location keywords naturally. If you’re a wedding photographer in Austin, include “Austin wedding photographer” in your homepage, about page, and relevant blog posts. Not stuffed into every sentence, but present enough that Google connects your site to local searches.
Set up Google Business Profile if you serve local clients. It’s free and puts your photography business on Google Maps. Include photos of your work, respond to reviews, and post updates regularly. For local photographers, Google Business Profile often generates more leads than your website’s organic rankings.
 Blogging Tips for New Photographers – Infographic 3″ class=”wp-image-1154383″/>
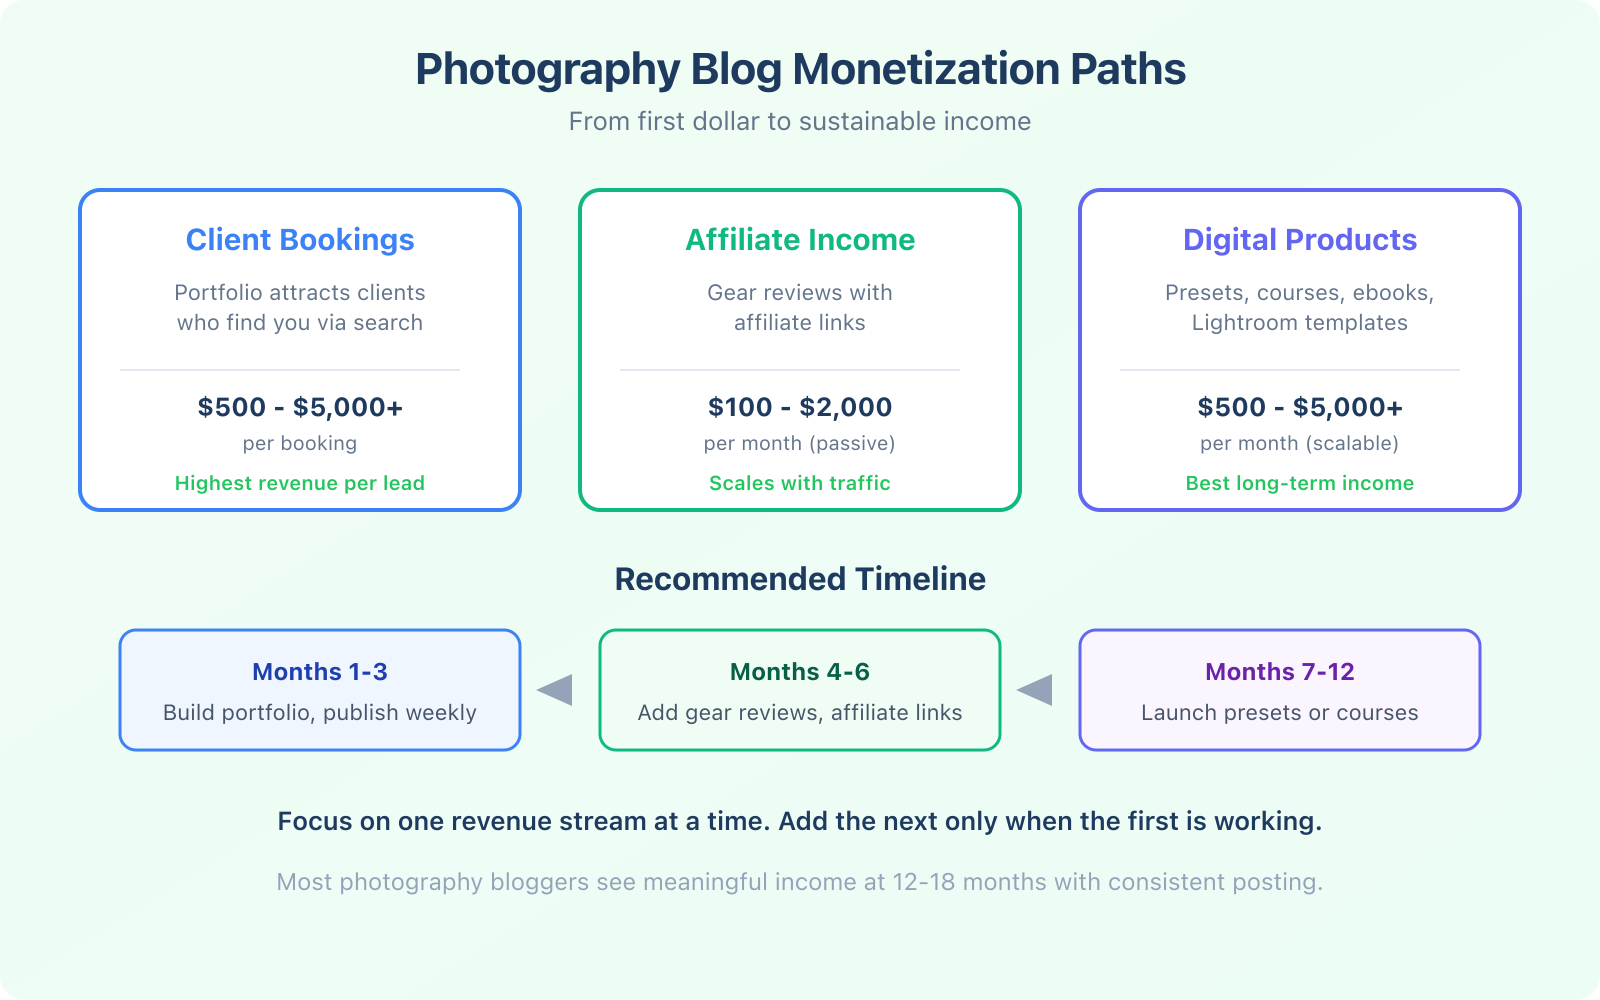
Monetizing Your Photography Blog
A photography blog can generate income beyond direct client bookings. Here are the most realistic revenue streams:
Client bookings from blog traffic. This is the primary revenue driver for most photography bloggers. Your portfolio and helpful content attract potential clients who search for photographers in your area or specialty. A single wedding booking at $3,000-$5,000 makes your entire year of blogging worthwhile.
Affiliate income from gear reviews. When you review cameras, lenses, or editing software, include affiliate links to the products. Amazon Associates is the most accessible affiliate program for photography gear. You earn 1-4% commission on each sale. It’s not life-changing money, but a popular gear review post can earn $100-$500/month passively.
Digital products. Lightroom presets, Photoshop actions, editing tutorials, and photography ebooks are popular digital products in the photography space. Once created, they sell indefinitely with no additional production cost. A pack of 20 Lightroom presets priced at $29-$49 can generate consistent monthly income.
Online courses. If you develop a unique skill or style, package it into an online course. Platforms like Teachable or Gumroad make it straightforward to sell and deliver course content. Photography courses typically price at $99-$499 depending on depth and production quality.
Print sales. Offer fine art prints of your best landscape or street photography. Print-on-demand services handle production and shipping so you don’t need inventory. Margins are slim on lower-priced prints, but limited edition signed prints can command $200-$500+.
Frequently Asked Questions
What platform should I use for a photography blog?
WordPress with a photography-specific theme is the best option for most photographers. It gives you full control over your site, excellent SEO capabilities, and thousands of gallery and portfolio plugins. Squarespace is a simpler alternative with beautiful built-in templates, but it offers less flexibility and weaker SEO tools. Avoid free platforms like Blogger or Tumblr. They limit your customization options and don’t look professional.
How many images should I post per blog article?
For a portfolio post showing a full session, 8-15 images is ideal. For a tutorial or gear review, 3-5 images plus any necessary screenshots. For a general blog post, 2-4 images to break up the text. More isn’t always better. Every image should serve a purpose: demonstrate a point, showcase a technique, or add visual interest. Remove any image that doesn’t earn its place on the page.
How do I get traffic to a new photography blog?
Start with three strategies: share every post on your social media (Instagram, Pinterest, Facebook groups for photographers), optimize each post for a specific keyword you want to rank for in Google, and join photography communities where you can share your work and link back to your blog. Pinterest is particularly powerful for photography blogs since it’s essentially a visual search engine. SEO traffic takes 3-6 months to build, but it becomes your largest traffic source long-term.
Should I watermark my blog photos?
For portfolio images, a subtle watermark is recommended. It discourages unauthorized use and promotes your brand when images are shared. Keep it small, semi-transparent, and in a consistent corner. For tutorial images where you’re showing editing steps, watermarks can be distracting, so use your judgment. Never use large, obnoxious watermarks that ruin the viewing experience. They hurt more than they help.
How long before a photography blog makes money?
Client bookings from your blog can start within 2-3 months if you’re posting your portfolio and optimizing for local searches. Affiliate income typically takes 6-12 months to become meaningful as your traffic grows. Digital product sales depend on your audience size and product quality, but most photographers see their first sales within 3-6 months of launching a product. Consistent blogging for 12-18 months is when most photography bloggers hit a sustainable income level.
Starting a photography blog takes effort, but the payoff is worth it. Your blog becomes your permanent online portfolio, your SEO engine, your client funnel, and potentially a revenue source in its own right. Focus on showing your best work, writing content that search engines can rank, optimizing your images for speed, maintaining a consistent schedule, and protecting your intellectual property. Do these five things well and your photography blog becomes one of the most valuable assets in your business.
Hi! I like this article, tahnk you! i can suggest another two tips:yo take part to foto contest and to biuld a great instgram profile!