How to Save an Image From Google Docs (7 Ways) 2026
Google Docs won’t let you right-click an image and save it the way you save a photo from any other web page. The option used to be there, Google quietly pulled it around 2018, and now every writer, editor, and blogger who shares docs runs into the same wall.
I’ve had to pull images out of client Google Docs well over 100 times, for ghostwritten posts, guest articles, case studies, and long-form lead magnets. Some docs have two images. Some have forty. The method I use changes based on which one it is, and that’s what this guide is really about.
The short answer
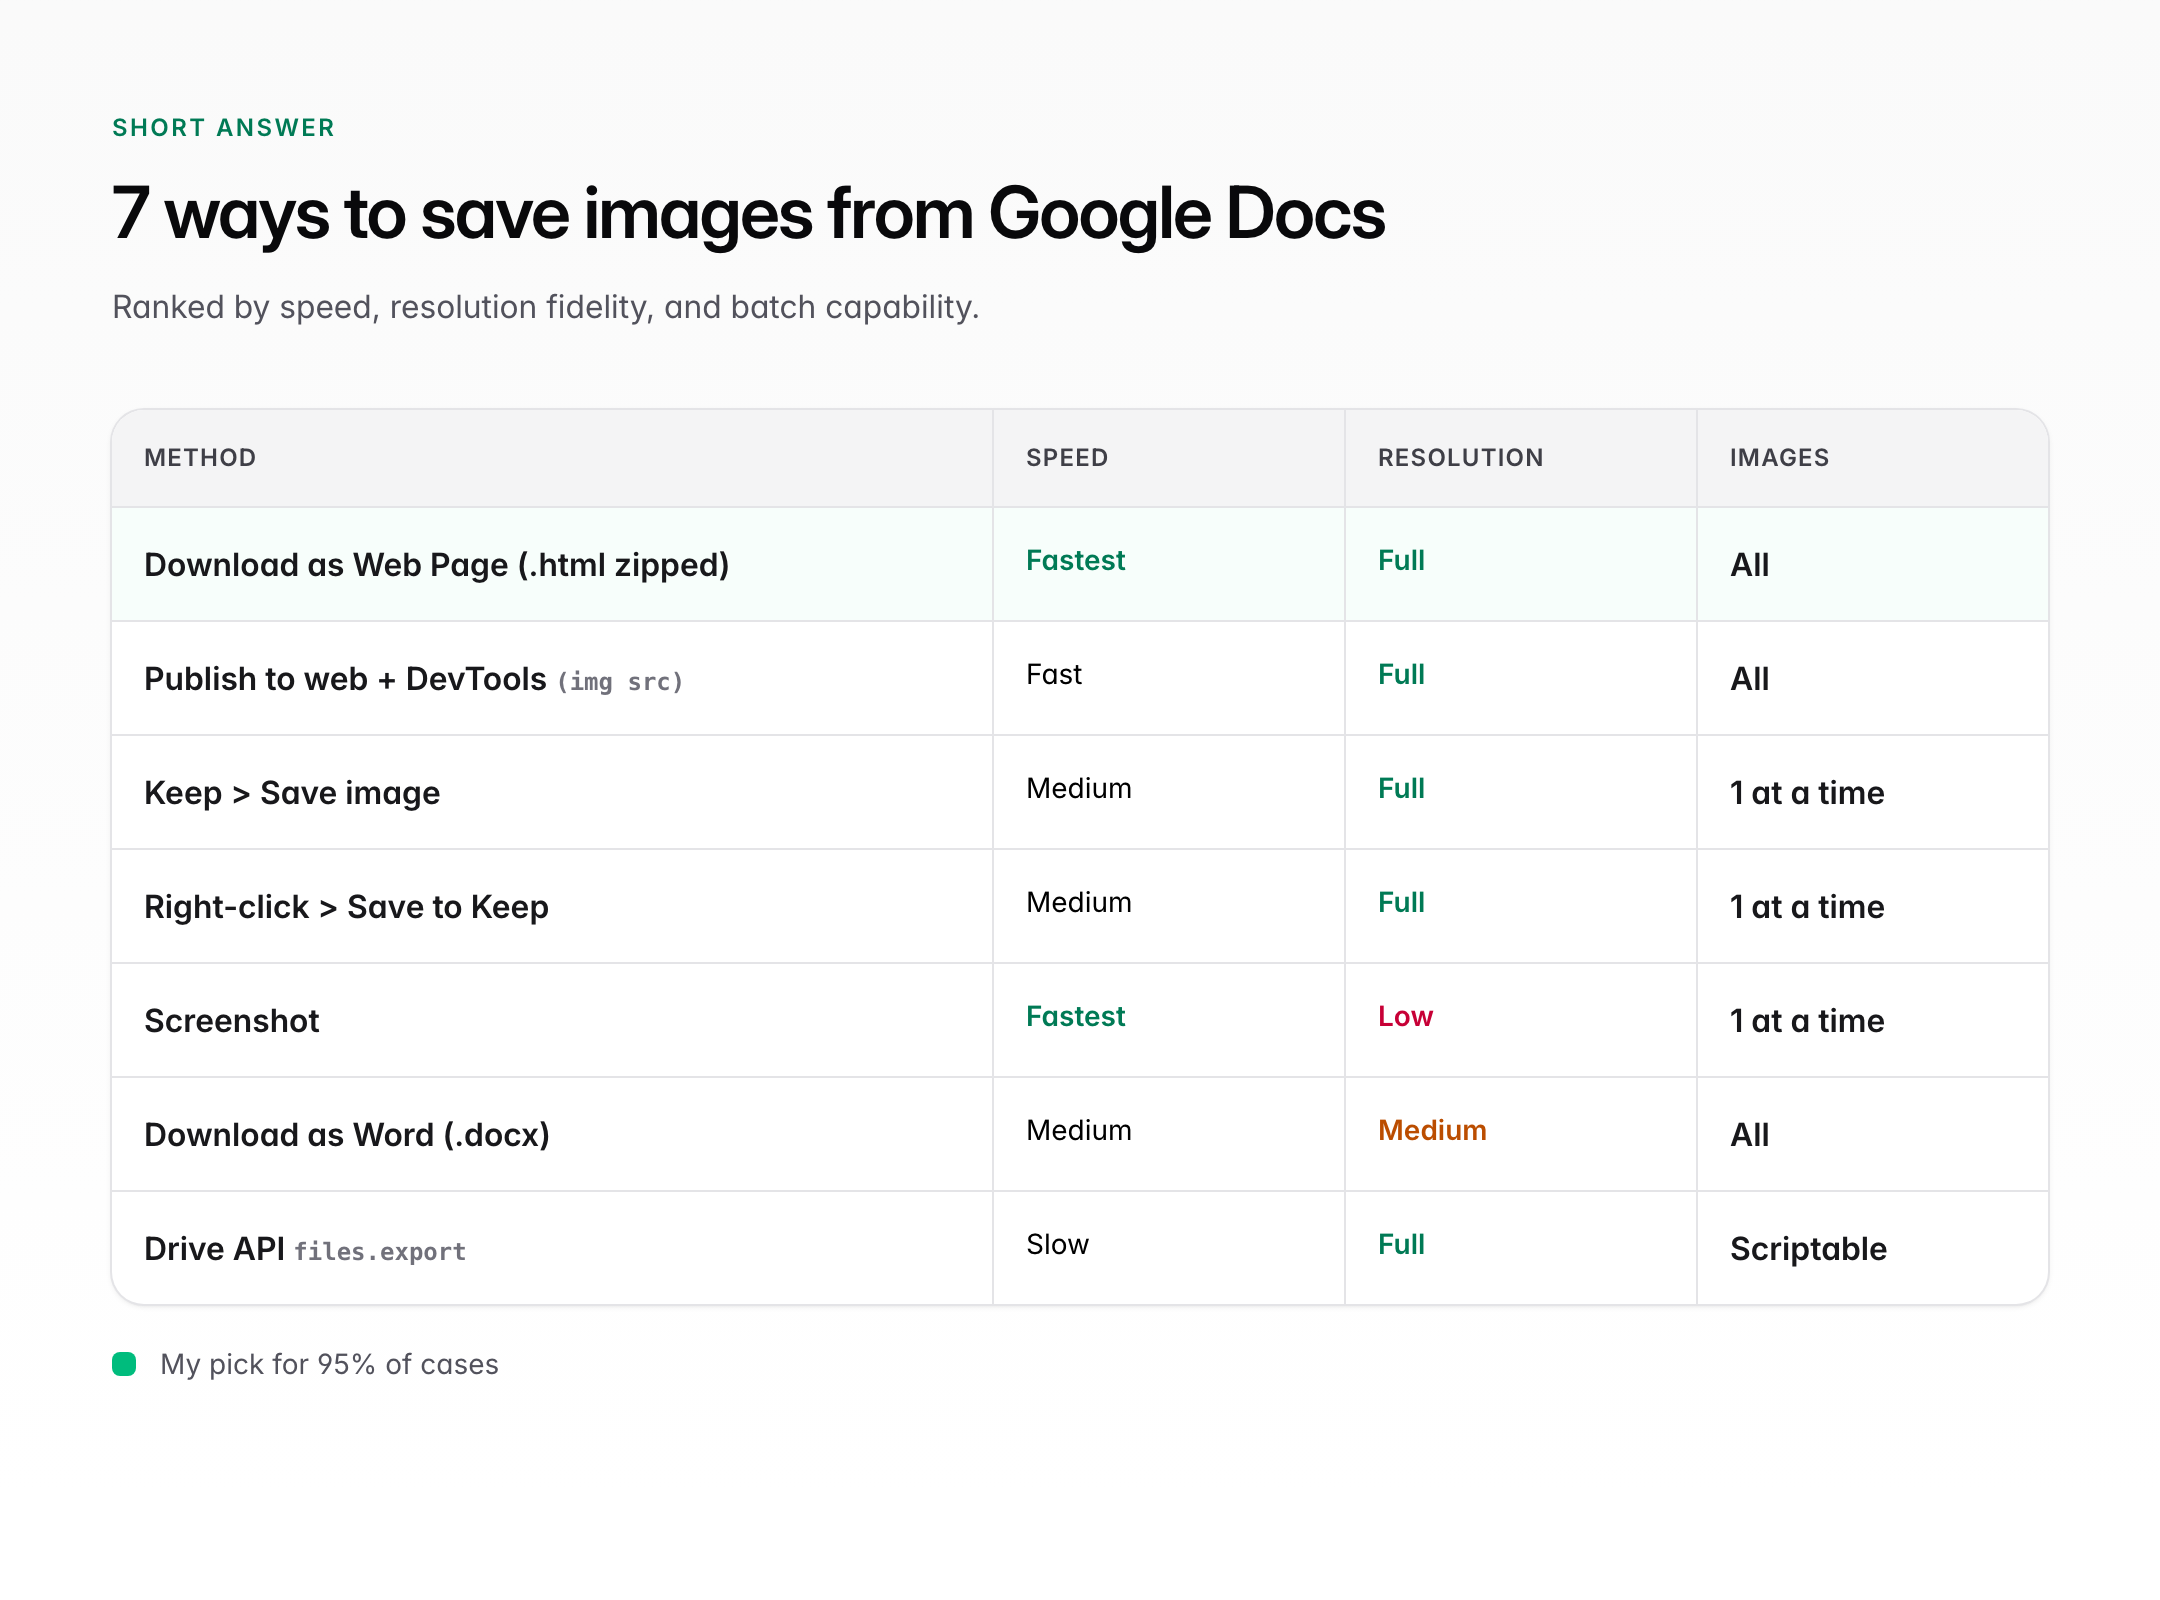
The fastest way to save an image from Google Docs is to right-click it and pick Save to Keep Notepad, then right-click the thumbnail in the sidebar and choose Save image as. For multiple images, use File then Download then Web Page .html, zipped, and unzip to find every image in the images/ subfolder. Seven methods work in 2026: Keep sidebar, web-page download, publish to web, Google Drawings, browser screenshot, Chrome DevTools, and screen capture with tools like ShareX or CleanShot X.
Method choice depends on three things: how many images, what resolution you need, and whether you own the doc. I’ll go through each one in order, flag the resolution trade-offs, and tell you which one I actually reach for when a client sends me a 40-image draft at 11pm.
Method 1: Right-click and Save to Keep (fastest for one-off images)
Right-click the image, pick Save to Keep, then right-click the thumbnail that appears in the right sidebar and pick Save image as. Two right-clicks. Done in under 5 seconds. Works in Chrome, Edge, and Brave on Windows, macOS, and Linux. This is the method I default to when a client sends a doc with 1 to 5 images.
Here’s the exact sequence. Open the doc in the browser (not the mobile app, which doesn’t support this). Right-click the image inside the doc. You’ll see a native Google menu. Pick Save to Keep. Google Keep slides in from the right as a sidebar. The image shows up as a thumbnail note in that sidebar. Right-click the thumbnail. Pick Save image as. Your browser’s regular save dialog opens. Name the file, pick the folder, hit Save.
Resolution caveat: Keep saves the image at whatever resolution Google Docs stored it at, which is usually the original upload size capped around 1600px on the longest edge. If the writer pasted a 3000px image, you’ll get it back at roughly 1600px. Good enough for blog posts, not good enough for print. For that you want Method 2 or Method 6.
Method 2: Download as web page (the bulk trick)
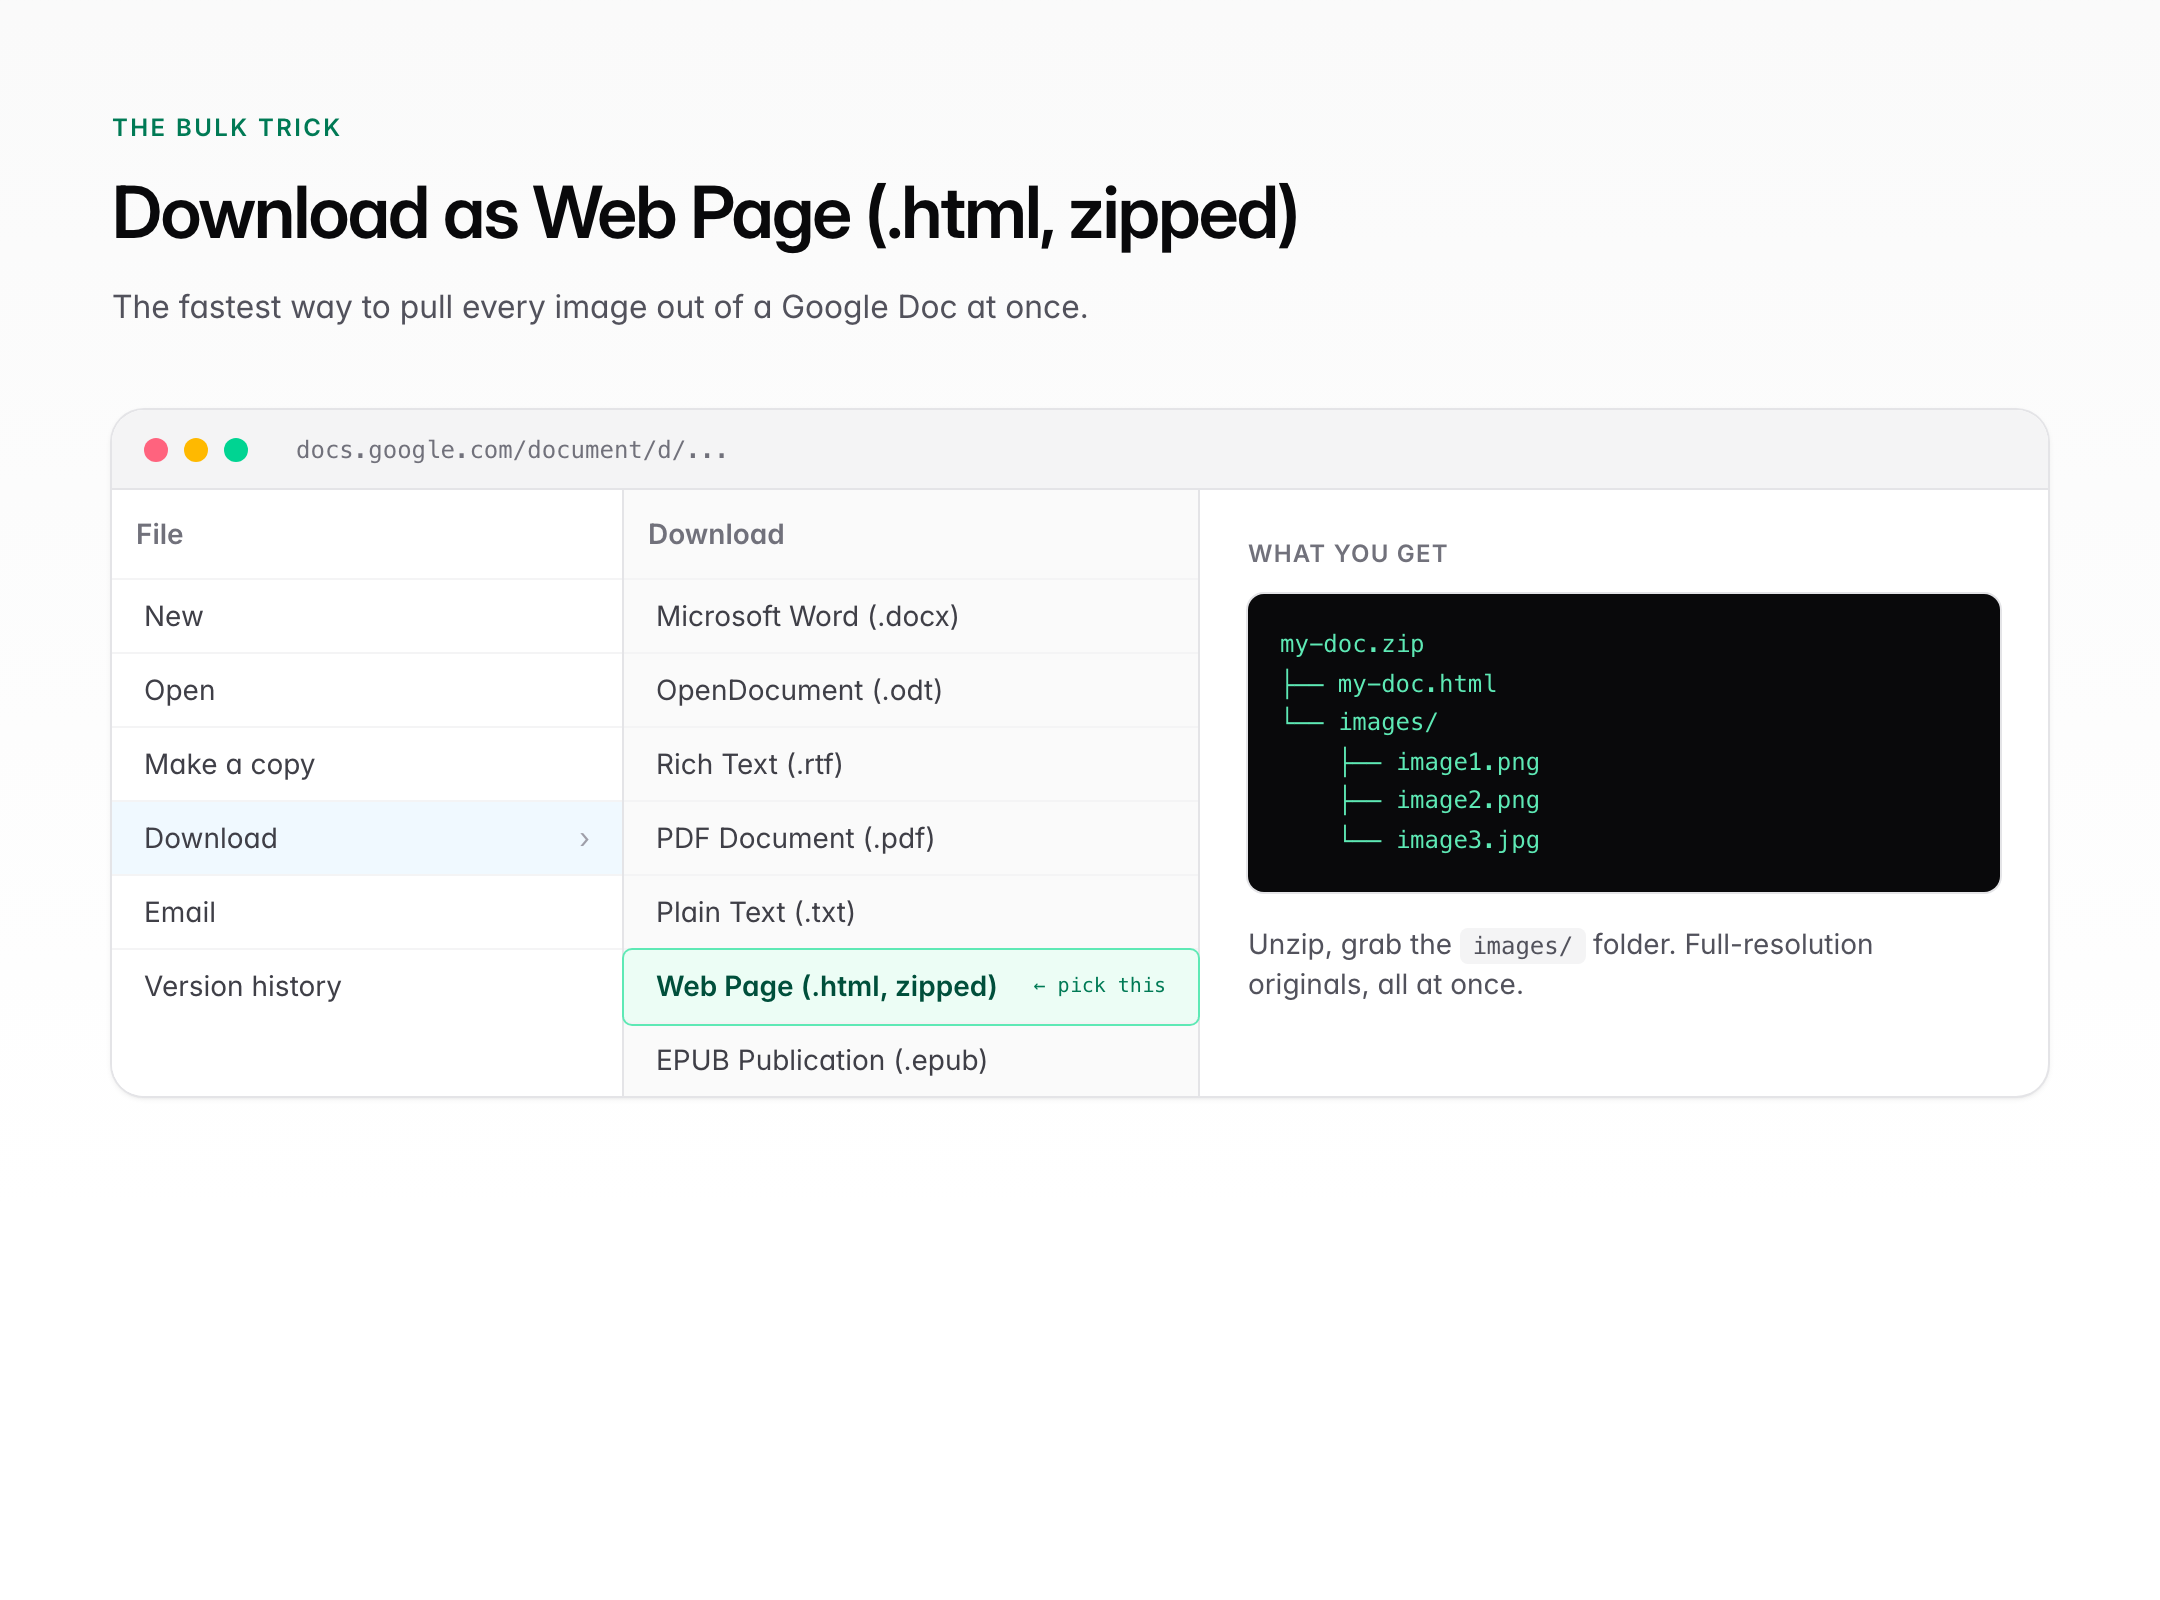
Use File then Download then Web Page (.html, zipped) to get every image in the doc at full resolution in one go. Google Docs bundles all images into an /images subfolder inside the zip. This is the method I use for any doc with more than 5 images, and the one I wish someone had taught me years ago.
Open the doc. Click File in the top menu. Hover over Download. Pick Web Page (.html, zipped). Google will generate a zip file named after your doc title and trigger a browser download. Find the zip in Downloads. Double-click on macOS or right-click and Extract All on Windows. You’ll get a folder with one .html file and one images folder. Inside that folder, every image is saved as image1.png, image2.png, image3.jpg, and so on, in the order they appear in the doc.
Two things I love about this method. First, the images come out at the original resolution Google stored, which is noticeably better than screenshots. On a test doc I ran last month, a chart screenshot came out 442KB versus 38KB for the same chart pulled via web-page download, and the web-page version was sharper on Retina displays. Second, filenames are predictable, so you can rename in bulk with a tool like A Better Finder Rename or PowerToys PowerRename.
One gotcha. If the doc uses the same image twice, Google Docs might only save one copy and reference it twice in the HTML. Rare, but I’ve seen it on heavily reused brand assets.
Method 3: Publish to Web (when you want a shareable URL too)
File then Share then Publish to web turns your doc into a public HTML page where right-click and Save image as works normally. Quality is the same as the web-page download method. Useful when you also want a shareable link for the whole doc as a preview.
Click File, Share, Publish to web. A modal opens. Click the green Publish button. Google gives you a public URL ending in /pub. Copy it. Open in a new tab. You now have a plain HTML version of the doc. Right-click any image and pick Save image as. That’s it.
When you’re done, go back to File, Share, Publish to web, and click Stop publishing. The public URL stops resolving within a few minutes. I always unpublish. Letting a draft stay publicly indexable is how client drafts end up in Google search results, and that’s a conversation nobody wants to have twice.
Method 4: Google Drawings trick (for embedded images)
Open the Insert menu then Drawing, create a new drawing, and paste the image into the drawing canvas. Google Drawings has a native Download option that saves images at full resolution as PNG, JPEG, or SVG. This sounds roundabout, and it is, but it works when every other method fails.
Where this helps: images that were pasted into the doc as part of a larger inline drawing, or images protected by a view-only doc where Method 1 and Method 2 are greyed out. Open the original image in the doc. Click it, hit Ctrl+C or Cmd+C. Go to Insert, Drawing, New. The Drawing editor opens in a modal. Paste with Ctrl+V. The image appears. Click Actions, Download, and pick PNG. Close the drawing without saving.
This is my fallback for view-only shares. I’ve used it twice this year on legal docs where the client couldn’t change sharing permissions. Not elegant. But when you have 10 minutes to extract 3 chart images before a pitch, elegance isn’t the priority.
Method 5: Screenshot with Snipping Tool or CleanShot X
A cropped screenshot works in under 2 seconds, but you lose original resolution and any transparency. Use Windows Snipping Tool (Win+Shift+S), macOS Screenshot (Cmd+Shift+4), or a dedicated screen capture tool like CleanShot X or ShareX for cleaner output with drop shadow and instant-copy to clipboard.
The big limitation: you can only capture what’s visible on screen, at the resolution your display is showing. A 4K image displayed at 800px in the doc becomes an 800px screenshot. If you need crisp output, zoom the doc to 200% before capturing, or use Method 2 or Method 6 instead. I only use screenshots when I need a marked-up version with annotations or when the image is a slide or chart where pixel-perfect accuracy doesn’t matter.
For writers and bloggers doing this daily, a paid tool is worth the upgrade. CleanShot X on macOS at $29 one-time gives you annotation, scrolling capture, and a floating overlay. ShareX on Windows is free and does everything CleanShot does plus more. My personal pick on Mac is CleanShot X. On Windows, ShareX.
Method 6: Chrome DevTools for hi-res original images
Open Chrome DevTools Network tab, filter to Img, reload the doc, and you’ll see every image file Google Docs loaded. Right-click any request and pick Open in new tab, then save from there. This is the method for when you need the absolute highest resolution Google has stored.
Press F12 (or Cmd+Option+I on Mac) to open DevTools. Click the Network tab. Click Img in the filter row. Press Cmd+R or Ctrl+R to reload the doc. As the page loads, image requests stream in. Click any row. In the Preview pane you’ll see the actual image. Right-click the row, pick Open in new tab. The raw image URL loads in a fresh tab. Right-click the image there and Save as.
Why bother: Google Docs sometimes stores a higher-resolution version than what the web-page download exports. I’ve seen cases where DevTools gave me a 2400px image while Method 2 gave me 1600px of the same asset. Worth the 90 seconds when print-quality matters.
Method 7: Save ALL images from a Google Doc at once
The web-page download in Method 2 is the bulk method. One click in File, Download, Web Page (.html, zipped) saves every single image in the doc at once into an images/ subfolder inside the zip. No extension needed, no third-party service, no copy-paste loop.
Full walkthrough for a doc with many images. Open the doc. Click File. Click Download. Click Web Page (.html, zipped). Wait for the download to complete, usually 3 to 10 seconds depending on doc size. Open the zip file. Open the images folder inside. You now have every image as image1.png through imageN, numbered in document order. Rename them in bulk with PowerRename on Windows or File Multi Tool on Mac. Upload to your CMS or asset library.
A doc with 40 images takes me about 90 seconds from File menu click to renamed files ready to upload. I’ve pulled this exact trick on guest posts for IBM and HubSpot when the writer delivered images inside the doc instead of a separate Drive folder. It just works.
One more tip for heavy users. Make a keyboard shortcut on your Mac or Windows machine that opens the Downloads folder instantly, and bind zip extraction to a single right-click action. I use Keka on macOS and 7-Zip on Windows for one-click extract. Cuts the 90-second per-doc workflow down to about 50 seconds once you stop hunting for the zip in Finder or Explorer.
What you can’t do (and why)
You can’t right-click an image directly in Google Docs and pick Save image as. Google removed that option years ago. The stated reason is content protection, though the practical effect is just extra friction for writers sharing their own files. The option still exists on Google Slides and Google Drawings, which is why Method 4 works.
You also can’t batch-download images from a doc using a Chrome extension in most cases, because Google Docs renders images inside an iframe with its own rights boundary. Some extensions claim to work. Most either don’t install anymore or only capture screenshots at display resolution. I’ve tested 4 in the last year and all 4 underperformed Method 2.
Saving images on mobile (iPhone, Android)
The Google Docs mobile app on iOS and Android doesn’t have any of the methods above. No right-click menu, no Save to Keep shortcut on images, and the File menu on mobile doesn’t expose Download as Web Page. Your only options are a screenshot or opening the doc in the mobile browser with Request Desktop Site enabled, then using Method 3 (Publish to Web) and saving from the published URL.
On iPhone: open the doc in Safari, not the Google Docs app. Tap the aA icon in the address bar. Pick Request Desktop Website. The doc now loads as it would on desktop. Most methods still don’t work because iOS Safari doesn’t allow right-click menus. Your realistic path: Publish to Web (Method 3), then save images from the published page using long-press and Save Image. On Android in Chrome, the same flow works, and long-press in Chrome actually does give you Download image.
Honest recommendation: if you’re dealing with image-heavy docs regularly, do this on a laptop. Writers who try to do content ops from an iPad almost always hit walls like this. My full picks are in my laptops for writers and bloggers post.
Image format, quality, and resolution (what Google Docs actually stores)
Google Docs recompresses images when you insert them. Original PNGs stay as PNG, JPEGs stay as JPEG, but Google often downscales anything larger than 1600px on the long edge and applies a mild compression pass. This means the image you extract will rarely match the original file the writer uploaded.
Three practical consequences. First, never treat Google Docs as your image source of truth. Ask the writer for original files in a Drive folder or Dropbox. Second, if you only have the doc, Method 2 (web-page download) or Method 6 (DevTools) will give you the highest-resolution copy Google holds. Third, for any image you plan to publish on a website, run the extracted file through an image optimizer before upload, see my image optimization guide for the workflow I use on gauravtiwari.org.
If image fidelity matters and you have any choice in the workflow, make the writer share images as a zipped folder alongside the doc. Takes them 30 extra seconds. Saves you an hour of extraction and guessing at original resolutions.
Which method should you actually use?
Pick by number of images and quality need. One or two images, decent quality is fine: Method 1 (Save to Keep). Five or more images, best possible quality: Method 2 (web-page download). You don’t own the doc and it’s view-only: Method 4 (Drawings trick). You need absolute maximum resolution: Method 6 (DevTools). You’re on mobile: Method 3 (Publish to Web) then save from the published URL.
Across 100+ times I’ve done this for client work, my split is roughly 60% Method 2, 30% Method 1, 5% Method 4, 5% everything else. If you only remember two of the seven, remember those two. They’ll cover 9 out of every 10 docs you’ll ever touch.
The one category I haven’t covered is extracting images from a Google Docs file that was exported to PDF. If your only copy is the PDF, none of these 7 methods apply. You’ll want a PDF image extractor like Adobe Acrobat Pro, PDF24, or the open-source pdfimages command-line tool. pdfimages -all file.pdf out will dump every embedded image at its stored resolution. That’s a different workflow, and I’ll cover it in a follow-up. For now, if you still have access to the live Google Doc, always prefer Method 2 over extracting from a PDF copy.
Last thing. Save your extracted images to a predictable folder structure. I use ~/Downloads/gdocs-extract/YYYY-MM-DD-clientname/ so six months later I can still find the original pull. Small habit. Saves hours across a year.
Google Docs is one of the best Google apps for collaborative writing, but it’s weirdly hostile to asset extraction. These 7 methods close that gap. If you’re also weighing your storage options, my breakdown of Google Drive alternatives is worth a read.
Frequently asked questions
Can you right-click and save an image from Google Docs?
No. Google removed the native Save image as option from the right-click menu on images in Google Docs. You can still right-click and pick Save to Keep, which saves the image to the Google Keep sidebar, and then right-click the thumbnail there to save it to your device. That two-step flow is the closest thing to a native save button in 2026.
How do I save all images from a Google Doc at once?
Use File then Download then Web Page (.html, zipped). Google will export the doc as a zip file containing one HTML file and an images folder with every image in the document at its stored resolution. Unzip and the images folder has all of them, named image1, image2, and so on in document order. This is the fastest way to get 10 or 40 images with no copy-paste.
Does the web-page download method lose image quality?
No meaningful loss. Google Docs exports images at the resolution it stored them, which is usually the original upload capped around 1600px on the longest edge. That matches what you’d get from Google Keep too. If you need higher than 1600px, Chrome DevTools Network tab sometimes surfaces a larger source file, but for most blog and print work 1600px is plenty.
How do I save a Google Docs image on iPhone or Android?
The Google Docs mobile app doesn’t support image saving. Open the doc in your mobile browser (Safari or Chrome), use File then Share then Publish to web to generate a public URL, open that URL in a new tab, and long-press any image to save it. On Android Chrome the long-press menu includes Download image. On iPhone Safari, long-press then Save to Photos. Remember to unpublish the doc afterwards.
Can I save an image from a view-only Google Doc?
Yes, usually. Try the Google Drawings trick: click the image, copy it with Ctrl+C or Cmd+C, then go to Insert, Drawing, New. Paste the image into the drawing canvas, click Actions, Download, pick PNG. This works on most view-only docs because Drawings lets you download any drawing content. If the owner disabled copy on the doc, the screenshot method (Cmd+Shift+4 on Mac, Win+Shift+S on Windows) is your last resort.
What’s the highest-resolution way to extract an image from Google Docs?
Chrome DevTools Network tab. Press F12 to open DevTools, click Network, filter to Img, reload the doc, and inspect image requests. Right-click any request and Open in new tab to reach the raw image URL, then save from there. In some cases Google stores a 2400px version that the web-page download exports at only 1600px, so DevTools can surface a sharper copy.
Is there a Chrome extension that saves all Google Docs images?
I don’t recommend any. Google Docs renders images inside a protected iframe, so most extensions either screenshot at display resolution (lower quality than the built-in web-page download) or stop working when Google updates the editor. I’ve tested four in the last year and all four underperformed the built-in File, Download, Web Page method. Stick with native features.
Why did Google remove the right-click save option?
Google hasn’t given a detailed reason. The pattern fits broader changes they’ve made around content protection and to discourage casual scraping of embedded assets. The Save image as option was removed around 2018, while the equivalent still works in Google Slides and Google Drawings. That inconsistency is what makes the Drawings trick a useful workaround for view-only docs.