
How to Organize iPhone Photos and Free Up Space in 2026
 by
by
The fastest way to organize iPhone photos is to work in two passes: clear the clutter first (duplicates, near-duplicate shots, old screenshots), then sort what’s left into Favorites, albums, and folders. I have over 20,000 pictures on my iPhone, and I used to spend minutes hunting for a single image. Two passes fixed it.
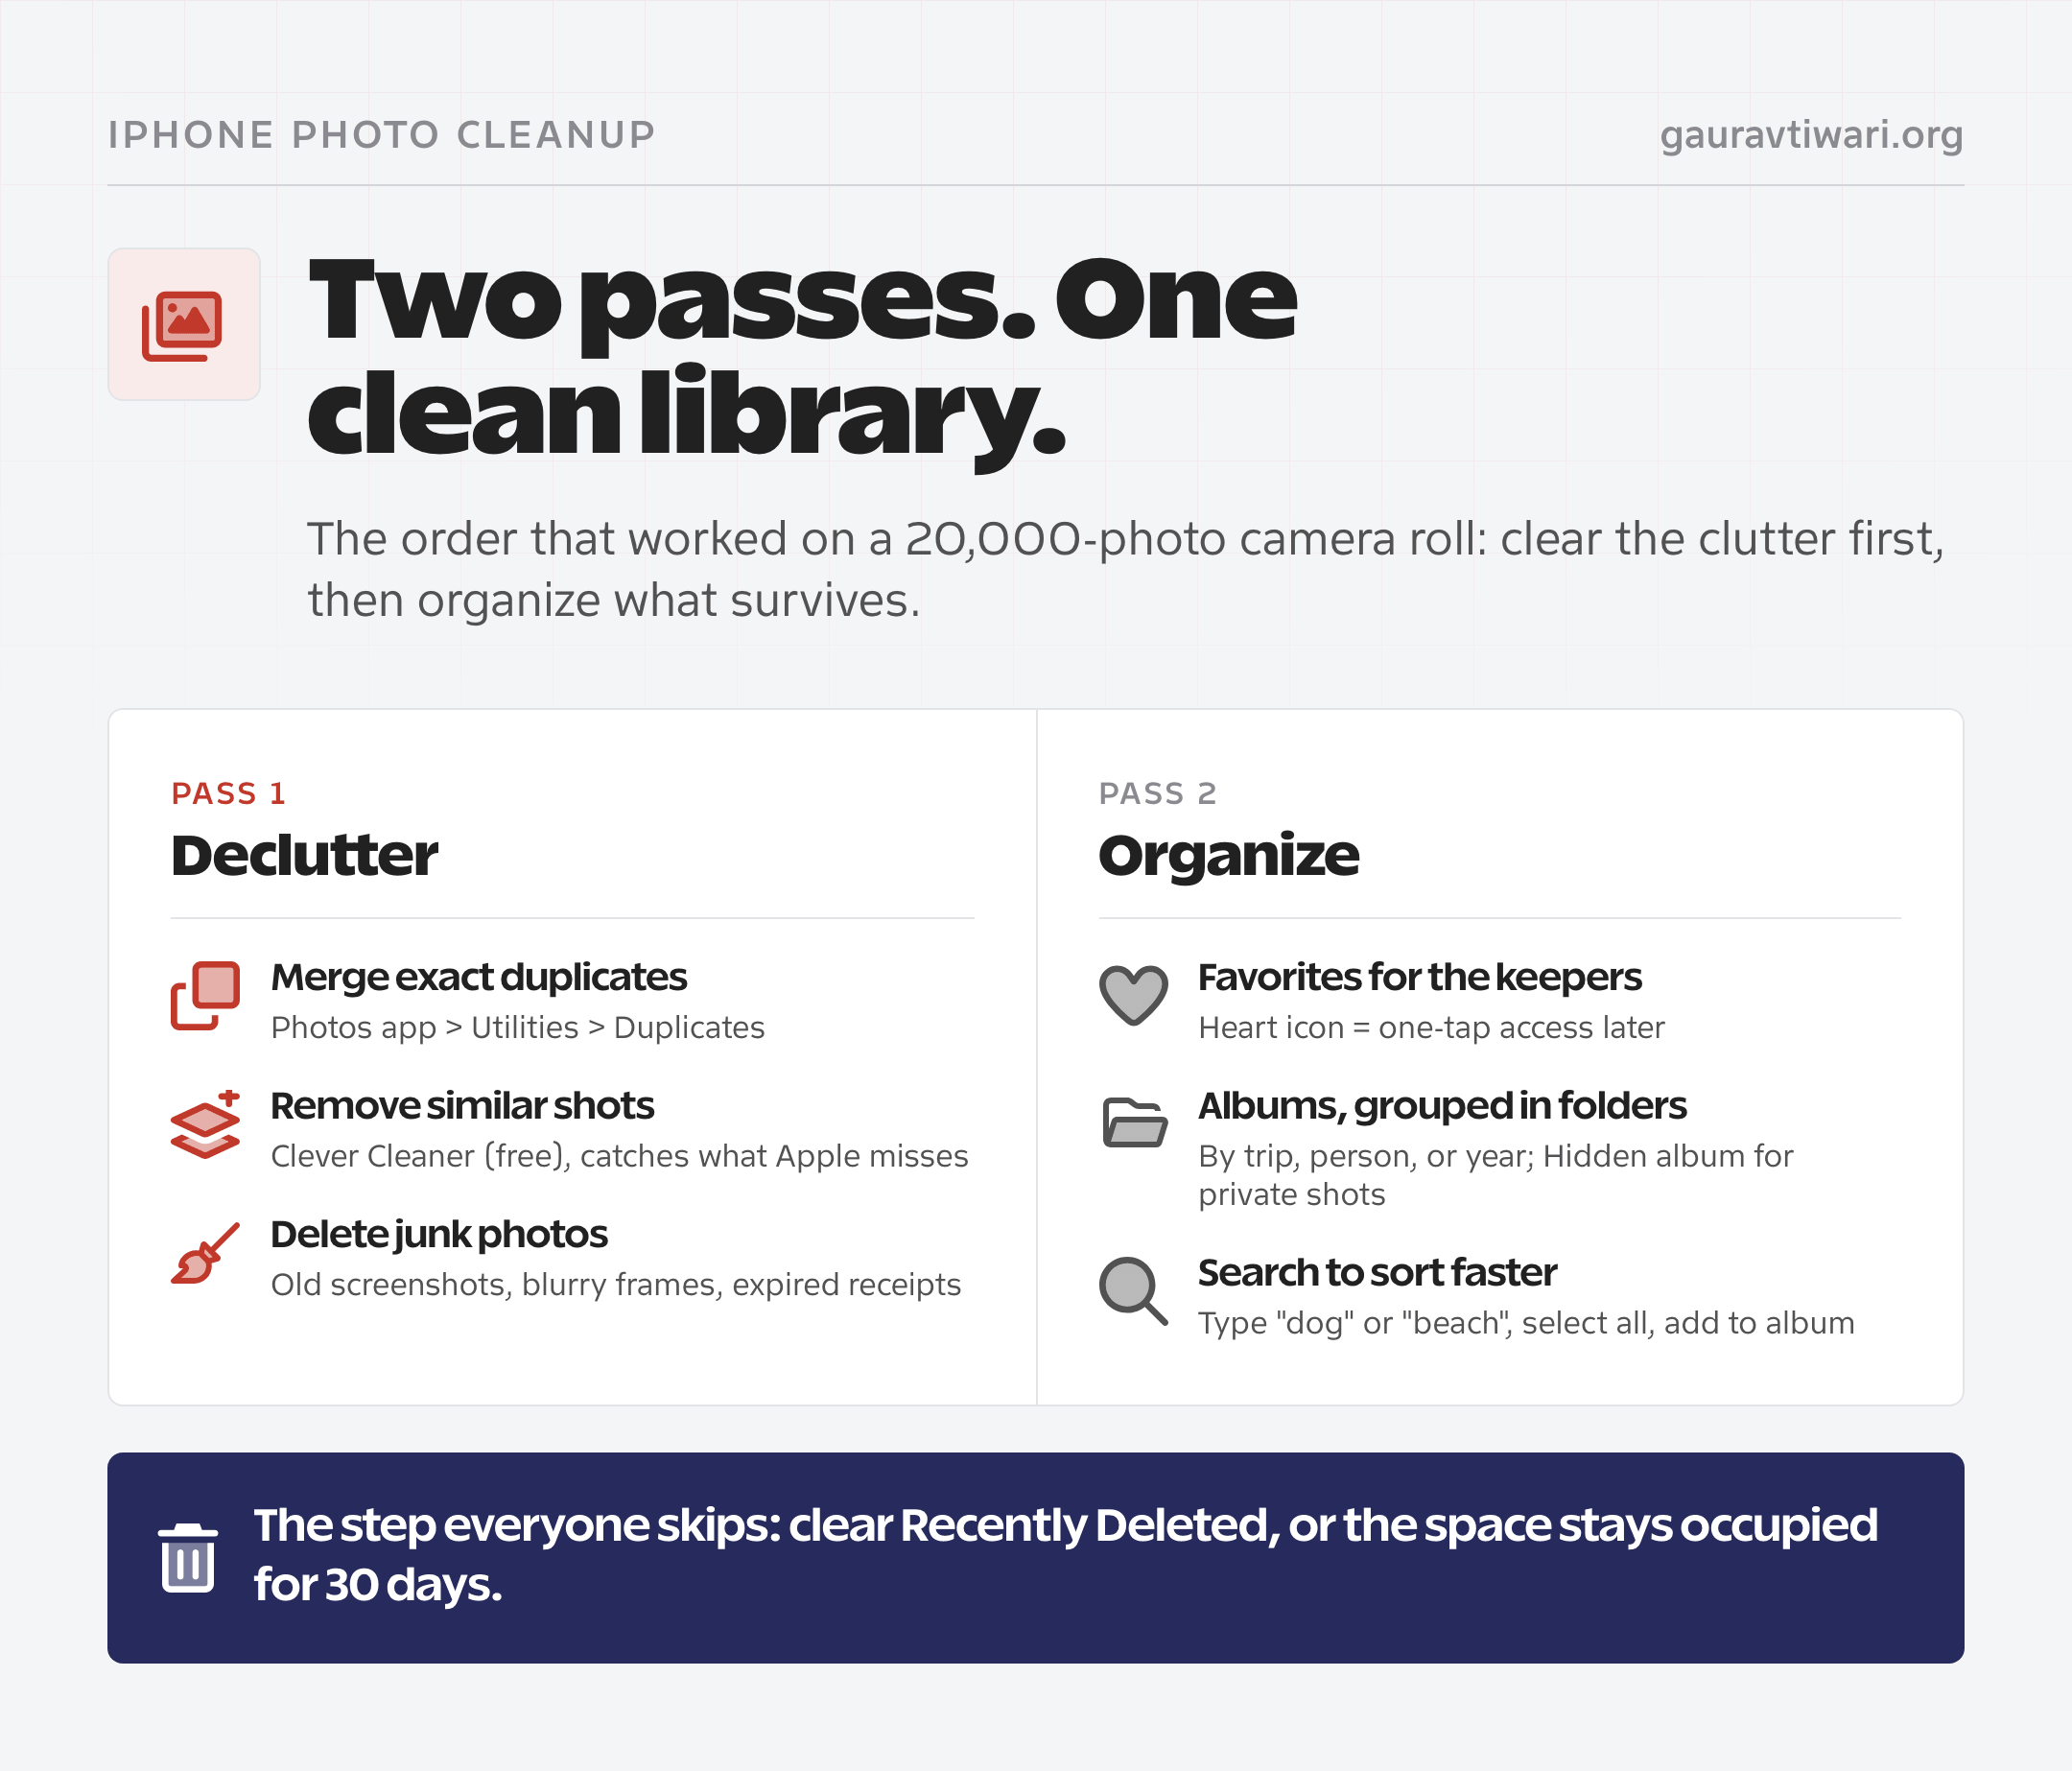
Table of Contents
Here’s every method in this guide at a glance. All but one use features already built into iOS.
| Method | What it does | Tool |
|---|---|---|
| Merge exact duplicates | Frees space with one tap | Photos app (Utilities > Duplicates) |
| Remove similar photos | Catches near-duplicates the built-in tool misses | Clever Cleaner (free) |
| Delete screenshots and old photos | Clears the biggest junk categories | Photos app (Media Types) |
| Favorites album | One-tap access to your best shots | Photos app (heart icon) |
| Hidden album | Keeps private photos out of the main feed | Photos app (locked by Face ID) |
| Albums and folders | Groups photos by trip, person, or year | Photos app (Create menu) |
| Search | Finds photos by keyword to sort faster | Photos app (Search tab) |
Why Should You Organize Your Photo Library?
I never really thought about this before, but when I started spending minutes just to search for a single photo, I realized how much easier life would be with a well-organized, clutter-free photo library. According to statistics I found, the average smartphone user has about 2,795 photos in their camera roll, and that number only grows. After some research, I found some solid reasons why keeping your photo library organized is worth it:
- When you eliminate unnecessary photos and categorize the essential ones into appropriate albums, navigation and searching for needed images become much quicker. You can find what you need in seconds without scrolling through all your images.
- As you go through your photo gallery, you might be surprised at how many useless pictures continue to occupy space on your iPhone. Deleting them not only frees up storage space but can even enhance the speed and performance of your phone.
How to Free Up iPhone Photo Storage
Two things eat most iPhone photo storage: duplicate or near-duplicate shots, and photos that stopped being useful (screenshots, blurry frames, old receipts). Clear those two categories first and the organizing part becomes much easier.
1. Remove Duplicates and Similar Photos
Start with Apple’s built-in tool. Open the Photos app, scroll down to Utilities, tap Duplicates, and tap Merge on each pair (or Select All to merge everything at once). It keeps the highest-quality version and moves the rest to Recently Deleted. Free, and it takes seconds.
The catch: it only detects exact matches. It won’t flag near-duplicates with slight differences in lighting, angle, or framing, and I had far more of those than exact copies. After some research, I came across recommendations to consider a photo organizer app for iPhone. Most options in the App Store are paid, so I had to test a few before finding a free one that actually worked.
Luckily, I found a free Clever Cleaner app with no annoying third-party ads, which was a relief after testing several others. What stood out was its ability to detect both duplicates and similar photos, group them, and automatically pick the best one in each set. This app allows you to either delete all the extras in one tap or manually select which ones to keep.
To remove duplicate & similar photos on your iPhone:
- Download Clever Cleaner: iPhone Cleaner App from the App Store.
- Open Clever Cleaner and grant it permission to access your photo gallery.
- The app opens in the “Similar” tab and scans your gallery, then displays the results in groups of duplicates and similar photos.
- Review a few groups. The app pre-selects the best photo in each set; I was happy with its picks, so I tapped ‘Smart Cleanup’ to delete everything marked for removal.
- For more control, you can adjust the automatic selections made by the app. Tap the collection, manually select the photos you wish to remove, and repeat these steps for each group. Then, tap ‘Move to Trash.’
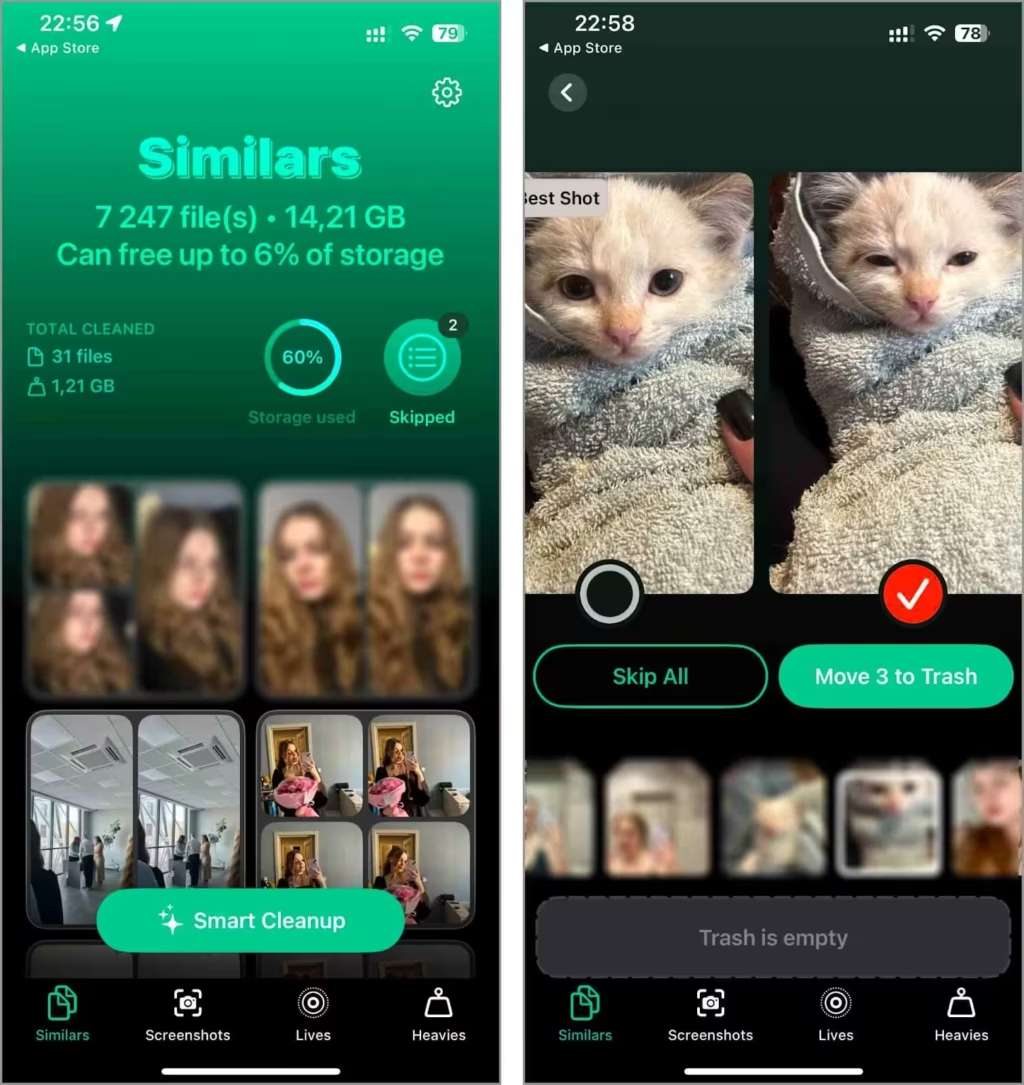
- All photos initially move to the trash within the app, where you can review them again and restore any if you change your mind. After reviewing, move the ‘Slide to Delete’ slider.
- Finally, the app notified me to clear the Recently Deleted folder. I chose to wait for it to clear automatically, but if you need space urgently, you might prefer to clear it manually.
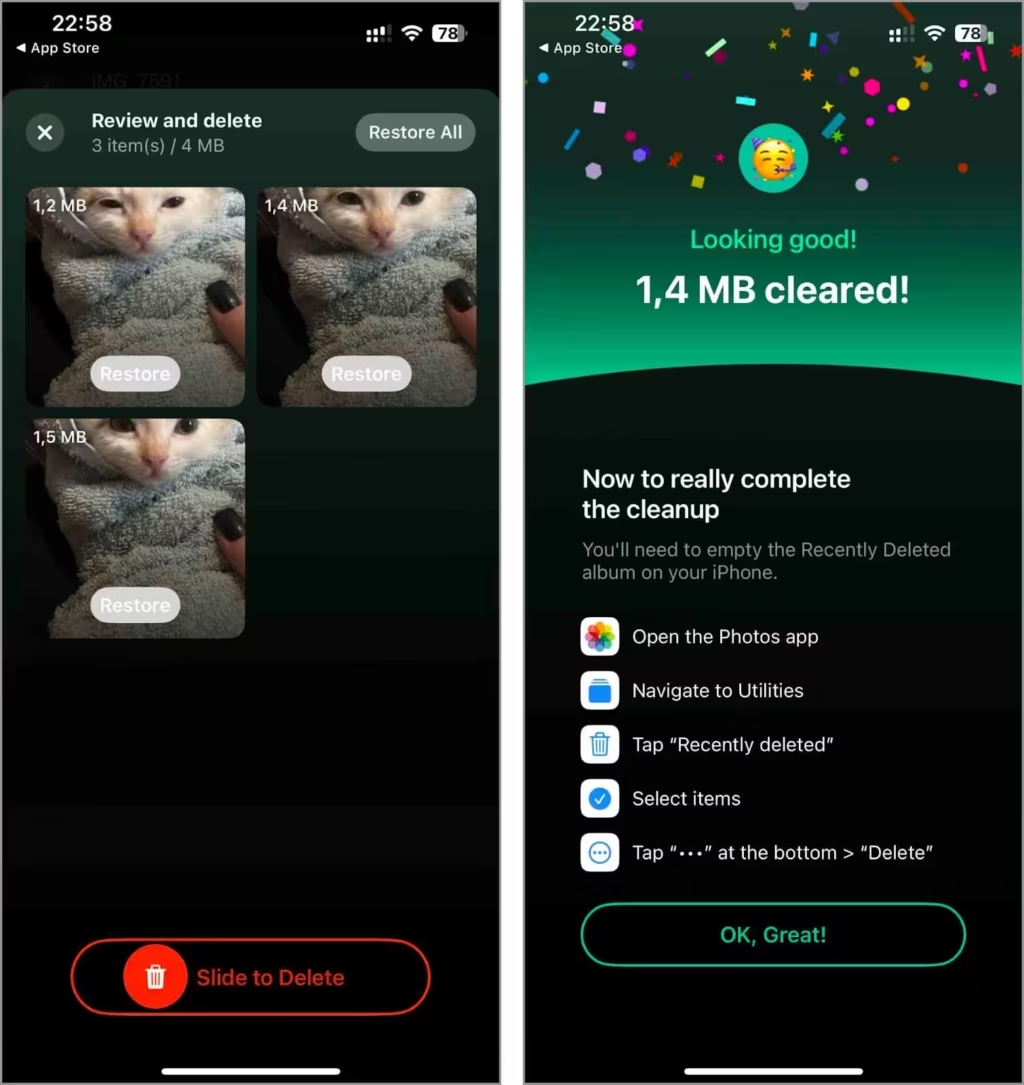
Besides deleting similar photos, Clever Cleaner can also remove screenshots, delete Live Photos while keeping their still versions, and flag large videos for deletion.
2. Delete Unwanted Photos
Besides removing duplicates, I also cleared out other unnecessary photos to keep my gallery organized – I recommend doing the same. This includes old pictures from years ago, random screenshots, and blurry shots. If you haven’t cleaned up your photo library yet, here’s how to get started:
- Start with the oldest photos in your library. Open the Photos app and scroll to the top to view your oldest photos. Evaluate each photo to decide if it still holds value.
- Often, screenshots become irrelevant after their immediate need passes. To find screenshots, scroll to the ‘Media Types’ section, then select ‘Screenshots’.
- Navigate to the photo or photos you wish to delete. Tap ‘Select’ in the top right corner of the screen, then select each photo you want to remove.
- Once selected, tap the trash icon and confirm by selecting ‘Delete Photo’. This process allows you to delete multiple photos at once efficiently.
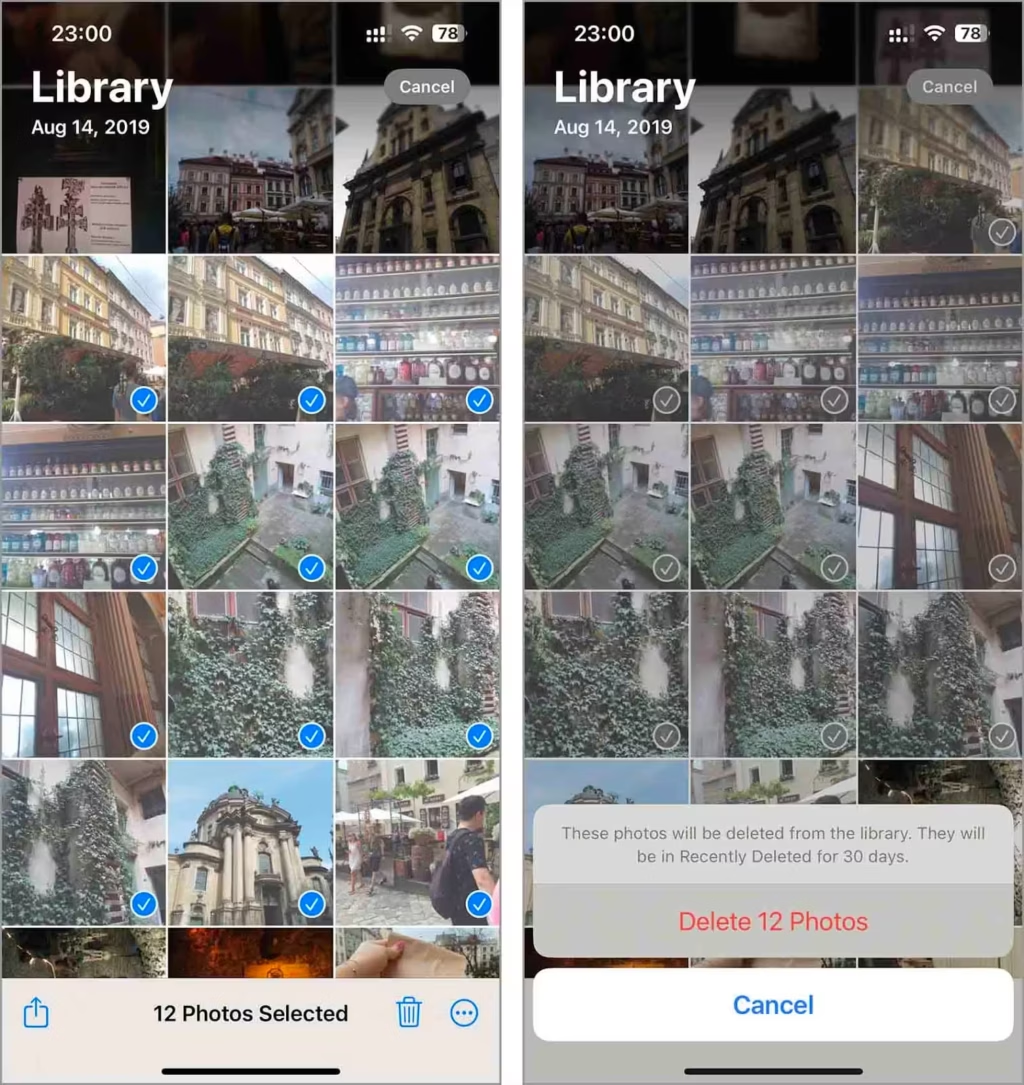
- To permanently remove the photos from your device, open the ‘Albums’ tab, scroll down to ‘Recently Deleted’, tap ‘Select’, and then tap ‘Delete All’ to clear all the photos.
With these two methods, you can free up space on your iPhone and get your library ready for better organization. However, if you’re happy with how your photo app looks at this point, you can stop here and enjoy a cleaner, more streamlined gallery.
How to Organize Your iPhone Photos
Four built-in features handle all the organizing: the Favorites album, the Hidden album, custom albums with folders, and search. No extra apps needed for this part. I used all four on my own library, and here’s how each one works.
1. Add Your Photos to “Favorites” Album
The Photos app has a handy “Favorites” album where you can save pictures based on your needs. Personally, after taking multiple shots, I add the best one here for easy access when editing later. You can use it to store your favorite photos or the ones you need most often.
- Launch the Photos app on your iPhone.
- Navigate through your photos to find the ones you want to mark as favorites.
- Tap on the photo you wish to add to your Favorites album and tap the heart icon on the photo. This action marks the photo as a favorite and automatically adds it to the Favorites album.
- To view all your favorite photos, you should go to the ‘Pinned Collections’ tab and open the ‘Favorites’ album.

2. Use the Album for Hidden Photos
Another handy feature in the Photos app is the Hidden album. When you add photos there, they won’t show up in your main feed. They’re only accessible by unlocking the album with your Apple ID or password. Not that I have anything to hide, but if you have photos or screenshots of planned gifts for the family, hiding them is a great way to keep the surprise.
- Open the Photos app on your iPhone again.
- Navigate through your gallery and choose the photo or photos you want to hide.
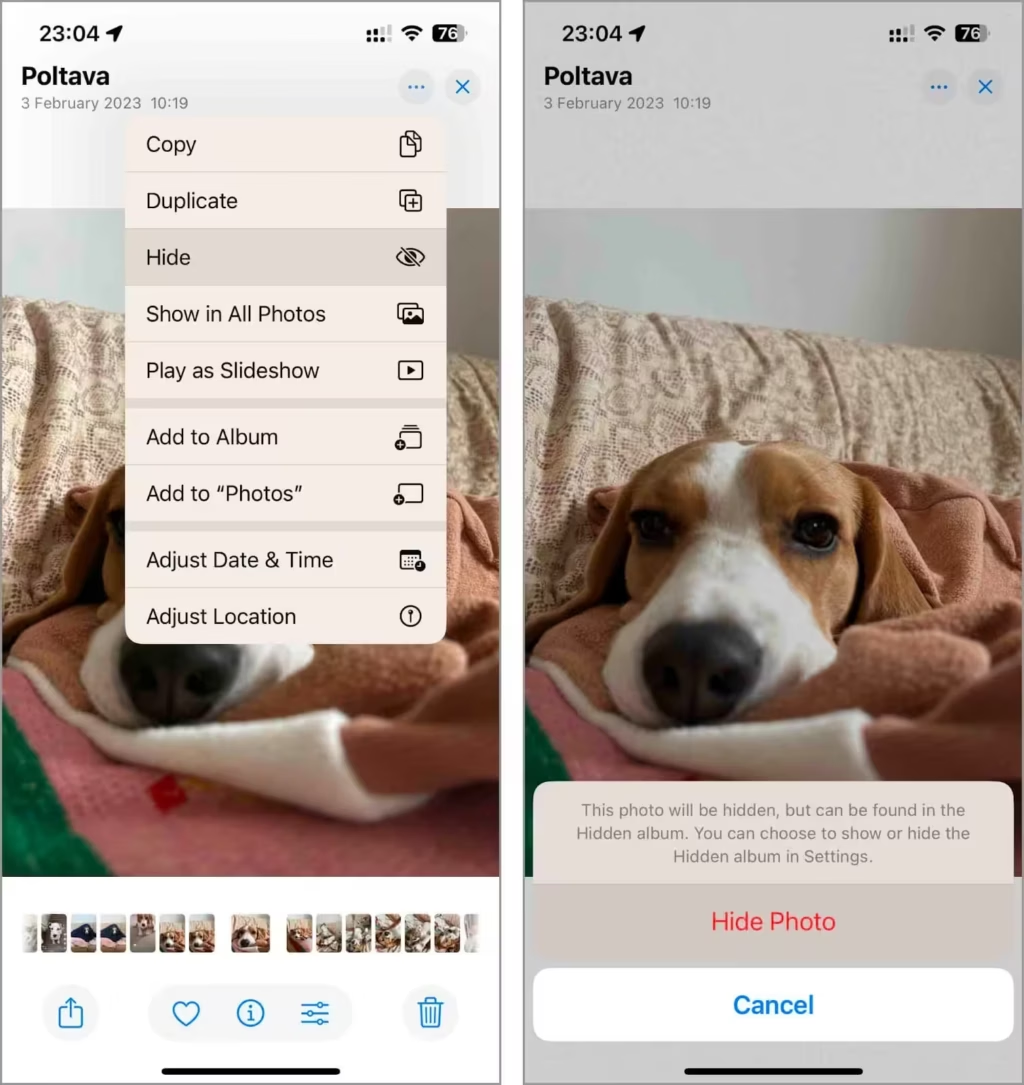
- Tap on the three dots icon, then select ‘Hide.’ When prompted, confirm your choice by tapping ‘Hide Photo’.
- To view your hidden photos, go to the ‘Utilities’ tab and scroll down to find the ‘Hidden’ album.
3. Create Albums and Folders
What helped me make the Photos app look the way I wanted was the ability to create custom albums. It all depends on how you want to organize everything. I created albums for all my animals and notable trips, which allowed me to access these photos quickly and easily.
- Launch the Photos app on your iPhone.
- Go to the ‘Albums’ tab at the bottom of the screen.
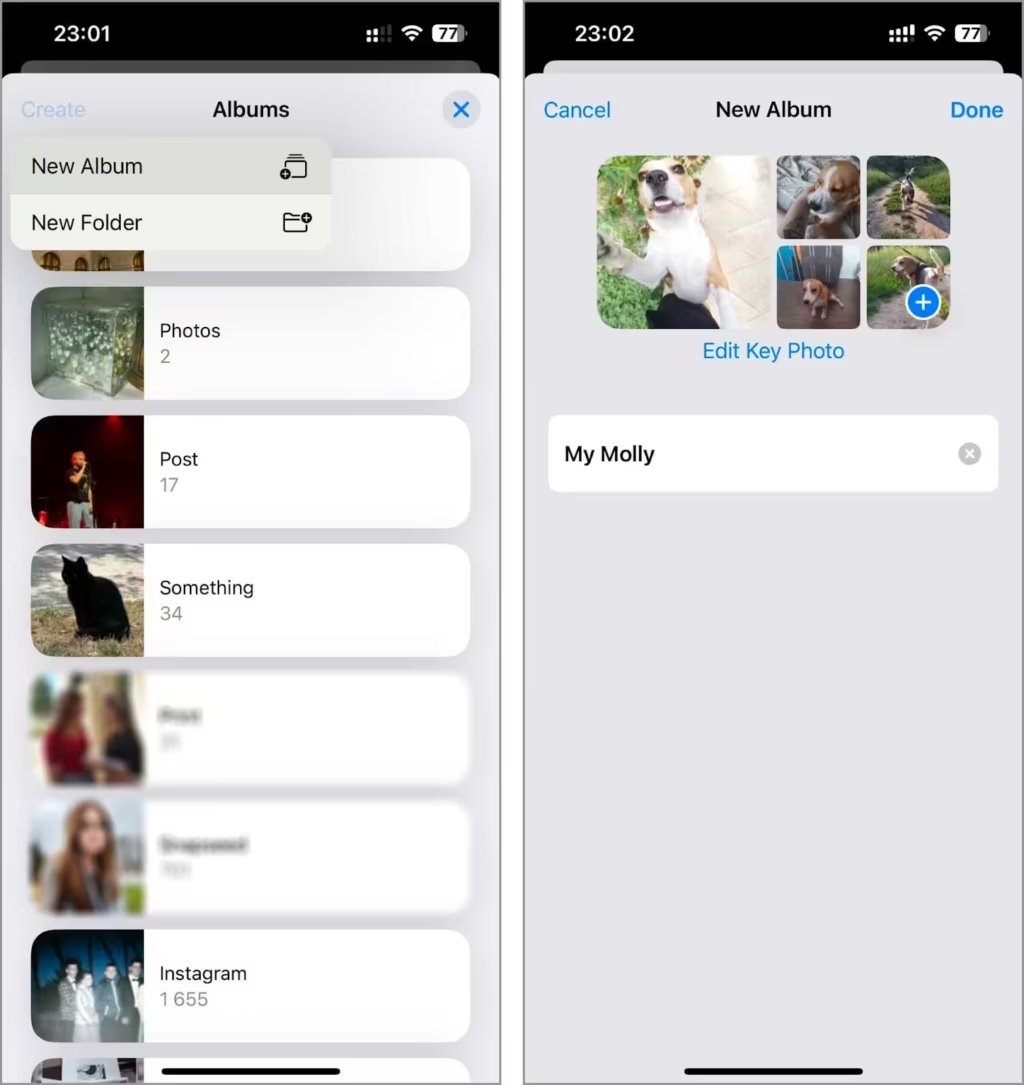
- Tap the “Create” in the upper left corner, then select ‘New Album’.
- Enter a name for your new album and choose the photos you want to include in this album and tap ‘Done’.
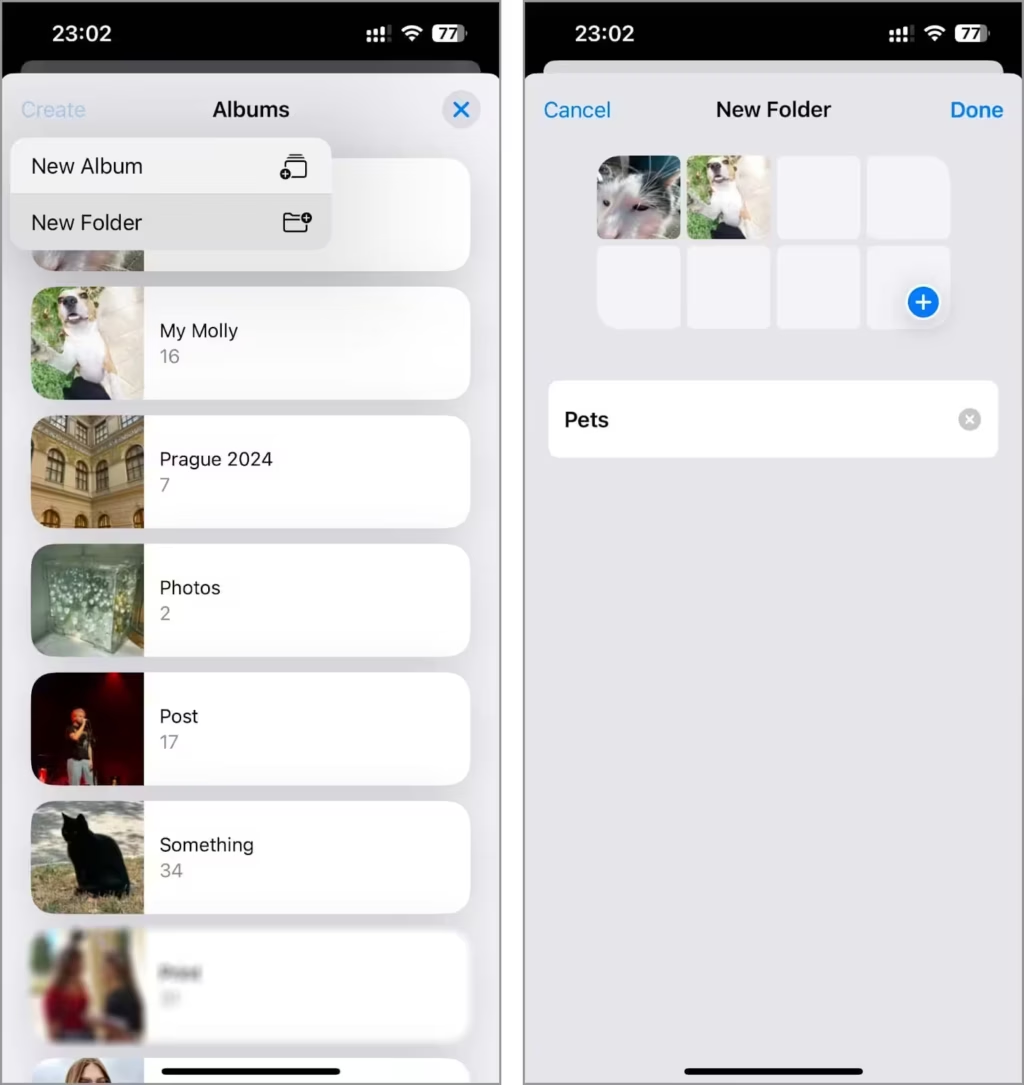
In the Photos app, you can create a folder to organize multiple albums. I made one folder for animal photos and added several albums there, and other folders for different years to store all my travel albums. The process is similar to creating an album, you just select “New Folder” instead of “New Album.”
4. Utilize Photo Search in the Photos App
Another feature that really helped me organize my photos was the search function in the Photos app. It might not always be perfect, but it makes it much easier to find the right pictures to add to an album. For example, when I wanted to create an album for photos of my dog, I simply used the search tool.
- Launch the Photos app on your iPhone.
- Tap on the ‘Search’ tab at the top of the screen.
- I typed “dog,” but you can type any relevant keyword into the search bar. The app will display photos associated with the entered keyword.
- Browse through the search results. Tap ‘Select’ in the upper right corner of the screen, then choose the photos you wish to add to your album.
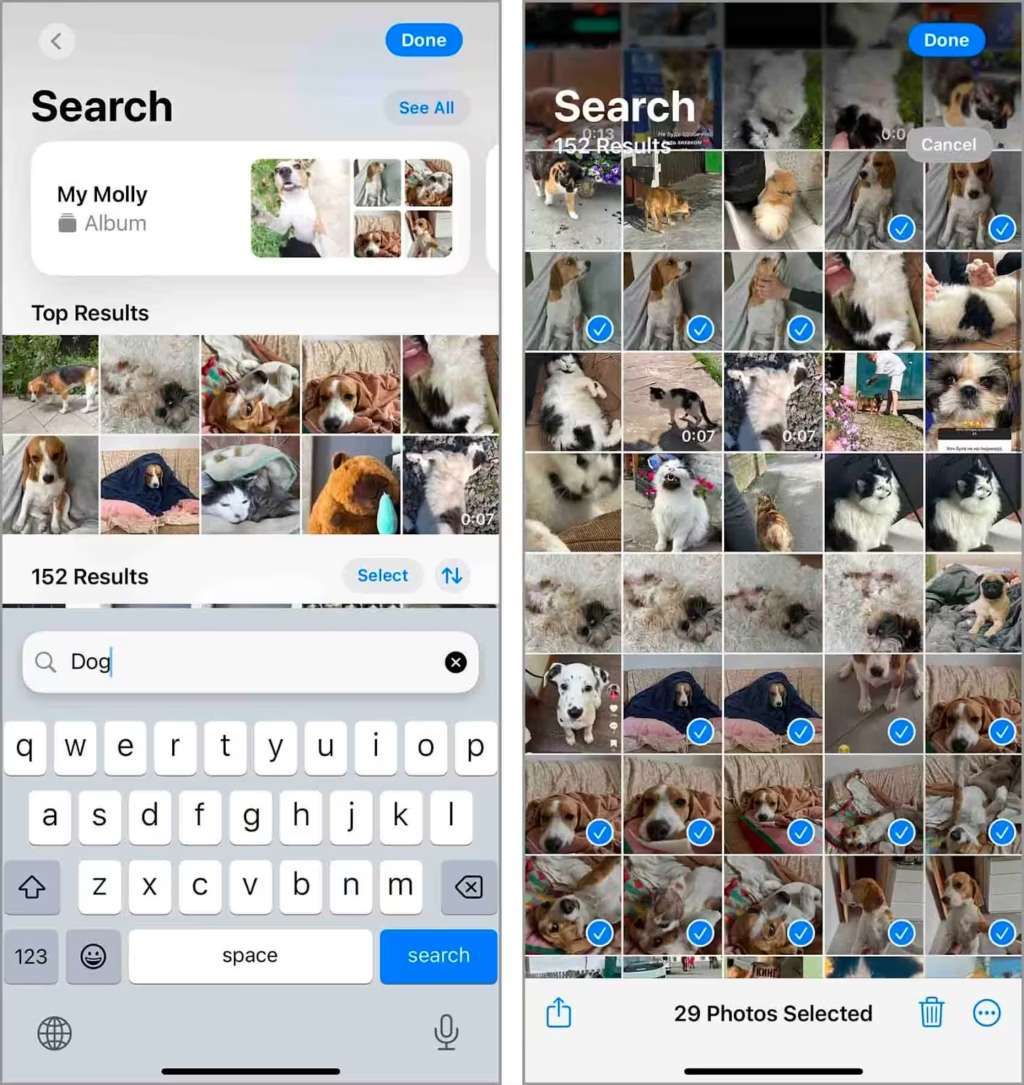
- After selecting the necessary photos, tap on the three dots and select ‘Add to Album’, then choose the album or create a new one for these photos.
Conclusion
There’s no magic button that perfects your Photos app in one tap. But the order matters more than the effort: duplicates first, junk second, then albums and folders for whatever survives. Repeat the cleanup pass every few months and the library stays manageable.
If your iPhone is still short on space after the photo cleanup, the guide on freeing up iPhone storage and boosting performance covers the other storage hogs: apps, messages, and caches. And if you’d rather move photos off the device entirely, a lifetime cloud storage deal is a one-time way to stop paying monthly for extra iCloud space.
Frequently Asked Questions
Does deleting duplicate photos free up iPhone storage?
Yes. Each duplicate is a full-size file, so merging or deleting them returns real storage. After deleting, open Albums, scroll to Recently Deleted, and clear it. iOS otherwise holds deleted photos for up to 30 days, and the space stays occupied until then.
How do I merge duplicate photos on my iPhone without an app?
Open the Photos app, scroll to the Utilities section, and tap Duplicates. Apple shows exact matches side by side with a Merge button, keeps the highest-quality version, and moves the rest to Recently Deleted. It will not catch similar shots taken at different angles or lighting.
What is the fastest way to organize thousands of iPhone photos?
Work in two passes. First remove duplicates and junk (screenshots, blurry shots) with the built-in Duplicates tool or a free cleaner app like Clever Cleaner. Then use the Photos search tab to pull related photos into albums by keyword, which beats scrolling the camera roll manually.
Do hidden photos still take up storage on my iPhone?
Yes. The Hidden album only removes photos from your main feed; the files stay on the device at full size. To reclaim space you have to delete photos and clear the Recently Deleted album, or move the library to cloud storage.
Why is my iPhone storage still full after deleting photos?
Deleted photos sit in the Recently Deleted album for up to 30 days before iOS removes them. Open Albums, tap Recently Deleted, and delete everything to reclaim the space immediately. Also check Messages attachments and app caches; photos are rarely the only culprit.
Tell Google you want more of this.
Add Gaurav Tiwari as a preferred sourceOne tap, and this site shows up more often in your own Top Stories, AI Overviews and AI Mode. Remove it any time.