WP Rocket Best Settings for the Optimal Performance
Using WP Rocket and wondering what should be the settings to make the most out of it? If you are, I have got you covered.
WP Rocket is a simple tool, but to get the most out of it, you need to configure it properly. By configuring the appropriate settings, you can enhance the performance and maximize the benefits of this plugin.
In this article, I will guide you through the basics of WP Rocket and tell you WP Rocket best settings and practices that can help you pass the core web vitals.
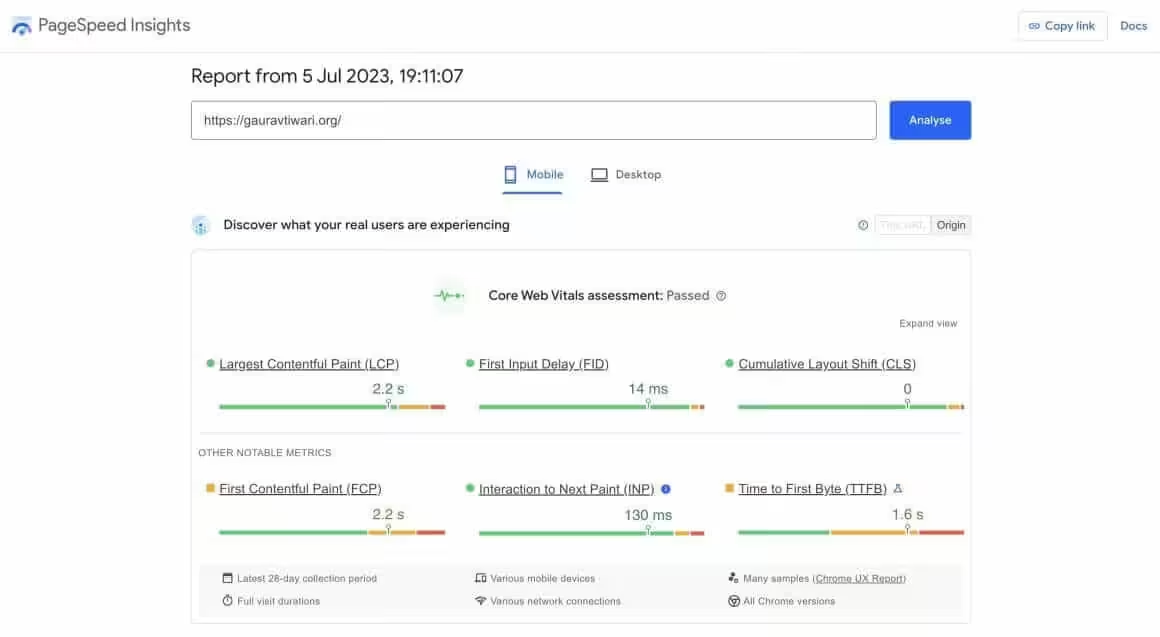
I have used these settings to pass the core web vitals on gauravtiwari.org:
What is WP Rocket?
WP Rocket is a cache and website performance-enhancing WordPress plugin that can significantly improve your website’s speed and core web vitals. WP Rocket is one of the best-selling premium WordPress plugins out there and costs $59 per year for a website.
If you are new to WP Rocket and don’t have a license yet, you can get one here. Read my WP Rocket review for a proper understanding of this plugin and why it is the best WordPress cache plugin out there.
Before changing any WP Rocket settings, take a baseline measurement. Run your site through Google PageSpeed Insights and WebPageTest. Save the results. Then make changes one at a time and re-test. This way you know exactly which setting improved (or broke) your score.

- One-click page caching (instant speed boost)
- CSS/JS minification and concatenation
- Lazy loading for images, iframes, and videos
- Remove Unused CSS (biggest Core Web Vitals win)
- CDN integration with Cloudflare and Bunny CDN
- $59/year for single site license
WP Rocket is the best WordPress caching plugin. No coding required. Page caching, file optimization, lazy loading, preloading, and CDN integration in one plugin. Used by 4+ million websites.
WP Rocket Best Settings
The configuration generally differs on different hosts.
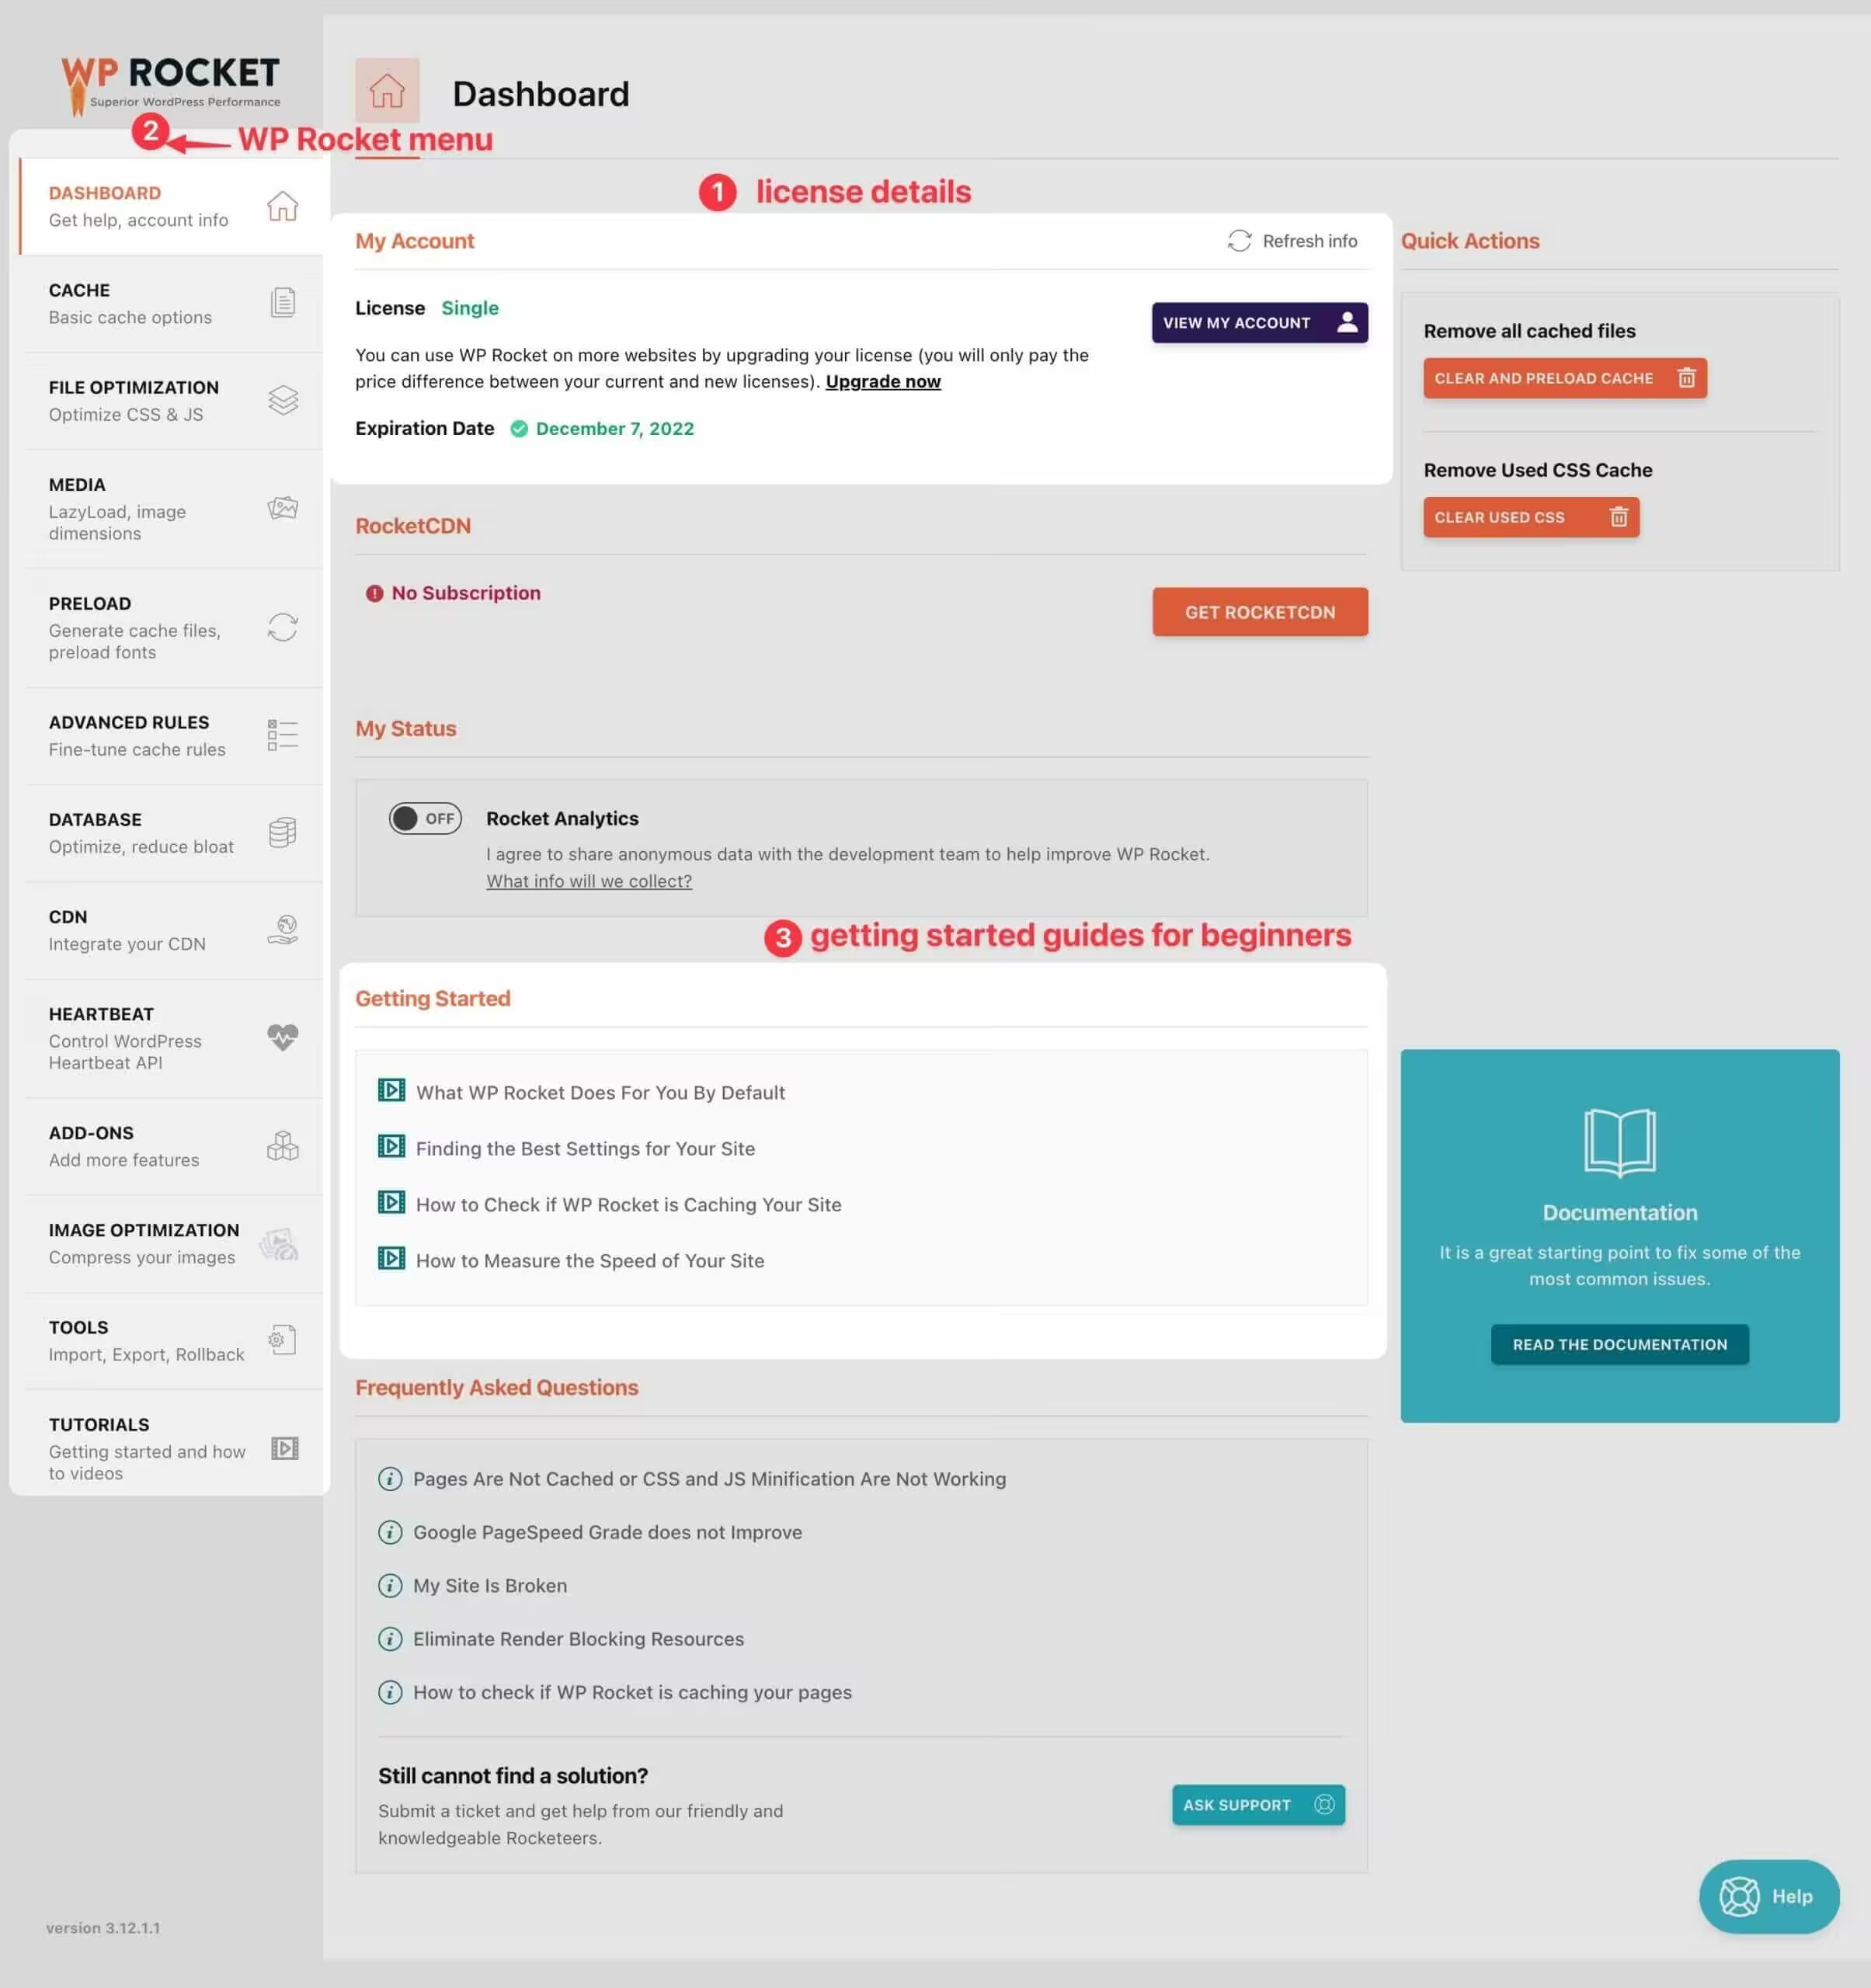
WP Rocket support can help you configure the settings (and that’s something I really liked about them) automatically.
But here is the configuration that I use.

Cache
Cache tab is super important to make your website fast.
In Dashboard → Cache tab, set things like this:
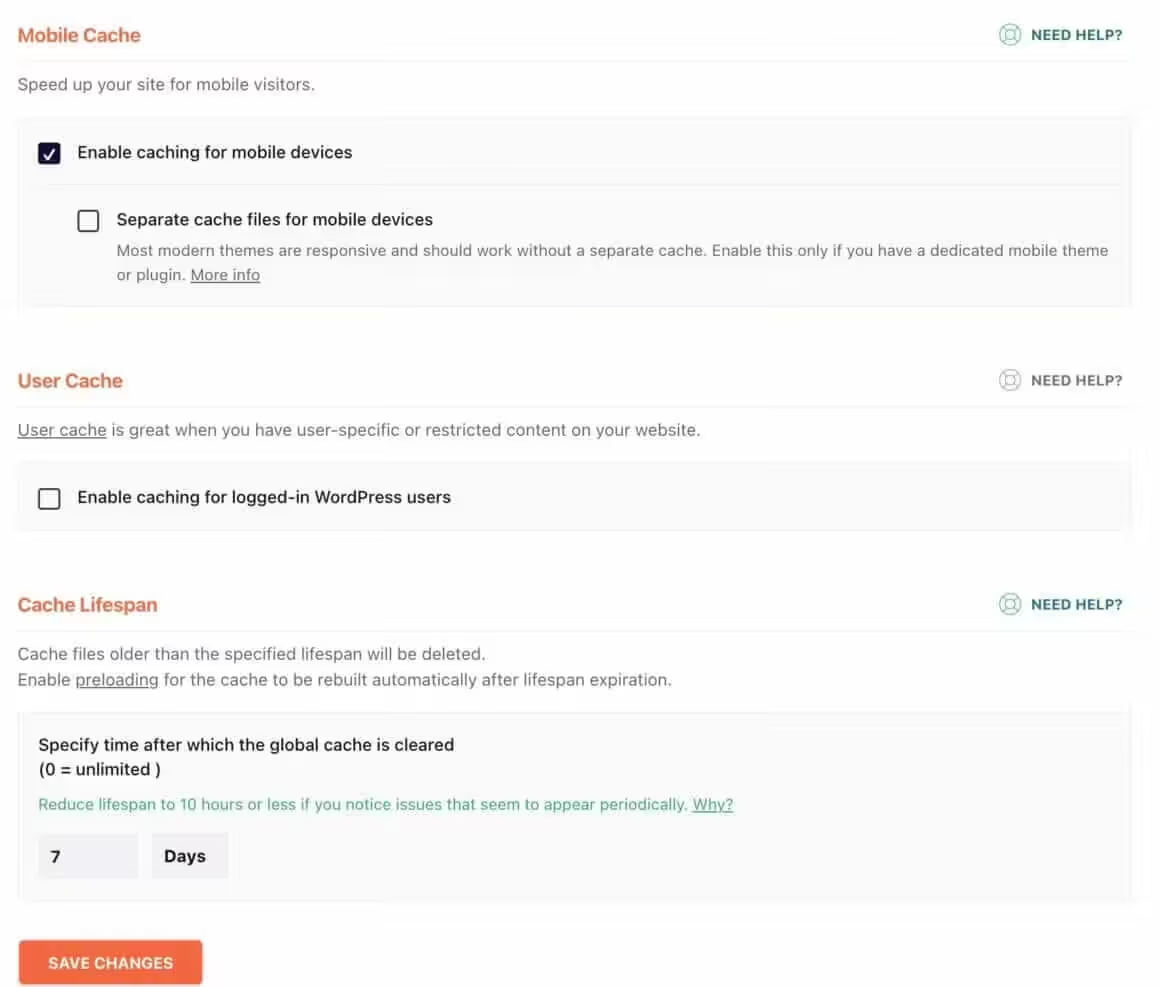
- Enable Cache for mobile devices: Checked ✅
- Separate Cache for mobile devices: Unchecked
- User Cache: Unchecked
- Cache Lifespan: 7 Days (Increase this if your website is mostly static that doesn’t update regularly.)
- Save changes.
Cache settings are basically the first thing to start with. Here is how these will look.
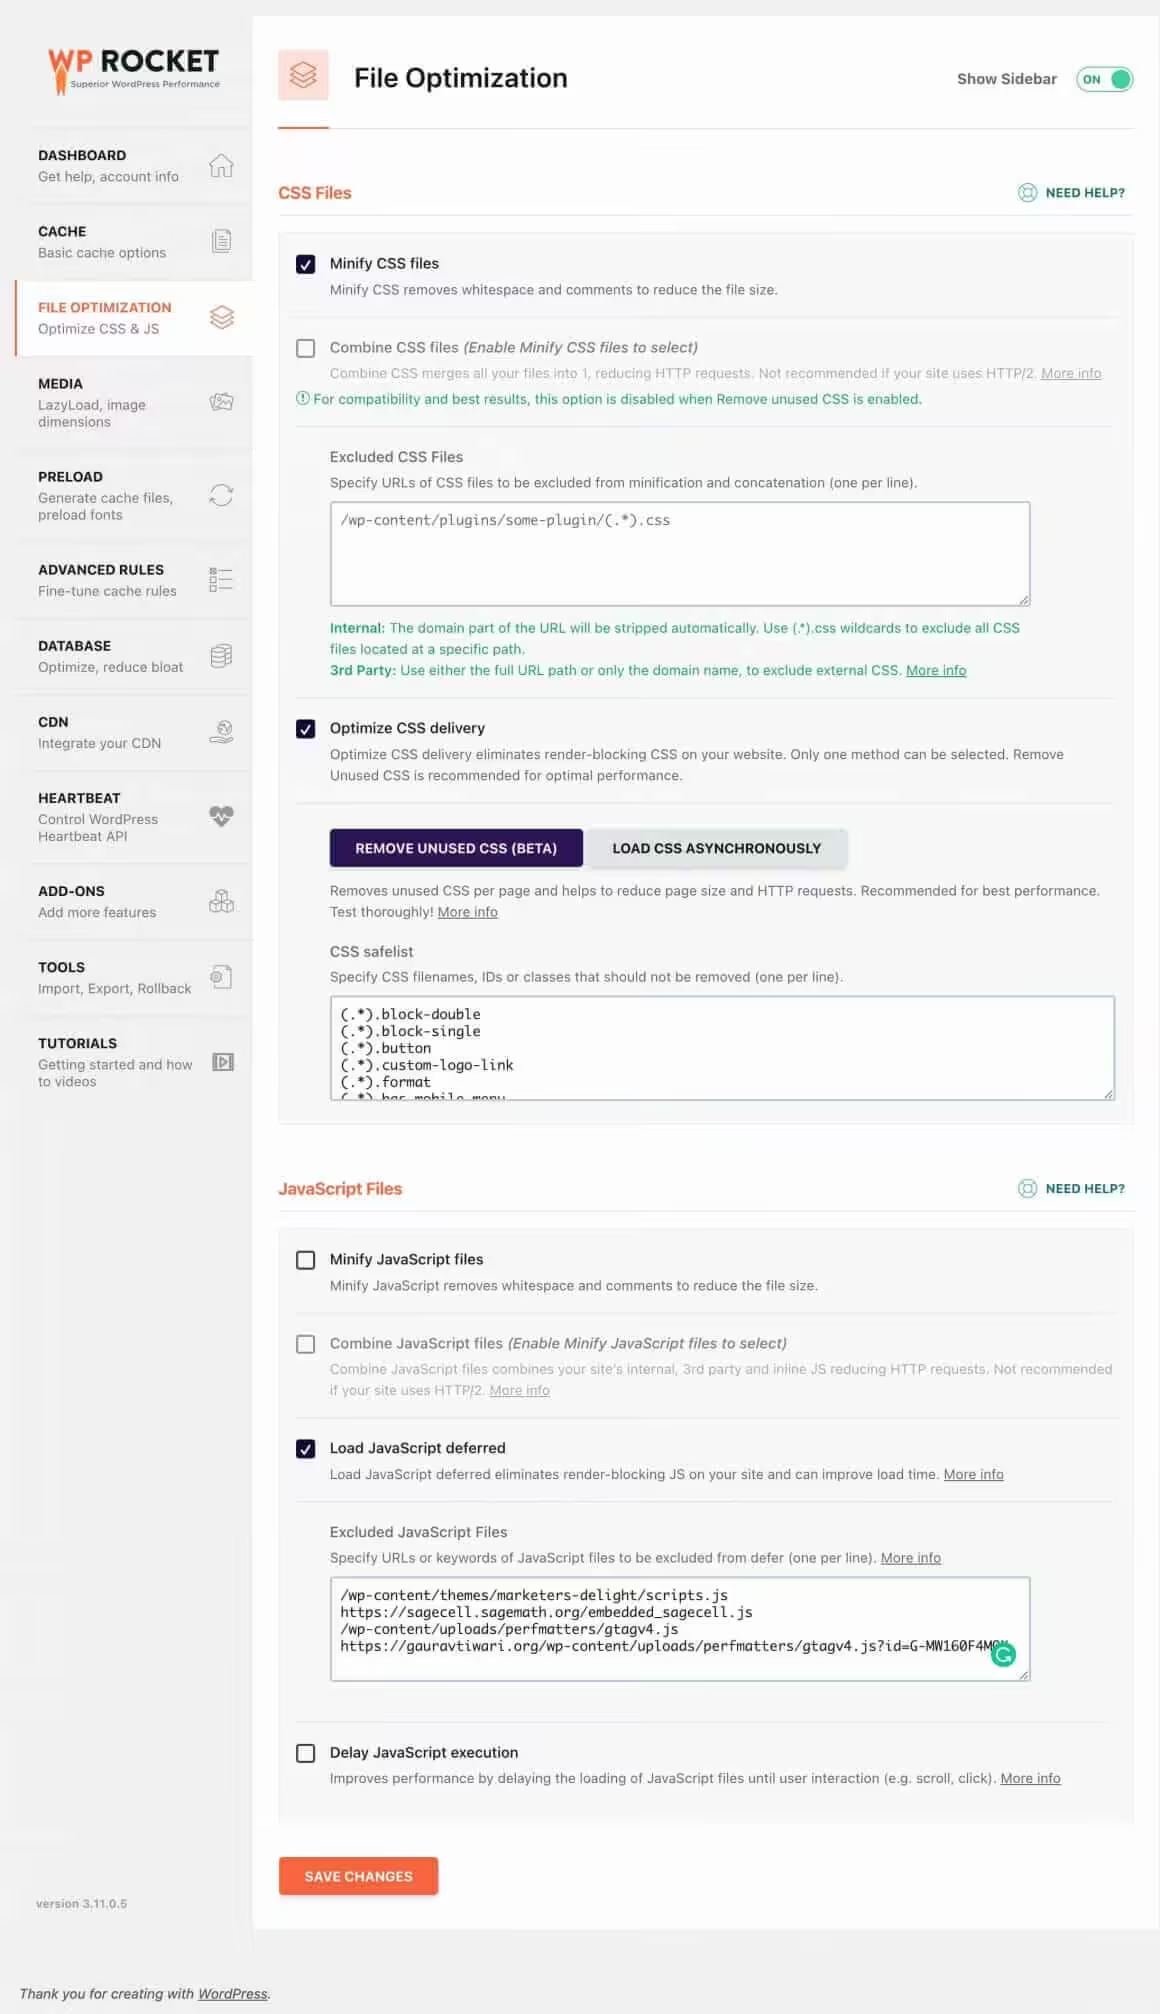
File Optimization
Here you can set how CSS and Javascript files will load on front end. This one is very important and if you must set it correctly for the best performance.
Here is how you can do it.
- In CSS section, enable minify CSS. You will be prompted with a warning. Ignore that and check this box.
- Do not combine CSS files. Most of the hosting services are now HTTP/2 and combining CSS can hurt the performance.
- Choose to optimize CSS delivery and select Remove Unused CSS for the best performance. Please note that this step involves adding a good exclusion list (called CSS safelist). Download my CSS safelist
- Next, Minify Javascript — Checked.
- Combine Javascript files — Unchecked.
- Load Javascript deferred.
- In Excluded JavaScript Files, you should exclude only those Javascript files that break on defer.
- Delay Javascript Execution — Unchecked.
- Save changes.
Media
Next comes the media tab, which helps you optimize the images and videos of your website properly.
I am using Jetpack’s lazy load — while there is an option in WP Rocket for this as well. Lazy loading is a great way to boost your website speed.
With lazy loading, images load once users scroll to that section and don’t if users don’t. Also, you can enable the lazyload for iframes and videos to improve the performance even further.
Here are the recommended settings (if you are not using any other lazy load plugins):
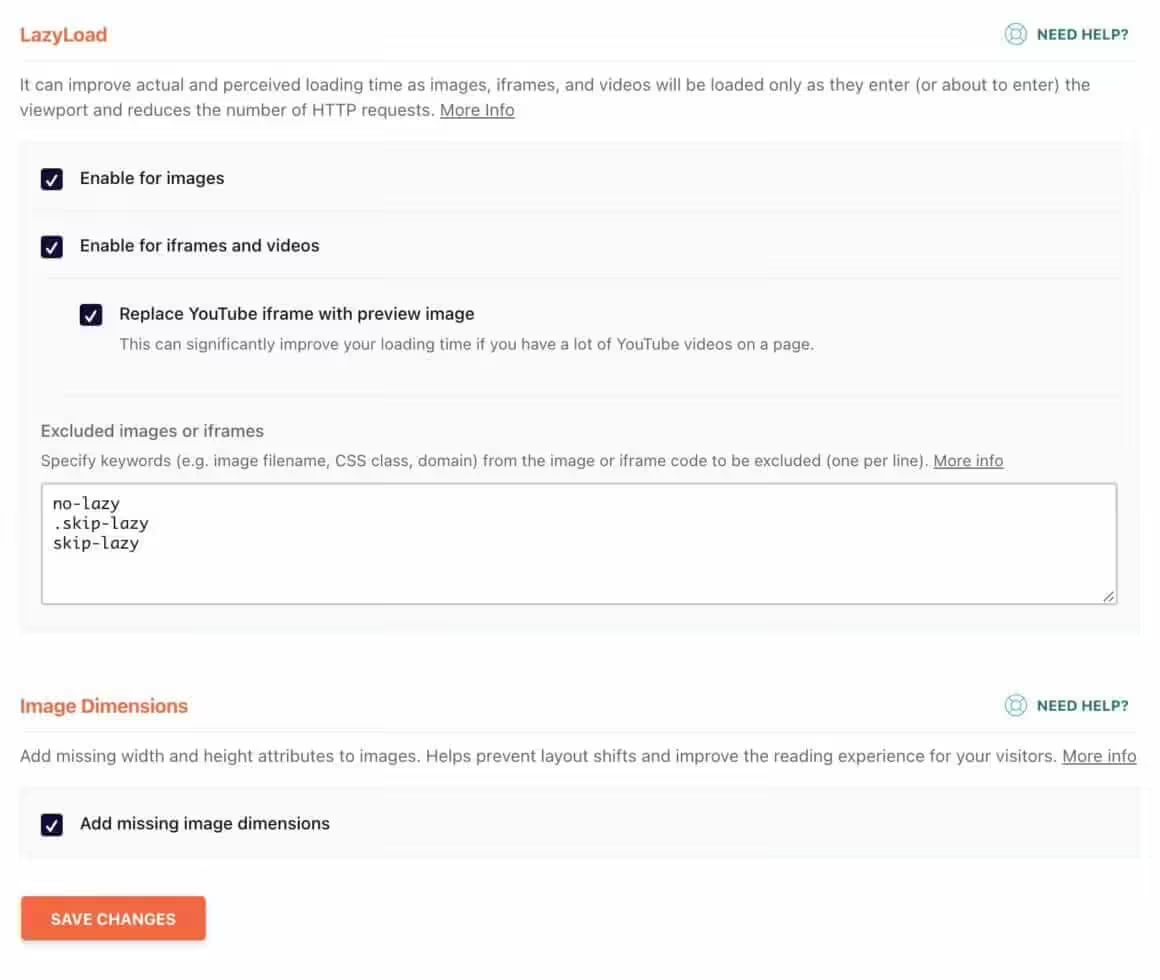
- The first thing under this section is Lazy load and in that check “enable for images”, “enable for iframes and videos” tab.
- Also, check the “replace the YouTube iframe with preview image” option.
- You can add any image or iframe code in this box if you don’t want them to be lazy-loaded.
- Next, check the “add missing image dimensions” option under the image dimensions section. This improves cumulative layout shift errors in core web vitals.
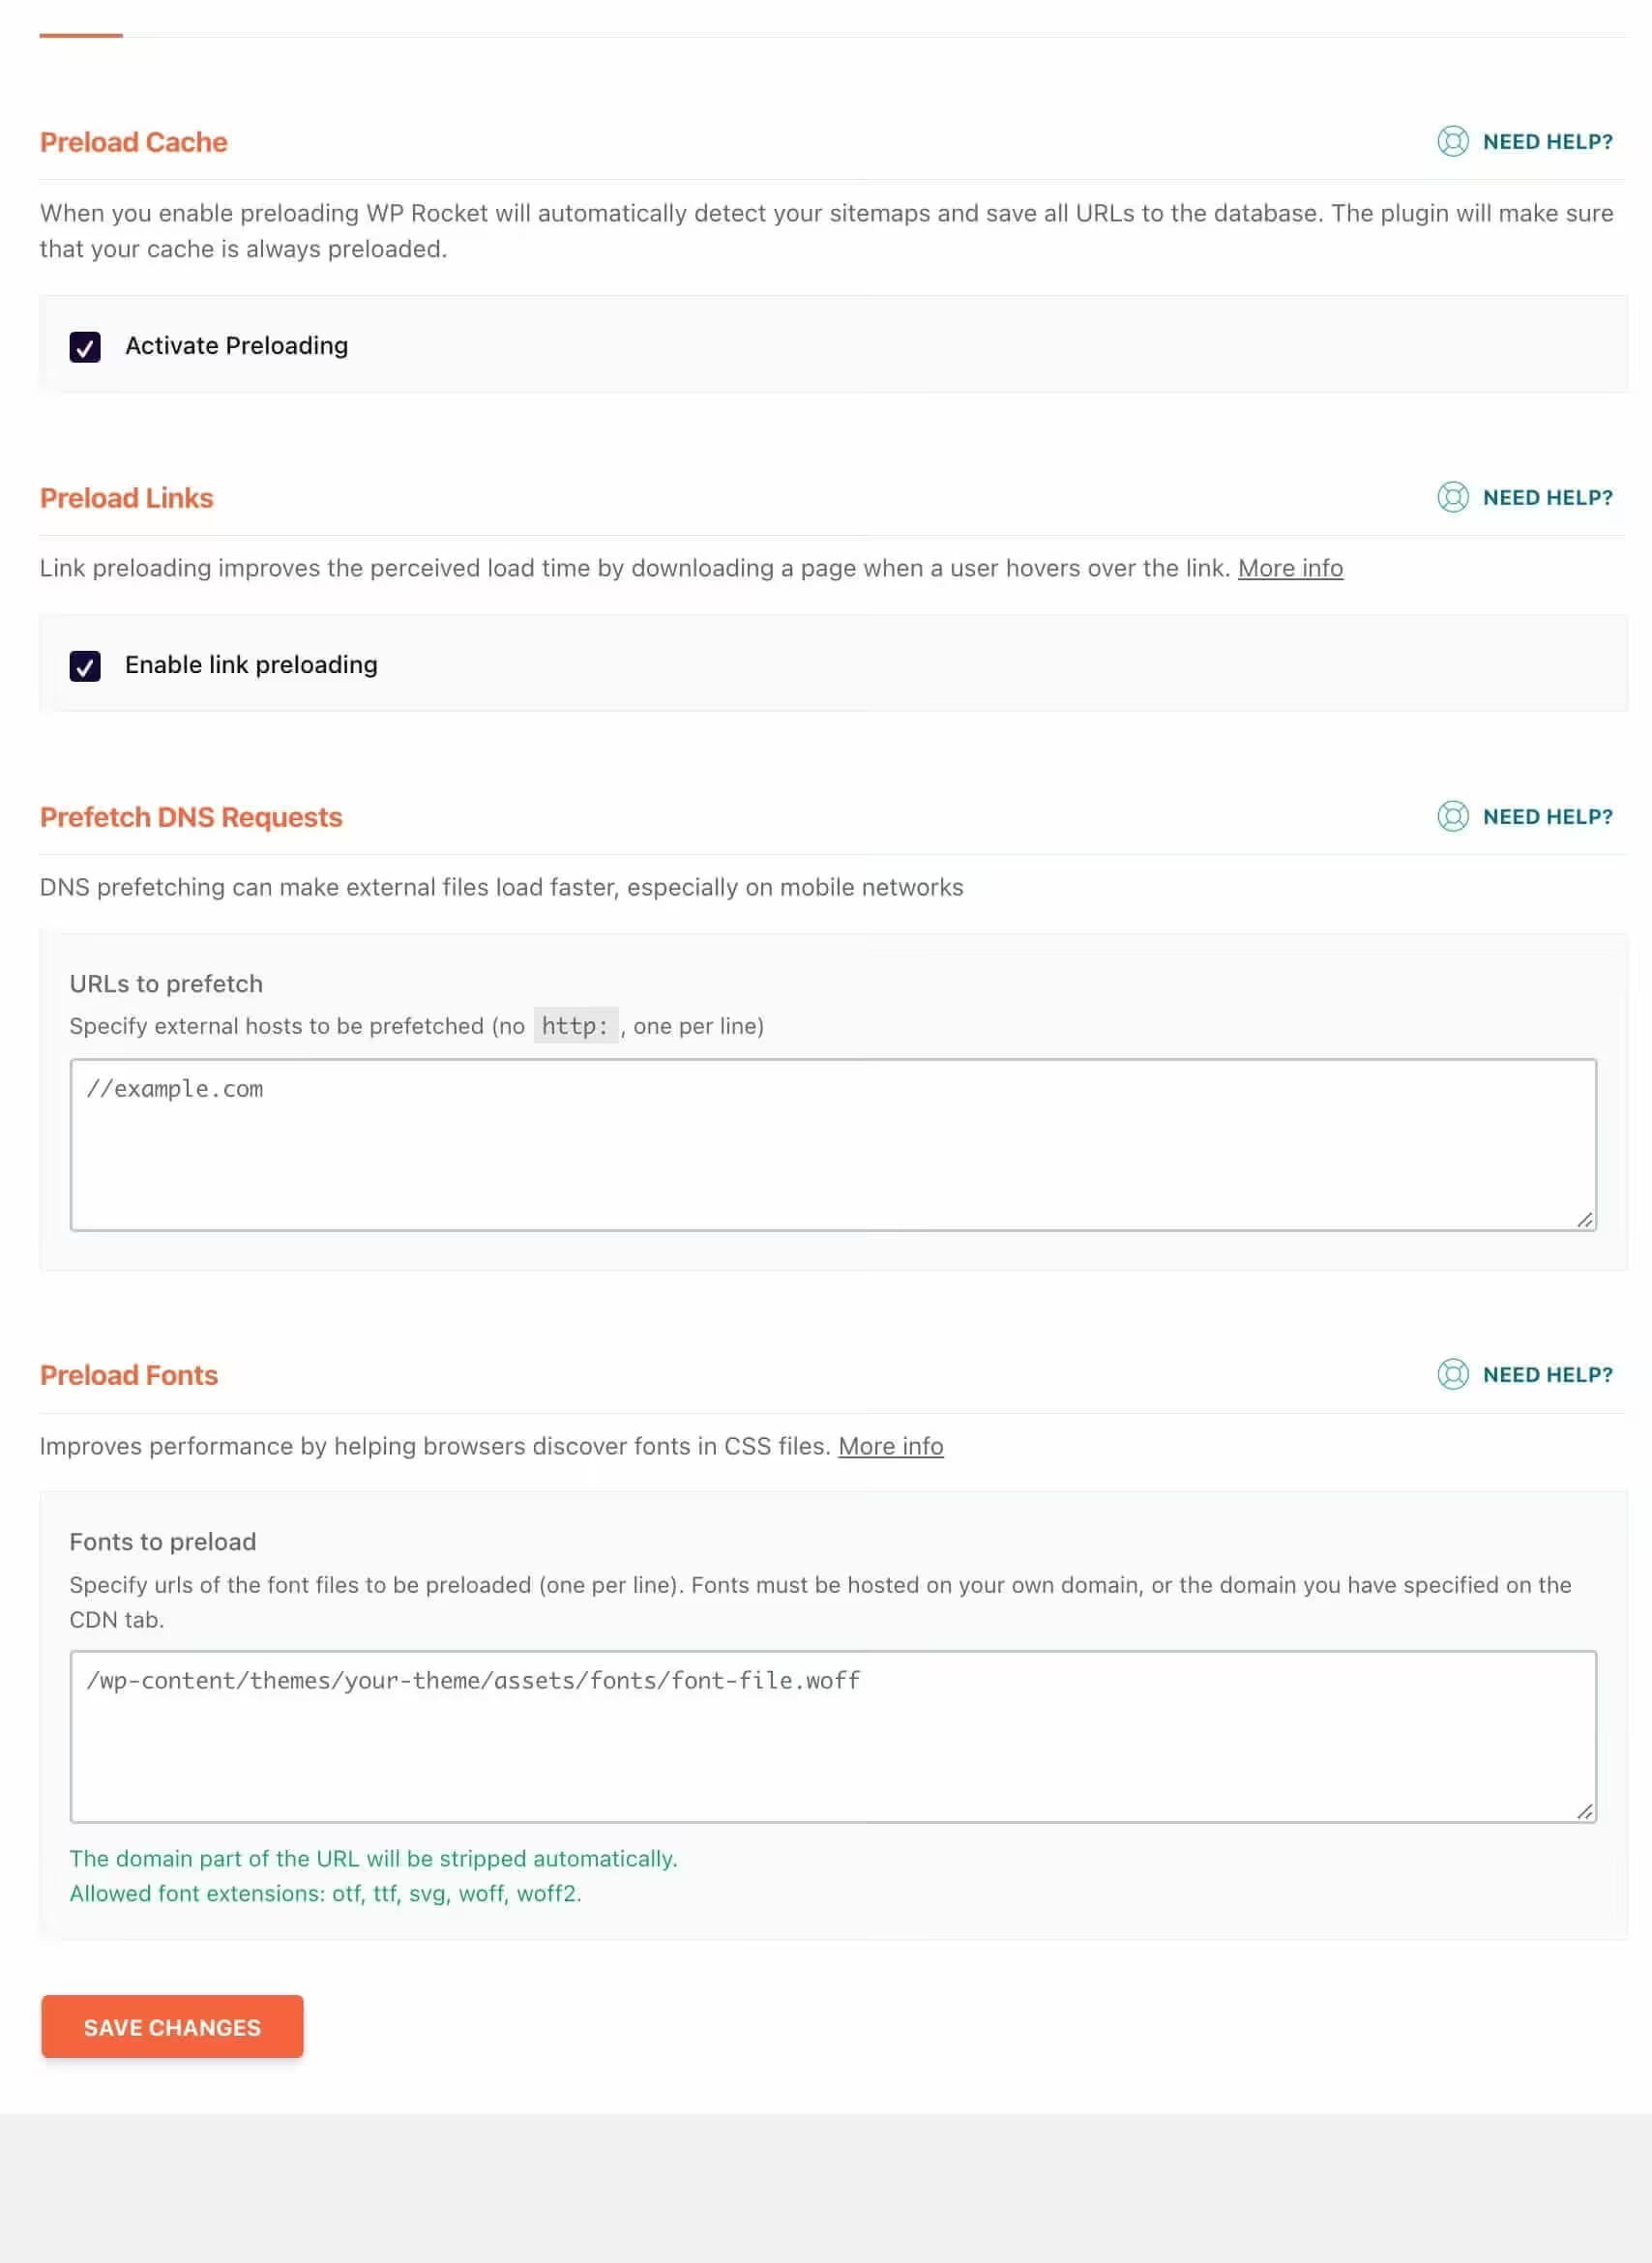
Preload Settings
You can enable preload so that WP Rocket creates HTML copies of your posts and pages to serve to readers.
It is my favorite feature of this plugin which helps you load your website like a cheetah.
Here’s how you can do it.
- Activate preloading — Checked
- Enable link preloading — Checked.
- Prefetch DNS requests — In this box, you can prefetch external sites’ resources like fonts, stylesheets etc. I use Typekit fonts on this site, so I’ll enter
//use.typekit.netas a value in the box. - Preload fonts — Enter any woff/wof2/otf/ttf fonts that your theme loads to improve performance. These fonts can be icon-fonts like font awesome, custom theme fonts etc.
Again, here are my WP Rocket Preload settings:
Advanced Rules
In the advanced rules tab of WP Rocket, you can fine-tune the settings that you have done till now.

- The first section is “never cache URLs” where you can add the URLs of your website that you don’t want to cache ever.
- Next is the “never cache cookies section” where you can add cookies on your website which you don’t want to cache.
- The third section is “never cache user agent” where you can add user-agent strings which you don’t want to cache.
- The next setting is “always purge URLs” where you can add the link of the pages of your website which you always want to purge after every update.
- The last section is “cache query strings” where you can add query strings that you always want to cache.
If you are a complete beginner then I would recommend leaving this section as it is.
Database
The database tab in WP Rocket is the place from where you can clean all garbage from your website’s database and make it faster.
You can check the options which you want to clean from your website’s database.
I would recommend these options to get cleaned from your database
- Revisions
- Trashed posts
- Spam comments
- Trashed comments
- Expired transients
Also, don’t forget to check the “scheduled automatic cleanup option” and put it on weekly frequency.
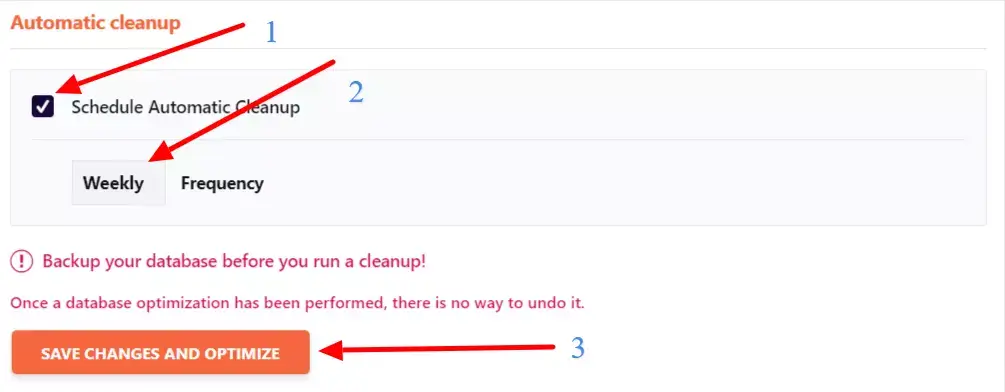
This means that your database would be cleaned automatically every week.
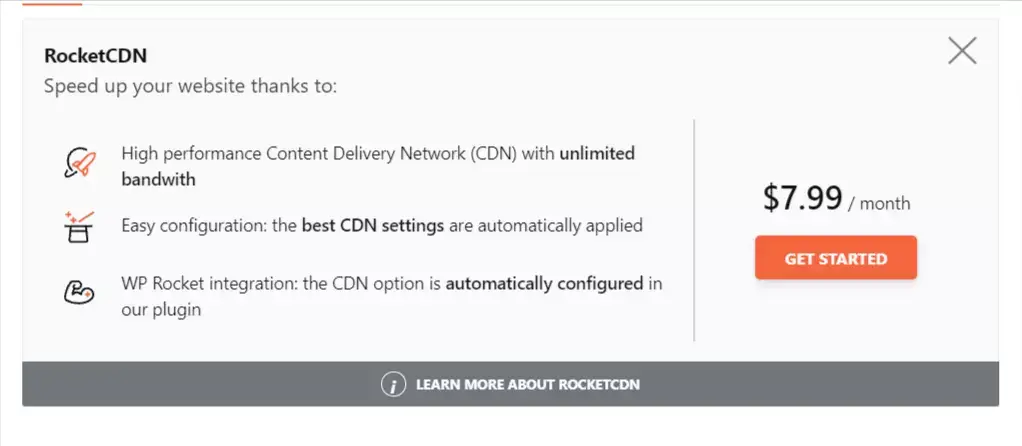
CDN
In the CDN tab, you can easily connect any CDN with your WP Rocket plugin.
Also, you can check out this plugin’s own CDN Rocket CDN if you haven’t bought any CDN yet but are planning to do so.
However, if you are using any CDN, first check the “enable content delivery network” option and put the CDN CNAME here.
Try: 10 Best WordPress CDN Services for Faster Performance
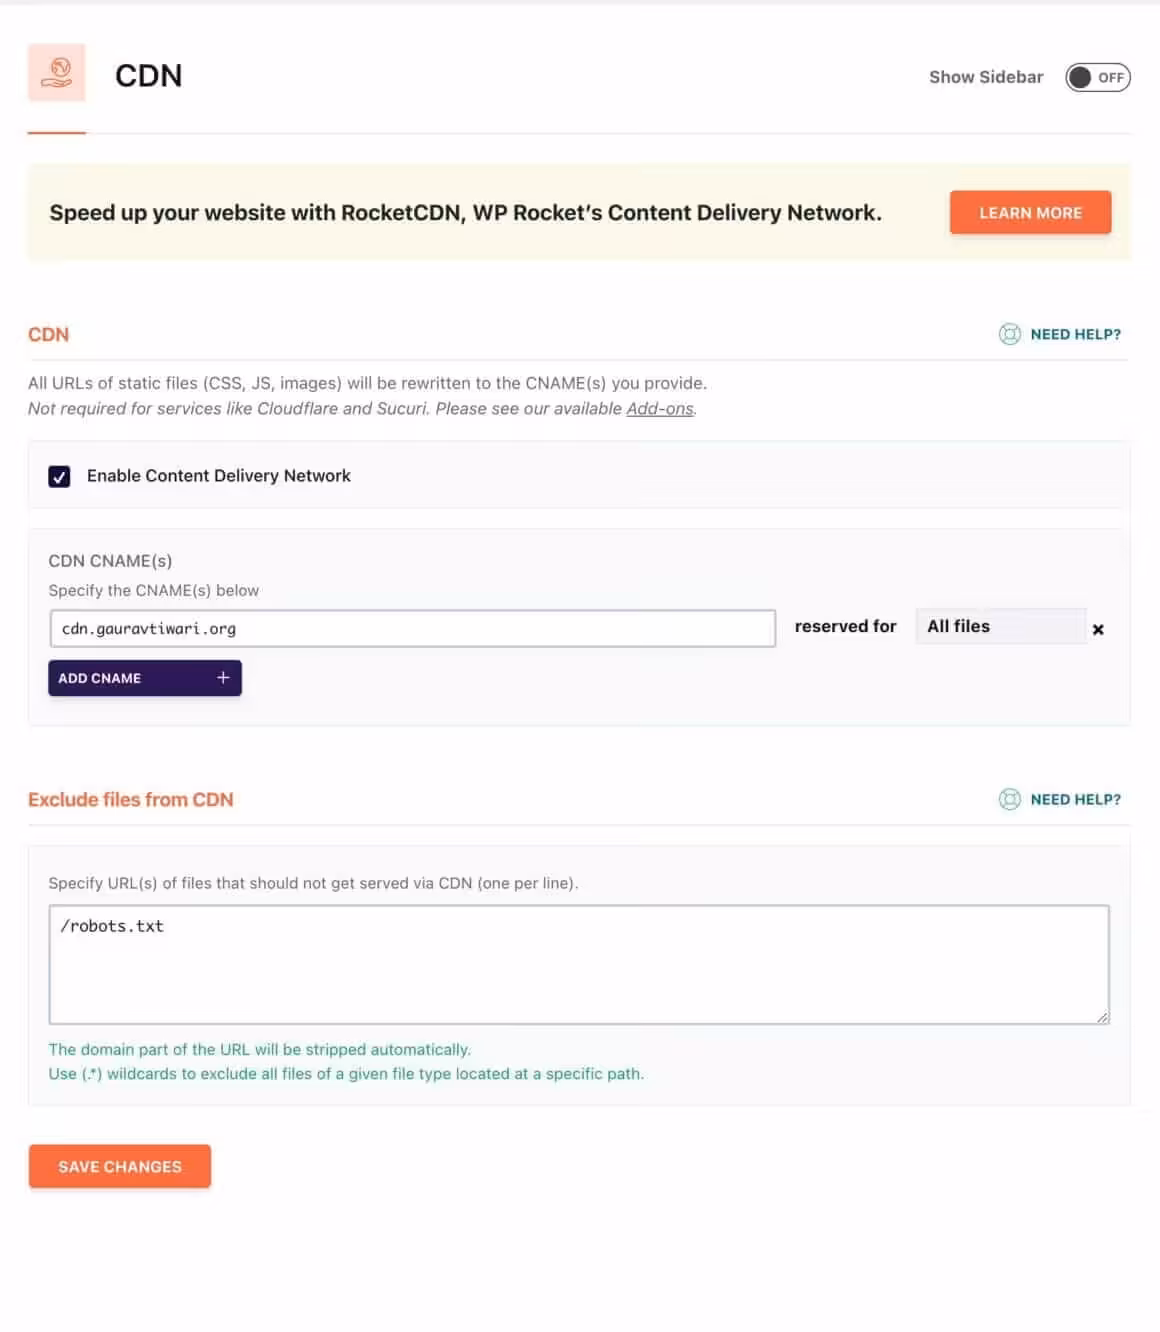
Also, if you want to exclude any specific URL(s) from your CDN then you just have to put it here.
However, if you are using Cloudflare as a CDN then you don’t have to put any CDN URL here. The configuration is a little different, which I will tell you how to configure it in a bit.
Heartbeat
Next is the heartbeat tab which is pretty easy to configure.
First, check the “control heartbeat” option and put every option under the “reduce or disable heartbeat activity option” to reduce activity.
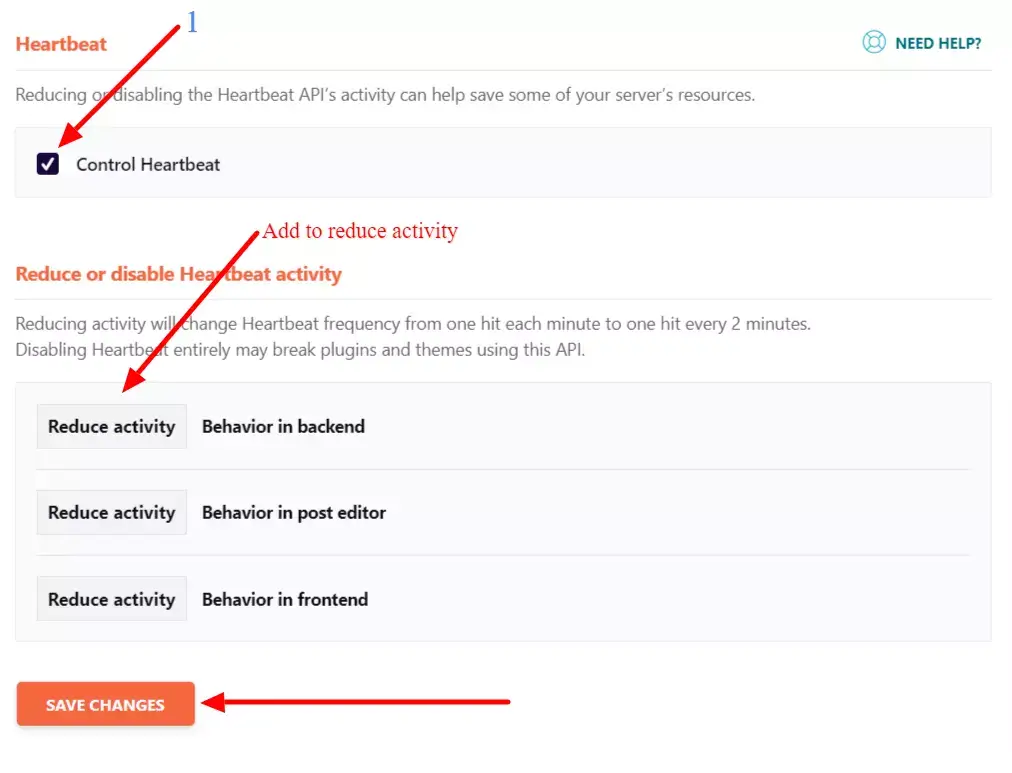
Don’t disable it totally because it can break your theme and plugins on your website and click on save changes.
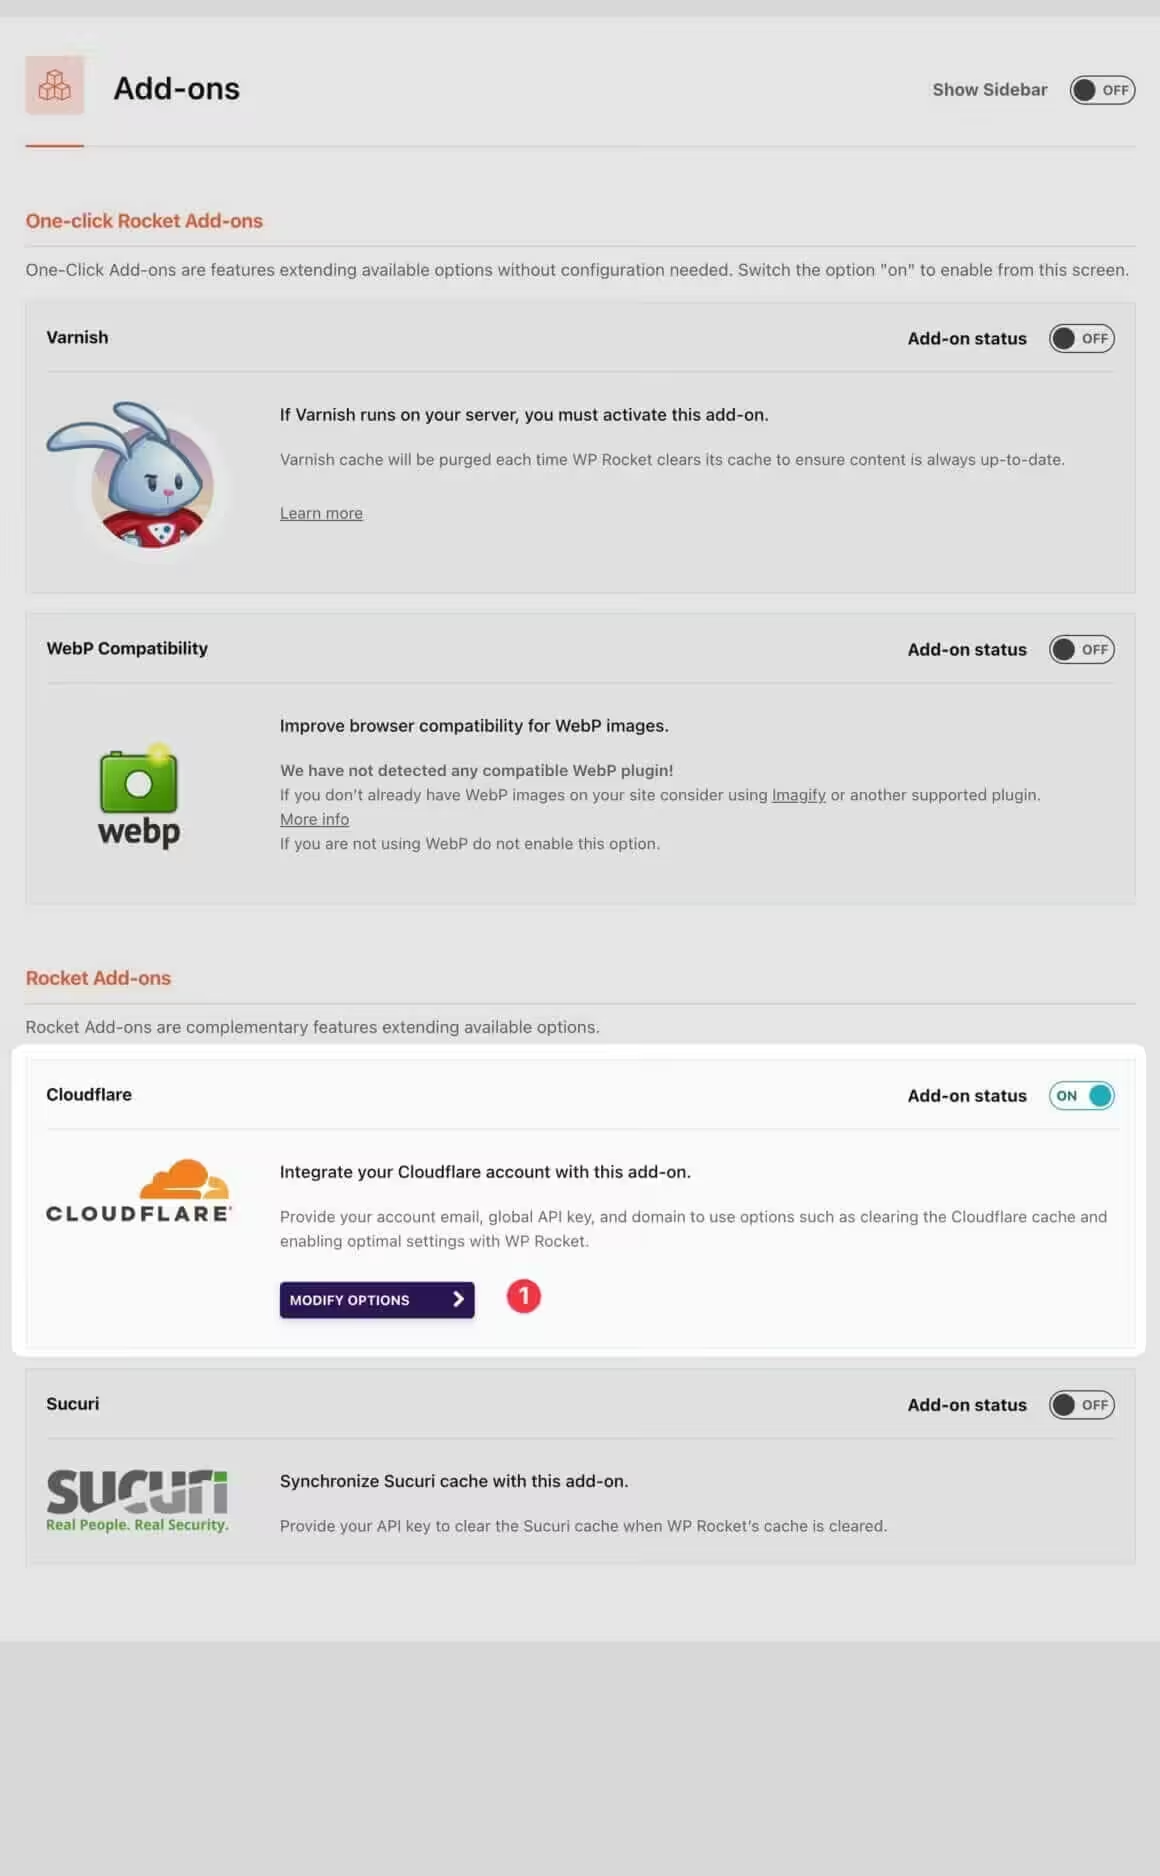
Add-ons Tab
The addon’s tab of WP rocket is for all those who want no stone to left unturned for your website’s speed.
Here are all the add-ons in WP Rocket:
- Sucuri Security Add-on helps you clear the sucuri security cache automatically
- Varnish add-on purges the varnish cache each time your clear cache by WP Rocket so your content remains up to date.
- Cloudflare add-on helps you easily connect Cloudflare with WP Rocket which would make your website fast.
- WebP addon improves WebP image rendering and browser compatibility.
The most important add-on is Cloudflare one as many people are using Cloudflare as the CDN for their website.
First, turn on Cloudflare add-on from here and then click on the “modify options” button.
After that, you would redirect to another page where you first have to fill in your Cloudflare Global API key, account email, and zone ID.
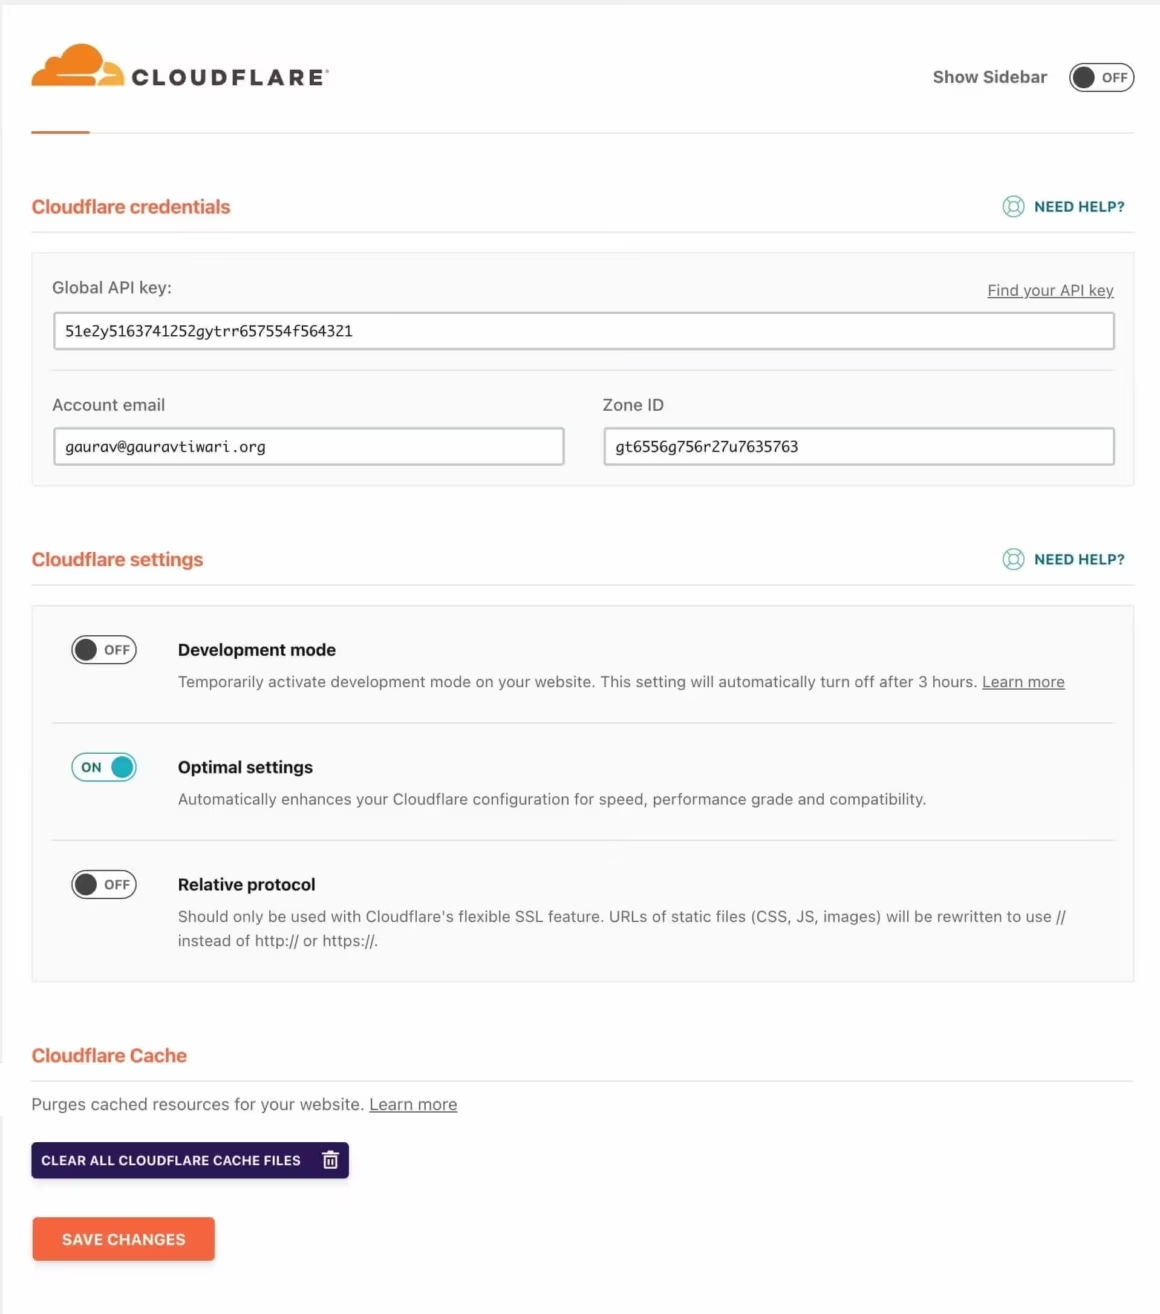
Next, if you have a live website, then check only the optimal settings option.
Click on the “clear all Cloudflare cache files” button and at last click on save changes.

Image optimization, tools and tutorials tabs
There is nothing to do in the image optimization tab just you have to install the Imagify plugin which is also made by the makers of the WP Rocket cache plugin.
Next in the tools tab, you can export your WP Rocket settings, import any other website’s WP Rocket settings to your website, or roll back to the previous version of this plugin.
And in the last tab, you will get tutorials that will help you configure the WP Rocket plugin easily.

- Self-hosted Google Fonts for faster loading
- Automatic Critical CSS generation
- Remove Unused CSS with safelist
- Lazy rendering for below-fold content
- Lightweight (no unnecessary features)
FlyingPress is a lightweight WP Rocket alternative focused on Core Web Vitals. If WP Rocket feels bloated for your needs, FlyingPress offers targeted optimizations with a cleaner interface.
- Bulk image optimization (compress existing library)
- WebP and AVIF format conversion
- 3 compression levels (Normal, Aggressive, Ultra)
- Free plan: 20MB/month (about 200 images)
- Made by the WP Rocket team
Imagify is the image optimization plugin from the WP Rocket team. Compress images by up to 80% without visible quality loss. WebP and AVIF conversion included. Integrates directly with WP Rocket.
WP Rocket vs Alternatives in 2026
WP Rocket is not the only caching plugin, but it is the most user-friendly. Here is how it compares to the competition.
- WP Rocket vs FlyingPress: WP Rocket has more features (database cleanup, heartbeat control, add-ons). FlyingPress is lighter and more focused on Core Web Vitals. For most sites, WP Rocket is the safer choice.
- WP Rocket vs LiteSpeed Cache: LiteSpeed Cache is free but only works on LiteSpeed/OpenLiteSpeed servers. WP Rocket works on any hosting. If you are on LiteSpeed hosting, test both and compare results.
- WP Rocket vs W3 Total Cache: W3 Total Cache is free but notoriously complex to configure. WP Rocket works out of the box. Unless you need granular server-level control, WP Rocket saves hours of configuration time.
- WP Rocket vs NitroPack: NitroPack is a SaaS solution ($21-$176/month). It handles everything including CDN, but costs significantly more. WP Rocket at $59/year paired with Bunny CDN ($1/TB) gives better value for most WordPress sites.
For a full comparison, read my guide on the best WordPress caching plugins.


My personal WP Rocket settings
These were my personal WP Rocket settings. But if you want to help configure yours, buy WP Rocket from this link and send me a message. I will help you configure your website for maximum performance.
Frequently Asked Questions
Is WP Rocket worth $59/year?
Yes. WP Rocket typically improves PageSpeed scores by 30-50 points and reduces load times by 2-3 seconds. That translates to better SEO rankings, lower bounce rates, and higher conversions. The time saved from not configuring free alternatives manually is worth the price alone. One license covers a single site with 1 year of updates and support.
What are the best WP Rocket settings for most WordPress sites?
Enable page caching, CSS/JS minification, lazy loading for images and iframes, preloading with sitemap, and Remove Unused CSS. These 5 settings handle 80% of the performance gains. Avoid enabling “Combine CSS/JS” on HTTP/2 servers (most modern hosts). Test each change individually and check for visual breaks.
Does WP Rocket work with Cloudflare?
Yes. WP Rocket has a built-in Cloudflare add-on. Enter your Cloudflare API credentials in the CDN tab, and WP Rocket automatically purges Cloudflare cache when you update content. You can also use Bunny CDN for a more affordable CDN alternative.
Can WP Rocket break my site?
Certain settings can cause visual issues: “Combine CSS” can break dynamic stylesheets. “Delay JavaScript” can break interactive elements. “Remove Unused CSS” can hide elements that load dynamically. Always test on a staging site first. If something breaks, WP Rocket’s Safelist feature lets you exclude specific files.
WP Rocket vs free caching plugins: which is better?
Free plugins like LiteSpeed Cache (LiteSpeed servers only), W3 Total Cache (complex), and WP Super Cache (basic) work but require more configuration. WP Rocket works on any host, requires no technical knowledge, and includes features that free plugins charge separately for (Remove Unused CSS, preloading, lazy loading). Read my full caching plugin comparison.
How do I check if WP Rocket is working correctly?
Open your site in an incognito browser window and view the page source (right-click > View Source). Scroll to the bottom. You should see a comment like “This website is powered by WP Rocket” with a timestamp. Also check PageSpeed Insights before and after enabling WP Rocket to measure the actual improvement.
Does WP Rocket improve Core Web Vitals?
Yes. WP Rocket directly improves all three Core Web Vitals: LCP (Largest Contentful Paint) through caching and preloading, CLS (Cumulative Layout Shift) through Remove Unused CSS and image dimensions, and INP (Interaction to Next Paint) through Delay JavaScript and script optimization. On my test sites, WP Rocket consistently brings Core Web Vitals into the “Good” range.
For more WordPress performance tips, check out my full WP Rocket review, the best caching plugins comparison, and my guide on essential WordPress plugins for content marketers.
Disclaimer: This site is reader-supported. If you buy through some links, I may earn a small commission at no extra cost to you. I only recommend tools I trust and would use myself. Your support helps keep gauravtiwari.org free and focused on real-world advice. Thanks. - Gaurav Tiwari