How to Migrate a WordPress Site to a New Host in 2026
Migrating a WordPress site to a new host takes between 15 and 60 minutes of active work if you prepare properly. The full DNS propagation window runs up to 48 hours, but real downtime for visitors can be kept under 5 minutes when you lower your TTL in advance and deploy to the new host before flipping nameservers.
I’ve handled 50 plus client migrations over the past decade, moving sites between SiteGround, Bluehost, Cloudways, Kinsta, WP Engine, Hostinger, and a few dozen smaller hosts. Most failures I’ve seen aren’t caused by the move itself. They’re caused by skipping the preparation, picking the wrong method for the site size, or forgetting one of the three post-migration checks that nobody writes about (object cache, transactional email, and mixed-content SSL). This guide fixes all of that.
What you need before starting
Before you touch anything, line up five things: an active account on the new host, a temporary URL or staging domain, access to your domain registrar’s DNS panel, a full backup of the current site, and a 60-minute quiet window where you’re not pushing content. Miss any of these and you’ll end up troubleshooting under pressure.
- New host account, provisioned and paid. Don’t start mid-trial. Trial accounts on Cloudways and Kinsta sometimes throttle outbound connections, which breaks pull-migrations.
- A temporary URL. Most managed hosts give you one (e.g.
wordpress-123456.cloudwaysapps.comorsite.kinsta.cloud). On cPanel hosts, request a preview URL or usehostsfile editing. - DNS access at the registrar. Namecheap, Cloudflare, GoDaddy, Porkbun. You need to edit A, AAAA, CNAME, and the TTL. If DNS is at the old host, move it to the registrar or Cloudflare before you migrate.
- A fresh full backup. Not the weekly automated one. A backup taken less than 2 hours before the move, stored off-server (S3, Google Drive, or local disk).
- A 15 to 60-minute content freeze. No publishing, no edits, no comment moderation. On e-commerce sites, also pause order notifications during the cutover.
Gotcha I’ve hit twice: if your current host uses a proprietary caching layer (SiteGround SG Optimizer, Kinsta MU plugin, WP Engine’s System plugin), those plugins will throw errors on the new host. Deactivate them before you export, and re-install the equivalent (or nothing) on the destination.
Method 1: Plugin migration (the simplest path for sites under 1GB)
Plugin migration is the right choice for 80% of WordPress sites. If your total size (files plus database) is under 1GB, use Duplicator Pro, All-in-One WP Migration, or WPVivid. You’ll be done in 20 to 40 minutes with near-zero chance of data loss.
My go-to plugin: Duplicator Pro
I’ve used Duplicator Pro on roughly 30 of my 50 plus client migrations. It’s the only plugin I trust for sites with custom database tables (WooCommerce, LearnDash, BuddyPress, Fluent CRM), because the serialized data replacement is rock solid. The free version caps at around 500MB and lacks scheduled backups and cloud storage, but handles a basic blog just fine.
The workflow: install Duplicator on the source, build a package (archive + installer), upload both files to the destination’s /public_html/ via FTP, visit yoursite.com/installer.php, point it at a fresh empty database, and let it run. Takes 10 to 15 minutes on a 300MB site.
Alternatives that also work
All-in-One WP Migration is friendlier for beginners but its free version caps at 512MB (the unlimited extension is a $69 one-time purchase). WPVivid is excellent for free users because the size limit is generous and direct server-to-server transfer works without intermediate uploads. Updraft Plus handles backups beautifully but its migration add-on is clunky.
Full comparison: best WordPress migration plugins.
Method 2: Host-provided free migration
If you’re moving to a managed WordPress host, use their free migration service first. Cloudways, Kinsta, and WP Engine all offer one free migration per site, and Hostinger includes unlimited free migrations on Business and above. This is the lowest-effort option that exists.
- Cloudways: one-click migrator plugin or concierge (up to 5 free with Flexible plans). The plugin works for 90% of sites in 20 to 45 minutes.
- Kinsta: unlimited free migrations from WP Engine, SiteGround, GoDaddy, and Flywheel. One premium migration from anywhere else.
- WP Engine: Automated Migration Plugin (free, DIY) plus free assisted migration on annual plans.
- Hostinger: manual assisted migration via support ticket. Slower (24 to 48 hours) but reliable.
When it’s worth doing yourself instead: if the site has non-standard directory layouts, bespoke server rules, or custom cron jobs, concierge migrations often miss them. I’ve had to redo three Kinsta concierge migrations because rewrite rules for a custom login URL got dropped.
Method 3: Manual migration via FTP and phpMyAdmin
Use manual migration when plugins fail, the site is over 1GB, or the source host is locked down. This is the old-school method, and it’s what you fall back to when everything else breaks. Budget 60 to 90 minutes.
- FTP download. Use FileZilla (free) or Transmit. Connect via SFTP on port 22, navigate to the web root (
/public_html/,/www/, or/htdocs/), and pull the entire WordPress install including the hidden.htaccess. On a 5GB site over a 50 Mbps connection, this takes about 15 minutes. - Database export. Log into phpMyAdmin on the old host. Select the WordPress DB, click Export, use Quick + SQL format, and download the
.sqlfile. For databases over 100MB, use SSH andmysqldumpinstead. Full guide: backup MySQL databases. - Create database on the new host. Open MySQL Databases in cPanel (or the equivalent). Create a new DB, a new user, and grant the user all privileges on the DB. Write down the three values.
- Edit wp-config.php. In your downloaded files, open
wp-config.phpand updateDB_NAME,DB_USER,DB_PASSWORD, andDB_HOST. Save a backup copy of the original first. - Upload files. FTP the entire directory to the new host’s
public_html. Include.htaccess. On a good connection this is 20 to 30 minutes for 5GB. - Import database. In the new phpMyAdmin, select your fresh DB, click Import, upload the
.sql, and run it. If the file is over 50MB, either increaseupload_max_filesizeor use SSH:mysql -u user -p dbname < backup.sql. - Run search-replace for URL changes. If the domain changed or you’re moving from HTTP to HTTPS, use Better Search Replace plugin or WP-CLI to update the DB. Never use raw SQL for this. It breaks serialized data.
The serialized data breaking problem: WordPress stores theme customizer settings, widget configs, and many plugin options as PHP serialized arrays. The serialized strings include character counts. Run a plain SQL find-and-replace on the URL and every one of those strings breaks, usually silently. Always use WP-CLI search-replace or a plugin that understands serialization.
Method 4: WP-CLI migration (scriptable, zero-downtime capable)
WP-CLI is the fastest method for developers and the only way to do a truly scripted, repeatable, near-zero-downtime migration. If you have SSH access on both hosts, this is the professional workflow.
The core sequence on the source:
wp db export backup.sql
tar czf files.tar.gz wp-content/ wp-config.php .htaccess
rsync -avz files.tar.gz backup.sql user@newhost:/home/user/migration/
Then on the destination:
cd /home/user/public_html/
tar xzf /home/user/migration/files.tar.gz
wp db import /home/user/migration/backup.sql
wp search-replace 'https://old-url.com' 'https://new-url.com' --all-tables --skip-columns=guid
wp cache flush
wp rewrite flush
The whole thing runs in under 5 minutes on a 500MB site. You can wrap it in a shell script, trigger it from CI, or run it twice (once as a dry run against the temp URL, once for real during cutover). Kinsta and Cloudways both expose SSH with WP-CLI pre-installed on every plan.
Pre-migration checklist (print this)
Run through this list in the 24 hours before the migration. Every item has saved me at least one late-night debugging session.
- Full backup taken less than 2 hours before cutover, stored in at least two locations.
- Screenshot or export your active plugins list (
wp plugin list --format=csv > plugins.csv). - Note your current theme and any child-theme customizations not stored in the theme folder.
- Export any custom code from Code Snippets, WPCode, or the theme’s
functions.php. - List server-level crons (
crontab -l) and rewrite rules outside.htaccess. - Document SSL setup (Let’s Encrypt on old host vs new, or paid cert). Certificates don’t transfer.
- Check for hardcoded URLs in theme files (
grep -r "old-domain.com" wp-content/themes/). - Lower your TTL to 300 seconds at the registrar 48 hours before cutover.
- Note current SMTP / transactional email setup (SendGrid, Amazon SES, Fluent SMTP). API keys may need re-entry.
- Confirm the destination’s PHP version matches or exceeds the source. Downgrading breaks sites.
DNS cutover: how to minimize downtime to under 5 minutes
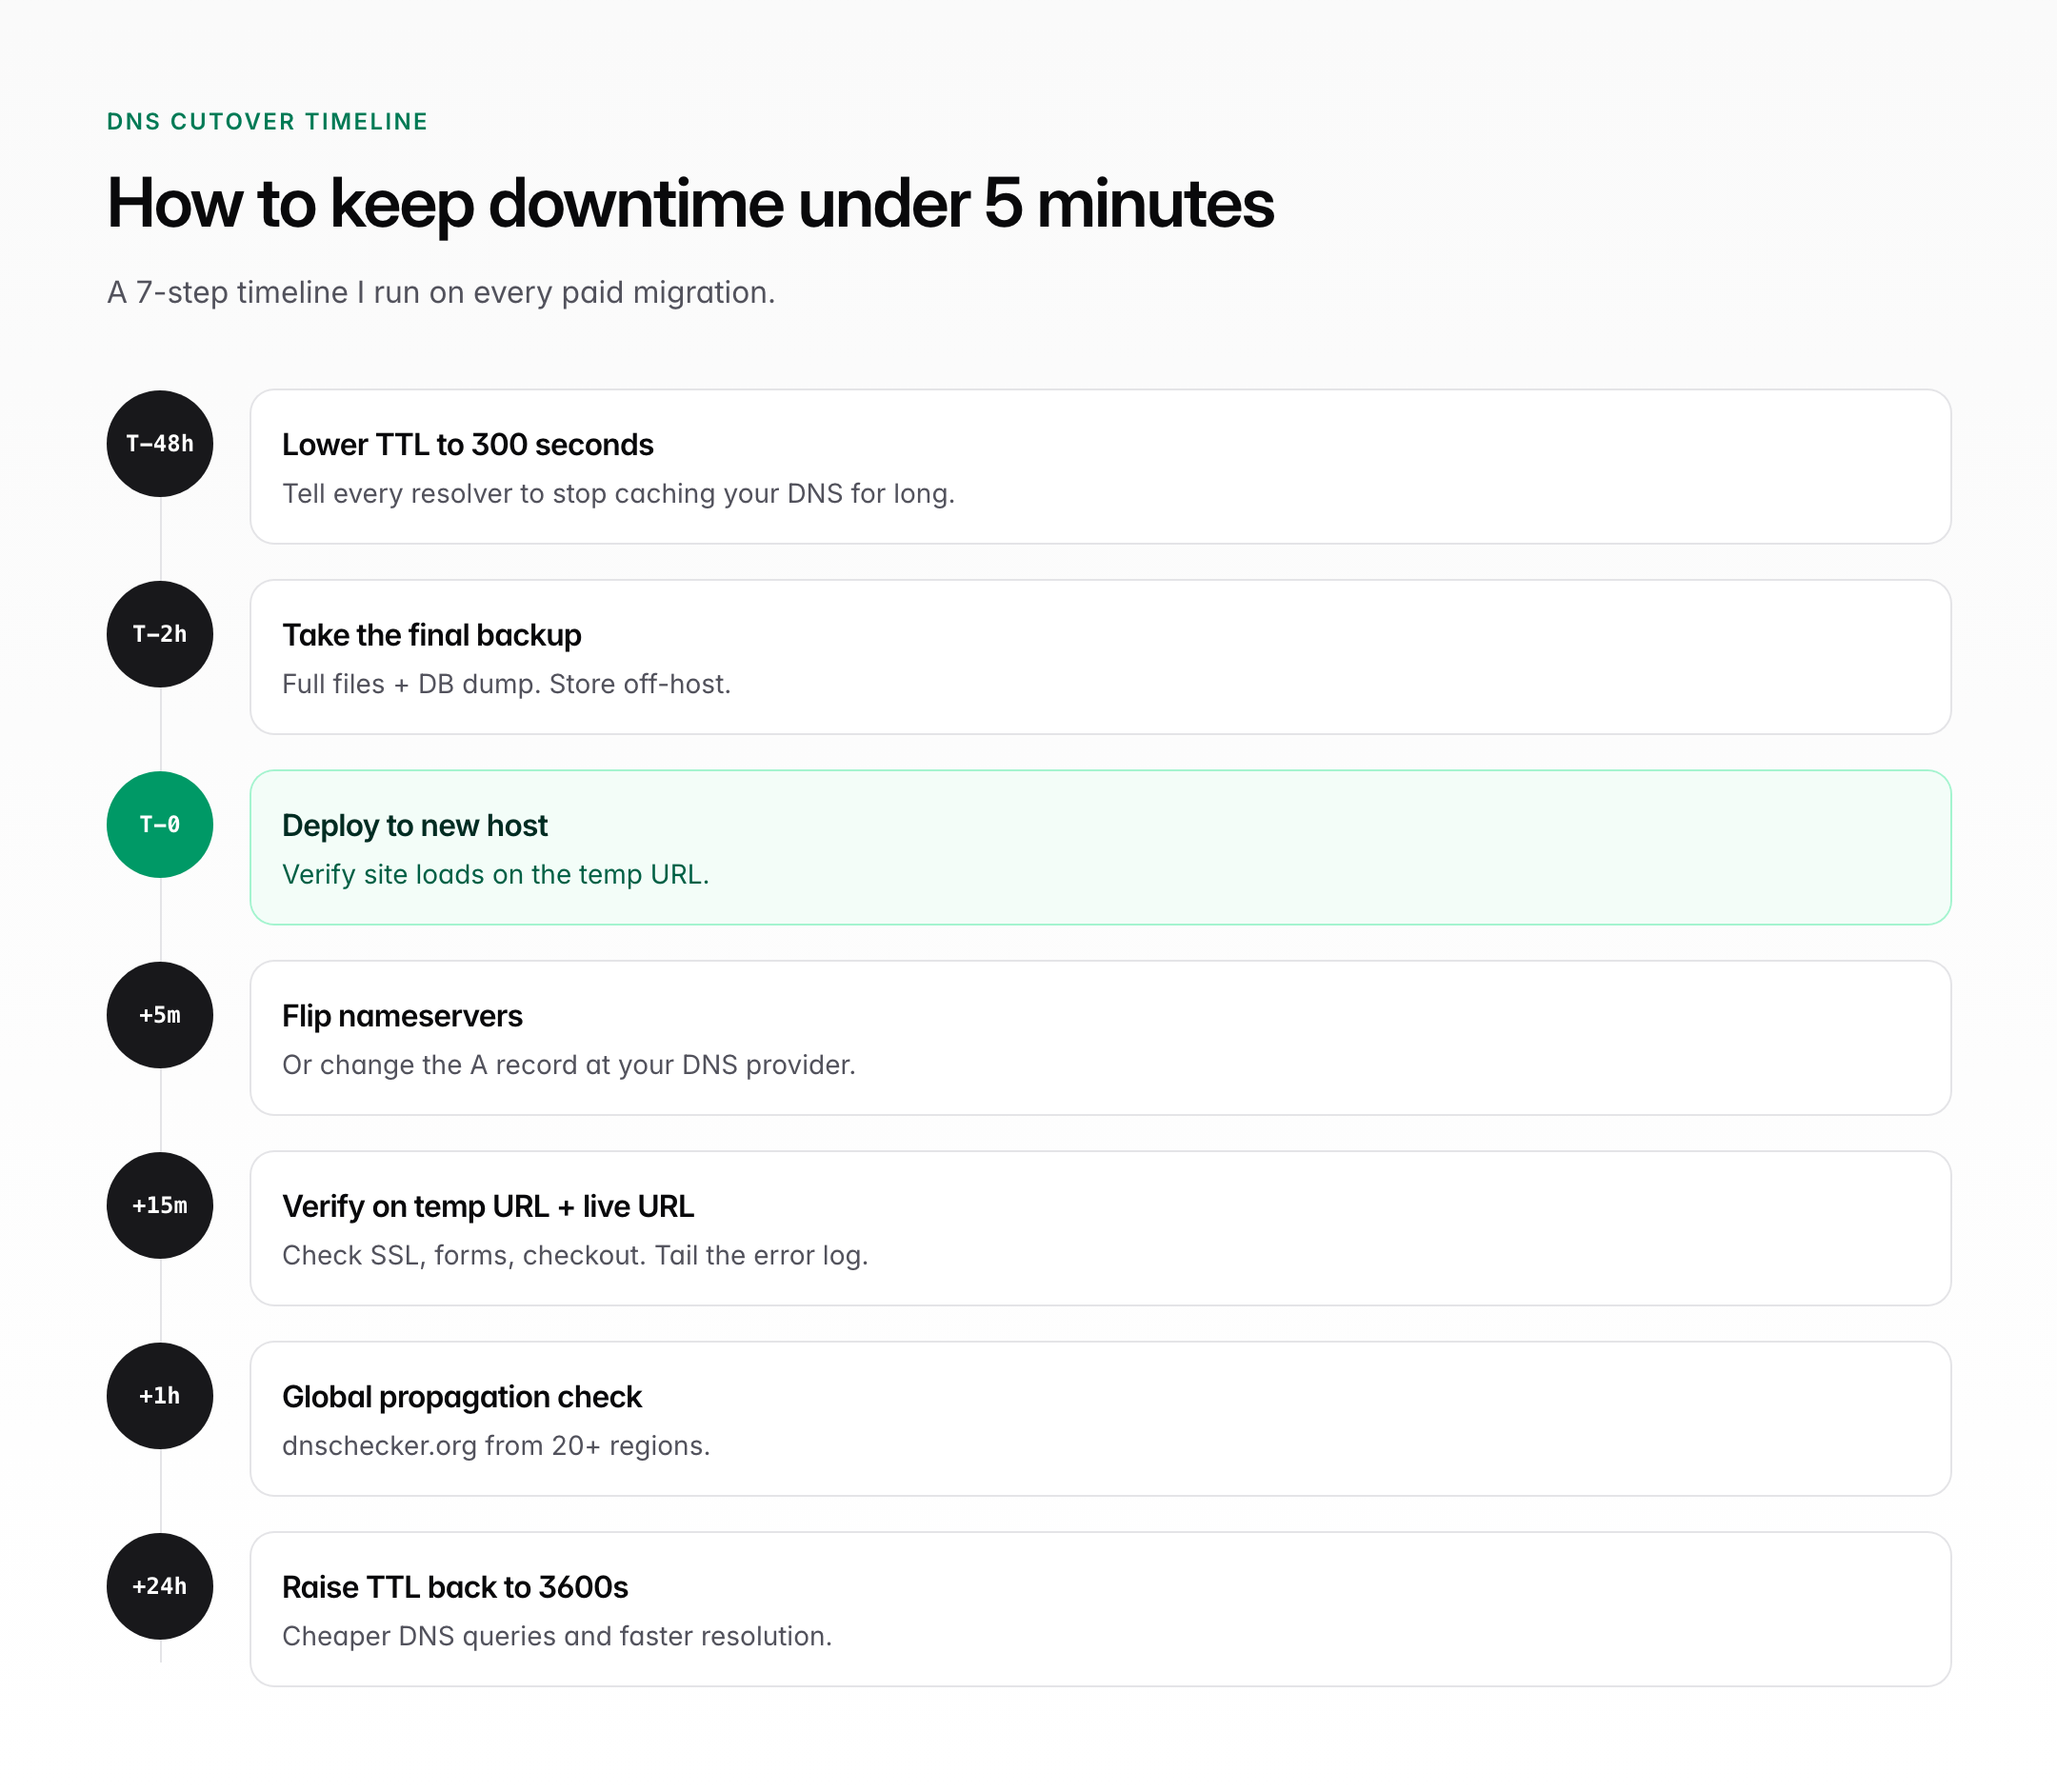
The DNS cutover is where most migrations fail publicly. Done right, visitors see zero downtime. Done wrong, your site is intermittently broken for 24 to 48 hours. The core trick: lower your TTL before the move, deploy to the new host under a temp URL, test everything, then flip the DNS record. The DNS cutover timing that works for me is:
- T-48 hours: Lower the A record TTL from 3600 (1 hour) to 300 (5 minutes). This change itself needs the old TTL to expire, which is why you do it 48 hours ahead.
- T-2 hours: Take the final backup. Freeze content edits.
- T-0: Deploy the site to the new host. Access it via the temp URL or by editing your local
hostsfile. Test the homepage, a single post, a product page, checkout, login, and contact form. - T+5 min: Update the A record at the registrar to point at the new host’s IP. (If using Cloudflare, also flip the origin there.)
- T+15 min: Check propagation at
dnschecker.org. Most locations will have updated thanks to the low TTL. - T+1 hour: Verify on mobile data (different DNS resolver), fix any straggling issues.
- T+24 hours: Raise TTL back to 3600 or 7200 seconds. Keep the old host live for 7 days as a rollback option.
If you use Cloudflare as your DNS, the cutover is even smoother because Cloudflare’s proxy respects the low TTL immediately. Pair it with Cloudflare’s Always Use HTTPS and Automatic HTTPS Rewrites and you avoid most mixed-content pain during the SSL handshake period.
Post-migration verification (the 12-point check)
The migration isn’t done when the site loads on the new host. It’s done when you’ve verified these 12 things. In my experience, 6 out of 10 migrations have at least one broken item from this list.
- Homepage, 3 random posts, archive pages load without errors. Check desktop and mobile.
- Images actually render. Check a post with gallery and a WooCommerce product page. Broken image fix guide here.
- Permalinks work. Click 5 random internal links. If you get 404s, visit Settings > Permalinks and click Save (no changes needed, just a re-flush).
- Contact forms submit and deliver. Test with a real email address, check your inbox and spam.
- Transactional email sends. Trigger a password reset, new user registration, and WooCommerce order confirmation if applicable.
- SSL covers all URLs, no mixed-content warnings. Open DevTools Console on any page. Zero red warnings.
- Checkout completes on e-commerce sites. Run a real test transaction for 1 unit of currency, then refund it.
- Login works for admin, editor, and a subscriber-level account.
- Object cache is hitting the new Redis / Memcached. If not, you’ll see fatal errors intermittently. Check
wp-content/object-cache.phppoints at the right server. - Search Console verification still works. Re-submit the sitemap.
- Analytics is recording. Check GA4 real-time for a minute.
- Crons are firing. Run
wp cron event list. Look for events scheduled in the past that haven’t run (means WP-Cron is misconfigured on the new host).
The object cache gotcha: if the old host used Redis and the new host uses Memcached (or vice versa), the object cache still pointing at the old server will throw 500 errors once the old host goes dark. Delete wp-content/object-cache.php immediately after migration, then re-install the correct drop-in on the new host.
Common migration problems and fixes
Here are the 6 problems I see on almost every migration, and the fix that works in 2 minutes.
- White screen of death (WSOD): PHP version mismatch or missing extension. Check the new host’s PHP version matches or exceeds the source. Enable
WP_DEBUGinwp-config.phpand read the error. - “Error establishing a database connection”: wrong
DB_HOST. On cPanel it’s usuallylocalhost, on Kinsta and Cloudways it’s a specific hostname or IP. - Broken images, theme CSS missing: old URLs still in DB. Run
wp search-replaceagain, this time on all tables including meta. - Permalinks return 404:
.htaccessdidn’t upload (FTP hides it by default) or Nginx rules aren’t set. Re-upload or re-save permalinks. - Mixed content warnings after SSL switch: hardcoded
http://references in posts, theme, or DB. Runwp search-replace 'http://domain.com' 'https://domain.com' --all-tables. - Emails not sending: destination host blocks
mail()or lacks SPF/DKIM. Install Fluent SMTP or WP Mail SMTP and route through SendGrid, Brevo, or Amazon SES.
Which migration method should you actually use
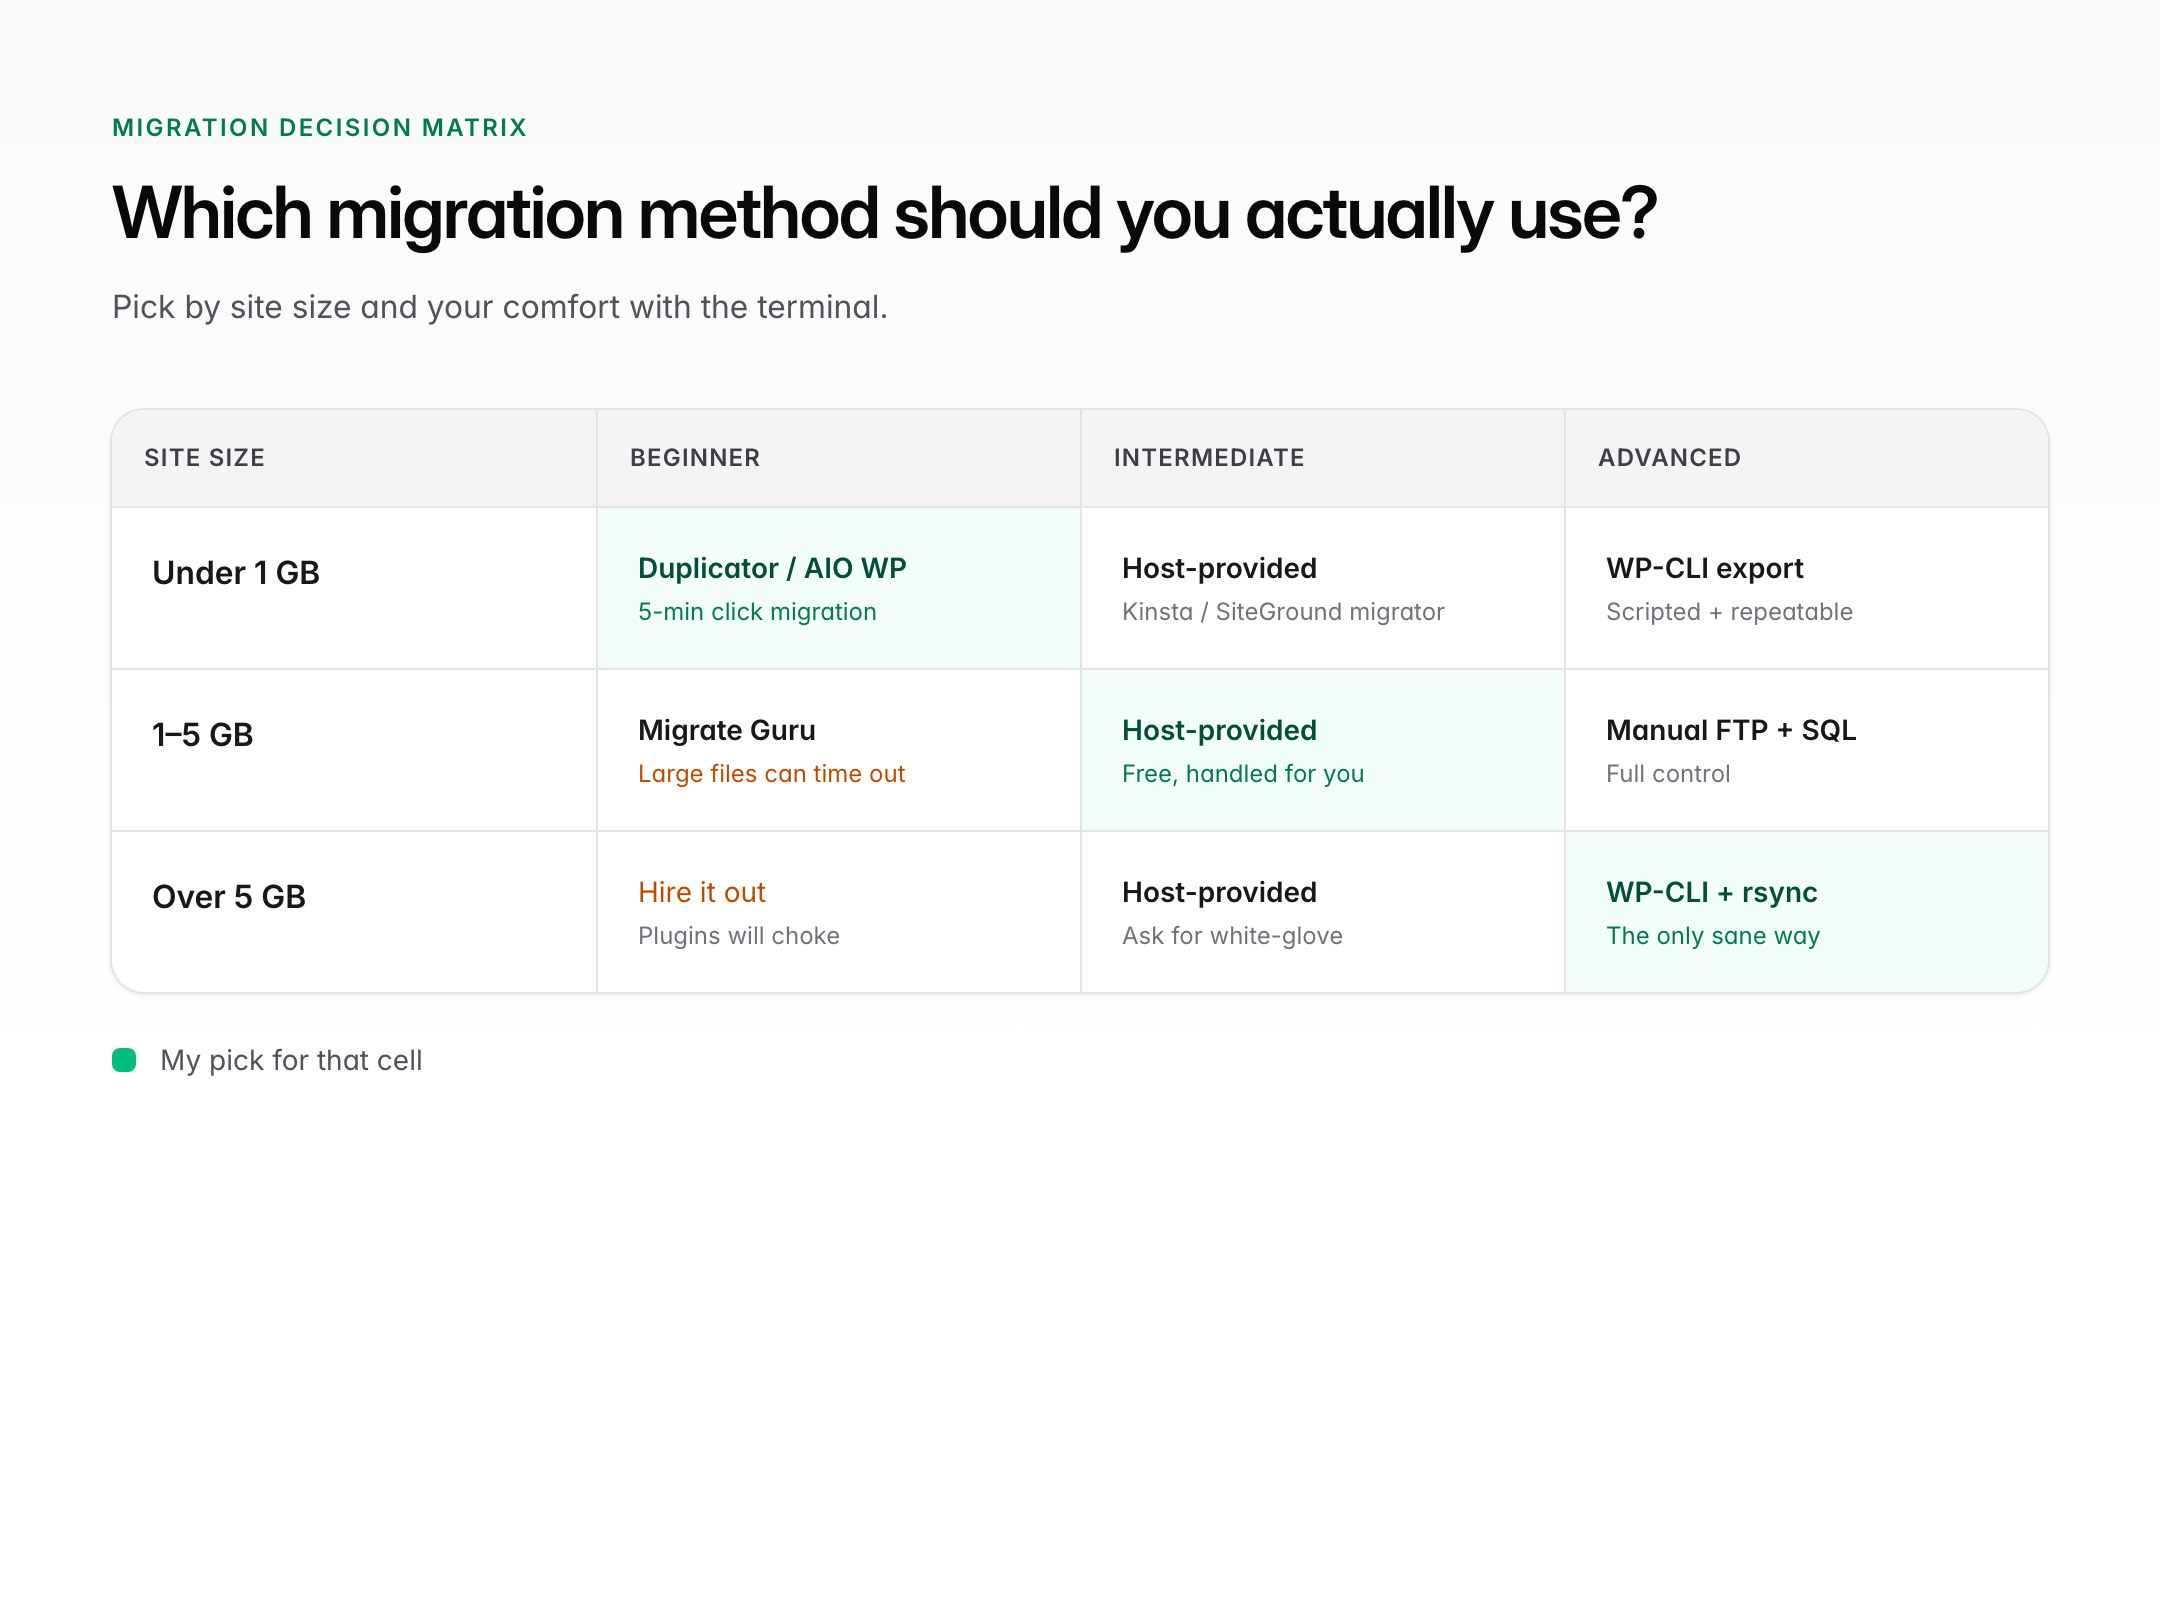
The right method depends on two variables: site size and your technical comfort. Here’s how I route clients based on those two factors.
- Under 1GB + beginner: Plugin (All-in-One WP Migration free). 20 minutes, almost impossible to break.
- Under 1GB + intermediate: Host-provided migration or Duplicator Pro.
- 1 to 5GB + any comfort level: Duplicator Pro or host concierge.
- Over 5GB + beginner/intermediate: Host concierge migration (Cloudways, Kinsta). Let the pros handle it.
- Over 5GB + advanced: WP-CLI + rsync. This is the only method that’s genuinely fast at scale.
- E-commerce or membership sites: Host concierge or WP-CLI, never free plugins. Serialized data in WooCommerce and LearnDash breaks too easily.
- Multi-site network: WP-CLI or manual. Plugins rarely handle multisite correctly.
If you’d rather not touch any of this yourself: hire me for migration, or check my full guide to the best WordPress hosting providers before picking a destination.
Frequently asked questions
How long does it take to migrate a WordPress site to a new host?
Active work takes 15 to 60 minutes for sites under 1GB. DNS propagation adds up to 48 hours, but actual downtime visible to visitors can be kept under 5 minutes if you lower your TTL to 300 seconds 48 hours before the cutover and deploy to the new host under a temp URL before flipping nameservers.
Will I lose SEO rankings when I migrate hosts?
No, as long as the URLs stay identical and you don’t change the domain. Google sees a host move as invisible because the domain, URLs, and content are unchanged. Rankings can drop temporarily if the new host is slower (Core Web Vitals dip) or if you accidentally change URLs during search-replace.
Which plugin is best for migrating a WordPress site to a new host?
Duplicator Pro for sites with custom tables, WooCommerce, or membership plugins. All-in-One WP Migration for simple blogs under 512MB. WPVivid for free users who need larger file limits. I’ve migrated 50 plus sites and these three cover 95% of cases.
Can I migrate without any downtime?
Yes, near-zero downtime is possible with proper DNS cutover timing. Lower TTL to 300 seconds 48 hours ahead, deploy to the new host under a temp URL, verify everything works, then flip the A record. Real-world downtime is typically under 5 minutes.
Do Cloudways, Kinsta, and WP Engine really offer free migrations?
Yes. Cloudways includes up to 5 free migrations on Flexible plans. Kinsta gives unlimited free migrations from WP Engine, SiteGround, GoDaddy, and Flywheel, plus one premium migration from other hosts. WP Engine offers a free Automated Migration Plugin and assisted migration on annual plans. Hostinger offers unlimited free migrations on Business plans and up.
What’s the difference between migrating a WordPress site and moving to a new domain?
Moving hosts keeps the domain, so only server-side files and DNS change. Moving to a new domain also requires a database search-replace across all URLs, 301 redirects from old to new domain, updating Search Console, and re-submitting the sitemap. Host moves are invisible to Google. Domain moves are not.
Why do my images break after migration?
The wp-content/uploads folder didn’t upload completely, or the database still references the old domain in image URLs. FTP sometimes silently skips large files. Re-upload uploads/ via rsync if possible, then run wp search-replace for the domain change. This fixes 95% of image issues.
Should I keep my old host active after migration?
Yes, for 7 to 14 days. You need the fallback if something breaks post-cutover, and you’ll want to verify that all traffic has propagated to the new host before canceling. Download a fresh final backup from the old host right before you cancel.
Migrating a WordPress site to a new host stops being scary once you pick the right method for your site size and handle the DNS cutover correctly. If this guide saved you a migration headache, pass it along to someone about to move hosts. And if you’d rather hand it off entirely, my migration service handles the full move, DNS cutover, and post-migration verification for a flat fee.
Disclaimer: This site is reader-supported. If you buy through some links, I may earn a small commission at no extra cost to you. I only recommend tools I trust and would use myself. Your support helps keep gauravtiwari.org free and focused on real-world advice. Thanks. - Gaurav Tiwari