How I Serve WordPress Assets from Cloudflare R2 (For Almost Free.)
Every static asset on gauravtiwari.org gets served from a Cloudflare R2 bucket. Images, stylesheets, JavaScript files, fonts. All of it comes from r2.gauravtiwari.org, not my origin server.
My R2 bill last month? $0. Literally zero. My storage fits within R2’s free tier (10 GB included), and bandwidth is free because R2 doesn’t charge for egress. Even if you blow past the free tier, you’re looking at $0.015 per GB/month for storage. Nothing else.
I built three components to make this work:
- a WordPress mu-plugin that rewrites all asset URLs,
- a Cloudflare Worker that acts as a pull-through cache, and
- a second mu-plugin that handles on-demand image resizing.
I didn’t bulk-upload anything, write migration scripts, or sync a single file. The system fills itself automatically as visitors hit the site.
This is the exact setup I’ve been running for over last couple of months. I’m going to walk you through every piece, with code, so you can build the same thing.
Why Cloudflare R2 Over Traditional CDNs
Most CDNs charge you for bandwidth. That’s their business model. You store files, they serve files, and every gigabyte that leaves their network costs money.
Amazon S3 charges $0.09 per GB for egress. Sounds cheap until you do the math. A site serving 500 GB of assets per month (not unusual for image-heavy WordPress sites) pays $45/month just in transfer fees. That doesn’t include storage, API requests, or anything else. I’ve seen S3 bills surprise people badly.
DigitalOcean Spaces is a bit better at $0.01/GB after the first 1 TB included. BunnyCDN runs about $0.01/GB too, with a $1/month minimum. These are reasonable. But Cloudflare R2 is… free on bandwidth.
R2’s pricing structure is simple. You pay $0.015 per GB per month for storage. You pay $0 for bandwidth. Zero. Class A operations (writes) cost $4.50 per million. Class B operations (reads) cost $0.36 per million. And there’s a free tier that covers 10 GB storage and 10 million reads per month.
Here’s exactly how R2 pricing breaks down, pulled from Cloudflare’s docs:
| Free Tier (per month) | Standard Storage | Infrequent Access | |
|---|---|---|---|
| Storage | 10 GB included | $0.015 / GB | $0.01 / GB |
| Class A ops (writes, lists, puts) | 1 million included | $4.50 / million | $9.00 / million |
| Class B ops (reads, gets, heads) | 10 million included | $0.36 / million | $0.90 / million |
| Data retrieval | None | None | $0.01 / GB |
| Egress (bandwidth) | Free | Free | Free |
The free tier resets every month. For a WordPress site with under 10 GB of actively-cached assets (most sites), you pay nothing. The Infrequent Access tier is for cold storage you rarely read. For a CDN use case, stick with Standard.
Quick math for different site sizes:
| R2 Storage Used | Monthly Storage Cost | Bandwidth Cost | Total |
|---|---|---|---|
| Under 10 GB | $0 (free tier) | $0 | $0 |
| 25 GB | $0.23 | $0 | $0.23 |
| 50 GB | $0.60 | $0 | $0.60 |
| 100 GB | $1.35 | $0 | $1.35 |
| 250 GB | $3.60 | $0 | $3.60 |
| 500 GB | $7.35 | $0 | $7.35 |
Compare that to Amazon S3 serving 500 GB of bandwidth at $0.09/GB: $45/month just in egress. Or DigitalOcean Spaces at $0.01/GB after the included 1 TB: still $5/month for a site pushing 1.5 TB. R2’s $0 egress makes those comparisons almost embarrassing.

My actual numbers: my R2 bucket for gauravtiwari.org holds under 10 GB of actively-cached assets. That fits within R2’s free tier entirely. My bill is $0/month. Zero. For a site that gets hundreds of thousands of pageviews and serves tens of thousands of images. Even at 50 GB, you’d pay $0.75/month for storage. At 150 GB, roughly $2.25. The bandwidth part is always free.
But cost isn’t the only reason. R2 lives inside the Cloudflare ecosystem. That means I can put a Cloudflare Worker in front of my bucket, attach a custom domain through Cloudflare DNS, and write cache logic that’s impossible with standalone CDNs. The Worker runs at the edge, in 300+ data centers worldwide, with sub-millisecond cold starts.
If you’re already using Cloudflare for DNS (and you should be), R2 fits into your stack without adding another vendor, another dashboard, or another billing relationship.
The Architecture: Three Components
The system has three pieces that work together. I’ll give you the full picture before we get into each one.

Component 1: URL Rewriter (WordPress mu-plugin). This runs on your WordPress site and intercepts every asset URL. Images, scripts, stylesheets, fonts. It rewrites them from yourdomain.com/wp-content/... to r2.yourdomain.com/wp-content/.... The origin never sees the traffic.
Component 2: Pull-Through Cache (Cloudflare Worker). When a request hits r2.yourdomain.com, the Worker checks R2 first. If the file exists, it serves it with aggressive cache headers. If not, it fetches from your origin, stores the file in R2, then serves it. This is the “lazy migration” trick. R2 fills itself.

Component 3: On-Demand Image Resizer (Worker + mu-plugin endpoint). WordPress generates thumbnail sizes at upload time. But if you add a new image size later, or your R2 bucket doesn’t have a specific crop… the Worker calls back to a resize endpoint on your WordPress site, generates the variant on the fly, stores it in R2, and serves it. One request, then it’s cached permanently.
I built it this way because I don’t want to manage a sync process or bulk-upload 50,000 images. The pull-through cache means R2 is always eventually consistent with the origin, with zero manual effort.
Browser → r2.yourdomain.com/wp-content/uploads/photo.jpg
         ↓
   Cloudflare Worker
         ↓
   Check R2 bucket
         ↓
   HIT?  → Serve from R2 (1-year cache headers)
   MISS? → Fetch from origin → Store in R2 → Serve
Setting Up the URL Rewriter (gt-r2-cdn.php)
                     ┌─────────────────────┐
                     │   WordPress Origin   │
                     │                      │
                     │  ┌────────────────┐  │
                     │  │ gt-r2-cdn.php  │──┼──→ Rewrites asset URLs
                     │  └────────────────┘  │    to r2.yourdomain.com
                     │                      │
                     │  ┌────────────────┐  │
  Cloudflare     ───▶│  │ gt-r2-image-   │──┼──→ Resizes images
  Worker             │  │ resizer.php    │  │    on demand
                     │  └────────────────┘  │
                     │                      │
                     │  ┌────────────────┐  │
  Media Library  ───▶│  │ r2-purge-on-   │──┼──→ Purges stale R2
  edit               │  │ update.php     │  │    objects
                     │  └────────────────┘  │
                     └─────────────────────┘
This is a must-use plugin (mu-plugin), meaning it sits in wp-content/mu-plugins/ and loads automatically. No activation needed. No deactivation possible. That’s intentional. You don’t want someone accidentally disabling your CDN rewrite and suddenly serving all assets from origin.
The mu-plugin hooks into several WordPress filters to catch every type of asset URL. The full production code is in the wordpress-r2-offload repo. Here’s the core rewrite function:
<?php
/**
 * Plugin Name: R2 CDN URL Rewriter (MU)
 * Description: Rewrites local static asset URLs to your R2 CDN subdomain.
 *
 * Drop this file into wp-content/mu-plugins/
 * Define in wp-config.php: define( 'R2_CDN_BASE', 'https://r2.example.com' );
 *
 * Full source: https://github.com/wpgaurav/wordpress-r2-offload
 */

function gt_r2_cdn_rewrite_url( $url ) {
    $cdn_base = defined( 'R2_CDN_BASE' ) ? rtrim( R2_CDN_BASE, '/' ) : '';

    if ( '' === $cdn_base || ! is_string( $url ) || '' === $url ) {
        return $url;
    }

    // Already rewritten.
    if ( 0 === strpos( $url, $cdn_base ) ) {
        return $url;
    }

    $parts = wp_parse_url( $url );
    if ( false === $parts || empty( $parts['path'] ) ) {
        return $url;
    }

    if ( ! gt_r2_cdn_is_allowed_path( $parts['path'] ) ) {
        return $url;
    }

    // Only rewrite URLs that belong to this site.
    $site_host = wp_parse_url( home_url(), PHP_URL_HOST );
    $url_host  = isset( $parts['host'] ) ? $parts['host'] : '';

    if ( '' !== $url_host && $site_host
         && strtolower( $url_host ) !== strtolower( $site_host ) ) {
        return $url;
    }

    $rebuilt = $cdn_base . $parts['path'];

    if ( isset( $parts['query'] ) && '' !== $parts['query'] ) {
        $rebuilt .= '?' . $parts['query'];
    }

    return $rebuilt;
}
Now, the hooks. Each one catches a different category of asset:
// Individual URL filters (fast path for enqueued assets).
add_filter( 'wp_get_attachment_url', 'gt_r2_cdn_rewrite_url', 99 );
add_filter( 'script_loader_src',    'gt_r2_cdn_rewrite_url', 99 );
add_filter( 'style_loader_src',     'gt_r2_cdn_rewrite_url', 99 );
add_filter( 'content_url',          'gt_r2_cdn_rewrite_url', 99 );
add_filter( 'plugins_url',          'gt_r2_cdn_rewrite_url', 99 );
add_filter( 'theme_file_uri',       'gt_r2_cdn_rewrite_url', 99 );

// Responsive image srcset.
add_filter( 'wp_calculate_image_srcset', 'gt_r2_cdn_rewrite_srcset', 99 );

// Preload and resource hint arrays.
add_filter( 'wp_preload_resources', 'gt_r2_cdn_rewrite_resource_array', 99 );
add_filter( 'wp_resource_hints',    'gt_r2_cdn_rewrite_resource_array', 99 );

// HTML content filters (catch inline URLs in rendered blocks/widgets).
add_filter( 'script_loader_tag',    'gt_r2_cdn_rewrite_content_urls', 99 );
add_filter( 'style_loader_tag',     'gt_r2_cdn_rewrite_content_urls', 99 );
add_filter( 'the_content',          'gt_r2_cdn_rewrite_content_urls', 99 );
add_filter( 'render_block',         'gt_r2_cdn_rewrite_content_urls', 99 );

// Output buffer: catch anything the filters above miss.
add_action( 'template_redirect', 'gt_r2_cdn_start_output_buffer', 0 );
There’s one more edge case. Some themes and plugins hardcode URLs in preload tags or inline styles outside the content filters. For those, I use output buffering as a catch-all:
function gt_r2_cdn_start_output_buffer() {
    if ( is_admin() || wp_doing_ajax() || wp_is_json_request() ) {
        return;
    }
    ob_start( 'gt_r2_cdn_rewrite_final_html' );
}
add_action( 'template_redirect', 'gt_r2_cdn_start_output_buffer', 0 );Name your mu-plugin file with a leading number like 00-gt-r2-cdn.php so it loads before any caching plugin that might also use output buffering.
The priority 99 on every filter matters. You want the rewrite to run last, after other plugins have finished modifying URLs. If a caching plugin or SEO plugin touches the URL first, your rewrite picks up the final version.
Testing the Rewriter
Open your site in a browser, right-click any image, and check the URL. It should start with r2.yourdomain.com instead of your origin domain. Open DevTools, go to the Network tab, and filter by images, JS, and CSS. Every static asset should be loading from the R2 subdomain.
If you see mixed origins, check which filter is missing. The most common culprit? Hardcoded URLs in theme template files. The output buffer catch-all handles most of these, but occasionally a theme will echo URLs before template_redirect fires. In that case, you’ll need to add specific filters for that theme’s hooks.
Building the Cloudflare Worker
The Worker sits between the browser and R2, handling cache logic, origin pulls, and version management.
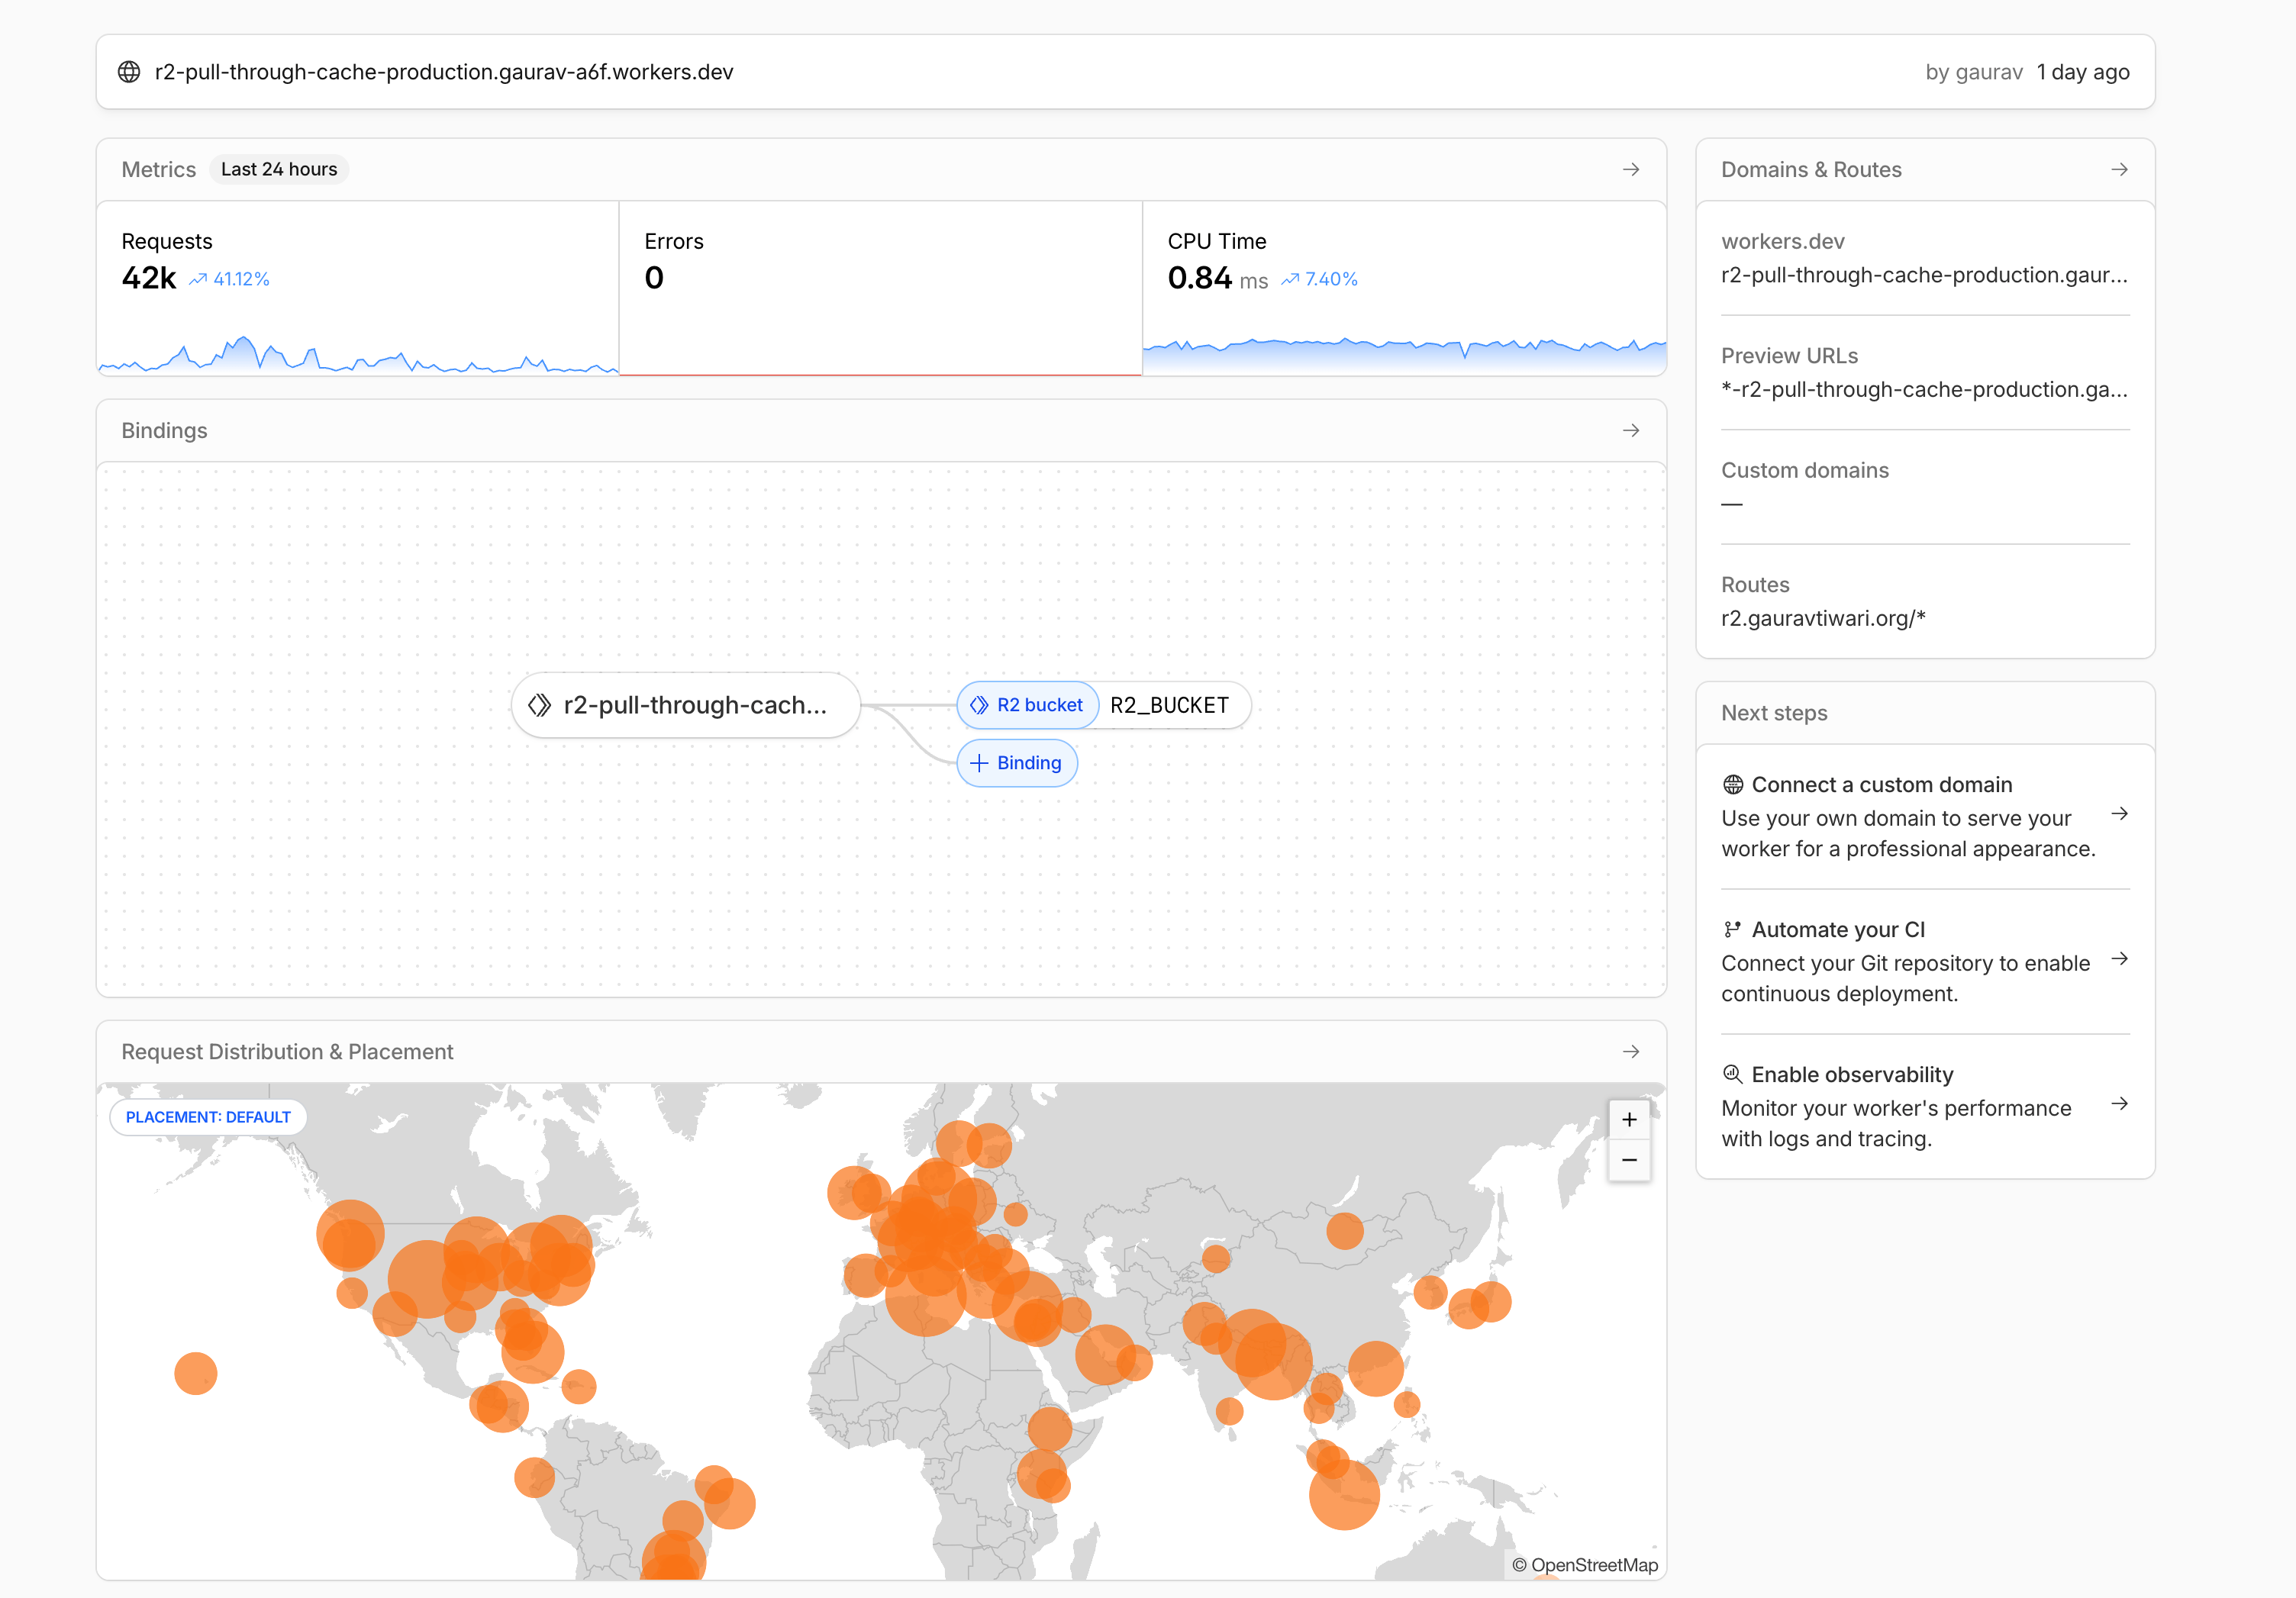
Prerequisites: A Cloudflare account (free plan works), an R2 bucket created from the Cloudflare dashboard, and Wrangler CLI installed (npm install -g wrangler).
Start with the wrangler.toml configuration. The full Worker source is in the cloudflare-r2-wordpress-cdn repo:
name = "r2-pull-through-cache"
main = "src/index.js"
compatibility_date = "2024-12-01"

[vars]
ORIGIN_HOST = "yourdomain.com"

[[r2_buckets]]
binding = "R2_BUCKET"
bucket_name = "your-bucket-name"
Now the Worker itself. I’ll walk through each piece of the logic:
export default {
  async fetch(request, env, ctx) {
    if (request.method === 'OPTIONS') {
      return new Response(null, {
        status: 204,
        headers: {
          'Access-Control-Allow-Origin': '*',
          'Access-Control-Allow-Methods': 'GET, HEAD, OPTIONS',
          'Access-Control-Allow-Headers': '*',
          'Access-Control-Max-Age': '86400',
        },
      });
    }

    const url = new URL(request.url);
    const key = url.pathname.slice(1);
    const requestedVer = url.searchParams.get('ver');
    const originBase = `https://${env.ORIGIN_HOST}`;

    // Bypass R2 for page cache paths.
    const shouldBypassR2 = key.startsWith('wp-content/cache/');

    if (!shouldBypassR2 && !isStaticPath(key)) {
      return new Response('Not a static asset path', { status: 404 });
    }

    try {
      // ── R2 lookup ──────────────────────────────────
      const object = await env.R2_BUCKET.get(key);

      if (object) {
        const cachedVer = object.customMetadata?.ver || null;

        // Version mismatch: WordPress updated the asset.
        if (requestedVer !== null && requestedVer !== cachedVer) {
          const originUrl = `${originBase}/${key}${url.search}`;
          const refreshResponse = await fetch(originUrl, { cf: { cacheTtl: 0 } });

          if (!refreshResponse.ok) {
            return new Response('File not found on origin', {
              status: refreshResponse.status,
            });
          }

          const contentType = refreshResponse.headers.get('Content-Type')
            || 'application/octet-stream';
          const refreshedBody = await refreshResponse.arrayBuffer();

          await env.R2_BUCKET.put(key, refreshedBody, {
            httpMetadata: { contentType },
            customMetadata: { ver: requestedVer },
          });

          const headers = new Headers();
          headers.set('Content-Type', contentType);
          headers.set('Cache-Control', 'public, max-age=31536000, immutable');
          headers.set('X-Cache', 'MISS-REFRESH');
          headers.set('Access-Control-Allow-Origin', '*');
          return new Response(refreshedBody, { headers });
        }

        // Cache hit.
        const headers = new Headers();
        headers.set('Content-Type',
          object.httpMetadata?.contentType || 'application/octet-stream');
        headers.set('Cache-Control', 'public, max-age=31536000, immutable');
        headers.set('X-Cache', 'HIT');
        headers.set('Access-Control-Allow-Origin', '*');
        return new Response(object.body, { headers });
      }

      // ── Cache miss: fetch from origin, store in R2 ─
      const originUrl = `${originBase}/${key}${url.search}`;
      const originResponse = await fetch(originUrl, { cf: { cacheTtl: 0 } });

      if (!originResponse.ok) {
        return new Response('File not found on origin', {
          status: originResponse.status,
        });
      }

      const contentType = originResponse.headers.get('Content-Type')
        || 'application/octet-stream';
      const body = await originResponse.arrayBuffer();

      // Store in R2 asynchronously (don't block the response).
      ctx.waitUntil(
        env.R2_BUCKET.put(key, body, {
          httpMetadata: { contentType },
          ...(requestedVer !== null
            ? { customMetadata: { ver: requestedVer } }
            : {}),
        })
      );

      const headers = new Headers();
      headers.set('Content-Type', contentType);
      headers.set('Cache-Control', 'public, max-age=31536000, immutable');
      headers.set('X-Cache', 'MISS');
      headers.set('Access-Control-Allow-Origin', '*');
      return new Response(body, { headers });

    } catch (error) {
      console.error('Worker error:', error);
      return new Response('Internal Server Error', { status: 500 });
    }
  },
};
The full Worker code above handles response building inline. Every response gets Cache-Control: public, max-age=31536000, immutable (cache for 1 year), the X-Cache debug header, and CORS headers. The ctx.waitUntil() call on cache miss is important: it stores the file in R2 after the response is sent, so the visitor doesn’t wait for the R2 write to complete.
Let me explain the X-Cache header values because they’re useful for debugging:
- HIT means the file was already in R2 and served directly. This is the fast path.
- MISS means the file wasn’t in R2, so the Worker fetched it from origin, stored it, and served it. Next request will be a HIT.
- MISS-REFRESH means the file existed in R2 but the
?ver=parameter didn’t match. The Worker fetched a fresh copy. This handles WordPress cache busting when plugins or themes update. - BYPASS means the request matched a skip pattern (cache paths, manifests) and went straight to origin.
The version check (step 4) is something I don’t see in most R2 tutorials, but it’s critical for WordPress. When you update a plugin, WordPress changes the ?ver= parameter on its scripts and styles. Without this check, R2 would keep serving the old version forever because max-age=31536000 tells browsers to cache for a year. The Worker compares the requested version against the stored metadata and forces a refresh when they don’t match.
Deploying with Wrangler
Deploy is one command:
git clone https://github.com/wpgaurav/cloudflare-r2-wordpress-cdn.git
cd cloudflare-r2-wordpress-cdn
npm install
# Edit wrangler.toml with your domain and bucket name
npx wrangler deploy
For the custom domain, go to your Cloudflare dashboard, navigate to Workers & Pages, find your Worker, and add a Custom Domain. Point it to r2.yourdomain.com. Cloudflare handles the SSL certificate automatically. The DNS record gets created for you.
One important note: don’t use a Workers Route with a wildcard pattern. Use the Custom Domain feature instead. Routes can conflict with other Cloudflare features. Custom Domains are cleaner.
On-Demand Image Resizing
WordPress generates all thumbnail sizes when you upload an image. If you have 6 registered image sizes (thumbnail, medium, medium_large, large, 1536×1536, 2048×2048), every upload creates 6 extra files. That’s fine for new uploads. But what about existing images that don’t have a newly registered size? Or sized variants that were never uploaded to R2?
The on-demand resizer fixes this. When the Worker can’t find a sized image variant in R2 or on the origin, it calls back to a resize endpoint on your WordPress site. That endpoint generates the image on the fly, streams it back, and the Worker stores it in R2 permanently.

Here’s the WordPress-side mu-plugin (full source with helper functions in the wordpress-r2-offload repo):
<?php
/**
 * Plugin Name: R2 On-Demand Image Resizer (MU)
 * Description: Generates resized image variants on-demand for the R2 Worker.
 *
 * Drop into wp-content/mu-plugins/
 * Define in wp-config.php: define( 'GT_R2_RESIZE_SECRET', 'your-secret' );
 *
 * Full source: https://github.com/wpgaurav/wordpress-r2-offload
 */

add_action( 'init', function () {
    if ( empty( $_GET['gt_r2_resize'] ) ) {
        return;
    }
    gt_r2_direct_resize_handler();
    exit;
} );

function gt_r2_direct_resize_handler() {
    // Verify shared secret from Worker.
    $expected = defined( 'GT_R2_RESIZE_SECRET' ) ? GT_R2_RESIZE_SECRET : '';
    $received = isset( $_SERVER['HTTP_X_RESIZE_SECRET'] )
        ? $_SERVER['HTTP_X_RESIZE_SECRET'] : '';

    if ( '' === $expected || ! hash_equals( $expected, $received ) ) {
        status_header( 403 );
        echo 'Forbidden';
        return;
    }

    $path   = sanitize_text_field( wp_unslash( $_GET['path'] ?? '' ) );
    $width  = absint( $_GET['w'] ?? 0 );
    $height = absint( $_GET['h'] ?? 0 );
    $path   = ltrim( $path, '/' );

    if ( empty( $path ) || $width < 1 || $height < 1
         || $width > 2560 || $height > 2560 ) {
        status_header( 400 );
        echo 'Invalid parameters';
        return;
    }

    // Try local file first, then download from R2.
    $local_file = gt_r2_resolve_local_path( $path );
    $is_temp    = false;

    if ( ! $local_file ) {
        $local_file = gt_r2_download_from_r2( $path );
        $is_temp    = true;
    }

    if ( ! $local_file || ! file_exists( $local_file ) ) {
        status_header( 404 );
        echo 'Original not found';
        return;
    }

    // Use WordPress image editor (GD or Imagick).
    $editor = wp_get_image_editor( $local_file );
    if ( is_wp_error( $editor ) ) {
        if ( $is_temp ) { @unlink( $local_file ); }
        status_header( 500 );
        echo 'Editor error: ' . $editor->get_error_message();
        return;
    }

    $ext = strtolower( pathinfo( $path, PATHINFO_EXTENSION ) );
    $editor->resize( $width, $height, true );
    $editor->set_quality( gt_r2_output_quality( $ext ) );

    $mime = [
        'jpg' => 'image/jpeg', 'jpeg' => 'image/jpeg',
        'png' => 'image/png',  'gif'  => 'image/gif',
        'webp' => 'image/webp', 'avif' => 'image/avif',
    ];

    $tmp = get_temp_dir() . wp_unique_filename( get_temp_dir(), wp_basename( $path ) );
    $saved = $editor->save( $tmp, $mime[ $ext ] ?? 'application/octet-stream' );

    if ( $is_temp ) { @unlink( $local_file ); }
    if ( is_wp_error( $saved ) ) {
        status_header( 500 );
        return;
    }

    status_header( 200 );
    header( 'Content-Type: ' . ( $mime[ $ext ] ?? 'application/octet-stream' ) );
    header( 'Content-Length: ' . filesize( $saved['path'] ) );
    header( 'Cache-Control: no-store' );
    readfile( $saved['path'] );
    @unlink( $saved['path'] );
}
All three mu-plugins need constants defined in wp-config.php. Here’s the full set:
/** Cloudflare R2 CDN — add to wp-config.php */
define( 'R2_CDN_BASE',          'https://r2.yourdomain.com' );
define( 'R2_CDN_HOST',          'r2.yourdomain.com' );
define( 'GT_R2_RESIZE_SECRET',  'your-resize-secret-here' );
define( 'R2_PURGE_SECRET',      'your-purge-secret-here' );
The Worker side of this is straightforward. When it can’t find a sized variant (like photo-800x600.jpg) in R2 or on the origin, it strips the dimensions from the filename, calls the resize endpoint with the X-Resize-Secret header, stores the result in R2, and serves it. One request, then it’s cached permanently. The full Worker code is in the cloudflare-r2-wordpress-cdn repo.
Quality Settings I Use
I’ve tested a lot of compression levels. These are my sweet spots:
- WebP: quality 82. Below 80, you start losing detail in gradients and text overlays. Above 85, the file size increase isn’t worth the barely-visible quality gain.
- AVIF: quality 72. AVIF compresses much better than WebP, so a lower quality number still produces great results. At 72, my AVIF files are typically 30-40% smaller than equivalent WebP files.
- JPEG: quality 82. Same logic as WebP. The 80-85 range is where JPEG quality and file size find their balance.
- PNG: compression level 9. PNG is lossless, so this controls compression effort, not quality. Level 9 takes slightly longer but produces the smallest files.
I didn’t arrive at these numbers randomly. I ran visual comparison tests across 200+ images from my media library, checking for artifacts on different image types: photographs, screenshots, graphics with text, and transparent PNGs. These settings produce files that are visually identical to the originals on screens up to 4K resolution.
Automatic Cache Purge
There’s a third mu-plugin I haven’t mentioned yet: r2-purge-on-update.php. It solves a problem you’ll hit the moment you replace an image in the media library or run an image optimization plugin like EWWW or ShortPixel.
The problem: R2 has no idea that the origin file changed. It still holds the old version with a 1-year cache header. Without purging, visitors see the stale image until you manually delete it from the R2 bucket.
The purge plugin hooks into wp_update_attachment_metadata and delete_attachment. Whenever WordPress updates an attachment (re-upload, optimization, regeneration), the plugin builds a list of every R2 key for that image: the original, all registered sizes, plus AVIF and WebP variants. Then it sends a PURGE request to the Worker’s /_purge endpoint.
<?php
/**
 * Plugin Name: R2 Purge on Attachment Update (MU)
 * Description: Deletes R2-cached images when attachments change.
 *
 * Drop into wp-content/mu-plugins/
 * Define in wp-config.php:
 *   define( 'R2_CDN_HOST', 'r2.yourdomain.com' );
 *   define( 'R2_PURGE_SECRET', 'your-purge-secret-here' );
 *
 * Full source: https://github.com/wpgaurav/wordpress-r2-offload
 */

function r2_purge_keys( $keys ) {
    if ( empty( $keys ) ) return;

    $cdn_host = defined( 'R2_CDN_HOST' ) ? R2_CDN_HOST : '';
    $secret   = defined( 'R2_PURGE_SECRET' ) ? R2_PURGE_SECRET : '';

    if ( '' === $cdn_host || '' === $secret ) return;

    wp_remote_request( 'https://' . $cdn_host . '/_purge', array(
        'method'  => 'PURGE',
        'timeout' => 10,
        'headers' => array(
            'Authorization' => 'Bearer ' . $secret,
            'Content-Type'  => 'application/json',
        ),
        'body' => wp_json_encode( array( 'keys' => array_values( $keys ) ) ),
    ) );
}

function r2_get_attachment_keys( $attachment_id, $metadata = null ) {
    if ( null === $metadata ) {
        $metadata = wp_get_attachment_metadata( $attachment_id );
    }
    if ( ! is_array( $metadata ) || empty( $metadata['file'] ) ) {
        return array();
    }

    $upload_dir = wp_get_upload_dir();
    $base_dir   = ltrim( str_replace( ABSPATH, '', $upload_dir['basedir'] ), '/' );
    $dir        = dirname( $metadata['file'] );
    $files      = array( $base_dir . '/' . $metadata['file'] );

    if ( ! empty( $metadata['sizes'] ) ) {
        foreach ( $metadata['sizes'] as $size ) {
            if ( ! empty( $size['file'] ) ) {
                $files[] = $base_dir . '/' . $dir . '/' . $size['file'];
            }
        }
    }

    // Add AVIF and WebP variants.
    $keys = array();
    foreach ( $files as $file ) {
        $keys[] = $file;
        $ext = strtolower( pathinfo( $file, PATHINFO_EXTENSION ) );
        if ( in_array( $ext, array( 'jpg', 'jpeg', 'png' ), true ) ) {
            $base = preg_replace( '/\.[^.]+$/', '', $file );
            $keys[] = $base . '.avif';
            $keys[] = $base . '.webp';
        }
    }

    return array_unique( $keys );
}

// Auto-purge on metadata update (upload, replace, optimize).
add_filter( 'wp_update_attachment_metadata', function( $metadata, $id ) {
    r2_purge_keys( r2_get_attachment_keys( $id, $metadata ) );
    return $metadata;
}, 99, 2 );

// Auto-purge on delete.
add_action( 'delete_attachment', function( $id ) {
    r2_purge_keys( r2_get_attachment_keys( $id ) );
} );
The plugin also includes a WP-CLI command for manual purges:
# Purge a single attachment (all sizes + variants)
wp r2-purge 1234

# Nuclear option: purge every image attachment
wp r2-purge all
I use the WP-CLI command maybe once a month when I bulk-optimize images. The rest of the time, the automatic hooks handle everything. If you’re running EWWW Image Optimizer or ShortPixel, the wp_update_attachment_metadata hook fires after every optimization pass, so the R2 cache stays in sync without any manual work.
The Migration Strategy: Lazy Is Better
The traditional approach to moving WordPress assets to object storage involves a bulk upload. You’d install a plugin like WP Offload Media, configure it to sync your uploads folder to S3 or R2, wait for it to upload thousands of files, then hope nothing breaks. I’ve done this. It’s stressful. And it often takes hours for sites with large media libraries.
My approach is different. I don’t upload anything.
The pull-through cache handles migration automatically. When a visitor requests an image, the Worker checks R2 first. If it’s not there, the Worker pulls it from the origin, stores it in R2, and serves it. The next visitor gets it straight from R2. No Worker-to-origin trip needed.
Over the first few days, R2 fills up with all the actively-used assets. The homepage images get cached on day one. Popular blog post images follow within hours. Older content that still gets organic traffic fills in over a few weeks.
And here’s the part I love… dead assets never get uploaded. That image from a 2018 blog post that gets zero traffic? It stays on your origin and never wastes R2 storage. You’re only storing what people actually request, which keeps costs proportional to real usage.
The downside? The first visitor to each uncached asset sees a slightly slower response (maybe 200-300ms extra for the origin fetch). But that happens exactly once per asset. After that, it’s edge-cached permanently. And honestly, for most sites, R2 fills up so fast that you’d never notice.
No downtime, no broken images, and no migration scripts to maintain.
Real-World Numbers
I’ve been running this setup on gauravtiwari.org since late 2025. Here’s what the numbers look like.

| Metric | Before R2 | After R2 |
|---|---|---|
| R2 storage used | N/A | ~150 GB |
| Monthly R2 bill | N/A | $0 (free tier) |
| Asset TTFB (origin) | 180-400ms | N/A |
| Asset TTFB (R2 edge) | N/A | 15-45ms |
| Cache hit rate (after 30 days) | N/A | ~98.5% |
| LCP improvement | Baseline | -0.3 to -0.8s |
| Origin bandwidth saved | 0% | ~94% |
The TTFB difference is the most noticeable. Going from 180-400ms (depending on server load and geographic distance) to 15-45ms for every image, stylesheet, and font file makes a real difference in how fast pages feel.
My server setup is already pretty fast. Hetzner dedicated box, CloudPanel, LiteSpeed, Redis. But no origin server, no matter how fast, can beat an edge network with 300+ locations. The file is physically closer to the user, so it arrives faster.
The LCP improvement varies by page. Image-heavy pages saw the biggest gains, sometimes 0.8 seconds faster. Text-heavy pages with fewer assets saw smaller improvements, around 0.3 seconds. But every tenth of a second matters for Core Web Vitals. And once you start optimizing WordPress performance at this level, those fractional improvements compound.
My R2 cache hit rate stabilized at about 98.5% after the first month. That means only 1.5% of requests need an origin fetch. And most of those are first-time hits on old content that someone found through search. The Worker handles them transparently.
Common Issues and Fixes
I ran into all of these while building this system. Save yourself the debugging time.
- Double-encoding in URLs. If your WordPress URL contains special characters (spaces encoded as
%20, for example), the str_replace in the mu-plugin can break things. Make sure you’re comparing normalized URLs. I ran into this with a few media files that had spaces in the filename. The fix was simple: don’t rename existing files, just make sureparse_url()handles the encoding correctly before you do the replacement. - Manifest files must stay same-origin. If your site uses a web app manifest (
manifest.jsonorsite.webmanifest), don’t rewrite that URL. Browsers require it to be same-origin for PWA features. The skip pattern in the mu-plugin handles this, but double-check. - Cache busting with ?ver= parameter. This is why the version check in the Worker exists. Without it, updating a plugin would leave the old version of its CSS/JS in R2 forever (or at least until the
immutablecache expired in the browser, which is… a year). The Worker compares the?ver=value against stored metadata and re-fetches when they differ. - Mixed content. If your origin is HTTPS (it should be), make sure your R2 custom domain also uses HTTPS. Cloudflare handles this automatically with Custom Domains, but if you’re using a Workers Route with a subdomain, verify the SSL certificate is active.
- Font CORS. Browsers enforce CORS for web fonts loaded cross-origin. The Worker’s
Access-Control-Allow-Origin: *header handles this. If you’re still seeing CORS errors on fonts, check that your origin isn’t also sending conflicting CORS headers. Two differentAccess-Control-Allow-Originheaders in the same response will cause browsers to reject the request. - Output buffering conflicts. Some plugins (especially caching plugins and page builders) use output buffering too. If the R2 rewrite isn’t working on certain parts of the page, it might be an OB conflict. The fix is usually adjusting the priority of your
template_redirecthook. I use priority 1 (very early) to start buffering before other plugins. - Admin panel exclusion. The mu-plugin returns early on
is_admin(). Don’t skip this check. The WordPress admin needs same-origin URLs for media uploads, editor previews, and AJAX requests. Rewriting admin URLs to R2 breaks things in subtle, annoying ways.
Is This Setup Right for You?
Before going down this road, make sure your base WordPress performance is solid. My Perfmatters review covers the script management side, and the image compression guide handles pre-upload optimization. R2 handles delivery, but garbage in means garbage out.
This is a custom solution. It’s not a one-click plugin. You need to be comfortable with Cloudflare Workers, mu-plugins, and basic debugging.
Good Fit
- 1,000+ images in media library
- 50,000+ monthly pageviews
- Already using Cloudflare for DNS
- Want lowest possible asset delivery cost
- Comfortable with Workers and mu-plugins
Overkill If
- Under 10,000 monthly visits
- Fewer than a few hundred images
- Don’t want to touch code or Workers
For simpler needs? A CDN pull zone from BunnyCDN or Cloudflare’s built-in CDN (just flip the orange cloud on) works fine. BunnyCDN costs about $1/month for most WordPress sites. It won’t give you the on-demand resize or pull-through caching, but for straightforward asset delivery, it gets the job done.
The difference is control. With this R2 setup, I control every header, every cache rule, every fallback behavior. If I want to add AVIF auto-conversion tomorrow, I add a few lines to the Worker. If I want to purge a single asset, I delete it from the R2 bucket and the Worker re-fetches it. That kind of flexibility matters when you’re running a site at scale and performance is part of your brand.
Frequently Asked Questions
How much does Cloudflare R2 actually cost for a WordPress site?
My R2 bill is $0/month. R2 has a free tier that includes 10 GB of storage, 10 million Class B (read) operations, and 1 million Class A (write) operations per month. Bandwidth egress is always free, no matter how much traffic you serve. If your cached assets stay under 10 GB, you pay nothing. Above the free tier, storage is $0.015/GB/month. A site with 50 GB of cached assets would pay $0.75/month. Even at 150 GB, that’s $2.25/month. Compare that to Amazon S3 at $0.09/GB for egress alone.
Do I need to bulk-upload my existing WordPress media to R2?
No. The pull-through cache handles migration automatically. When a visitor requests an image, the Cloudflare Worker checks R2 first. If it’s not there, the Worker fetches it from your origin, stores it in R2, and serves it. Next request is an R2 hit. Your bucket fills itself over days as real traffic flows. High-traffic assets get cached first, which is exactly what you want. Dead assets that nobody visits never waste R2 storage.
Will this setup break my WordPress Media Library?
No. The mu-plugin rewrites asset URLs at the output layer only. WordPress still thinks files live on your server. You upload images through the standard Media Library, edit them normally, and delete them normally. The rewrite only affects what the visitor’s browser sees. The admin panel is excluded entirely.
What’s the difference between Cloudflare R2 and using a traditional CDN like BunnyCDN?
The key difference is egress pricing. BunnyCDN charges around $0.01/GB for bandwidth, which is already cheap. R2 charges nothing for egress. For high-traffic sites serving lots of images, that adds up fast. R2 also lets you put a Cloudflare Worker in front of the bucket for custom cache logic, version-aware invalidation, on-demand image resizing, and automatic cache purging. Standalone CDNs can’t match that level of control.
Does this work with any WordPress host?
Yes. The mu-plugins run on any WordPress installation. The Cloudflare Worker handles requests at the edge. As long as your domain uses Cloudflare for DNS (free plan is fine), you can plug this in on shared hosting, VPS, or managed WordPress hosting. I run it on a Hetzner dedicated server with CloudPanel and LiteSpeed, but the architecture is host-agnostic.
What happens when I update a plugin or theme? Will R2 serve stale CSS/JS?
No, because the Worker handles version-aware invalidation. WordPress appends a ?ver= parameter to enqueued scripts and styles. When you update a plugin, the ?ver= value changes. The Worker compares the requested version against the version stored in R2 metadata. If they don’t match, the Worker fetches a fresh copy from the origin, updates R2, and serves the new version. No manual purging needed.
How do I purge a specific file from R2?
Three ways. First, the r2-purge-on-update.php mu-plugin automatically purges when you replace or optimize an image in WordPress. Second, use the WP-CLI command: wp r2-purge 1234 (where 1234 is the attachment ID) purges that image and all its size variants plus AVIF/WebP copies. Third, you can delete the object directly from the R2 bucket in the Cloudflare dashboard. The next request will trigger a fresh pull from the origin.
Can I use this alongside WP Offload Media or another S3 plugin?
You shouldn’t. WP Offload Media and similar plugins upload files to S3/R2 at upload time and rewrite URLs themselves. This setup takes the opposite approach: files stay on your origin, and the Cloudflare Worker pulls them to R2 on demand. Running both would create conflicts since two plugins would be competing to rewrite the same URLs. Pick one approach. The pull-through cache is simpler and doesn’t require a running sync process.
Is the Cloudflare free plan enough, or do I need a paid plan?
The free plan works. Cloudflare Workers has a free tier of 100,000 requests per day, and R2’s free tier covers 10 GB storage with 10 million reads per month. For most WordPress sites, that’s more than enough. If you exceed the Workers free tier (unlikely for a content site), the Workers Paid plan is $5/month for 10 million requests. R2 storage above 10 GB is $0.015/GB. You can start completely free and only pay when you outgrow the limits.
What happens if Cloudflare goes down? Do my images break?
If the Cloudflare Worker or R2 is unreachable, the browser gets an error for that specific asset. The origin is still running with all files intact, but the URL rewriter points to the R2 subdomain. In practice, Cloudflare’s uptime across 300+ data centers is extremely high. I’ve been running this for months and haven’t had a single R2-caused outage. If you’re worried, you could add a JavaScript fallback that retries from the origin on error, but I haven’t needed it.
I’ve been running this exact setup on gauravtiwari.org since late 2025. It handles every image, every stylesheet, every font file. I haven’t had a single R2-caused outage, sync issue, or surprise bill. The total cost? $0/month, thanks to R2’s free tier.
If you’re serious about WordPress performance, asset delivery compounds across every page. Faster images improve LCP, which improves Core Web Vitals, which gives you a small ranking boost on every URL. Multiply that across hundreds of pages and the impact is real.
Get the Code and Full Setup Steps
I’ve open-sourced everything. Both repos are production-ready, sanitized (no credentials, no hardcoded domains), and documented. Here’s the exact sequence to go from zero to serving assets from R2.
Step 1: Create the R2 Bucket
In your Cloudflare dashboard, go to R2 Object Storage and create a new bucket. Name it something like wordpress-yourdomain. Region doesn’t matter much since Cloudflare replicates globally, but pick the one closest to your origin server if prompted.
Or use Wrangler from the terminal:
npx wrangler r2 bucket create wordpress-yourdomainStep 2: Deploy the Cloudflare Worker
git clone https://github.com/wpgaurav/cloudflare-r2-wordpress-cdn.git
cd cloudflare-r2-wordpress-cdn
npm install
Edit wrangler.toml with your values:
[vars]
ORIGIN_HOST = "yourdomain.com"

[[r2_buckets]]
binding = "R2_BUCKET"
bucket_name = "wordpress-yourdomain"
Deploy:
npx wrangler deployThen add a custom domain in the Cloudflare dashboard: Workers & Pages → your worker → Settings → Domains & Routes → Add Custom Domain. Point it to r2.yourdomain.com. Cloudflare handles the DNS record and SSL certificate automatically.
Step 3: Install the WordPress mu-plugins
git clone https://github.com/wpgaurav/wordpress-r2-offload.git
scp wordpress-r2-offload/*.php \
  user@server:/var/www/yourdomain.com/wp-content/mu-plugins/
That copies all three files: gt-r2-cdn.php (URL rewriter), gt-r2-image-resizer.php (on-demand resize), and r2-purge-on-update.php (cache purge).
Step 4: Add Constants to wp-config.php
/** Cloudflare R2 CDN */
define( 'R2_CDN_BASE',          'https://r2.yourdomain.com' );
define( 'R2_CDN_HOST',          'r2.yourdomain.com' );
define( 'GT_R2_RESIZE_SECRET',  'your-resize-secret-here' );
define( 'R2_PURGE_SECRET',      'your-purge-secret-here' );
Generate the secrets with openssl rand -hex 24 or any random string generator. These secrets authenticate requests between the Worker and your WordPress site. Anyone who knows the resize secret can generate images on your server, so treat it like a password.
Here’s what each constant does:
| Constant | Used by | What it does |
|---|---|---|
R2_CDN_BASE | URL rewriter, image resizer | Full CDN URL with protocol (https://r2.yourdomain.com) |
R2_CDN_HOST | Cache purge | CDN hostname only, no protocol (r2.yourdomain.com) |
GT_R2_RESIZE_SECRET | Image resizer | Shared secret sent in X-Resize-Secret header |
R2_PURGE_SECRET | Cache purge | Bearer token for the Worker’s /_purge endpoint |
Step 5: Test It
Clear your page cache. Open your site in a browser, right-click any image, and check the URL. It should start with r2.yourdomain.com.
Open DevTools and check the X-Cache response header. First load will show MISS (Worker fetched from origin and stored in R2). Refresh and it should say HIT. That’s it. Your R2 bucket is filling itself.
Check fonts, CSS, and JS files too. Filter the Network tab by type and verify everything static loads from r2.yourdomain.com. If something is still loading from the origin, check the allowed extensions list in the mu-plugin.
Two repos, everything you need:
- cloudflare-r2-wordpress-cdn — The Cloudflare Worker. Pull-through cache with version-aware invalidation, CORS headers, and origin bypass for page cache paths.
- wordpress-r2-offload — Three WordPress mu-plugins: URL rewriter, on-demand image resizer, and R2 cache purge with WP-CLI support.
This is production code. I’m running it on this site right now. Clone the repos, change yourdomain.com to your domain, deploy, and your R2 bucket fills itself while your origin server takes a break. PRs are open if you want to extend it.