Guides on How to Restore iPhone
Your iPhone is stuck on the Apple logo. Or you forgot your passcode. Or an iOS update went wrong and now you’re staring at a black screen. I’ve been through all of these scenarios, and the fix is almost always the same: a full restore. This guide covers everything you need to know about restoring any iPhone model, from the latest iPhone 16 series all the way back to iPhone 7. I’ll also walk you through backup methods, data recovery options, and common troubleshooting steps.
Before You Restore: Backup Your iPhone
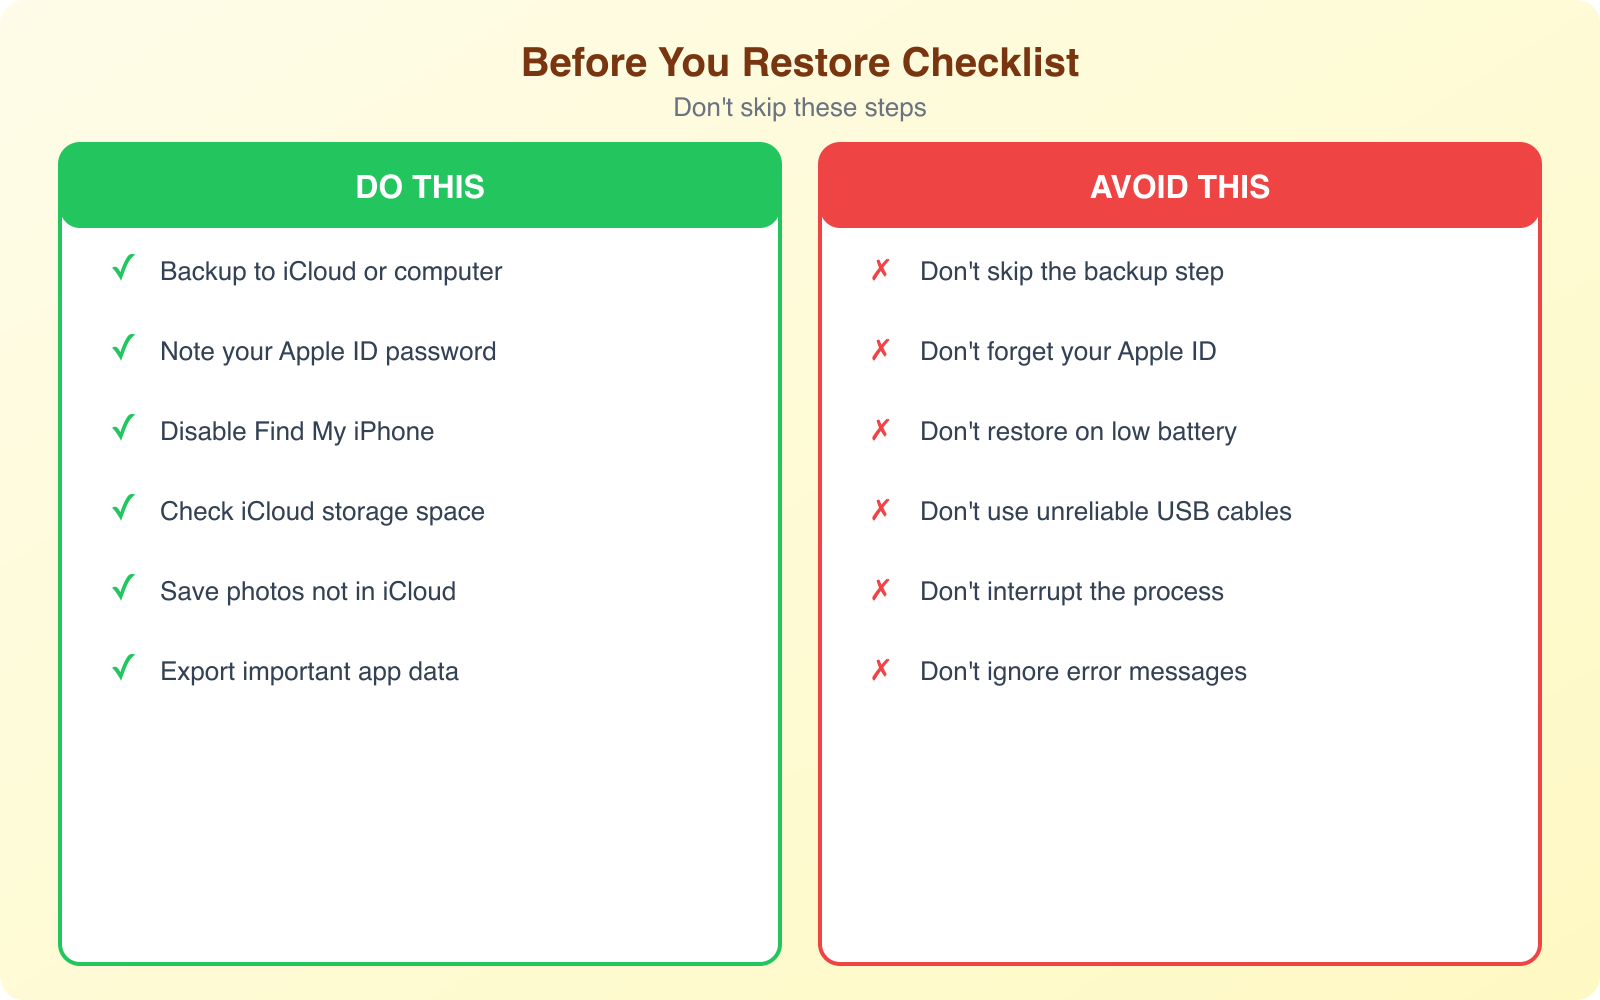
Restoring your iPhone erases everything. Photos, messages, apps, settings, all gone. Before you touch the restore button, make sure your data is backed up. You have two main options.
iCloud Backup: Go to Settings > [Your Name] > iCloud > iCloud Backup and tap “Back Up Now.” This saves your data to Apple’s cloud servers. You get 5GB free, which isn’t enough for most people. The 50GB plan costs $0.99/month and is worth every penny for the peace of mind alone. iCloud backups happen automatically when your iPhone is charging, locked, and connected to Wi-Fi.
Finder/iTunes Backup: Connect your iPhone to a Mac (using Finder) or Windows PC (using iTunes) via USB cable. Select your device, then click “Back Up Now.” This creates a complete backup on your computer’s hard drive. I recommend checking “Encrypt local backup” since this also saves your passwords, Health data, and Wi-Fi settings. Without encryption, those sensitive categories aren’t included.
Always do both an iCloud backup AND a local Finder/iTunes backup before restoring. If one backup fails or gets corrupted, you have the other as a safety net. This has saved me multiple times when an iCloud backup turned out to be incomplete.
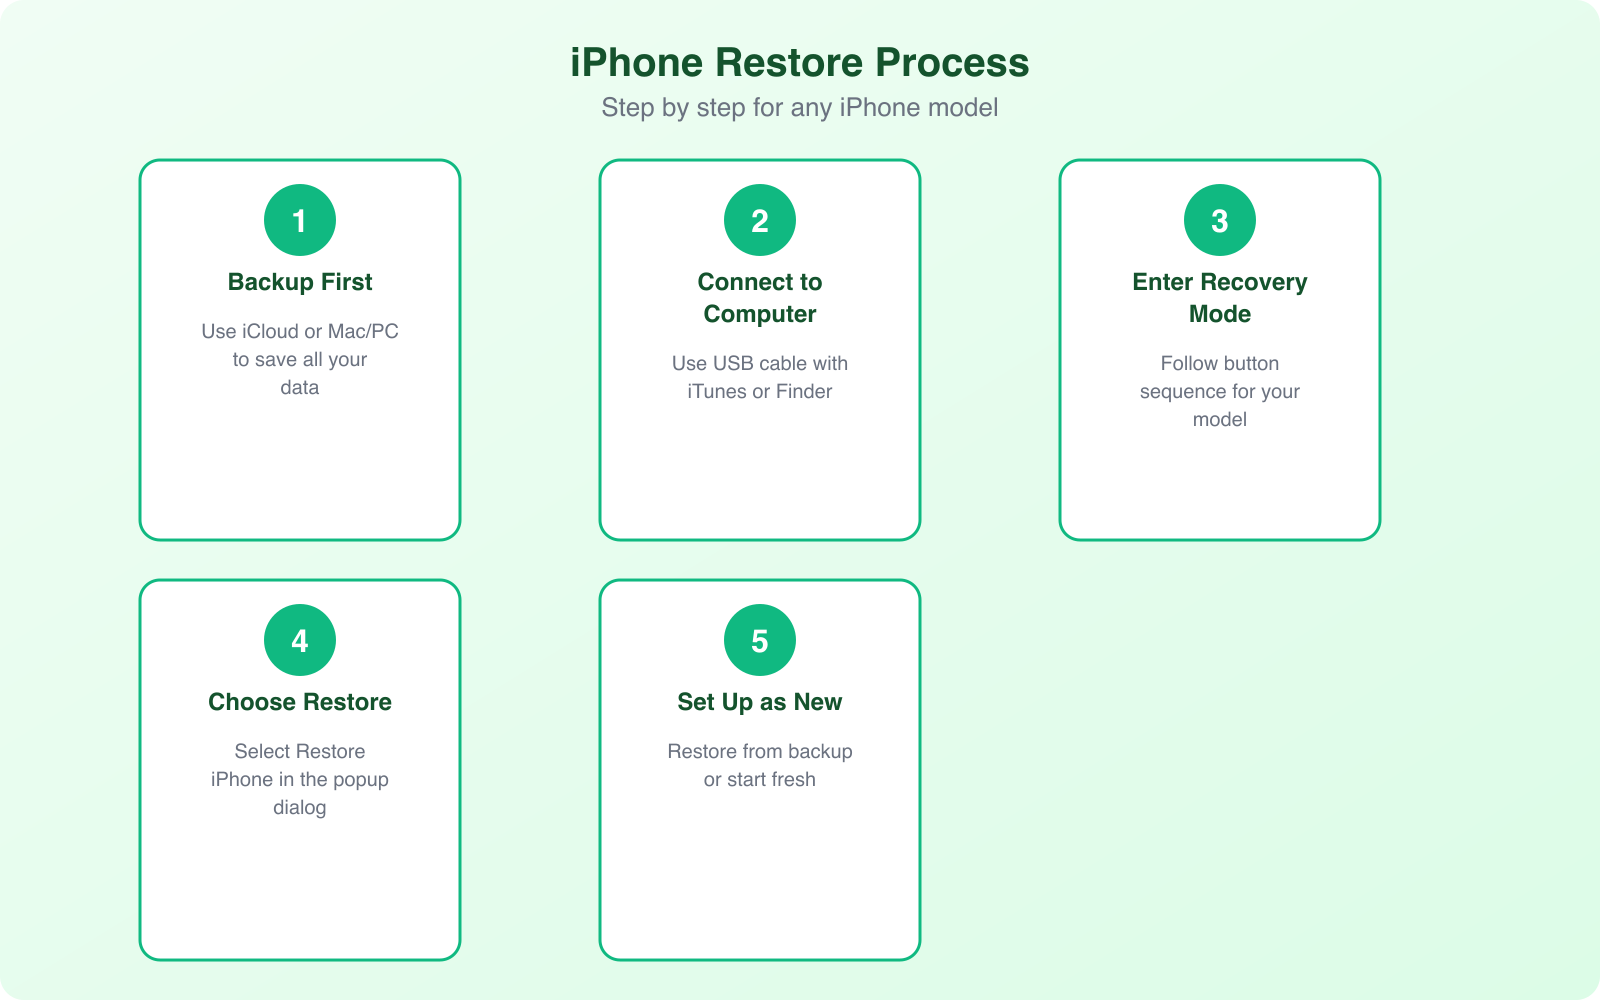
How to Restore iPhone 16, 15, 14, and 13
All modern iPhones (iPhone 8 and later, including the entire 13, 14, 15, and 16 lineup) use the same restore process. Here are the exact steps:
Step 1: Make sure you have the latest version of Finder (macOS Catalina or later) or iTunes (Windows). Update your computer’s operating system if needed.
Step 2: Connect your iPhone to your computer using a USB cable. Use the cable that came with your iPhone or a certified Apple cable. Third-party cables sometimes don’t work for recovery mode.
Step 3: Put your iPhone into recovery mode with this button sequence:
- Press and quickly release the Volume Up button
- Press and quickly release the Volume Down button
- Press and hold the Side button until you see the recovery mode screen (a cable pointing to a computer icon)
Step 4: Your computer will detect the iPhone in recovery mode. Finder or iTunes will show a dialog asking whether you want to Update or Restore. Choose Restore. This downloads the latest iOS version and installs it on your device.
Step 5: Wait for the process to complete. Depending on your internet speed, this can take 15-45 minutes. Don’t disconnect your iPhone during this time. When it’s done, you’ll see the iPhone setup screen.
Step 6: Set up your iPhone as new, or restore from your iCloud or Finder/iTunes backup.
How to Restore iPhone 12, 11, X, and 8
The process is identical to the iPhone 13-16 series. These models all use Face ID (except iPhone 8) and have the same button layout. Follow the exact same steps above: Volume Up, Volume Down, then hold Side button until recovery mode appears.
iPhone 8 and 8 Plus use Touch ID but have the same button sequence for recovery mode as newer models. Apple standardized the recovery mode process starting with iPhone 8.
How to Restore iPhone 7 and 7 Plus
The iPhone 7 series uses a different button combination because it has a non-mechanical home button. Here’s the process:
Step 1: Connect your iPhone 7 to your computer and open Finder or iTunes.
Step 2: Press and hold the Volume Down button AND the Side (Power) button at the same time.
Step 3: Keep holding both buttons until the recovery mode screen appears (cable pointing to computer icon).
Step 4: Choose Restore in Finder/iTunes and wait for the process to complete.
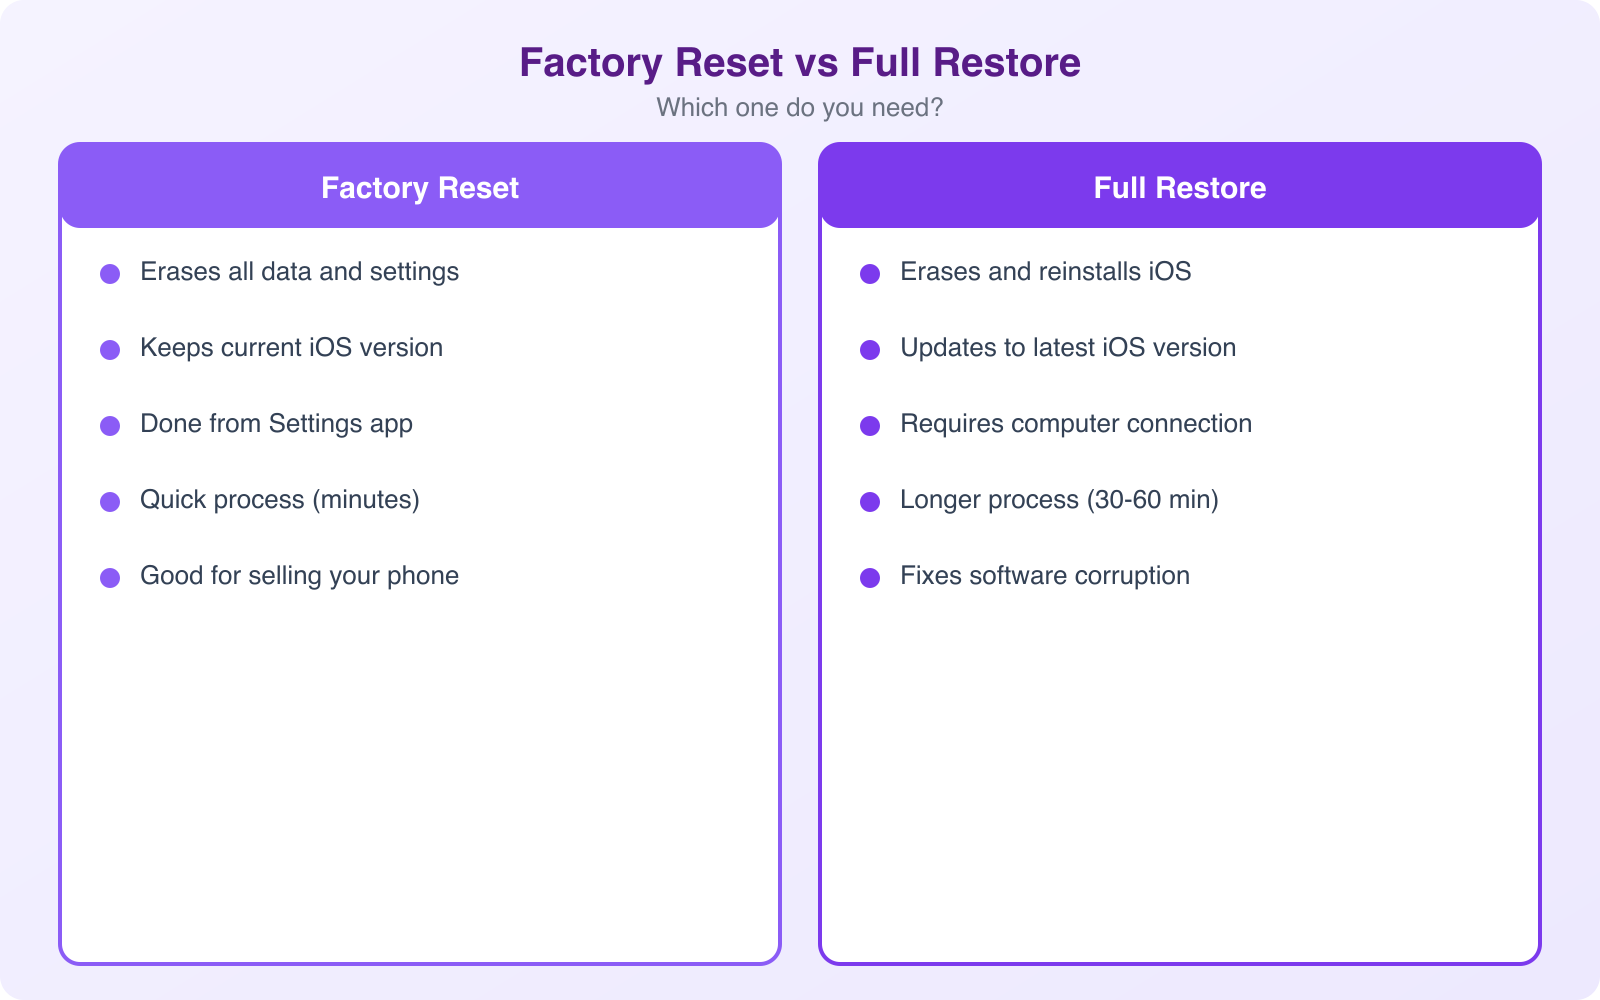
Factory Reset vs. Full Restore: Which Do You Need?
These are two different things, and choosing the wrong one wastes time.
Factory Reset (Settings menu): Erases all your content and settings but keeps the current iOS version. Do this when your iPhone is working fine but you want to start fresh, sell it, or fix performance issues. Go to Settings > General > Transfer or Reset iPhone > Erase All Content and Settings.
Full Restore (Computer): Completely reinstalls iOS from scratch. This is what you need when your iPhone won’t boot, is stuck on the Apple logo, has a corrupt operating system, or you’ve forgotten your passcode. This requires a computer and USB cable.
If your iPhone is functional enough to access Settings, try the factory reset first. It’s faster and doesn’t require a computer. Only use the full restore when the iPhone isn’t responding normally.
DFU Mode: When Recovery Mode Doesn’t Work
If recovery mode fails, DFU (Device Firmware Update) mode is the nuclear option. It lets your computer communicate with your iPhone without loading the operating system, which means it can fix problems that recovery mode can’t.
To enter DFU mode on iPhone 8 and later:
- Connect your iPhone to your computer
- Press and quickly release Volume Up
- Press and quickly release Volume Down
- Press and hold the Side button for 10 seconds
- While still holding the Side button, press and hold the Volume Down button for 5 seconds
- Release the Side button but keep holding Volume Down for 10 more seconds
If done correctly, your iPhone screen stays completely black (no Apple logo, no recovery mode icon) and Finder/iTunes will say it detected an iPhone in recovery mode. That’s DFU mode.
The DFU mode button timing is tricky and often takes 2-3 attempts to get right. If you see the Apple logo, you’ve held the Side button too long. Start over. The screen must remain completely black for DFU mode to work.
Data Recovery After a Restore
If you restored without backing up first (or your backup is incomplete), not all hope is lost. Here are your options for recovering data:
iCloud data sync: Many types of data sync independently of backups. Photos (if iCloud Photos is enabled), contacts, calendars, notes, reminders, and Safari bookmarks may still be in your iCloud account. Sign into iCloud on your restored iPhone and wait for sync to complete.
Recently Deleted folder: Photos and notes have a “Recently Deleted” folder that keeps items for 30 days. Check there immediately after restoring.
App-specific backups: WhatsApp, Signal, and many other apps have their own backup systems. Check each app’s settings for restoration options.
Third-party recovery software: Tools like iMobie PhoneRescue or Tenorshare UltData can sometimes recover data from iTunes backups or directly from the device. Results vary, and these tools typically cost $30-80. They’re worth trying if you’ve lost important data with no other recovery path.
Fixing iPhone Invalid SIM Problem
If your iPhone shows “Invalid SIM” or “No SIM” after a restore, try these fixes in order:
- Toggle Airplane Mode: Turn it on, wait 10 seconds, turn it off. This forces the SIM to reconnect
- Reboot your iPhone: A simple restart often resolves SIM detection issues after a restore
- Remove and reinsert the SIM: Use the SIM ejector tool, pull the SIM tray out, clean the SIM card gently, and reinsert it
- Check for carrier settings update: Go to Settings > General > About. If an update is available, a popup will appear
- Reset Network Settings: Go to Settings > General > Transfer or Reset iPhone > Reset > Reset Network Settings
If none of these work, contact your carrier. The SIM may need to be replaced, especially if it’s more than a few years old.
Troubleshooting Common Restore Problems
Here are the most common issues people run into during the restore process:
“iPhone could not be restored” error: Usually caused by a poor USB connection. Try a different cable, a different USB port, or a different computer. Also make sure Finder/iTunes is fully updated.
Restore takes forever or freezes: Large iOS downloads can take time on slow connections. If the progress bar hasn’t moved in over an hour, disconnect, restart both devices, and try again. Using a wired ethernet connection instead of Wi-Fi can speed things up significantly.
iPhone stuck in recovery mode loop: If your iPhone keeps going back to recovery mode after restore, try DFU mode instead. If DFU mode also fails, the issue might be hardware-related (battery, logic board) and you’ll need to visit an Apple Store or authorized repair center.
Activation Lock after restore: If the iPhone asks for a previous owner’s Apple ID, it’s Activation Locked. You’ll need the original owner to remove the device from their Apple ID account. Apple Support cannot bypass this for you without proof of purchase.
The restore process works the same way regardless of whether you’re running the latest iOS or an older version. Apple has kept the recovery mode process consistent for years. If you follow the steps above carefully and backup your data first, you should be able to restore any iPhone successfully.
Frequently Asked Questions
Will restoring my iPhone delete everything?
Yes, a full restore erases all data, settings, and content from your iPhone and reinstalls the operating system from scratch. That’s why backing up is critical before you start. A factory reset through Settings also erases everything but keeps the current iOS version. Either way, you’ll lose any data not backed up to iCloud or your computer. Always verify your backup completed successfully before restoring.
How long does an iPhone restore take?
A typical iPhone restore takes 15-45 minutes depending on your internet speed and the iPhone model. Downloading the iOS firmware is usually the longest part. The actual restore process (erasing and reinstalling) takes 10-20 minutes. Restoring from a backup afterward adds another 15-60 minutes depending on how much data you have. Don’t disconnect your iPhone during the process, and make sure your computer or iPhone has sufficient battery.
Can I restore my iPhone without a computer?
You can do a factory reset directly from your iPhone through Settings > General > Transfer or Reset iPhone > Erase All Content and Settings. However, a full restore that reinstalls iOS requires a computer with iTunes (Windows) or Finder (Mac). If your iPhone is stuck or unresponsive, you’ll need a computer to enter recovery mode and perform the restore. iCloud can reset your device remotely via Find My iPhone, but that’s technically a remote erase, not a full iOS restore.
What’s the difference between Update and Restore in recovery mode?
Update reinstalls iOS while keeping all your data, apps, and settings intact. It’s the safer option when your iPhone is having software issues. Restore completely wipes your iPhone and installs a fresh copy of iOS. Choose Update first if your iPhone is responsive but acting buggy. Choose Restore only if Update didn’t fix the problem or if you’re selling or giving away the device. Always try Update before Restore since it preserves your data.
My iPhone won’t enter recovery mode. What should I do?
The button sequence varies by model. For iPhone 8 and later, quickly press volume up, then volume down, then hold the side button until you see the recovery mode screen. For iPhone 7, hold volume down and the side button simultaneously. If it still doesn’t work, make sure you’re using a working cable (try a different one), update iTunes or Finder to the latest version, and restart your computer. In rare cases, a hardware issue like a faulty button may prevent recovery mode, and you’ll need to visit an Apple Store.