You need two things to work with LaTeX: a TeX distribution (the compiler and packages) and a text editor. This chapter walks through every option, from zero-install cloud editors to full local setups, and ends with your first compiled document.
Option 1: Overleaf (No Installation)
If you want to start writing in the next sixty seconds, use Overleaf.
- Go to https://www.overleaf.com and create a free account.
- Click New Project > Blank Project.
- Type your content in the left panel. Click Recompile. The PDF appears on the right.
Overleaf Pros and Cons
Advantages
- Zero installation
- Real-time collaboration (like Google Docs)
- Hundreds of templates
- Automatic package installation
- Git integration (paid plan)
- Works on any device with a browser
Limitations
- Requires internet connection
- Free plan: 20-second compile timeout
- Limited to
pdflatexon free plan - Can’t use system fonts (
xelatexlimited) - Single-project view
- Vendor lock-in risk
Tip: Overleaf is excellent for getting started and for collaborative papers. But for a thesis or book, a local installation gives you more control, faster compilation, and offline access.
Option 2: Full Local Installation
A local installation gives you complete control. The three major distributions:
TeX Live (Linux, macOS, Windows)
TeX Live is the standard cross-platform distribution. It includes everything: engines, packages, fonts, and documentation.
# Linux (Debian/Ubuntu)
sudo apt install texlive-full

# Linux (Fedora)
sudo dnf install texlive-scheme-full

# macOS (via Homebrew — installs MacTeX)
brew install --cask mactex

# Windows — download installer from:
# https://tug.org/texlive/
Warning: The full TeX Live installation is large (4–7 GB). If disk space is tight, install
texlive-baseand add packages as needed withtlmgr install <package>. But for students, the full install avoids “package not found” errors that waste hours of debugging.
MacTeX (macOS)
MacTeX is TeX Live repackaged for macOS with additional GUI tools:
- TeXShop — a native macOS editor with built-in PDF preview.
- BibDesk — bibliography management.
- LaTeXiT — equation editor for drag-and-drop into Keynote/Pages.
- TeX Live Utility — GUI for managing packages.
Download from https://tug.org/mactex/. The installer handles everything.
MiKTeX (Windows)
MiKTeX’s distinguishing feature is on-the-fly package installation. When you use a package for the first time, MiKTeX downloads it automatically. This means you can start with a minimal install and grow as needed.
Download from https://miktex.org.
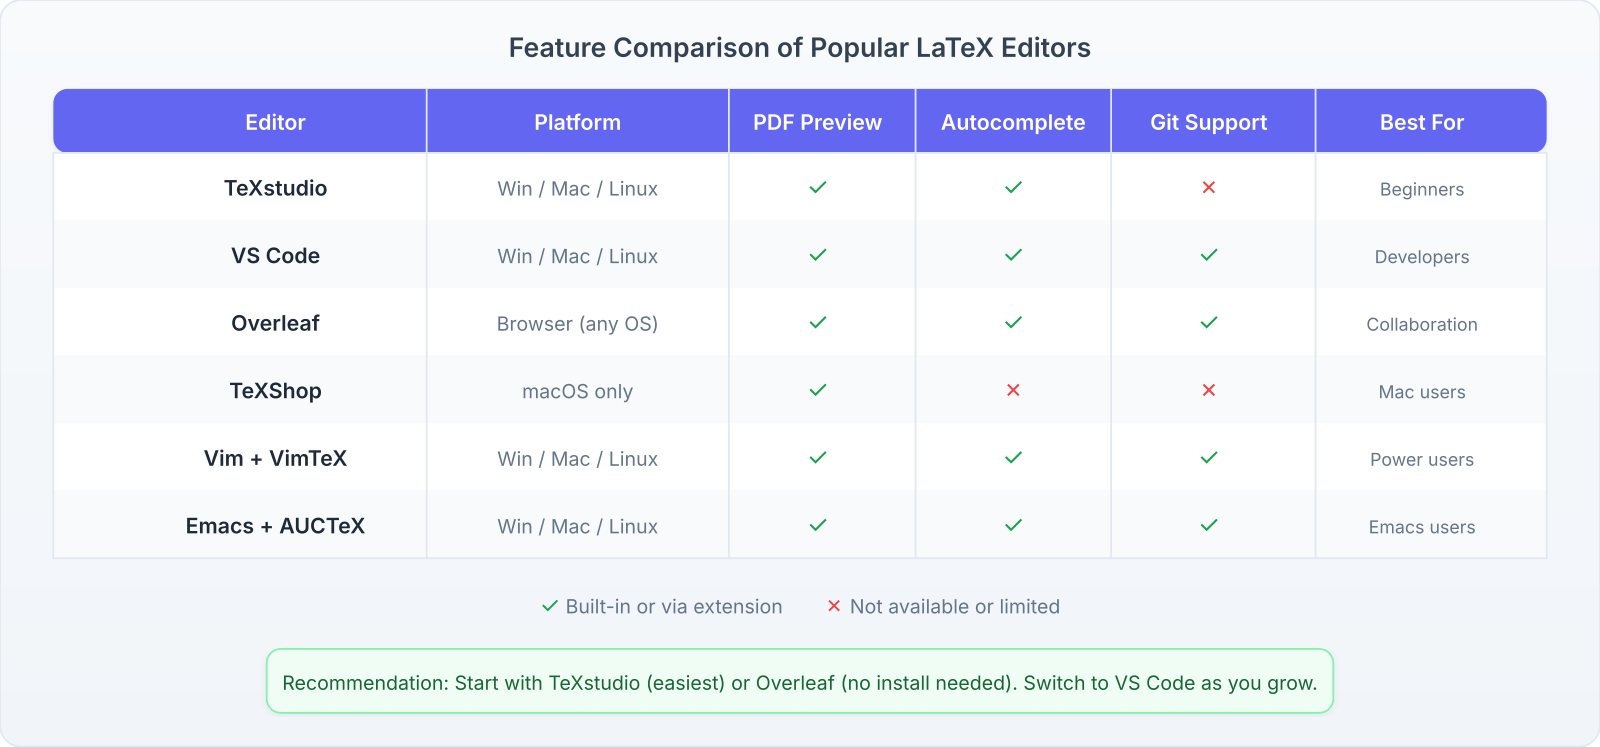
Choosing an Editor
The TeX distribution is the engine; the editor is where you drive. Here are the major options:
VS Code + LaTeX Workshop
The most popular choice for students who already use VS Code.
- Install VS Code from https://code.visualstudio.com.
- Open Extensions (Ctrl/Cmd + Shift + X).
- Search for “LaTeX Workshop” by James Yu. Install it.
- Open a
.texfile. The extension detects it automatically. - Press Ctrl/Cmd + Alt + B to build, or save (auto-build is on by default).
VS Code + LaTeX Workshop Shortcuts
- Shortcut: Ctrl/Cmd + Alt + B | Action: Build PDF
- Shortcut: Ctrl/Cmd + Alt + V | Action: View PDF
- Shortcut: Ctrl/Cmd + Alt + J | Action: SyncTeX forward (jump to PDF location)
- Shortcut: Click in PDF | Action: SyncTeX inverse (jump to source)
To usexelatex(which this book requires), add to your VS Codesettings.json:
{
  "latex-workshop.latex.tools": [{
    "name": "xelatex",
    "command": "xelatex",
    "args": ["-synctex=1", "-interaction=nonstopmode",
             "-file-line-error", "%DOC%"]
  }],
  "latex-workshop.latex.recipes": [{
    "name": "xelatex",
    "tools": ["xelatex"]
  }]
}
TeXShop (macOS)
If you installed MacTeX, TeXShop is already on your system. It’s simple, fast, and native to macOS. The PDF viewer is built in and supports SyncTeX. Many macOS users prefer it for its simplicity.
TeXShop Shortcuts
- Shortcut: Cmd + T | Action: Typeset (compile)
- Shortcut: Cmd + click in PDF | Action: Jump to source
- Shortcut: Cmd + click in source | Action: Jump to PDF
To usexelatexin TeXShop: go to TeXShop > Preferences > Engine, and set the default engine toxelatex.
TeXstudio (Cross-platform)
A dedicated LaTeX IDE with auto-completion, integrated PDF viewer, and error highlighting. Good for students who want an all-in-one solution without configuring VS Code.
Download from https://www.texstudio.org.
Vim/Neovim with VimTeX
For terminal enthusiasts. The VimTeX plugin provides compilation, PDF viewing, and motion commands for LaTeX structures. Not recommended for beginners, but extremely efficient once mastered.
Your First Document
Create a file called hello.tex with this content:
\documentclass{article}
\begin{document}

Hello, world!

This is my first
\LaTeX{} document.

The quadratic formula:
<!--M1-->

\end{document}
This produces:
Hello, world!
This is my first LaTeX document.
The quadratic formula:
$$ x = \frac{-b \pm \sqrt{b^2 – 4ac}}{2a} $$
Compile it:
xelatex hello.texIf compilation succeeds, you’ll see hello.pdf in the same directory. Open it. You’ve just created your first LaTeX document.
The Compilation Pipeline
When you run xelatex hello.tex, several things happen:
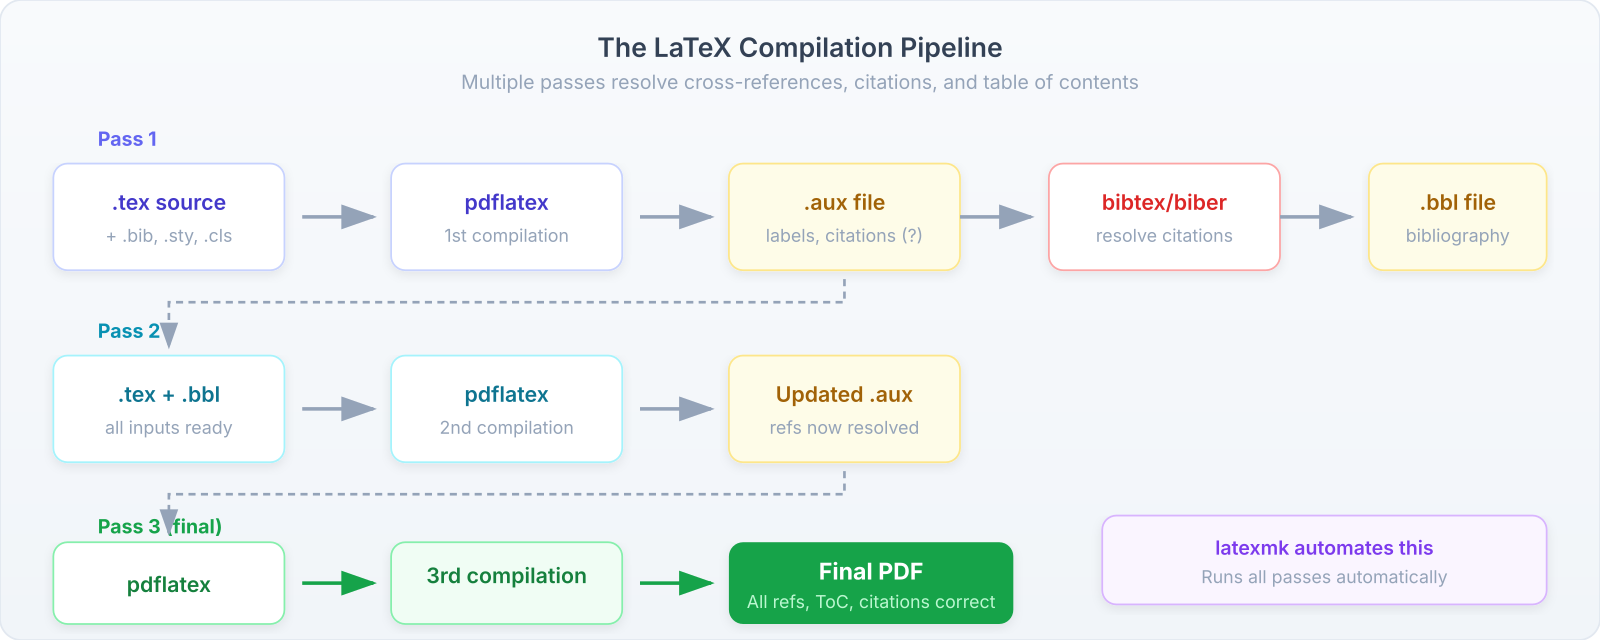
- First pass. The engine reads
hello.tex, processes commands, and generates the PDF. It also writes auxiliary files:.aux(cross-references),.log(messages),.out(PDF bookmarks). - Second pass. If your document has cross-references (
\ref,\cite,\pageref), you need to compile twice. The first pass writes references to.aux; the second pass reads them back. - Third pass (if needed). Documents with bibliographies need an additional step:
bibtexorbiberbetween the second and thirdxelatexrun.
Tip: For daily work, a single compilation is usually enough. Run twice when you add or change cross-references. Your editor (VS Code, TeXShop) can be configured to run the correct number of passes automatically.
Generated Files
After compilation, your directory will contain several new files:
- File:
.pdf| Purpose: The output document. This is what you share. - File:
.aux| Purpose: Cross-reference data. Needed between compilations. - File:
.log| Purpose: Full compilation log. Check this when errors occur. - File:
.out| Purpose: PDF bookmark data (fromhyperref). - File:
.toc| Purpose: Table of contents data. - File:
.synctex.gz| Purpose: SyncTeX data for editor-to-PDF synchronization.
You can safely delete all files except.texand.pdf. They’ll be regenerated on the next compilation.
Troubleshooting Your First Compile
Common problems when getting started:
“Command not found: xelatex”
Your TeX distribution isn’t installed or isn’t on your system PATH.
- macOS: Run
eval "$(/usr/libexec/path_helper)"or restart Terminal after installing MacTeX. - Linux: Verify with
which xelatex. If missing, installtexlive-xetex. - Windows: The MiKTeX installer should set PATH automatically. If not, add
C:\Program Files\MiKTeX\bin\x64to your PATH.
“Font not found”
This happens with xelatex when the specified font isn’t installed on your system. For this book’s setup (STIX Two):
# macOS: Download from https://www.stixfonts.org
# Move .otf files to ~/Library/Fonts/

# Linux:
sudo apt install fonts-stix

# Windows: Download .otf files, right-click, Install
“Missing package”
If you see ! LaTeX Error: File 'somepackage.sty' not found, install the package:
# TeX Live
tlmgr install somepackage

# MiKTeX: packages install automatically on first use
Reading Error Messages
LaTeX error messages follow a pattern:
! Undefined control sequence.
l.42 \bgin{equation}
This tells you: there’s an undefined command (\bgin should be \begin) on line 42. The ! marks the error; the l.42 tells you the line number. Always check the line number first.
Warning: Don’t scroll past errors hoping they’ll go away. The first error often causes a cascade of secondary errors. Fix the first one, recompile, and repeat.
Recommended Setup for This Book
To follow along with every example in this book, you need:
- TeX Live 2024 or later (full installation).
- XeLaTeX as your default engine (for STIX Two fonts and Unicode).
- STIX Two Text and STIX Two Math fonts installed system-wide.
- JetBrains Mono font installed (for code listings).
- An editor of your choice (VS Code with LaTeX Workshop recommended).
Exercises
- Install a TeX distribution on your computer. Verify the installation by running
xelatex --versionin a terminal.- Create and compile the “Hello, world” document from the Your First Document section. Verify that the PDF contains the quadratic formula.
- Find three
.textemplates on Overleaf’s template gallery (https://www.overleaf.com/templates) that match documents you need to write (homework, resume, presentation).- Deliberately introduce an error (remove a closing brace) and read the error message. Identify the line number and the nature of the error.