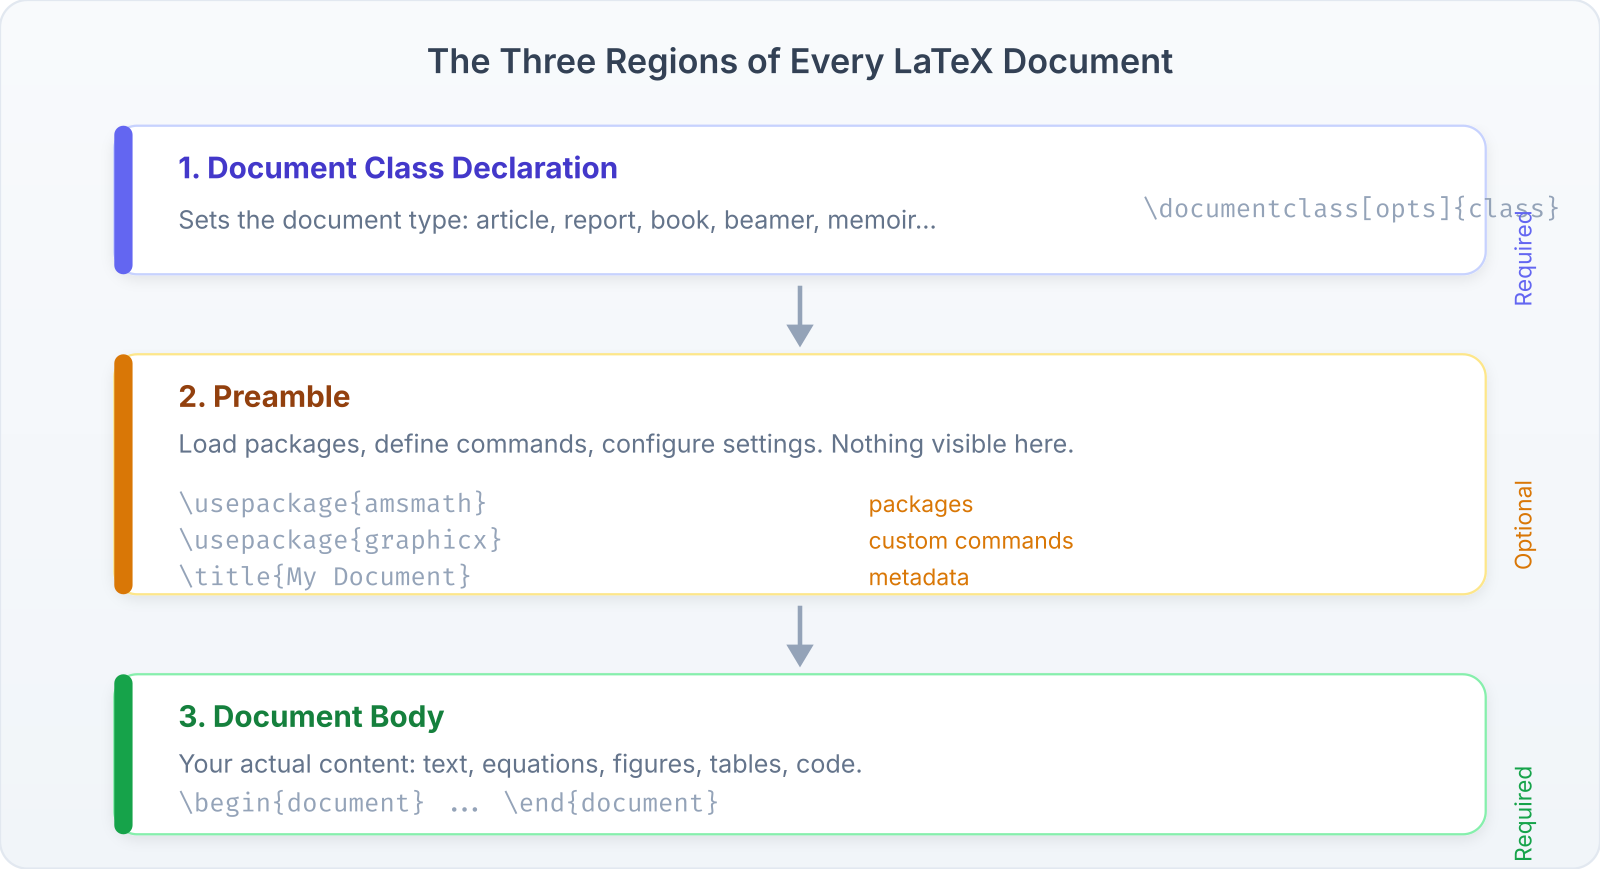
Every LaTeX document follows the same skeleton: a document class declaration, a preamble where you load packages and define settings, and a body where your content lives. Understanding this structure is the foundation for everything else in this book.
The Anatomy of a .tex File
\documentclass[11pt,a4paper]{article}   % 1. Class declaration

% === PREAMBLE ===                       % 2. Preamble
\usepackage{amsmath}
\usepackage{graphicx}
\title{My Document}
\author{Your Name}
\date{\today}

\begin{document}                         % 3. Body begins

\maketitle
\tableofcontents

\section{Introduction}
Your content goes here.

\end{document}                           % 3. Body ends
The Document Class
The \documentclass command is always the first line. It sets the overall document type:
- Class:
article| Use Case: Papers, homework, short documents | Notes: No\chaptercommand. Most common for students. - Class:
report| Use Case: Longer documents, lab reports | Notes: Adds\chapter. Title page by default. - Class:
book| Use Case: Books, theses | Notes: Two-sided. Parts, chapters, front/back matter. - Class:
beamer| Use Case: Presentations | Notes: Slide-based. Separate syntax for frames. - Class:
letter| Use Case: Formal letters | Notes: Specialized formatting commands. - Class:
memoir| Use Case: Flexible long documents | Notes: Superset of book with extensive customization.
Class options go in square brackets:
\documentclass[11pt,a4paper,twoside]{book}
%              ^^^^^  ^^^^^^  ^^^^^^^
%              font   paper   two-sided printing
Common options:
- Font size:
10pt(default),11pt,12pt - Paper:
a4paper,letterpaper,a5paper - Sides:
oneside(default for article),twoside(default for book) - Columns:
onecolumn(default),twocolumn - Equation numbering:
fleqn(left-aligned),leqno(left-numbered)
The Preamble
Everything between \documentclass and \begin{document} is the preamble. This is where you:
- Load packages with
\usepackage{...} - Define colors, commands, and environments
- Set document metadata (title, author, date)
- Configure page layout, headers, and fonts
The preamble is configuration. No visible output is produced here.
The Document Body
Everything between \begin{document} and \end{document} is the body. This is your content: text, equations, figures, tables, and references.
Anything after \end{document} is ignored by the compiler.
Packages
Packages extend LaTeX’s capabilities. You load them in the preamble:
\usepackage{amsmath}          % Advanced math
\usepackage[margin=1in]{geometry}  % Page margins
\usepackage{graphicx}         % Images
\usepackage[colorlinks]{hyperref}  % Clickable links
Some packages take options in square brackets. The order of \usepackage declarations usually doesn’t matter, with one major exception: hyperref should be loaded last (or near-last) because it redefines many internal commands.
Important: Essential packages for students:
amsmath— math environmentsamssymb— math symbolsgraphicx— imageshyperref— links and bookmarksgeometry— page marginsenumitem— list customizationbooktabs— professional tablesxcolor— colors
Sectioning
LaTeX provides a hierarchy of sectioning commands:
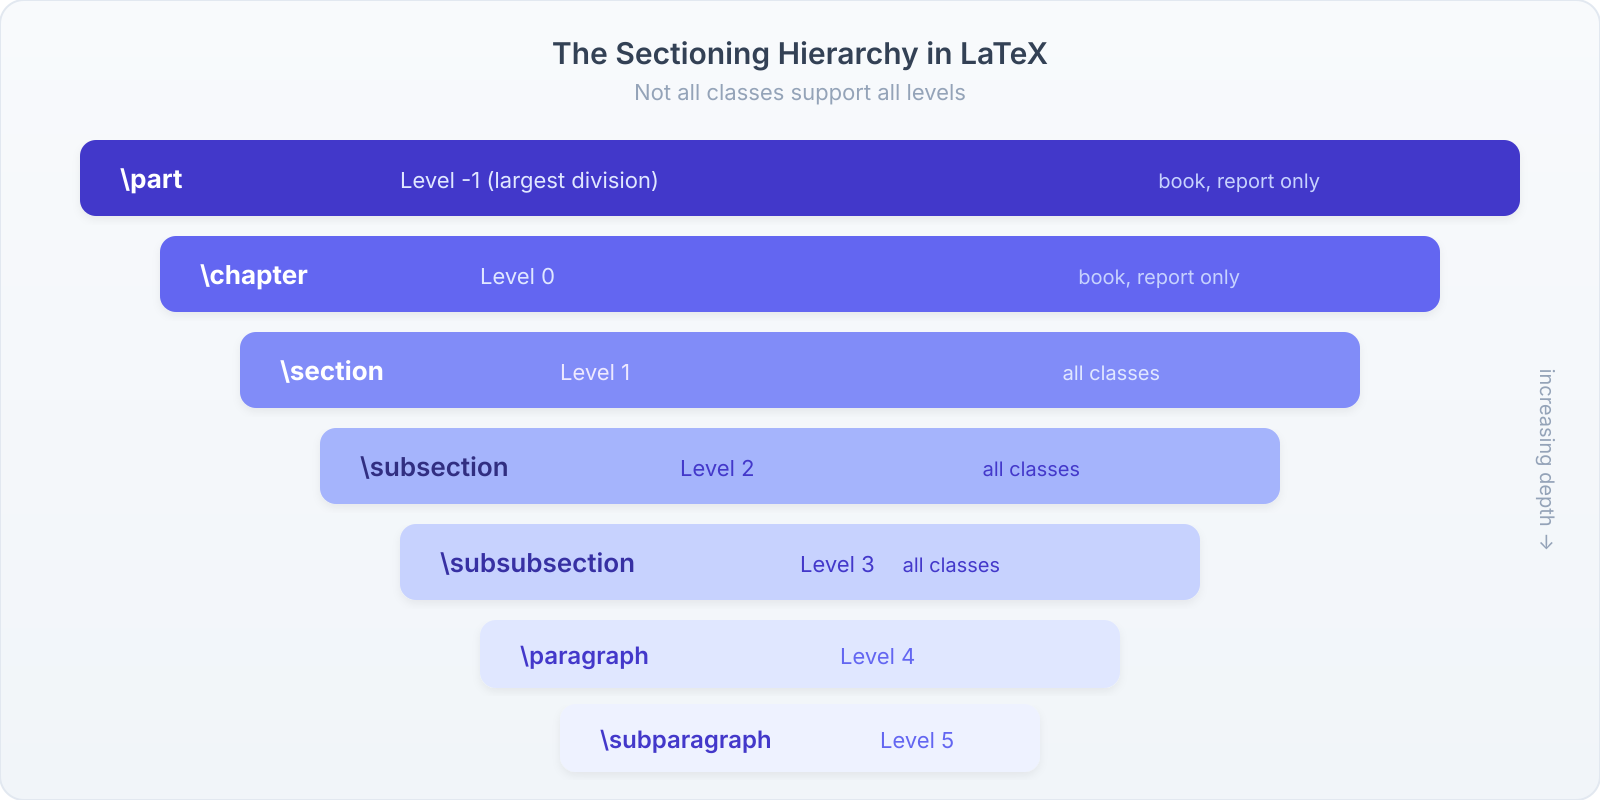
- Command:
\part| Level: -1 | Available in: book, report - Command:
\chapter| Level: 0 | Available in: book, report - Command:
\section| Level: 1 | Available in: all classes - Command:
\subsection| Level: 2 | Available in: all classes - Command:
\subsubsection| Level: 3 | Available in: all classes - Command:
\paragraph| Level: 4 | Available in: all classes - Command:
\subparagraph| Level: 5 | Available in: all classesNumbered vs. Unnumbered Sections
Add an asterisk to suppress numbering:
\section{Introduction}     % Numbered: 1. Introduction
\section*{Acknowledgments} % Unnumbered
This produces:
1 Introduction
Acknowledgments
Starred sections don’t appear in the table of contents by default. To add them manually:
\section*{Acknowledgments}
\addcontentsline{toc}{section}{Acknowledgments}
Labels and Cross-References
One of LaTeX’s most powerful features is automatic cross-referencing. You label things, then refer to them by label. If numbering changes, references update automatically.
\section{Introduction}
\label{sec:intro}

As discussed in Section~\ref{sec:intro} on
page~\pageref{sec:intro}...

\begin{equation}
  E = mc^2
  \label{eq:einstein}
\end{equation}

Equation~\ref{eq:einstein} shows...
Tip: Use a consistent naming convention for labels:
sec:for sectionseq:for equationsfig:for figurestab:for tablesch:for chaptersthm:for theoremsThis makes labels easy to find and avoids collisions.
Warning: Cross-references require two compilations. After the first pass, references appear as ??. The second pass reads the
.auxfile and fills them in. If you see ?? in your PDF, compile again.
Front Matter, Main Matter, Back Matter
The book and report classes support three document regions:
\begin{document}

\frontmatter        % Roman numeral pages (i, ii, iii...)
\include{preface}   % No chapter numbers
\tableofcontents

\mainmatter         % Arabic pages (1, 2, 3...)
\include{ch01}      % Chapter 1, etc.
\include{ch02}

\backmatter         % Arabic pages continue
\include{bibliography}  % No chapter numbers
\include{index}

\end{document}\frontmatter: Roman numeral page numbers, unnumbered chapters (preface, acknowledgments, table of contents).\mainmatter: Arabic page numbers restart at 1, chapters are numbered.\backmatter: Arabic numbers continue, chapters are unnumbered (bibliography, index, appendices).
\input vs. \include
For multi-file projects (like this book), you split content across files:
\input{file}
- Simple text insertion
- Can be nested
- No page break
- Works anywhere
- Use for: preambles, small sections
\include{file}
- Starts a new page
- Cannot be nested
- Creates separate
.auxfile - Works with
\includeonly - Use for: chapters
The practical difference: use \input for your preamble and small reusable pieces. Use \include for chapters when you want \includeonly support (compile only specific chapters during writing).
\documentclass{book}
\includeonly{ch03,ch04}  % Only compile these chapters
\begin{document}
\include{ch01}  % Skipped, but cross-refs preserved
\include{ch02}  % Skipped
\include{ch03}  % Compiled
\include{ch04}  % Compiled
\end{document}
This book uses \input for everything because we’re using xelatex (which doesn’t benefit from \includeonly‘s auxiliary file caching as much) and we want chapters to flow without forced page breaks between them and the preceding part page.
Comments
Everything after a % on a line is a comment. The compiler ignores it.
This is visible text. % This is a comment.
% This entire line is a comment.
For multi-line comments, use the comment package:
\usepackage{comment}
...
\begin{comment}
Everything in here is ignored.
Even \LaTeX{} commands.
\end{comment}
Whitespace and Line Breaks
LaTeX handles whitespace differently from word processors:
- Multiple spaces are treated as a single space.
- A single line break is treated as a space.
- A blank line (two consecutive line breaks) starts a new paragraph.
\\forces a line break within a paragraph (use sparingly).\newpageor\clearpageforces a page break.
These    words    have
multiple   spaces.

This is a new paragraph
because of the blank line.

Manual line break:\\
second line.
This produces:
These words have multiple spaces.
This is a new paragraph because of the blank line.
Manual line break:
second line.
Warning: Don’t use
\\to create space between paragraphs. Use blank lines for paragraph breaks and\vspace{1em}if you need extra vertical space. Abusing\\creates inconsistent spacing.
Special Characters
Ten characters have special meaning in LaTeX:
- Char:
#| Meaning: Parameter | Char:%| Meaning: Comment - Char:
$| Meaning: Math mode | Char:^| Meaning: Superscript - Char:
&| Meaning: Alignment | Char:_| Meaning: Subscript - Char:
{| Meaning: Group open | Char:}| Meaning: Group close - Char:
~| Meaning: Non-breaking space | Char:\| Meaning: Command prefix
To typeset these characters literally:
\# \$ \% \& \_ \{ \}
\^{} \~{} \textbackslash
A Complete Starter Template
Here’s a practical template for homework assignments:
\documentclass[11pt]{article}
\usepackage[margin=1in]{geometry}
\usepackage{amsmath,amssymb}
\usepackage{enumitem}
\usepackage{hyperref}

\title{Math 201: Homework 3}
\author{Your Name}
\date{\today}

\begin{document}
\maketitle

\section*{Problem 1}
Find the derivative of $f(x) = x^3 \sin(x)$.

\textbf{Solution.}
Using the product rule:
\begin{align}
  f'(x) &= 3x^2 \sin(x) + x^3 \cos(x) \\
         &= x^2(3\sin(x) + x\cos(x))
\end{align}

\section*{Problem 2}
Evaluate $\displaystyle\int_0^1 e^{-x^2}\,dx$.
% Continue...

\end{document}
Exercises
- Create a document using the
articleclass with three sections: Introduction, Methods, and Results. Add a subsection to each. Compile and verify the numbering.- Add labels to each section and create a paragraph that references all three sections by number.
- Create a multi-file project: a main file that uses
\inputto include a separate file for each section. Compile and verify it produces identical output to the single-file version.- Modify the homework template above to include your name, a real problem from one of your classes, and a formatted solution. Compile with
xelatex.