How to Merge Videos Into One File (2026 Guide for Every Device)
Merging videos is one of those tasks that sounds trivial until you actually try it. Two clips from your phone, a screen recording plus a webcam feed, four GoPro files from the same hike. You drop them into a tool, hit export, and get a file with broken audio, a black frame in the middle, or a size that refuses to upload anywhere.
I’ve merged thousands of client clips over the past 16 years. Product demos, webinar recordings, YouTube cuts, course modules, raw footage from content shoots. The method that works depends on three things: where your files live, what codec they use, and how much you care about quality. This guide walks through every method I actually use, on every device, with the specific pitfalls that cost me hours the first time.
What merging videos actually means (and why it matters)
Merging videos means joining two or more clips end-to-end into a single continuous file, in the order you choose. That’s the plain definition. The messy reality is that there are three very different jobs hiding under that phrase, and picking the wrong tool for the wrong job is why people end up with broken output.
Job 1: On-device join. You have two or three clips on the same phone or laptop, all from the same camera, and you want a single file to send to someone. Any native app works. Photos on Windows 11, iMovie on Mac, the Photos app on iPhone, Google Photos on Android. Thirty seconds of work.
Job 2: Cloud / online merge. Files are scattered across Drive, Dropbox, or a browser, or you’re on a Chromebook. Kapwing, Clideo, and Veed handle this without installing anything. The tradeoff is upload time, a watermark on the free tier, and handing your footage to a third party.
Job 3: Professional edit. You want transitions, color correction, audio cleanup, titles, a consistent export. That’s a real NLE job, DaVinci Resolve or Premiere Pro or Final Cut. Merging is a five-second step inside a two-hour edit session.
Pick your job first. Everything below is organized by job, not by tool popularity.
Free and fast: merge videos on Windows 11
On Windows 11, the fastest free way to merge videos is Clipchamp, which ships with the OS by default. The Photos app used to have a built-in Video Editor, but Microsoft retired it and redirects you to Clipchamp now. Open Clipchamp, drag your clips into the media panel, drop them on the timeline in order, hit Export. That’s the whole workflow.
Clipchamp step by step
Launch Clipchamp from Start. Click Create a new video. Drag every clip you want to merge into the media pane on the left. Select them all, then drag onto the timeline. They snap end-to-end automatically. Click Export, pick 1080p for general use or 720p if the source was lower resolution, and wait. On my test run, six 1080p clips totaling 2.3 GB exported in about four minutes on a Ryzen 7 laptop.
The catch: Clipchamp re-encodes everything. That means a quality loss (small, usually invisible) and a file size that may differ from the sum of your inputs. If that bothers you, jump down to the FFmpeg section for a lossless merge.
When to skip Clipchamp
Skip it for batch jobs, anything over 4 GB total, and anything where you want the original quality preserved byte-for-byte. I’ve also seen Clipchamp stumble on variable frame rate footage from screen recordings (OBS, Loom exports), where the audio drifts by a frame or two across a long timeline. For those, use FFmpeg.
Free and fast: merge videos on macOS
On macOS, iMovie is the fastest free option and it’s pre-installed. For quick joins without transitions, QuickTime Player can do it even faster. Both are free, both ship with the OS, and both handle standard iPhone and screen-recording footage without fuss.
iMovie (best for most people)
Open iMovie, click the plus button, choose Movie. Drag your clips into the browser panel, then drag them to the timeline in the order you want. Use File, Share, File to export. Pick 1080p ProRes if you’re going to edit further, H.264 if you just want a deliverable. I run this workflow weekly for client video reviews. Six to eight clips, fifteen to twenty minutes end to end including review time.
QuickTime Player (fastest, no transitions)
Open the first clip in QuickTime. Go to Edit, then Add Clip to End, and pick the next file. Repeat for every clip you want to append. Save with File, Export As. This is a direct append with no re-encode if the codecs match, and it’s noticeably faster than iMovie. Fair warning: all clips need the same resolution and codec. Mix an H.264 1080p with an H.265 4K and QuickTime will complain or silently re-encode to the lowest common denominator.
Free online video mergers: Kapwing, Clideo, Veed
Free online mergers are the right choice when your files live in cloud storage, you’re on a Chromebook, or you just don’t want to install anything. Kapwing, Clideo, and VEED are the three I actually use. All three handle MP4, MOV, WebM, and AVI, run entirely in the browser, and export within minutes for most consumer-grade files.
Kapwing has the cleanest UI and the most forgiving free tier. Free accounts get up to 250 MB per file and seven minutes of export per video, with a watermark unless you sign in. Good for short clips, podcast highlight reels, social cuts.
Clideo is purpose-built for single-job merges. No account, drag your files, reorder, export. Free exports carry a watermark and cap at 500 MB per upload. Quick for one-offs.
Veed has a more editor-like interface with transitions and subtitle tools. Free tier caps at 250 MB per upload and 10 minutes of total duration, watermarked. Pro starts at $12/month and removes both caps.
The caveats are the same across all three. You’re uploading your footage to a third party. Read the privacy policy if the content is sensitive (client work, internal recordings, anything unreleased). File size caps bite quickly: a 20-minute 4K clip from an iPhone is already over 4 GB, past every free tier. And the upload time dominates the actual merge time on a 100 Mbps connection.
Free and pro: merge with FFmpeg (command-line, batch-safe)

FFmpeg is the most reliable way to merge videos, full stop. It’s free, open source, runs on every OS, handles batch jobs, and can merge without re-encoding when the codecs match (meaning zero quality loss). The only cost is a one-time command-line learning curve.
Install it on macOS with brew install ffmpeg, on Windows with winget install ffmpeg, on Linux through your package manager. Then use one of three approaches depending on your files.
Approach 1: concat demuxer (lossless, same codec)
This is the concat demuxer without re-encoding, and it’s my default for any merge where all inputs share the same codec, resolution, and frame rate. Create a text file called list.txt with one line per clip:
file 'clip1.mp4'
file 'clip2.mp4'
file 'clip3.mp4'
Then run:
ffmpeg -f concat -safe 0 -i list.txt -c copy output.mp4
The -c copy flag is the magic. It tells FFmpeg to copy the existing streams directly rather than decoding and re-encoding. On my machine, merging four 1 GB clips takes about three seconds. The output is bit-identical to the originals, just concatenated.
Approach 2: re-encode when codecs differ
If you’re mixing H.264 and H.265 in the same timeline, or different frame rates, -c copy will fail. Use filter_complex instead:
ffmpeg -i clip1.mp4 -i clip2.mp4 -i clip3.mp4 \
  -filter_complex "[0:v][0:a][1:v][1:a][2:v][2:a]concat=n=3:v=1:a=1[v][a]" \
  -map "[v]" -map "[a]" -c:v libx264 -crf 18 -c:a aac output.mp4
Slower (minutes instead of seconds), but it handles any codec mix and normalizes the output to H.264.
Approach 3: batch processing a folder
For a folder of 20 clips named in order, a one-liner builds the list and merges everything:
for f in *.mp4; do echo "file '$f'" >> list.txt; done
ffmpeg -f concat -safe 0 -i list.txt -c copy merged.mp4
This is how I merge weekly Zoom recordings for clients without opening a GUI.
Best paid editors for regular work
If you merge videos more than a few times a month and you care about output quality, a real NLE pays for itself in hours saved. The three I recommend are DaVinci Resolve, Adobe Premiere Pro, and Final Cut Pro. All three handle merging as a trivial operation inside a broader edit workflow.
DaVinci Resolve (free tier is excellent, Studio is $295 one-time). This is what I use daily. The free version is not crippled. It supports 4K, multi-cam, Fairlight audio, Fusion effects, and uncapped timeline length. Studio adds neural engine features, collaboration, and a handful of codecs. For merging clips, drop files in the media pool, drag to the timeline, deliver. The Blackmagic hardware focus means it’s color-graded better by default than any competitor.
Adobe Premiere Pro ($22.99/month standalone, $59.99/month full Creative Cloud). Industry standard for a reason. Best integration with After Effects and Audition, strongest third-party plugin ecosystem, and a familiar interface for anyone who has used Adobe tools. I keep a seat for client work where the deliverable needs to round-trip through other Adobe apps. For a single-tool shop, it’s pricey compared to Resolve. See my full breakdown of the best video editing software for more detail.
Final Cut Pro ($299.99 one-time, Mac only). Faster than anything else on Apple Silicon, cleanest UI of the three, and the one-time price beats Premiere’s subscription after a year. Magnetic timeline divides opinion: some editors love it, some can’t adjust. If you’re on a Mac and you don’t need cross-platform, this is the shortest path from clips to finished video.
Affordable paid alternatives
If DaVinci Resolve’s learning curve and Premiere’s pricing are both wrong for you, three mid-tier paid editors are genuinely worth a look.
Filmora by Wondershare ($49.99/year or $79.99 perpetual) is the polish-over-power pick. Drag-drop merging, beat-sync templates, AI scene detection, and an asset library deep enough to skip Adobe Stock. Best for content creators who care more about output than mastering an NLE.
Movavi Video Editor ($54.95/year or $94.95 perpetual). Lightweight, fast, and forgiving on older hardware. Solid pick if your laptop won’t run Resolve smoothly.
InVideo Studio (free tier + paid from $20/month). Cloud-based, browser-only, AI-assisted. Best for marketers who want script-to-video automation without installing a desktop NLE. The merge tool is a small piece of a much broader product. Side-by-side breakdown in my InVideo vs VEED comparison.
How to merge videos on iPhone
On iPhone, the fastest way to merge videos is the built-in Photos app for two or three clips, or iMovie for anything more elaborate. Both are free and pre-installed on every iPhone since iOS 16.
Photos app: Open Photos, tap Select, tap each clip in the order you want them merged, tap the Share button, scroll down to Save as Video. Done. No re-encoding beyond what iOS does for compatibility, no watermark, no app to install. The limitation is that clips must be in your camera roll and you get no control over transitions or trim points.
iMovie for iOS: Open iMovie, tap Start New Project, Movie. Pick the clips in order, tap Create Movie, and the app drops them on a timeline. Trim, reorder, add titles if you want, tap Done, then the share icon to save or export. Handles up to 4K ProRes on iPhone 15 Pro and later. I’ve used iMovie on iPhone for same-day conference recap videos and it’s genuinely fast.
Heads up on HEVC: iPhones record in H.265 (HEVC) by default for space savings. If your recipient is on older Windows or Android, switch to Settings, Camera, Formats, Most Compatible before recording. Or convert after the fact. Saves hours of codec-mismatch troubleshooting on the other end.
How to merge videos on Android
On Android, the easiest free option is Google Photos for basic joins, and CapCut or InShot for anything with more control. All three handle the common use cases without subscriptions or watermarks on basic features.
Google Photos: Open the app, tap Library, tap Utilities, tap Movie, then Create new movie. Pick your clips, tap Create. Done in under a minute. No watermark. Exports back to your camera roll.
CapCut: Free from ByteDance (same company as TikTok), no watermark on basic exports, full editing toolkit. Tap New Project, select your clips, drag to reorder, tap the export arrow. Supports up to 4K output on capable devices. This is what I recommend for social creators on Android. CapCut Pro at $9.99/month adds AI auto-captions, premium effects, and removes the watermark from advanced exports. Just be aware of the data privacy debate around ByteDance products if that’s a concern.
InShot: Popular alternative to CapCut, similar feature set, free tier has a watermark that you remove with a one-time in-app purchase ($3.99 or so). Clean UI, good for square and vertical exports for Instagram and Reels.
Common problems when merging videos (and how to fix them)
Most merge failures trace back to four root causes: codec mismatch, resolution mismatch, audio sync drift, and file size caps. Here’s what each one looks like and how to fix it.
Problem 1: codec mismatch (H.264 vs H.265)
Symptoms: black frames at the join point, audio from clip 2 starts before the video, or the output refuses to play on half the devices you try. Cause: clips encoded with different codecs don’t concat directly. Fix: pick a target codec (H.264 for compatibility, H.265 for size), convert every input to match, then merge. FFmpeg’s filter_complex method handles this automatically.
Problem 2: resolution or frame rate mismatch
Symptoms: the output plays but switches size mid-clip, or motion looks juddery at a certain timestamp. Cause: merging a 4K 60fps clip with a 1080p 30fps clip. Fix: downscale everything to the lowest common denominator before merging. In FFmpeg, add -vf scale=1920:1080 -r 30 during the re-encode step. In a GUI editor, set your sequence settings first and drag clips onto it.
Problem 3: variable frame rate drift
Variable frame rate is the silent killer for screen recordings. OBS, Loom, and Zoom often record VFR to save space during idle periods. When you merge VFR clips, audio slowly drifts out of sync over long timelines. Fix: convert to constant frame rate first with ffmpeg -i input.mp4 -r 30 -c:v libx264 -c:a copy output.mp4, then merge the converted files.
Problem 4: file size caps
Email attachments max out at 25 MB on Gmail. WhatsApp caps at 2 GB. Many online mergers cap free uploads at 500 MB. The FAT32 cap at 4 GB per file still bites anyone using old USB drives or SD cards. Fix: either split your merge into multiple files under the target cap, or compress the output before you upload. A 10-minute 4K clip at CRF 23 (FFmpeg default) typically lands under 500 MB.
Which method should you actually use?
If you’re merging videos once in a blue moon, use whatever is already on your device: Photos on iPhone, Google Photos on Android, Clipchamp on Windows, iMovie on Mac. Don’t install anything. If you do it weekly or more, learn FFmpeg. Two commands cover 90% of real jobs and it never fails in ways a GUI does.
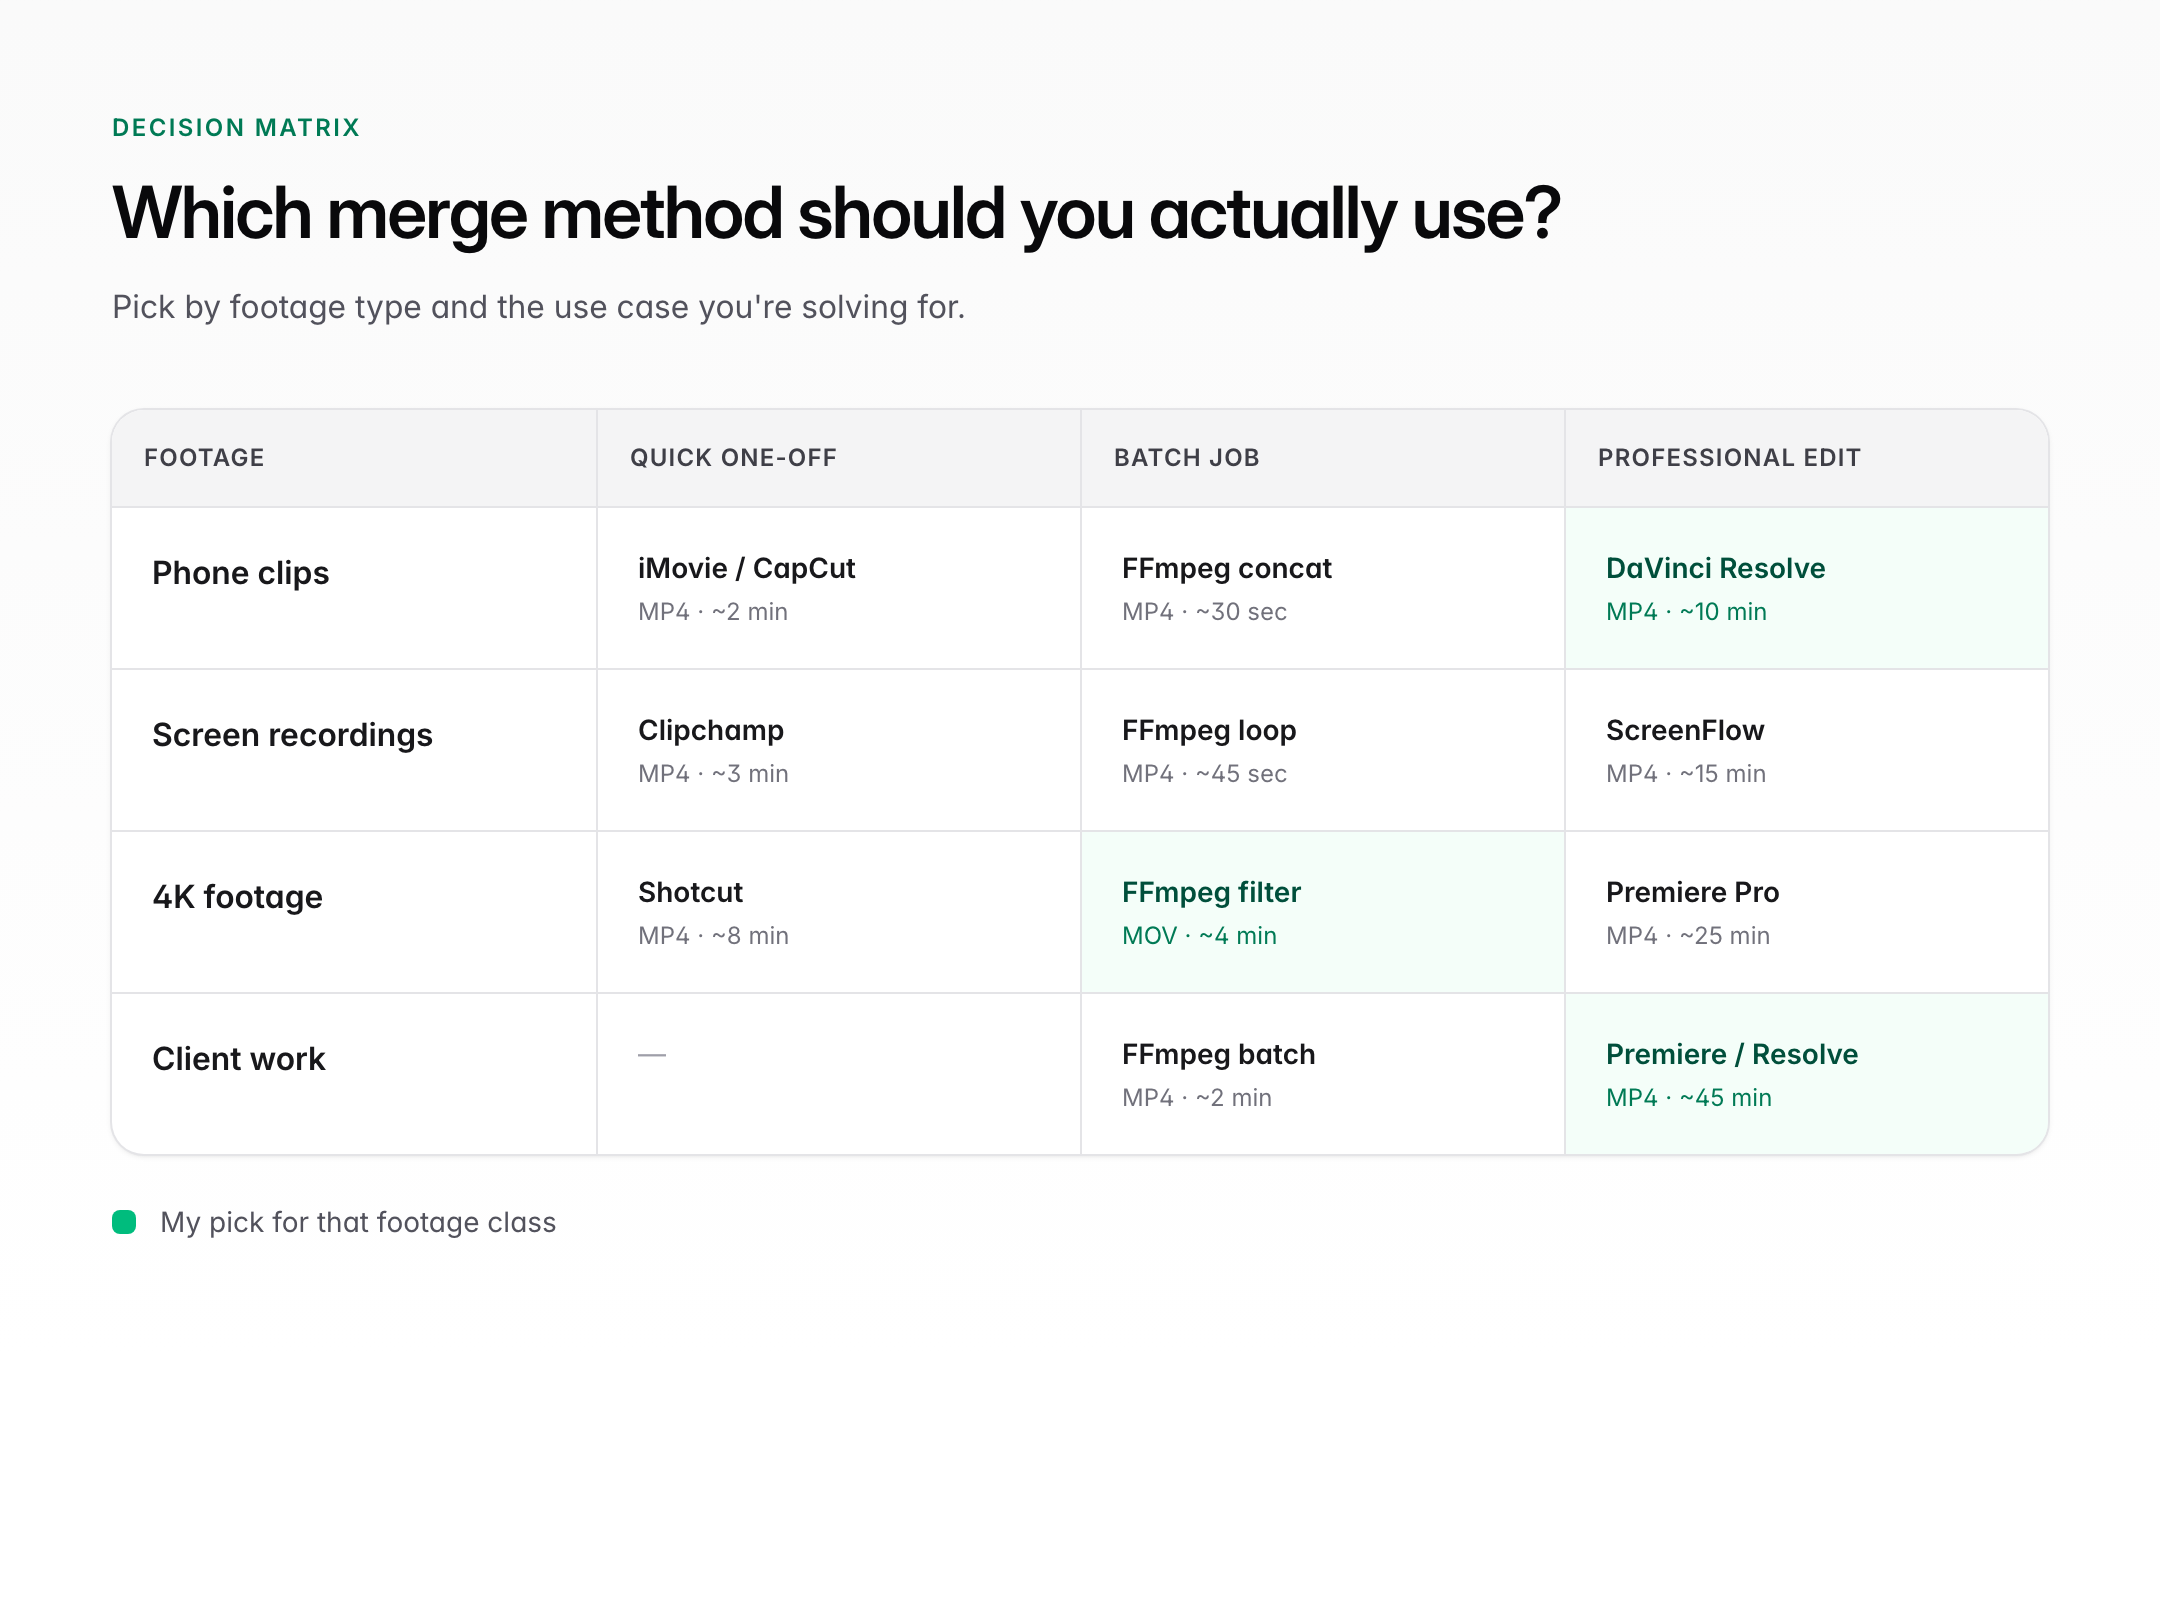
Here’s the simplified decision logic I use with clients:
- Two clips from the same phone, same format: native Photos app (iPhone or Android). 30 seconds.
- A handful of clips, one-off task, on a desktop: Clipchamp (Windows) or iMovie (Mac). Two minutes.
- Files scattered across cloud storage, no install allowed: Kapwing for under 250 MB, Clideo for single merges. Watermark tradeoff.
- Batch job, large files, same codec, quality matters: FFmpeg concat demuxer. Seconds.
- Mixed codecs, mixed resolutions, weird screen recordings: FFmpeg with
filter_complex. Minutes. - Client work, transitions, color, audio cleanup: DaVinci Resolve free tier. Hours well spent.
- You’re already in the Adobe or Apple ecosystem: Premiere Pro or Final Cut Pro. No reason to switch.
One more pattern I use often: record in whatever format your phone defaults to, merge on the phone with the native Photos app if it’s a quick share, and move to FFmpeg on the desktop for anything going to a client or a platform. The mix of native simplicity and command-line control covers almost every scenario I hit in a week.
Frequently asked questions
Quick answers to the questions I get most often about merging videos.
What is the easiest way to merge two videos into one?
On iPhone, open the Photos app, tap Select, tap both clips in the order you want, tap Share, then Save as Video. On Android, use Google Photos, Library, Utilities, Movie. On Windows 11, use Clipchamp. On Mac, use iMovie or QuickTime Player. Each of these takes under a minute for two clips and needs nothing installed.
Can I merge videos without losing quality?
Yes, but only when every input clip uses the same codec, resolution, and frame rate. Use FFmpeg with the concat demuxer and the -c copy flag. This stream-copies the originals into a single file with zero re-encoding and therefore zero quality loss. Any tool that re-encodes (Clipchamp, iMovie, online mergers) introduces some loss, even if it is visually imperceptible.
How do I merge videos with different formats or codecs?
You have to re-encode all inputs to a single target codec first. The cleanest way is FFmpeg with filter_complex, which handles the conversion and concatenation in one pass. In a GUI editor like DaVinci Resolve or iMovie, this happens automatically when you drop mixed clips on a timeline and export.
What is the best free video merger in 2026?
For desktop work, FFmpeg is the most reliable free option and has no file size or watermark limits. For GUI users, DaVinci Resolve free tier handles serious edits, Clipchamp handles quick Windows jobs, and iMovie handles quick Mac jobs. For cloud-based merges, Kapwing has the most generous free tier for clips under 250 MB.
Why is my merged video out of sync?
Almost always variable frame rate (VFR) from screen recordings. OBS, Loom, and Zoom often record VFR, and audio drifts away from video across long timelines during a merge. Convert each clip to constant frame rate first with ffmpeg -i input.mp4 -r 30 -c:v libx264 output.mp4, then merge the converted files.
Can I merge videos on iPhone without an app?
Yes. The built-in Photos app can do it. Open Photos, tap Select, tap each clip in order, tap the Share button, then tap Save as Video. The merged file appears in your camera roll. No App Store install required.
What file size limits apply to online video mergers?
Free tiers typically cap at 250 to 500 MB per file. Kapwing free is 250 MB, Clideo free is 500 MB, Veed free is 250 MB. Paid plans lift these caps significantly. A 20-minute 4K iPhone clip is already over 4 GB, which rules out every free online tier. For large files, use FFmpeg locally or compress the footage first.
Is it safe to upload videos to online mergers?
For personal, non-sensitive footage, yes. Reputable tools like Kapwing, Clideo, and Veed have clear privacy policies and auto-delete uploads after a short window. For client work, unreleased content, or anything under NDA, merge locally with FFmpeg or a desktop editor instead. Nothing leaves your machine that way.
Disclaimer: This site is reader-supported. If you buy through some links, I may earn a small commission at no extra cost to you. I only recommend tools I trust and would use myself. Your support helps keep gauravtiwari.org free and focused on real-world advice. Thanks. - Gaurav Tiwari
Hey Gaurav Tiwari ,
Awesome post with Fab-work. I thoroughly enjoyed reading this post and Thanks for highlighting this topic. This post is very helpful for me , As i was looking for such type of post to merge multiple videos into a single one since long time & finally i found one.
Glad to say that you have provided helpful tips to merge multiple videos and form a single one using Mini-tool Movie Maker. I really like the way you have used to combine multiple videos and form a single one in such a step-by-step process making the concept very clear and easy to understand. Your each included steps ( including images ) to merge videos using VLC media player are so clear, well-elaborated and also providing good understanding as well. Following the steps will helps a lot.
After going through complete guide i really gain ideas and learned about various methods to combine multiple videos & form a single
one. I am sure that this post will definitely help lots of people, readers to sort out their queries.
Eventually thanks for sharing your knowledge, ideas and such an informative post.
Regards
-Aadarsh